
Difference between revisions of "Item Box"
From Sonic Retro
BSonirachi (talk | contribs) (→List of monitors) |
m (→Sonic Riders: Zero Gravity: table fixing columns) |
||
| (119 intermediate revisions by 5 users not shown) | |||
| Line 1: | Line 1: | ||
[[Image:Sonic3kmonitors.png|frame|right|Various monitors in ''[[Sonic 3 & Knuckles]]''.]] | [[Image:Sonic3kmonitors.png|frame|right|Various monitors in ''[[Sonic 3 & Knuckles]]''.]] | ||
| − | ''' | + | '''Item Boxes'''{{fileref|SonicAdventure DC US manual.pdf|page=13}} (アイテムボックス{{fileref|Sonic1 MD JP manual.pdf|page=21}}), also called '''Item Capsules'''{{fileref|SonicUnleashed PS2 US manual.pdf|page=10}}, and known in Western releases of earlier games as '''Monitors'''{{fileref|Sonic1 MD US manual.pdf|page=8}}, are staple objects in ''[[Sonic the Hedgehog]]'' games, and are a means for the player to obtain items. They usually take the form of computer monitors or circular containers which are to be broken in-game, awarding the player their contents shortly afterwards. For the latter design, all regions tend to opt for the term "Item Box"{{fileref|SonicAdventure DC US manual.pdf|page=13}}, though this phrase has been consistently used in Japan since 1991{{fileref|Sonic1 MD JP manual.pdf|page=21}}, and newer games that use the monitor design have used the term "Item Box"{{fileref|SM PC DIGITAL MANUAL UK V10 LR.pdf|page=17}} in place of "monitor". |
| − | + | Traditionally Item Boxes are to be broken with some form of [[Spin Attack]], be it jumping, rolling or moves such as the [[Spin Dash]] or [[Homing Attack]], though in some later games, they break simply by walking into them. Item Boxes can usally be hit from all sides, though in the early 2D games, hitting one from below causes it to start falling until it hits solid ground. Once an Item Box is broken, it will remain as such until the player loses a life. | |
| − | + | Common Item Boxes include the Super Ring (which awards 10 [[Ring]]s), [[Shield]], [[Power Sneakers]], [[Invincibility]] and extra lives. They have also been used to denote [[checkpoint]]s, and some cases (with [[Eggman Mark]]s), even obstacles. In the [[Sonic the Hedgehog (2006 game)|2006 release of ''Sonic the Hedgehog'']], [[Miles "Tails" Prower|Tails]] can [[Dummy Ring Bomb|throw Item Boxes]] as an attack. | |
| − | + | Almost all 2D ''Sonic'' platform games contain Item Boxes, though not all 3D games include them, as the gameplay styles seen in ''[[Sonic Unleashed]]'' (PS3/X-Box version) and later ''[[Sonic Colours]]'' negated the need for them. Though items are contained in computer monitors in some later games like ''[[Sonic Generations]]'', ''[[Sonic Mania]]'' and ''[[Sonic Forces]]'', they are referred to as "Item Boxes" in all regions. | |
| − | + | ==Description in the ''[[Sonic the Hedgehog Bible]]''== | |
| + | According to [[Sega of America]]'s ''[[Sonic the Hedgehog Bible]]'', monitors are in fact PCs placed around the planet [[Mobius]] by [[Dr. Ovi Kintobor]], in an attempt to locate the "Gray Emerald" (and thus control the [[Chaos Emeralds]]){{fileref|SonicBibleDraft2 Document.pdf|page=26}}. They are described as part of a bulletin board service, where users could document any Gray Emerald findings, but after the accident that turned Kintobor into [[Robotnik]], the information was wiped and their contents were replaced with "magical objects"{{fileref|SonicBibleDraft2 Document.pdf|page=33}}. | ||
| − | + | ==List of Item Boxes== | |
| − | |||
| − | |||
| − | |||
| − | |||
| − | |||
| − | |||
| − | |||
| − | |||
| − | |||
| − | |||
| − | |||
| − | |||
| − | |||
| − | |||
| − | |||
| − | |||
| − | |||
| − | |||
| − | |||
| − | |||
| − | |||
| − | |||
| − | |||
| − | |||
| − | |||
| − | |||
| − | |||
| − | |||
| − | |||
| − | |||
| − | |||
| − | |||
| − | |||
| − | |||
| − | |||
| − | ==List of | ||
===''[[Sonic the Hedgehog (16-bit)]]''=== | ===''[[Sonic the Hedgehog (16-bit)]]''=== | ||
Known in this game as '''video monitors'''{{fileref|Sonic1 MD US manual.pdf|page=8}}. | Known in this game as '''video monitors'''{{fileref|Sonic1 MD US manual.pdf|page=8}}. | ||
| Line 63: | Line 28: | ||
|-style="text-align:center;" | |-style="text-align:center;" | ||
!English name | !English name | ||
| − | |Super Ring{{fileref|Sonic1 MD US manual.pdf|page=8}} | + | |[[Super Ring]]{{fileref|Sonic1 MD US manual.pdf|page=8}} |
|[[Shield]]{{fileref|Sonic1 MD US manual.pdf|page=8}} | |[[Shield]]{{fileref|Sonic1 MD US manual.pdf|page=8}} | ||
|[[Power Sneakers]]{{fileref|Sonic1 MD US manual.pdf|page=8}} | |[[Power Sneakers]]{{fileref|Sonic1 MD US manual.pdf|page=8}} | ||
| Line 69: | Line 34: | ||
|One-Up{{fileref|Sonic1 MD US manual.pdf|page=8}} | |One-Up{{fileref|Sonic1 MD US manual.pdf|page=8}} | ||
|"Static"{{ref|[[Edit mode]] only|group=a}} | |"Static"{{ref|[[Edit mode]] only|group=a}} | ||
| − | |"Robotnik"{{ref|[[Sonic the Hedgehog (16-bit)/Hidden content|Unused]]|group=a}} | + | |"[[Eggman Mark|Robotnik]]"{{ref|[[Sonic the Hedgehog (16-bit)/Hidden content|Unused]]|group=a}} |
|"S"{{ref|[[Sonic the Hedgehog (16-bit)/Hidden content|Unused]]|group=a}} | |"S"{{ref|[[Sonic the Hedgehog (16-bit)/Hidden content|Unused]]|group=a}} | ||
|"Goggles"{{ref|[[Sonic the Hedgehog (16-bit)/Hidden content|Unused]]|group=a}} | |"Goggles"{{ref|[[Sonic the Hedgehog (16-bit)/Hidden content|Unused]]|group=a}} | ||
|-style="text-align:center;" | |-style="text-align:center;" | ||
!Japanese name | !Japanese name | ||
| − | |Big 10 Ring (ビッグ10リング){{fileref|Sonic1 MD JP manual.pdf|page=21}} | + | |[[Super Ring|Big 10 Ring]] (ビッグ10リング){{fileref|Sonic1 MD JP manual.pdf|page=21}} |
|[[Barrier]] (バリア){{fileref|Sonic1 MD JP manual.pdf|page=21}} | |[[Barrier]] (バリア){{fileref|Sonic1 MD JP manual.pdf|page=21}} | ||
|[[High Speed]] (ハイスピード){{fileref|Sonic1 MD JP manual.pdf|page=21}} | |[[High Speed]] (ハイスピード){{fileref|Sonic1 MD JP manual.pdf|page=21}} | ||
| Line 100: | Line 65: | ||
|-style="text-align:center;" | |-style="text-align:center;" | ||
!English name | !English name | ||
| − | |Super Ring{{fileref|Sonic1 GG US manual.pdf|page=9}} | + | |[[Super Ring]]{{fileref|Sonic1 GG US manual.pdf|page=9}} |
|[[Shield]]{{fileref|Sonic1 GG US manual.pdf|page=9}} | |[[Shield]]{{fileref|Sonic1 GG US manual.pdf|page=9}} | ||
|[[Power Sneakers]]{{fileref|Sonic1 GG US manual.pdf|page=9}} | |[[Power Sneakers]]{{fileref|Sonic1 GG US manual.pdf|page=9}} | ||
| Line 106: | Line 71: | ||
|One-up{{fileref|Sonic1 GG US manual.pdf|page=9}} | |One-up{{fileref|Sonic1 GG US manual.pdf|page=9}} | ||
|Arrow{{fileref|Sonic1 GG US manual.pdf|page=8}} | |Arrow{{fileref|Sonic1 GG US manual.pdf|page=8}} | ||
| − | |Continue{{fileref|Sonic1 GG US manual.pdf|page=11}} | + | |[[Continue]]{{fileref|Sonic1 GG US manual.pdf|page=11}} |
|-style="text-align:center;" | |-style="text-align:center;" | ||
!Japanese name | !Japanese name | ||
| − | | | + | |[[Super Ring|Big 10 Ring]] (ビッグ10リング){{fileref|Sonic 1 GG JP Manual.pdf|page=12}} |
| + | |[[Barrier]] (バリア){{fileref|Sonic 1 GG JP Manual.pdf|page=13}} | ||
| + | |[[High Speed]] (ハイスピード){{fileref|Sonic 1 GG JP Manual.pdf|page=12}} | ||
| + | |[[Muteki]] (無敵){{fileref|Sonic 1 GG JP Manual.pdf|page=13}} | ||
| + | |1 up{{fileref|Sonic 1 GG JP Manual.pdf|page=12}} | ||
| + | |[[Point Marker]] (ポイントマーカー){{fileref|Sonic 1 GG JP Manual.pdf|page=13}} | ||
| + | |[[Continue]] (コンティニュー){{fileref|Sonic 1 GG JP Manual.pdf|page=16}} | ||
|} | |} | ||
| Line 126: | Line 97: | ||
|-style="text-align:center;" | |-style="text-align:center;" | ||
!English name | !English name | ||
| − | |Super Ring{{fileref|Sonic2 GG US manual.pdf|page=8}} | + | |[[Super Ring]]{{fileref|Sonic2 GG US manual.pdf|page=8}} |
|[[Power Sneakers]]{{fileref|Sonic2 GG US manual.pdf|page=8}} | |[[Power Sneakers]]{{fileref|Sonic2 GG US manual.pdf|page=8}} | ||
|[[Invincibility]]{{fileref|Sonic2 GG US manual.pdf|page=8}} | |[[Invincibility]]{{fileref|Sonic2 GG US manual.pdf|page=8}} | ||
|1-UP{{fileref|Sonic2 GG US manual.pdf|page=9}} | |1-UP{{fileref|Sonic2 GG US manual.pdf|page=9}} | ||
| − | |"Continue"{{ref|Exists in [[Crystal Egg Zone]], but is masked by foreground scenery so the image is never seen.|group=c}} | + | |"[[Continue]]"{{ref|Exists in [[Crystal Egg Zone]], but is masked by foreground scenery so the image is never seen.|group=c}} |
|"?"{{ref|[[Sonic the Hedgehog 2 (8-bit)/Hidden content|Unused]]|group=c}} | |"?"{{ref|[[Sonic the Hedgehog 2 (8-bit)/Hidden content|Unused]]|group=c}} | ||
|"Grey Sneakers"{{ref|[[Sonic the Hedgehog 2 (8-bit)/Hidden content|Unused]]|group=c}} | |"Grey Sneakers"{{ref|[[Sonic the Hedgehog 2 (8-bit)/Hidden content|Unused]]|group=c}} | ||
| Line 136: | Line 107: | ||
|-style="text-align:center;" | |-style="text-align:center;" | ||
!Japanese name | !Japanese name | ||
| − | |Big 10 Ring (ビッグ10リング){{fileref|Sonic 2 GG JP Manual.pdf|page=14}} | + | |[[Super Ring|Big 10 Ring]] (ビッグ10リング){{fileref|Sonic 2 GG JP Manual.pdf|page=14}} |
| | | | ||
|[[Muteki]] (無敵){{fileref|Sonic 2 GG JP Manual.pdf|page=15}} | |[[Muteki]] (無敵){{fileref|Sonic 2 GG JP Manual.pdf|page=15}} | ||
| Line 156: | Line 127: | ||
|{{spriteImage|Sonic2 MD Sprite Monitors.png|crop_width=30|crop_x=240}} | |{{spriteImage|Sonic2 MD Sprite Monitors.png|crop_width=30|crop_x=240}} | ||
|{{spriteImage|Sonic2 MD Sprite Monitors.png|crop_width=30|crop_x=210}} | |{{spriteImage|Sonic2 MD Sprite Monitors.png|crop_width=30|crop_x=210}} | ||
| + | |{{spriteImage|Sonic2 MD Sprite Monitors.png|crop_width=30|crop_x=300}} | ||
|{{spriteImage|Sonic2 MD Sprite Monitors.png|crop_width=30|crop_x=60}}{{spriteImage|Sonic2 MD Sprite Monitors.png|crop_width=30|crop_x=90}}{{spriteImage|Sonic2 MD Sprite Monitors.png|crop_width=30|crop_x=120}} | |{{spriteImage|Sonic2 MD Sprite Monitors.png|crop_width=30|crop_x=60}}{{spriteImage|Sonic2 MD Sprite Monitors.png|crop_width=30|crop_x=90}}{{spriteImage|Sonic2 MD Sprite Monitors.png|crop_width=30|crop_x=120}} | ||
| − | |||
|{{spriteImage|Sonic2 MD Sprite Monitors.png|crop_width=30|crop_x=180}} | |{{spriteImage|Sonic2 MD Sprite Monitors.png|crop_width=30|crop_x=180}} | ||
|{{spriteImage|Sonic2 MD Sprite Monitors.png|crop_width=30|crop_x=30}} | |{{spriteImage|Sonic2 MD Sprite Monitors.png|crop_width=30|crop_x=30}} | ||
| Line 164: | Line 135: | ||
|-style="text-align:center;" | |-style="text-align:center;" | ||
!English name | !English name | ||
| − | |Super Ring{{fileref|Sonic2 MD US manual.pdf|page=12}} | + | |[[Super Ring]]{{fileref|Sonic2 MD US manual.pdf|page=12}} |
|[[Shield]]{{fileref|Sonic2 MD US manual.pdf|page=12}} | |[[Shield]]{{fileref|Sonic2 MD US manual.pdf|page=12}} | ||
|[[Power Sneakers]]{{fileref|Sonic2 MD US manual.pdf|page=12}} | |[[Power Sneakers]]{{fileref|Sonic2 MD US manual.pdf|page=12}} | ||
| + | |[[Invincible]]{{fileref|Sonic2 MD US manual.pdf|page=12}} | ||
|One-Up{{fileref|Sonic2 MD US manual.pdf|page=12}} | |One-Up{{fileref|Sonic2 MD US manual.pdf|page=12}} | ||
| − | |[[ | + | |[[Teleporter]]{{fileref|Sonic2 MD US manual.pdf|page=22}}{{ref|2P mode only|group=d}} |
| − | + | |"[[Eggman Mark|Robotnik]]"{{ref|2P mode only|group=d}} | |
| − | |"Robotnik"{{ref|2P mode only|group=d}} | ||
|"?"{{ref|2P mode only|group=d}} | |"?"{{ref|2P mode only|group=d}} | ||
|"Static"{{ref|[[Sonic the Hedgehog 2 (16-bit)/Hidden content|Unused]]|group=d}} | |"Static"{{ref|[[Sonic the Hedgehog 2 (16-bit)/Hidden content|Unused]]|group=d}} | ||
|-style="text-align:center;" | |-style="text-align:center;" | ||
!Japanese name | !Japanese name | ||
| − | | | + | |[[Super Ring|Big 10 Ring]] (ビッグ10リング){{fileref|Sonic2 MD JP manual.pdf|page=22}} |
| − | | | + | |[[Barrier]] (バリア){{fileref|Sonic2 MD JP manual.pdf|page=22}} |
| − | | | + | |[[High Speed]] (ハイスピード){{fileref|Sonic2 MD JP manual.pdf|page=22}} |
| − | | | + | |[[Muteki]] (無敵){{fileref|Sonic2 MD JP manual.pdf|page=22}} |
| − | | | + | |1 up{{fileref|Sonic2 MD JP manual.pdf|page=22}} |
| − | | | + | |[[Teleportation]] (テレポテーション){{fileref|Sonic2 MD JP manual.pdf|page=28}} |
| − | | | + | |[[Eggman Mark]] (エッグマンマーク){{fileref|Sonic2 MD JP manual.pdf|page=28}} |
| | | | ||
|N/A | |N/A | ||
| Line 202: | Line 173: | ||
|-style="text-align:center;" | |-style="text-align:center;" | ||
!English name | !English name | ||
| − | |Super Ring{{fileref|SonicCD MCD US manual.pdf|page=12}} | + | |[[Super Ring]]{{fileref|SonicCD MCD US manual.pdf|page=12}} |
|[[Shield]]{{fileref|SonicCD MCD US manual.pdf|page=12}} | |[[Shield]]{{fileref|SonicCD MCD US manual.pdf|page=12}} | ||
|[[Power Sneakers]]{{fileref|SonicCD MCD US manual.pdf|page=12}} | |[[Power Sneakers]]{{fileref|SonicCD MCD US manual.pdf|page=12}} | ||
|[[Invincible]]{{fileref|SonicCD MCD US manual.pdf|page=12}} | |[[Invincible]]{{fileref|SonicCD MCD US manual.pdf|page=12}} | ||
|1-UP{{fileref|SonicCD MCD US manual.pdf|page=12}} | |1-UP{{fileref|SonicCD MCD US manual.pdf|page=12}} | ||
| − | |"S" | + | |"S"{{ref|[[Sonic the Hedgehog CD/Hidden content|Unused]]|group=e}} |
| − | |"Blue ring" | + | |"Blue ring"{{ref|[[Sonic the Hedgehog CD/Hidden content|Unused]]|group=e}} |
| − | |"Time" | + | |"Time"{{ref|[[Sonic the Hedgehog CD/Hidden content|Unused]]|group=e}} |
|-style="text-align:center;" | |-style="text-align:center;" | ||
!Japanese name | !Japanese name | ||
| − | | | + | |[[Super Ring|Ring 10]] (リング10){{fileref|SonicCD MCD JP manual.pdf|page=19}} |
| + | |[[Barrier]] (バリア){{fileref|SonicCD MCD JP manual.pdf|page=19}} | ||
| + | |[[High Speed]] (ハイスピード){{fileref|SonicCD MCD JP manual.pdf|page=19}} | ||
| + | |[[Muteki]] (無敵){{fileref|SonicCD MCD JP manual.pdf|page=19}} | ||
| + | |1up{{fileref|SonicCD MCD JP manual.pdf|page=19}} | ||
| + | |N/A | ||
| + | |N/A | ||
| + | |N/A | ||
|} | |} | ||
| + | ====Notes==== | ||
| + | <references group="e" /> | ||
===''[[Sonic Chaos]]''=== | ===''[[Sonic Chaos]]''=== | ||
| Line 227: | Line 207: | ||
|-style="text-align:center;" | |-style="text-align:center;" | ||
!English name | !English name | ||
| − | |Super Ring{{fileref|SonicChaos GG US manual.pdf|page=10}} | + | |[[Super Ring]]{{fileref|SonicChaos GG US manual.pdf|page=10}} |
|"Power Sneakers" | |"Power Sneakers" | ||
|[[Invincible]]{{fileref|SonicChaos GG US manual.pdf|page=10}} | |[[Invincible]]{{fileref|SonicChaos GG US manual.pdf|page=10}} | ||
| Line 235: | Line 215: | ||
|-style="text-align:center;" | |-style="text-align:center;" | ||
!Japanese name | !Japanese name | ||
| − | |10 Ring (10リング){{fileref|Sonic Chaos Game Gear JP Manual.pdf|page=17}} | + | |[[Super Ring|10 Ring]] (10リング){{fileref|Sonic Chaos Game Gear JP Manual.pdf|page=17}} |
|[[Speed Shoes]] (スピードシューズ){{fileref|Sonic Chaos Game Gear JP Manual.pdf|page=17}} | |[[Speed Shoes]] (スピードシューズ){{fileref|Sonic Chaos Game Gear JP Manual.pdf|page=17}} | ||
|[[Muteki]] (無敵){{fileref|Sonic Chaos Game Gear JP Manual.pdf|page=17}} | |[[Muteki]] (無敵){{fileref|Sonic Chaos Game Gear JP Manual.pdf|page=17}} | ||
|1UP{{fileref|Sonic Chaos Game Gear JP Manual.pdf|page=17}} | |1UP{{fileref|Sonic Chaos Game Gear JP Manual.pdf|page=17}} | ||
|[[Rocket Shoes]] (ロケットシューズ){{fileref|Sonic Chaos Game Gear JP Manual.pdf|page=17}} | |[[Rocket Shoes]] (ロケットシューズ){{fileref|Sonic Chaos Game Gear JP Manual.pdf|page=17}} | ||
| − | |Time | + | |Time Stop (タイムストップ){{fileref|Sonic Chaos Game Gear JP Manual.pdf|page=17}} |
|} | |} | ||
| Line 260: | Line 240: | ||
|-style="text-align:center;" | |-style="text-align:center;" | ||
!English name | !English name | ||
| − | |Super Ring{{fileref|Sonic3 MD US manual.pdf|page=14}} | + | |[[Super Ring]]{{fileref|Sonic3 MD US manual.pdf|page=14}} |
|[[Lightning Shield]]{{fileref|Sonic3 MD US manual.pdf|page=15}} | |[[Lightning Shield]]{{fileref|Sonic3 MD US manual.pdf|page=15}} | ||
|[[Flame Shield]]{{fileref|Sonic3 MD US manual.pdf|page=14}} | |[[Flame Shield]]{{fileref|Sonic3 MD US manual.pdf|page=14}} | ||
| Line 267: | Line 247: | ||
|[[Invincibility]]{{fileref|Sonic3 MD US manual.pdf|page=14}} | |[[Invincibility]]{{fileref|Sonic3 MD US manual.pdf|page=14}} | ||
|1-Up{{fileref|Sonic3 MD US manual.pdf|page=15}} | |1-Up{{fileref|Sonic3 MD US manual.pdf|page=15}} | ||
| − | |Robotnik{{fileref|Sonic3 MD US manual.pdf|page=15}} | + | |[[Eggman Mark|Robotnik]]{{fileref|Sonic3 MD US manual.pdf|page=15}} |
|"S" | |"S" | ||
|-style="text-align:center;" | |-style="text-align:center;" | ||
!Japanese name | !Japanese name | ||
| − | |Big 10 Ring (ビッグ10リング){{fileref|Sonic3 MD JP manual.pdf|page=18}} | + | |[[Super Ring|Big 10 Ring]] (ビッグ10リング){{fileref|Sonic3 MD JP manual.pdf|page=18}} |
|[[Thunder Barrier]] (サンダーバリア){{fileref|Sonic3 MD JP manual.pdf|page=18}} | |[[Thunder Barrier]] (サンダーバリア){{fileref|Sonic3 MD JP manual.pdf|page=18}} | ||
|[[Flame Barrier]] (フレイムバリア){{fileref|Sonic3 MD JP manual.pdf|page=18}} | |[[Flame Barrier]] (フレイムバリア){{fileref|Sonic3 MD JP manual.pdf|page=18}} | ||
| Line 301: | Line 281: | ||
|-style="text-align:center;" | |-style="text-align:center;" | ||
!English name | !English name | ||
| − | |Super Ring{{fileref|SonicTripleTrouble GG US manual.pdf|page=10}} | + | |[[Super Ring]]{{fileref|SonicTripleTrouble GG US manual.pdf|page=10}} |
|[[Power Sneakers]]{{fileref|SonicTripleTrouble GG US manual.pdf|page=10}} | |[[Power Sneakers]]{{fileref|SonicTripleTrouble GG US manual.pdf|page=10}} | ||
|[[Invincibility]]{{fileref|SonicTripleTrouble GG US manual.pdf|page=10}} | |[[Invincibility]]{{fileref|SonicTripleTrouble GG US manual.pdf|page=10}} | ||
| Line 308: | Line 288: | ||
|[[Rocket Shoes]]{{fileref|SonicTripleTrouble GG US manual.pdf|page=12}} | |[[Rocket Shoes]]{{fileref|SonicTripleTrouble GG US manual.pdf|page=12}} | ||
|[[Propeller Shoes]]{{fileref|SonicTripleTrouble GG US manual.pdf|page=12}} | |[[Propeller Shoes]]{{fileref|SonicTripleTrouble GG US manual.pdf|page=12}} | ||
| − | |Jet Board{{fileref|SonicTripleTrouble GG US manual.pdf|page=12}} | + | |[[Jet Board]]{{fileref|SonicTripleTrouble GG US manual.pdf|page=12}} |
| − | |Marker{{fileref|SonicTripleTrouble GG US manual.pdf|page=11}} | + | |[[Checkpoint|Marker]]{{fileref|SonicTripleTrouble GG US manual.pdf|page=11}} |
|[[Chaos Emerald]]{{fileref|SonicTripleTrouble GG US manual.pdf|page=10}} | |[[Chaos Emerald]]{{fileref|SonicTripleTrouble GG US manual.pdf|page=10}} | ||
|Time Bonus{{fileref|SonicTripleTrouble GG US manual.pdf|page=11}} | |Time Bonus{{fileref|SonicTripleTrouble GG US manual.pdf|page=11}} | ||
| − | |Hyper Heli-Tails{{fileref|SonicTripleTrouble GG US manual.pdf|page=11}} | + | |[[Hyper Heli-Tails]]{{fileref|SonicTripleTrouble GG US manual.pdf|page=11}} |
|-style="text-align:center;" | |-style="text-align:center;" | ||
!Japanese name | !Japanese name | ||
| − | |10 Ring (10リング){{fileref|SonicTripleTrouble GG JP manual.pdf|page=19}} | + | |[[Super Ring|10 Ring]] (10リング){{fileref|SonicTripleTrouble GG JP manual.pdf|page=19}} |
| − | | | + | |[[High Speed Shoes]] (ハイスピードシューズ){{fileref|SonicTripleTrouble GG JP manual.pdf|page=13}} |
|[[Muteki]] (無敵){{fileref|SonicTripleTrouble GG JP manual.pdf|page=19}} | |[[Muteki]] (無敵){{fileref|SonicTripleTrouble GG JP manual.pdf|page=19}} | ||
|1UP{{fileref|SonicTripleTrouble GG JP manual.pdf|page=19}} | |1UP{{fileref|SonicTripleTrouble GG JP manual.pdf|page=19}} | ||
| Line 322: | Line 302: | ||
|[[Rocket Shoes]] (ロケットシューズ){{fileref|SonicTripleTrouble GG JP manual.pdf|page=13}} | |[[Rocket Shoes]] (ロケットシューズ){{fileref|SonicTripleTrouble GG JP manual.pdf|page=13}} | ||
|[[Screw Shoes]] (スクリューシューズ){{fileref|SonicTripleTrouble GG JP manual.pdf|page=13}} | |[[Screw Shoes]] (スクリューシューズ){{fileref|SonicTripleTrouble GG JP manual.pdf|page=13}} | ||
| − | |Snowboard (スノーボード){{fileref|SonicTripleTrouble GG JP manual.pdf|page=12}} | + | |[[Snowboard]] (スノーボード){{fileref|SonicTripleTrouble GG JP manual.pdf|page=12}} |
|Marker (マーカー){{fileref|SonicTripleTrouble GG JP manual.pdf|page=19}} | |Marker (マーカー){{fileref|SonicTripleTrouble GG JP manual.pdf|page=19}} | ||
| − | | | + | |Warp Gate (ワープゲート){{fileref|SonicTripleTrouble GG JP manual.pdf|page=19}} |
| − | | | + | |Time (タイム){{fileref|SonicTripleTrouble GG JP manual.pdf|page=19}} |
| − | |High Speed Heli- | + | |[[High Speed Heli-Tail]] (ハイスピードヘリテイル) {{fileref|SonicTripleTrouble GG JP manual.pdf|page=13}} |
|} | |} | ||
| Line 350: | Line 330: | ||
|-style="text-align:center;" | |-style="text-align:center;" | ||
!English name | !English name | ||
| − | |Super Ring{{fileref|Chaotix 32X US manual.pdf|page=20}} | + | |[[Super Ring]]{{fileref|Chaotix 32X US manual.pdf|page=20}} |
|[[Shield]]{{fileref|Chaotix 32X US manual.pdf|page=20}} | |[[Shield]]{{fileref|Chaotix 32X US manual.pdf|page=20}} | ||
|[[Power Sneakers]]{{fileref|Chaotix 32X US manual.pdf|page=20}} | |[[Power Sneakers]]{{fileref|Chaotix 32X US manual.pdf|page=20}} | ||
| Line 365: | Line 345: | ||
|-style="text-align:center;" | |-style="text-align:center;" | ||
!Japanese name | !Japanese name | ||
| − | |Ring 10 (リング10){{fileref|Chaotix 32X JP manual.pdf|page=29}} | + | |[[Super Ring|Ring 10]] (リング10){{fileref|Chaotix 32X JP manual.pdf|page=29}} |
|[[Barrier]] (バリア){{fileref|Chaotix 32X JP manual.pdf|page=30}} | |[[Barrier]] (バリア){{fileref|Chaotix 32X JP manual.pdf|page=30}} | ||
|[[High Speed]] (ハイスピード){{fileref|Chaotix 32X JP manual.pdf|page=30}} | |[[High Speed]] (ハイスピード){{fileref|Chaotix 32X JP manual.pdf|page=30}} | ||
| Line 374: | Line 354: | ||
|Big (ビッグ){{fileref|Chaotix 32X JP manual.pdf|page=30}} | |Big (ビッグ){{fileref|Chaotix 32X JP manual.pdf|page=30}} | ||
|Small (スモール){{fileref|Chaotix 32X JP manual.pdf|page=30}} | |Small (スモール){{fileref|Chaotix 32X JP manual.pdf|page=30}} | ||
| + | |Slot (スロット){{fileref|Chaotix 32X JP manual.pdf|page=34}} | ||
| + | |Combi (コソビ){{fileref|Chaotix 32X JP manual.pdf|page=34}} | ||
| + | |N/A | ||
| + | |N/A | ||
|} | |} | ||
====Notes==== | ====Notes==== | ||
| Line 379: | Line 363: | ||
===''[[Sonic 3D: Flickies' Island]]''=== | ===''[[Sonic 3D: Flickies' Island]]''=== | ||
| − | + | 'Sonic 3D'' has items which can be found in '''TVs''' (as well as other places){{fileref|Sonic3D MD US manual.pdf|page=9}}. | |
{| | {| | ||
|-style="text-align:center;" | |-style="text-align:center;" | ||
| Line 392: | Line 376: | ||
|-style="text-align:center;" | |-style="text-align:center;" | ||
!English name | !English name | ||
| − | |"Rings" | + | |"[[Super Ring|Rings]]" |
|[[Blue Shield]]{{fileref|Sonic3D MD US manual.pdf|page=9}} | |[[Blue Shield]]{{fileref|Sonic3D MD US manual.pdf|page=9}} | ||
|[[Gold Shield]]{{fileref|Sonic3D MD US manual.pdf|page=9}} | |[[Gold Shield]]{{fileref|Sonic3D MD US manual.pdf|page=9}} | ||
|[[Red Shield]]{{fileref|Sonic3D MD US manual.pdf|page=9}} | |[[Red Shield]]{{fileref|Sonic3D MD US manual.pdf|page=9}} | ||
| − | |"Power Sneakers" | + | |"[[Power Sneakers]]" |
| − | |"Invincible" | + | |"[[Invincible]]" |
|Extra Life{{fileref|Sonic3D MD US manual.pdf|page=9}} | |Extra Life{{fileref|Sonic3D MD US manual.pdf|page=9}} | ||
|-style="text-align:center;" | |-style="text-align:center;" | ||
!Japanese name | !Japanese name | ||
| + | |[[Super Ring|Ring 10 Ko]] (リング10コ){{fileref|Sonic3D Sat JP manual.pdf|page=16}} | ||
| + | |[[Blue Barrier]] (ブルーバリア){{fileref|Sonic3D Sat JP manual.pdf|page=16}} | ||
| + | |[[Gold Barrier]] (ゴールドバリア){{fileref|Sonic3D Sat JP manual.pdf|page=16}} | ||
| + | |[[Red Barrier]] (レッドバリア){{fileref|Sonic3D Sat JP manual.pdf|page=16}} | ||
| + | |[[High Speed]] (ハイスピード){{fileref|Sonic3D Sat JP manual.pdf|page=16}} | ||
| + | |[[Muteki]] (無敵){{fileref|Sonic3D Sat JP manual.pdf|page=16}} | ||
| + | |Sonic 1UP (ソニック1UP){{fileref|Sonic3D Sat JP manual.pdf|page=16}} | ||
| + | |} | ||
| + | |||
| + | ===''[[Sonic Blast]]''=== | ||
| + | 'Sonic Blast'' features items in '''TVs'''{{fileref|Sonic Blast GG US Manual.pdf|page=8}} just like other games in the series. Note that in this game, the Sonic and Knuckles 1UP items are considered separate items and will only grant an extra life to the corresponding character when broken. | ||
| + | {| | ||
| + | |-style="text-align:center;" | ||
| + | !Sprite | ||
| + | |{{spriteImage|SonicBlast GG Sprite Monitors.png|crop_width=22|crop_x=0}} | ||
| + | |{{spriteImage|SonicBlast GG Sprite Monitors.png|crop_width=22|crop_x=22}} | ||
| + | |{{spriteImage|SonicBlast GG Sprite Monitors.png|crop_width=22|crop_x=44}} | ||
| + | |{{spriteImage|SonicBlast GG Sprite Monitors.png|crop_width=22|crop_x=66}} | ||
| + | |{{spriteImage|SonicBlast GG Sprite Monitors.png|crop_width=22|crop_x=88}} | ||
| + | |{{spriteImage|SonicBlast GG Sprite Monitors.png|crop_width=22|crop_x=110}} | ||
| + | |{{spriteImage|SonicBlast GG Sprite Monitors.png|crop_width=22|crop_x=154}} | ||
| + | |{{spriteImage|SonicBlast GG Sprite Monitors.png|crop_width=22|crop_x=132}} | ||
| + | |{{spriteImage|SonicBlast GG Sprite Monitors.png|crop_width=22|crop_x=176}} | ||
| + | |-style="text-align:center;" | ||
| + | !English name | ||
| + | |"[[Super Ring]]" | ||
| + | |[[Shield]]{{fileref|Sonic Blast GG US Manual.pdf|page=8}} | ||
| + | |[[Power Sneakers|Shoe]]{{fileref|Sonic Blast GG US Manual.pdf|page=8}} | ||
| + | |"[[Invincibility]]" | ||
| + | |Sonic icon{{fileref|Sonic Blast GG US Manual.pdf|page=9}} | ||
| + | |Knuckles icon{{fileref|Sonic Blast GG US Manual.pdf|page=9}} | ||
| + | |"[[Eggman Mark|Robotnik]]" | ||
| + | |"Marker" | ||
| + | |"?" | ||
| + | |-style="text-align:center;" | ||
| + | !Japanese name | ||
| + | |[[Super Ring|10 Ring]] (10リング){{fileref|SonicBlast GG JP manual.pdf|page=16}} | ||
| + | |[[Barrier]] (バリア){{fileref|SonicBlast GG JP manual.pdf|page=16}} | ||
| + | |[[Speed Boots]] (スピードブーツ){{fileref|SonicBlast GG JP manual.pdf|page=16}} | ||
| + | |[[Muteki]] (ムテキ){{fileref|SonicBlast GG JP manual.pdf|page=16}} | ||
| + | |Sonic 1up (ソニック1up){{fileref|SonicBlast GG JP manual.pdf|page=16}} | ||
| + | |Knuckles 1up (ナックルズ1up){{fileref|SonicBlast GG JP manual.pdf|page=16}} | ||
| + | |[[Eggman Mark|Eggman]] (エッグマン){{fileref|SonicBlast GG JP manual.pdf|page=16}} | ||
| + | |Marker (マーカー){{fileref|SonicBlast GG JP manual.pdf|page=16}} | ||
| + | |???{{fileref|SonicBlast GG JP manual.pdf|page=16}} | ||
| + | |} | ||
| + | |||
| + | ===''[[Sonic Adventure]]''=== | ||
| + | 'Sonic Adventure'' radically changed the design of its '''Item Boxes'''{{fileref|SonicAdventure DC US manual.pdf|page=13}} in order to better suit its 3D world. Rather than resembling computer screens, they are clear tubes with a rotating symbol inside. This makes them visible from more angles, and would be a design shared with future 3D titles. | ||
| + | {| | ||
| + | |-style="text-align:center;" | ||
| + | !Render | ||
| | | | ||
| + | |[[File:Monitor Sonic Adventure.png]] | ||
| + | |[[File:RandomRingBonusSAdventure.png]] | ||
| | | | ||
| | | | ||
| Line 408: | Line 446: | ||
| | | | ||
| | | | ||
| − | |||
| − | |||
| − | |||
| − | |||
| − | |||
| − | |||
| − | |||
| − | |||
| − | |||
|-style="text-align:center;" | |-style="text-align:center;" | ||
!English name | !English name | ||
| − | |5 Rings{{fileref|SonicAdventure DC US manual.pdf|page=13}} | + | |[[Super Ring|5 Rings]]{{fileref|SonicAdventure DC US manual.pdf|page=13}} |
| − | |10 Rings{{fileref|SonicAdventure DC US manual.pdf|page=13}} | + | |[[Super Ring|10 Rings]]{{fileref|SonicAdventure DC US manual.pdf|page=13}} |
| − | |Random Rings{{fileref|SonicAdventure DC US manual.pdf|page=13}} | + | |[[Super Ring|Random Rings]]{{fileref|SonicAdventure DC US manual.pdf|page=13}} |
|[[Shield]]{{fileref|SonicAdventure DC US manual.pdf|page=13}} | |[[Shield]]{{fileref|SonicAdventure DC US manual.pdf|page=13}} | ||
|[[Magnetic Shield]]{{fileref|SonicAdventure DC US manual.pdf|page=13}} | |[[Magnetic Shield]]{{fileref|SonicAdventure DC US manual.pdf|page=13}} | ||
| Line 427: | Line 456: | ||
|[[Invincibility]]{{fileref|SonicAdventure DC US manual.pdf|page=13}} | |[[Invincibility]]{{fileref|SonicAdventure DC US manual.pdf|page=13}} | ||
|Extra Life{{fileref|SonicAdventure DC US manual.pdf|page=13}} | |Extra Life{{fileref|SonicAdventure DC US manual.pdf|page=13}} | ||
| + | |"Explosion" | ||
|-style="text-align:center;" | |-style="text-align:center;" | ||
!Japanese name | !Japanese name | ||
| − | | | + | |[[Super Ring|5 Ring]] (5リング){{fileref|SonicAdventure DC JP manual.pdf|page=12}} |
| + | |[[Super Ring|10 Ring]] (10リング){{fileref|SonicAdventure DC JP manual.pdf|page=12}} | ||
| + | |Random Ring (ランダムリング){{fileref|SonicAdventure DC JP manual.pdf|page=12}} | ||
| + | |[[Barrier]] (バリア){{fileref|SonicAdventure DC JP manual.pdf|page=12}} | ||
| + | |[[Jiryoku Barrier]] (磁力バリア){{fileref|SonicAdventure DC JP manual.pdf|page=12}} | ||
| + | |[[High Speed]] (ハイスピード){{fileref|SonicAdventure DC JP manual.pdf|page=12}} | ||
| + | |[[Muteki]] (無敵){{fileref|SonicAdventure DC JP manual.pdf|page=12}} | ||
| + | |1UP{{fileref|SonicAdventure DC JP manual.pdf|page=12}} | ||
| + | |[[Explosion]] (エクスプロージョン){{fileref|SonicAdventureNavigationGuide Book JP.pdf|page=18}} | ||
|} | |} | ||
| Line 443: | Line 481: | ||
|-style="text-align:center;" | |-style="text-align:center;" | ||
!English name | !English name | ||
| − | |Super | + | |[[Super Ring]]s{{fileref|SPA NGPC US manual.pdf|page=12}} |
|[[Shield]]{{fileref|SPA NGPC US manual.pdf|page=12}} | |[[Shield]]{{fileref|SPA NGPC US manual.pdf|page=12}} | ||
|[[Power-Sneaker]]{{fileref|SPA NGPC US manual.pdf|page=12}} | |[[Power-Sneaker]]{{fileref|SPA NGPC US manual.pdf|page=12}} | ||
| Line 450: | Line 488: | ||
|-style="text-align:center;" | |-style="text-align:center;" | ||
!Japanese name | !Japanese name | ||
| − | | | + | |[[Super Ring|Big 10 Ring]] (ビッグ10リング){{fileref|SPA_NGPC_JP_manual.pdf|page=10}} |
| + | |[[Barrier]] (バリア){{fileref|SPA_NGPC_JP_manual.pdf|page=10}} | ||
| + | |[[High Speed]] (ハイスピード){{fileref|SPA_NGPC_JP_manual.pdf|page=10}} | ||
| + | |[[Muteki]] (無敵){{fileref|SPA_NGPC_JP_manual.pdf|page=10}} | ||
| + | |1UP{{fileref|SPA_NGPC_JP_manual.pdf|page=10}} | ||
|} | |} | ||
===''[[Sonic Adventure 2]]''=== | ===''[[Sonic Adventure 2]]''=== | ||
| + | {| | ||
| + | |-style="text-align:center;" | ||
| + | !Render | ||
| + | |[[File:Sa2_item_box_ring_5.png|x100px]] | ||
| + | |[[File:Sa2_item_box_ring_10.png|x100px]] | ||
| + | |[[File:Sa2_item_box_ring_20.png|x100px]] | ||
| + | |[[File:Sa2_item_box_shield.png|x100px]] | ||
| + | |[[File:Sa2_item_box_shield_magnetic.png|x100px]] | ||
| + | |[[File:Sa2_item_box_speed_shoes.png|x100px]] | ||
| + | |[[File:Sa2_item_box_invincibility.png|x100px]] | ||
| + | |[[File:Sa2_item_box_extra-life.png|x100px]] | ||
| + | |[[File:Sa2_item_box_health.png|x100px]] | ||
| + | |[[File:Sa2_item_box_bomb.png|x100px]] | ||
| + | |[[File:Sa2_item_box_blank.png|x100px]] | ||
| + | |-style="text-align:center;" | ||
| + | !English name | ||
| + | |[[Super Ring|5 Rings]]{{fileref|SonicAdventure2 DC US manual.pdf|page=21}} | ||
| + | |[[Super Ring|10 Rings]]{{fileref|SonicAdventure2 DC US manual.pdf|page=21}} | ||
| + | |[[Super Ring|20 Rings]]{{fileref|SonicAdventure2 DC US manual.pdf|page=21}} | ||
| + | |[[Shield]]{{fileref|SonicAdventure2 DC US manual.pdf|page=21}} | ||
| + | |[[Magnetic Shield]]{{fileref|SonicAdventure2 DC US manual.pdf|page=21}} | ||
| + | |[[High-Speed Shoes]]{{fileref|SonicAdventure2 DC US manual.pdf|page=21}} | ||
| + | |[[Invincibility]]{{fileref|SonicAdventure2 DC US manual.pdf|page=21}} | ||
| + | |Extra Life{{fileref|SonicAdventure2 DC US manual.pdf|page=21}} | ||
| + | |Health{{fileref|SonicAdventure2 DC US manual.pdf|page=21}} | ||
| + | |Bomb{{fileref|SonicAdventure2 DC US manual.pdf|page=21}} | ||
| + | |"Blank" | ||
| + | |-style="text-align:center;" | ||
| + | !Japanese name | ||
| + | |[[Super Ring|5 Ring]] (5リング){{fileref|SonicAdventure2 DC JP manual.pdf|page=26}} | ||
| + | |[[Super Ring|10 Ring]] (10リング){{fileref|SonicAdventure2 DC JP manual.pdf|page=26}} | ||
| + | |[[Super Ring|20 Ring]] (20リング){{fileref|SonicAdventure2 DC JP manual.pdf|page=26}} | ||
| + | |[[Barrier]] (バリア){{fileref|SonicAdventure2 DC JP manual.pdf|page=26}} | ||
| + | |[[Jiryoku Barrier]] (磁力バリア){{fileref|SonicAdventure2 DC JP manual.pdf|page=26}} | ||
| + | |[[High Speed]] (ハイスピード){{fileref|SonicAdventure2 DC JP manual.pdf|page=26}} | ||
| + | |[[Muteki]] (無敵){{fileref|SonicAdventure2 DC JP manual.pdf|page=26}} | ||
| + | |1UP{{fileref|SonicAdventure2 DC JP manual.pdf|page=26}} | ||
| + | |Life (ライフ){{fileref|SonicAdventure2 DC JP manual.pdf|page=26}} | ||
| + | |Explosion (エクスプロージョン){{fileref|SonicAdventure2 DC JP manual.pdf|page=26}} | ||
| + | |N/A | ||
| + | |} | ||
| + | |||
===''[[Sonic Advance]]''=== | ===''[[Sonic Advance]]''=== | ||
| − | + | <!-- NOTE: This game has additional item boxes in multiplayer modes. --> | |
| + | 'Sonic Advance'' has '''boxes''' with items in them{{fileref|SonicAdvance GBA US manual.pdf|page=22}}. Rather than be contained inside monitors like in the classic games, they are contained in capsules similar to ''Sonic Adventure''<nowiki>'</nowiki>s, though they are hexagonal in shape. In a VS Race, the Boxes rotate between items at a steady pace, while in Chao Hunt, monitors containing set items appear throughout the level, disappearing if nobody breaks them after enough time has passed. | ||
{| | {| | ||
|-style="text-align:center;" | |-style="text-align:center;" | ||
| Line 467: | Line 552: | ||
|{{spriteImage|SonicAdvance GBA Sprite Monitors.png|crop_width=28|crop_x=84}} | |{{spriteImage|SonicAdvance GBA Sprite Monitors.png|crop_width=28|crop_x=84}} | ||
|{{spriteImage|SonicAdvance GBA Sprite Monitors.png|crop_width=28|crop_x=224}}{{spriteImage|SonicAdvance GBA Sprite Monitors.png|crop_width=28|crop_x=252}}{{spriteImage|SonicAdvance GBA Sprite Monitors.png|crop_width=28|crop_x=280}}{{spriteImage|SonicAdvance GBA Sprite Monitors.png|crop_width=28|crop_x=308}} | |{{spriteImage|SonicAdvance GBA Sprite Monitors.png|crop_width=28|crop_x=224}}{{spriteImage|SonicAdvance GBA Sprite Monitors.png|crop_width=28|crop_x=252}}{{spriteImage|SonicAdvance GBA Sprite Monitors.png|crop_width=28|crop_x=280}}{{spriteImage|SonicAdvance GBA Sprite Monitors.png|crop_width=28|crop_x=308}} | ||
| + | |{{spriteImage|SonicAdvance GBA Sprite Monitors.png|crop_width=28|crop_x=364}} | ||
| + | |{{spriteImage|SonicAdvance GBA Sprite Monitors.png|crop_width=28|crop_x=336}} | ||
| + | |{{spriteImage|SonicAdvance GBA Sprite Monitors.png|crop_width=28|crop_x=392}} | ||
| + | |{{spriteImage|SonicAdvance GBA Sprite Monitors.png|crop_width=28|crop_x=420}} | ||
| + | |{{spriteImage|SonicAdvance GBA Sprite Monitors.png|crop_width=28|crop_x=448}} | ||
|-style="text-align:center;" | |-style="text-align:center;" | ||
!English name | !English name | ||
| − | |5 Rings{{fileref|SonicAdvance GBA US manual.pdf|page=22}} | + | |[[Super Ring|5 Rings]]{{fileref|SonicAdvance GBA US manual.pdf|page=22}} |
| − | |10 Rings{{fileref|SonicAdvance GBA US manual.pdf|page=22}} | + | |[[Super Ring|10 Rings]]{{fileref|SonicAdvance GBA US manual.pdf|page=22}} |
| − | |? Rings{{fileref|SonicAdvance GBA US manual.pdf|page=22}} | + | |[[Super Ring|? Rings]]{{fileref|SonicAdvance GBA US manual.pdf|page=22}} |
|[[Barrier]]{{fileref|SonicAdvance GBA US manual.pdf|page=22}} | |[[Barrier]]{{fileref|SonicAdvance GBA US manual.pdf|page=22}} | ||
|[[Magnetic Barrier]]{{fileref|SonicAdvance GBA US manual.pdf|page=22}} | |[[Magnetic Barrier]]{{fileref|SonicAdvance GBA US manual.pdf|page=22}} | ||
| Line 477: | Line 567: | ||
|[[Invincible]]{{fileref|SonicAdvance GBA US manual.pdf|page=22}} | |[[Invincible]]{{fileref|SonicAdvance GBA US manual.pdf|page=22}} | ||
|Extra Try{{fileref|SonicAdvance GBA US manual.pdf|page=22}} | |Extra Try{{fileref|SonicAdvance GBA US manual.pdf|page=22}} | ||
| + | |"Slow"{{ref|VS Race only|group=r}} | ||
| + | |"Confusion"{{ref|VS Race & Chao Hunt only|group=r}} | ||
| + | |"Attract"{{ref|VS Race only|group=r}} | ||
| + | |"Blind"{{ref|VS Chao Hunt only|group=r}} | ||
| + | |"Transparent"{{ref|VS Chao Hunt only|group=r}} | ||
| + | |-style="text-align:center;" | ||
| + | !Japanese name | ||
| + | |[[Super Ring|5 Ring]] (5リング){{fileref|SonicAdvance GBA JP manual.pdf|page=30}} | ||
| + | |[[Super Ring|10 Ring]] (10リング){{fileref|SonicAdvance GBA JP manual.pdf|page=30}} | ||
| + | |[[Super Ring|Random Ring]] (ランダムリング)[{{fileref|SonicAdvance GBA JP manual.pdf|page=30}} | ||
| + | |[[Barrier]] (バリア){{fileref|SonicAdvance GBA JP manual.pdf|page=31}} | ||
| + | |[[Jiryoku Barrier]] (磁力バリア){{fileref|SonicAdvance GBA JP manual.pdf|page=31}} | ||
| + | |[[High Speed]] (ハイスピード){{fileref|SonicAdvance GBA JP manual.pdf|page=30}} | ||
| + | |[[Muteki]] (無敵){{fileref|SonicAdvance GBA JP manual.pdf|page=30}} | ||
| + | |1up{{fileref|SonicAdvance GBA JP manual.pdf|page=31}} | ||
| + | |Brake (ブレーキ){{fileref|SonicAdvanceVictoryPerfect JP guide.pdf|page=94}} | ||
| + | |Konran (混乱){{fileref|SonicAdvanceVictoryPerfect JP guide.pdf|page=94}} | ||
| + | |Warp (ワープ){{fileref|SonicAdvanceVictoryPerfect JP guide.pdf|page=94}} | ||
| + | |Blind (ブラインド){{fileref|SonicAdvanceVictoryPerfect JP guide.pdf|page=94}} | ||
| + | |Toumei (透明){{fileref|SonicAdvanceVictoryPerfect JP guide.pdf|page=94}} | ||
| + | |} | ||
| + | ====Notes==== | ||
| + | <references group="r" /> | ||
| + | |||
| + | ===''[[Sonic Advance 2]]''=== | ||
| + | 'Sonic Advance 2'' redesigns the boxes to be rounder in shape to reflect the style in ''Sonic Adventure'' more closely. In this game, they can be broken by simply running into them. | ||
| + | {| | ||
| + | |-style="text-align:center;" | ||
| + | !Sprite | ||
| + | |{{SpriteImage|SonicAdvance2 GBA Sprite Monitors.png|crop_x=0|crop_width=26}} | ||
| + | |{{SpriteImage|SonicAdvance2 GBA Sprite Monitors.png|crop_x=26|crop_width=26}} | ||
| + | |{{SpriteImage|SonicAdvance2 GBA Sprite Monitors.png|crop_x=52|crop_width=26}} | ||
| + | |{{SpriteImage|SonicAdvance2 GBA Sprite Monitors.png|crop_x=78|crop_width=26}} | ||
| + | |{{SpriteImage|SonicAdvance2 GBA Sprite Monitors.png|crop_x=104|crop_width=26}} | ||
| + | |{{SpriteImage|SonicAdvance2 GBA Sprite Monitors.png|crop_x=130|crop_width=26}} | ||
| + | |{{SpriteImage|SonicAdvance2 GBA Sprite Monitors.png|crop_x=156|crop_width=26}} | ||
| + | |{{SpriteImage|SonicAdvance2 GBA Sprite Monitors.png|crop_x=182|crop_width=26}}{{SpriteImage|SonicAdvance2 GBA Sprite Monitors.png|crop_x=208|crop_width=26}}{{SpriteImage|SonicAdvance2 GBA Sprite Monitors.png|crop_x=234|crop_width=26}}{{SpriteImage|SonicAdvance2 GBA Sprite Monitors.png|crop_x=260|crop_width=26}}{{SpriteImage|SonicAdvance2 GBA Sprite Monitors.png|crop_x=286|crop_width=26}} | ||
| + | |{{SpriteImage|SonicAdvance2 GBA Sprite Monitors.png|crop_x=312|crop_width=26}} | ||
| + | |{{SpriteImage|SonicAdvance2 GBA Sprite Monitors.png|crop_x=338|crop_width=26}} | ||
| + | |{{SpriteImage|SonicAdvance2 GBA Sprite Monitors.png|crop_x=364|crop_width=26}} | ||
| + | |{{SpriteImage|SonicAdvance2 GBA Sprite Monitors.png|crop_x=390|crop_width=26}} | ||
| + | |{{SpriteImage|SonicAdvance2 GBA Sprite Monitors.png|crop_x=416|crop_width=26}} | ||
| + | |-style="text-align:center;" | ||
| + | !English name | ||
| + | |[[Super Ring|5 Ring Bonus]]{{fileref|SonicAdvance2 GBA US manual.pdf|page=24}} | ||
| + | |[[Super Ring|10 Ring Bonus]]{{fileref|SonicAdvance2 GBA US manual.pdf|page=24}} | ||
| + | |[[Super Ring|Random Ring Bonus]]{{fileref|SonicAdvance2 GBA US manual.pdf|page=24}} | ||
| + | |[[Shield]]{{fileref|SonicAdvance2 GBA US manual.pdf|page=24}} | ||
| + | |[[Ring Magnet]]{{fileref|SonicAdvance2 GBA US manual.pdf|page=24}} | ||
| + | |[[Maximum Speed]]{{fileref|SonicAdvance2 GBA US manual.pdf|page=24}} | ||
| + | |[[Invincibility]]{{fileref|SonicAdvance2 GBA US manual.pdf|page=24}} | ||
| + | |1-Up{{fileref|SonicAdvance2 GBA US manual.pdf|page=24}} | ||
| + | |"Slow"{{ref|Multi-Pak VS only|group=s}} | ||
| + | |"Confusion"{{ref|Multi-Pak VS only|group=s}} | ||
| + | |"Attract"{{ref|Multi-Pak VS only|group=s}} | ||
| + | |"Attack"{{ref|Multi-Pak VS only|group=s}} | ||
| + | |"Mosaic"{{ref|Single Pak VS only|group=s}} | ||
| + | |-style="text-align:center;" | ||
| + | !Japanese name | ||
| + | |[[Super Ring|5 Ring Bonus]] (5リングボーナス){{fileref|SonicAdvance2 GBA JP manual.pdf|page=33}} | ||
| + | |[[Super Ring|10 Ring Bonus]] (10リングボーナス){{fileref|SonicAdvance2 GBA JP manual.pdf|page=33}} | ||
| + | |[[Super Ring|Random Ring Bonus]] (ランダムリングボーナス){{fileref|SonicAdvance2 GBA JP manual.pdf|page=33}} | ||
| + | |[[Barrier]] (バリア){{fileref|SonicAdvance2 GBA JP manual.pdf|page=32}} | ||
| + | |[[Jiryoku Barrier]] (磁力バリア){{fileref|SonicAdvance2 GBA JP manual.pdf|page=32}} | ||
| + | |[[Max Speed]] (MAXスピード){{fileref|SonicAdvance2 GBA JP manual.pdf|page=33}} | ||
| + | |[[Muteki]] (無敵){{fileref|SonicAdvance2 GBA JP manual.pdf|page=32}} | ||
| + | |1UP{{fileref|SonicAdvance2 GBA JP manual.pdf|page=32}} | ||
| + | | | ||
| + | | | ||
| + | | | ||
| + | | | ||
| + | | | ||
| + | |} | ||
| + | ====Notes==== | ||
| + | <references group="s" /> | ||
| + | |||
| + | ===''[[Sonic Advance 3]]''=== | ||
| + | 'Sonic Advance 3'' retains the same '''Box'''{{fileref|SonicAdvance3 GBA US manual.pdf|page=24}} design and item contents as the previous game. It should be noted that in Multi-Pak VS play, Box contents rotate between select items at a steady pace, sometimes becoming red and black Boxes with greyed-out upside down contents. Breaking a red and black Box causes a negative effect to happen, such as the opponent(s) getting a boost or the player(s) being on the receiving end of a "power-down" meant to hinder opponents. | ||
| + | {| | ||
| + | |-style="text-align:center;" | ||
| + | !Sprite | ||
| + | |{{SpriteImage|SonicAdvance3 GBA Sprite Monitors.png|crop_x=0|crop_y=0|crop_width=26|crop_height=29}} | ||
| + | |{{SpriteImage|SonicAdvance3 GBA Sprite Monitors.png|crop_x=26|crop_y=0|crop_width=26|crop_height=29}} | ||
| + | |{{SpriteImage|SonicAdvance3 GBA Sprite Monitors.png|crop_x=52|crop_y=0|crop_width=26|crop_height=29}} | ||
| + | |{{SpriteImage|SonicAdvance3 GBA Sprite Monitors.png|crop_x=78|crop_y=0|crop_width=26|crop_height=29}} | ||
| + | |{{SpriteImage|SonicAdvance3 GBA Sprite Monitors.png|crop_x=104|crop_y=0|crop_width=26|crop_height=29}} | ||
| + | |{{SpriteImage|SonicAdvance3 GBA Sprite Monitors.png|crop_x=130|crop_y=0|crop_width=26|crop_height=29}}{{SpriteImage|SonicAdvance3 GBA Sprite Monitors.png|crop_x=52|crop_y=29|crop_width=26|crop_height=29}} | ||
| + | |{{SpriteImage|SonicAdvance3 GBA Sprite Monitors.png|crop_x=156|crop_y=0|crop_width=26|crop_height=29}} | ||
| + | |{{SpriteImage|SonicAdvance3 GBA Sprite Monitors.png|crop_x=182|crop_y=0|crop_width=26|crop_height=29}}{{SpriteImage|SonicAdvance3 GBA Sprite Monitors.png|crop_x=208|crop_y=0|crop_width=26|crop_height=29}}{{SpriteImage|SonicAdvance3 GBA Sprite Monitors.png|crop_x=234|crop_y=0|crop_width=26|crop_height=29}}{{SpriteImage|SonicAdvance3 GBA Sprite Monitors.png|crop_x=260|crop_y=0|crop_width=26|crop_height=29}}{{SpriteImage|SonicAdvance3 GBA Sprite Monitors.png|crop_x=286|crop_y=0|crop_width=26|crop_height=29}} | ||
| + | |{{SpriteImage|SonicAdvance3 GBA Sprite Monitors.png|crop_x=312|crop_y=0|crop_width=26|crop_height=29}}{{SpriteImage|SonicAdvance3 GBA Sprite Monitors.png|crop_x=78|crop_y=29|crop_width=26|crop_height=29}} | ||
| + | |{{SpriteImage|SonicAdvance3 GBA Sprite Monitors.png|crop_x=338|crop_y=0|crop_width=26|crop_height=29}}{{SpriteImage|SonicAdvance3 GBA Sprite Monitors.png|crop_x=104|crop_y=29|crop_width=26|crop_height=29}} | ||
| + | |{{SpriteImage|SonicAdvance3 GBA Sprite Monitors.png|crop_x=364|crop_y=0|crop_width=26|crop_height=29}} | ||
| + | |{{SpriteImage|SonicAdvance3 GBA Sprite Monitors.png|crop_x=0|crop_y=29|crop_width=26|crop_height=29}}{{SpriteImage|SonicAdvance3 GBA Sprite Monitors.png|crop_x=26|crop_y=29|crop_width=26|crop_height=29}} | ||
| + | |{{SpriteImage|SonicAdvance3 GBA Sprite Monitors.png|crop_x=390|crop_y=0|crop_width=26|crop_height=29}} | ||
| + | |{{SpriteImage|SonicAdvance3 GBA Sprite Monitors.png|crop_x=416|crop_y=0|crop_width=26|crop_height=29}} | ||
| + | |-style="text-align:center;" | ||
| + | !English name | ||
| + | |[[Super Ring|5 Ring Bonus]]{{fileref|SonicAdvance3 GBA US manual.pdf|page=24}} | ||
| + | |[[Super Ring|10 Ring Bonus]]{{fileref|SonicAdvance3 GBA US manual.pdf|page=24}} | ||
| + | |[[Super Ring|Random Ring Bonus]]{{fileref|SonicAdvance3 GBA US manual.pdf|page=24}} | ||
| + | |[[Shield]]{{fileref|SonicAdvance3 GBA US manual.pdf|page=24}} | ||
| + | |[[Ring Magnet]]{{fileref|SonicAdvance3 GBA US manual.pdf|page=24}} | ||
| + | |[[Maximum Speed]]{{fileref|SonicAdvance3 GBA US manual.pdf|page=24}} | ||
| + | |[[Invincibility]]{{fileref|SonicAdvance3 GBA US manual.pdf|page=24}} | ||
| + | |1-Up{{fileref|SonicAdvance3 GBA US manual.pdf|page=24}} | ||
| + | |"Slow"{{ref|Multi-Pak Battle only|group=t}} | ||
| + | |"Confusion"{{ref|Multi-Pak Battle only|group=t}} | ||
| + | |"[[Swap]]"{{ref|Multi-Pak Battle only|group=t}} | ||
| + | |"Minus Ring"{{ref|Multi-Pak Battle only|group=t}} | ||
| + | |"Transparent"{{ref|Single Pak Battle only|group=t}} | ||
| + | |"Mosaic"{{ref|Single Pak Battle only|group=t}} | ||
| + | |-style="text-align:center;" | ||
| + | !Japanese name | ||
| + | |[[Super Ring|5 Ring Bonus]] (5リングボーナス){{fileref|SonicAdvance3 WiiUVC manual.pdf|page=22}} | ||
| + | |[[Super Ring|10 Ring Bonus]] (10リングボーナス){{fileref|SonicAdvance3 WiiUVC manual.pdf|page=22}} | ||
| + | |[[Super Ring|Random Ring Bonus]] (ランダムリングボーナス){{fileref|SonicAdvance3 WiiUVC manual.pdf|page=22}} | ||
| + | |[[Barrier]] (バリア){{fileref|SonicAdvance3 WiiUVC manual.pdf|page=22}} | ||
| + | |[[Jiryoku Barrier]] (磁力バリア){{fileref|SonicAdvance3 WiiUVC manual.pdf|page=22}} | ||
| + | |[[Max Speed]] (MAXスピード){{fileref|SonicAdvance3 WiiUVC manual.pdf|page=22}} | ||
| + | |[[Muteki]] (無敵){{fileref|SonicAdvance3 WiiUVC manual.pdf|page=22}} | ||
| + | |1UP{{fileref|SonicAdvance3 WiiUVC manual.pdf|page=22}} | ||
| + | |Slow (スロー){{fileref|SonicAdvance3 WiiUVC manual.pdf|page=29}} | ||
| + | |Konran (混乱){{fileref|SonicAdvance3 WiiUVC manual.pdf|page=29}} | ||
| + | |[[Irekae]] (入れ替え){{fileref|SonicAdvance3 WiiUVC manual.pdf|page=29}} | ||
| + | |Minus Ring (マイナスリング){{fileref|SonicAdvance3 WiiUVC manual.pdf|page=29}} | ||
| + | |Toumei (透明){{fileref|SonicAdvance3 WiiUVC manual.pdf|page=29}} | ||
| + | |Mosaic (モザイク){{fileref|SonicAdvance3 WiiUVC manual.pdf|page=29}} | ||
| + | |} | ||
| + | ====Notes==== | ||
| + | <references group="t" /> | ||
| + | |||
| + | ===''[[Sonic Heroes]]''=== | ||
| + | {| | ||
| + | |-style="text-align:center;" | ||
| + | !Render | ||
| + | | | ||
| + | |[[File:Monitor Sonic Heroes.png|x100px]] | ||
| + | | | ||
| + | | | ||
| + | | | ||
| + | | | ||
| + | | | ||
| + | | | ||
| + | | | ||
| + | | | ||
| + | |-style="text-align:center;" | ||
| + | !English name | ||
| + | |[[Super Ring|5 Rings]]{{fileref|SonicHeroes GC US manual.pdf|page=28}} | ||
| + | |[[Super Ring|10 Rings]]{{fileref|SonicHeroes GC US manual.pdf|page=28}} | ||
| + | |[[Super Ring|20 Rings]]{{fileref|SonicHeroes GC US manual.pdf|page=28}} | ||
| + | |[[Barrier]]{{fileref|SonicHeroes GC US manual.pdf|page=28}} | ||
| + | |[[High Speed]]{{fileref|SonicHeroes GC US manual.pdf|page=28}} | ||
| + | |[[Invincible]]{{fileref|SonicHeroes GC US manual.pdf|page=28}} | ||
| + | |1 UP{{fileref|SonicHeroes GC US manual.pdf|page=28}} | ||
| + | |[[Power Core]]{{fileref|SonicHeroes GC US manual.pdf|page=28}} | ||
| + | |[[Team Blast Ring]]{{fileref|SonicHeroes GC US manual.pdf|page=28}} | ||
| + | |[[Fly Change]]{{fileref|SonicHeroes GC US manual.pdf|page=28}} | ||
|-style="text-align:center;" | |-style="text-align:center;" | ||
!Japanese name | !Japanese name | ||
| + | | | ||
| + | | | ||
| + | | | ||
| | | | ||
| | | | ||
| Line 488: | Line 738: | ||
|} | |} | ||
| − | |||
| − | |||
| − | |||
===''[[Shadow the Hedgehog (game)|Shadow the Hedgehog]]''=== | ===''[[Shadow the Hedgehog (game)|Shadow the Hedgehog]]''=== | ||
| + | {| | ||
| + | |-style="text-align:center;" | ||
| + | !Render | ||
| + | | | ||
| + | | | ||
| + | | | ||
| + | | | ||
| + | | | ||
| + | | | ||
| + | | | ||
| + | | | ||
| + | | | ||
| + | |-style="text-align:center;" | ||
| + | !English name | ||
| + | |[[Super Ring|5 Rings]]{{fileref|Shadow GC US manual.pdf|page=23}} | ||
| + | |[[Super Ring|10 Rings]]{{fileref|Shadow GC US manual.pdf|page=23}} | ||
| + | |[[Super Ring|20 Rings]]{{fileref|Shadow GC US manual.pdf|page=23}} | ||
| + | |[[Barrier]]{{fileref|Shadow GC US manual.pdf|page=23}} | ||
| + | |[[Magnetic Barrier]]{{fileref|Shadow GC US manual.pdf|page=23}} | ||
| + | |[[Heat Barrier]]{{fileref|Shadow GC US manual.pdf|page=23}} | ||
| + | |[[Invincible]]{{fileref|Shadow GC US manual.pdf|page=23}} | ||
| + | |1-Up{{fileref|Shadow GC US manual.pdf|page=23}} | ||
| + | |Damage Recover{{fileref|Shadow GC US manual.pdf|page=23}} | ||
| + | |-style="text-align:center;" | ||
| + | !Japanese name | ||
| + | | | ||
| + | | | ||
| + | | | ||
| + | |[[Barrier]] (バリア){{fileref|Shadow The Hedgehog GC JP Manual.pdf|page=34}} | ||
| + | |[[Magnet Barrier]] (マグネツバリア){{fileref|Shadow The Hedgehog GC JP Manual.pdf|page=34}} | ||
| + | |[[Heat Barrier]] (ヒートバリア){{fileref|Shadow The Hedgehog GC JP Manual.pdf|page=34}} | ||
| + | |[[Muteki]] (無敵){{fileref|Shadow The Hedgehog GC JP Manual.pdf|page=35}} | ||
| + | |1UP{{fileref|Shadow The Hedgehog GC JP Manual.pdf|page=34}} | ||
| + | |Damage Kaifuku (ダメージ回復){{fileref|Shadow The Hedgehog GC JP Manual.pdf|page=35}} | ||
| + | |} | ||
| + | |||
===''[[Sonic Rush]]''=== | ===''[[Sonic Rush]]''=== | ||
| + | <!-- NOTE: This game has additional item boxes in multiplayer modes. --> | ||
| + | {| | ||
| + | |-style="text-align:center;" | ||
| + | !Sprite | ||
| + | |{{spriteImage|SonicRush DS Sprite Monitors.png|crop_width=26|crop_x=26}} | ||
| + | |{{spriteImage|SonicRush DS Sprite Monitors.png|crop_width=26|crop_x=78}} | ||
| + | |{{spriteImage|SonicRush DS Sprite Monitors.png|crop_width=26|crop_x=0}} | ||
| + | |{{spriteImage|SonicRush DS Sprite Monitors.png|crop_width=26|crop_x=104}} | ||
| + | |{{spriteImage|SonicRush DS Sprite Monitors.png|crop_width=26|crop_x=52}} | ||
| + | |{{spriteImage|SonicRush DS Sprite Monitors.png|crop_width=26|crop_x=182}} | ||
| + | |{{spriteImage|SonicRush DS Sprite Monitors.png|crop_width=26|crop_x=130}} | ||
| + | |{{spriteImage|SonicRush DS Sprite Monitors.png|crop_width=26|crop_x=156}} | ||
| + | | | ||
| + | | | ||
| + | | | ||
| + | |-style="text-align:center;" | ||
| + | !English name | ||
| + | |[[Super Ring|5 Ring Bonus]]{{fileref|SonicRush DS US manual.pdf|page=22}} | ||
| + | |[[Super Ring|Random Ring Bonus]]{{fileref|SonicRush DS US manual.pdf|page=22}} | ||
| + | |[[Barrier]]{{fileref|SonicRush DS US manual.pdf|page=22}} | ||
| + | |[[Magnetic Barrier]]{{fileref|SonicRush DS US manual.pdf|page=22}} | ||
| + | |[[Invincible]]{{fileref|SonicRush DS US manual.pdf|page=22}} | ||
| + | |1 UP{{fileref|SonicRush DS US manual.pdf|page=22}} | ||
| + | |Tension Bonus{{fileref|SonicRush DS US manual.pdf|page=22}} | ||
| + | |Max Tension Bonus{{fileref|SonicRush DS US manual.pdf|page=22}} | ||
| + | |Slow{{fileref|SonicRush DS US manual.pdf|page=34}}{{ref|Battle Play only|group=w}} | ||
| + | |Confusion{{fileref|SonicRush DS US manual.pdf|page=34}}{{ref|Battle Play only|group=w}} | ||
| + | |Attract{{fileref|SonicRush DS US manual.pdf|page=34}}{{ref|Battle Play only|group=w}} | ||
| + | |-style="text-align:center;" | ||
| + | !Japanese name | ||
| + | |[[Super Ring|5 Ring Bonus]] (5リングボーナス){{fileref|SonicRush DS JP manual.pdf|page=29}} | ||
| + | |[[Super Ring|Random Ring Bonus]] (ランダムリングボーナス){{fileref|SonicRush DS JP manual.pdf|page=29}} | ||
| + | |[[Barrier]] (バリア){{fileref|SonicRush DS JP manual.pdf|page=29}} | ||
| + | |[[Jiryoku Barrier]] (磁力バリア){{fileref|SonicRush DS JP manual.pdf|page=29}} | ||
| + | |[[Muteki]] (無敵){{fileref|SonicRush DS JP manual.pdf|page=29}} | ||
| + | |1UP{{fileref|SonicRush DS JP manual.pdf|page=29}} | ||
| + | |Tension Bonus (テンションボーナス){{fileref|SonicRush DS JP manual.pdf|page=29}} | ||
| + | |Max Tension Bonus (MAXテンションボーナス){{fileref|SonicRush DS JP manual.pdf|page=29}} | ||
| + | |Slow (スロー){{fileref|SonicRush DS JP manual.pdf|page=40}} | ||
| + | |{{fileref|SonicRush DS JP manual.pdf|page=40}} | ||
| + | |{{fileref|SonicRush DS JP manual.pdf|page=40}} | ||
| + | |} | ||
| + | ====Notes==== | ||
| + | <references group="w" /> | ||
| + | |||
===''[[Sonic Riders]]''=== | ===''[[Sonic Riders]]''=== | ||
| + | {| | ||
| + | |-style="text-align:center;" | ||
| + | !Render | ||
| + | | | ||
| + | | | ||
| + | | | ||
| + | | | ||
| + | | | ||
| + | | | ||
| + | | | ||
| + | | | ||
| + | |-style="text-align:center;" | ||
| + | !English name | ||
| + | |[[Super Ring|Rings]]{{fileref|SonicRiders GC US manual.pdf|page=24}} | ||
| + | |Air{{fileref|SonicRiders GC US manual.pdf|page=24}} | ||
| + | |[[Magnetic Barrier]]{{fileref|SonicRiders GC US manual.pdf|page=24}} | ||
| + | |[[High Speed]]{{fileref|SonicRiders GC US manual.pdf|page=24}} | ||
| + | |Speed Down{{fileref|SonicRiders GC US manual.pdf|page=24}} | ||
| + | |[[Invincible Barrier]]{{fileref|SonicRiders GC US manual.pdf|page=24}} | ||
| + | |Explosion{{fileref|SonicRiders GC US manual.pdf|page=24}} | ||
| + | |Question Item{{fileref|SonicRiders GC US manual.pdf|page=24}} | ||
| + | |-style="text-align:center;" | ||
| + | !Japanese name | ||
| + | |[[Super Ring|Ring]] (リング){{fileref|Sonic Riders GC JP Manual.pdf|page=24}} | ||
| + | |Air (エア){{fileref|Sonic Riders GC JP Manual.pdf|page=24}} | ||
| + | |[[Jiryoku Barrier]] (磁力バリア){{fileref|Sonic Riders GC JP Manual.pdf|page=25}} | ||
| + | |[[High Speed]] (ハイスピード){{fileref|Sonic Riders GC JP Manual.pdf|page=24}} | ||
| + | |Speed Down (スピードダウン){{fileref|Sonic Riders GC JP Manual.pdf|page=25}} | ||
| + | |[[Muteki]] (無敵){{fileref|Sonic Riders GC JP Manual.pdf|page=24}} | ||
| + | |Explosion (エクスプロージョン){{fileref|Sonic Riders GC JP Manual.pdf|page=24}} | ||
| + | |Question (クエスチョン){{fileref|Sonic Riders GC JP Manual.pdf|page=25}} | ||
| + | |} | ||
| + | |||
===''[[Sonic the Hedgehog (2006)]]''=== | ===''[[Sonic the Hedgehog (2006)]]''=== | ||
| + | {| | ||
| + | |-style="text-align:center;" | ||
| + | !Render | ||
| + | | | ||
| + | | | ||
| + | | | ||
| + | | | ||
| + | | | ||
| + | | | ||
| + | | | ||
| + | | | ||
| + | |-style="text-align:center;" | ||
| + | !English name | ||
| + | |[[Super Ring|5 Rings]]{{fileref|Sonic06 360 US manual.pdf|page=13}} | ||
| + | |[[Super Ring|10 Rings]]{{fileref|Sonic06 360 US manual.pdf|page=13}} | ||
| + | |[[Super Ring|20 Rings]]{{fileref|Sonic06 360 US manual.pdf|page=13}} | ||
| + | |[[Shield]]{{fileref|Sonic06 360 US manual.pdf|page=13}}{{ref|[[Sonic the Hedgehog (2006 game)/Hidden content|Unused]]|group=y}} | ||
| + | |[[High Speed]]{{fileref|Sonic06 360 US manual.pdf|page=13}} | ||
| + | |[[Invincible]]{{fileref|Sonic06 360 US manual.pdf|page=13}} | ||
| + | |1-Up{{{fileref|Sonic06 360 US manual.pdf|page=13}} | ||
| + | |Gauge Up{{fileref|Sonic06 360 US manual.pdf|page=13}} | ||
| + | |-style="text-align:center;" | ||
| + | !Japanese name | ||
| + | |[[Super Ring|5 Ring]] (5リング){{fileref|Sonic06 ps3 jp manual.pdf|page=16}} | ||
| + | |[[Super Ring|10 Ring]] (10リング){{fileref|Sonic06 ps3 jp manual.pdf|page=16}} | ||
| + | |[[Super Ring|20 Ring]] (20リング){{fileref|Sonic06 ps3 jp manual.pdf|page=16}} | ||
| + | |N/A | ||
| + | |[[High Speed]] (ハイスピード){{fileref|Sonic06 ps3 jp manual.pdf|page=16}} | ||
| + | |[[Muteki]] (無敵){{fileref|Sonic06 ps3 jp manual.pdf|page=16}} | ||
| + | |1UP{{fileref|Sonic06 ps3 jp manual.pdf|page=16}} | ||
| + | |Gauge Up (ゲージUP){{fileref|Sonic06 ps3 jp manual.pdf|page=16}} | ||
| + | |} | ||
| + | ====Notes==== | ||
| + | <references group="y"/> | ||
| + | |||
===''[[Sonic Rush Adventure]]''=== | ===''[[Sonic Rush Adventure]]''=== | ||
| + | <!-- NOTE: This game has additional item boxes in multiplayer modes. --> | ||
| + | {| | ||
| + | |-style="text-align:center;" | ||
| + | !Sprite | ||
| + | |[[File:SRushAdventure5Ring.png]] | ||
| + | |[[File:SRushAdventureRandomRing.png]] | ||
| + | |[[File:SRushAdventureShield.png]] | ||
| + | |[[File:SRushAdventureMagneticShield.png]] | ||
| + | |[[File:SRushAdventureHighSpeed.png]] | ||
| + | |[[File:SRushAdventureInvincible.png]] | ||
| + | |[[File:SRushAdventure1UP.png]] | ||
| + | |[[File:SRushAdventureTensionBoost.png]] | ||
| + | |[[File:SRushAdventureMaxTensionBoost.png]] | ||
| + | | | ||
| + | | | ||
| + | | | ||
| + | | | ||
| + | | | ||
| + | | | ||
| + | |-style="text-align:center;" | ||
| + | !English name | ||
| + | |[[Super Ring|5 Ring Bonus]]{{fileref|SonicRushAdventure DS US manual.pdf|page=24}} | ||
| + | |[[Super Ring|Random Ring Bonus]]{{fileref|SonicRushAdventure DS US manual.pdf|page=24}} | ||
| + | |[[Barrier]]{{fileref|SonicRushAdventure DS US manual.pdf|page=24}} | ||
| + | |[[Magnetic Barrier]]{{fileref|SonicRushAdventure DS US manual.pdf|page=24}} | ||
| + | |[[High Speed]]{{fileref|SonicRushAdventure DS US manual.pdf|page=24}} | ||
| + | |[[Invincible]]{{fileref|SonicRushAdventure DS US manual.pdf|page=24}} | ||
| + | |1UP{{fileref|SonicRushAdventure DS US manual.pdf|page=24}} | ||
| + | |Tension Bonus{{fileref|SonicRushAdventure DS US manual.pdf|page=24}} | ||
| + | |Maximum Tension Bonus{{fileref|SonicRushAdventure DS US manual.pdf|page=24}} | ||
| + | |Repair{{fileref|SonicRushAdventure DS US manual.pdf|page=20}}{{ref|Sea Stages only|group=z}} | ||
| + | |Boost Up{{fileref|SonicRushAdventure DS US manual.pdf|page=20}}{{ref|Sea Stages only|group=z}} | ||
| + | |Score Bonus{{fileref|SonicRushAdventure DS US manual.pdf|page=20}}{{ref|Sea Stages only|group=z}} | ||
| + | |Slow{{fileref|SonicRushAdventure DS US manual.pdf|page=34}}{{ref|Battle Mode only|group=z}} | ||
| + | |Confusion{{fileref|SonicRushAdventure DS US manual.pdf|page=34}}{{ref|Battle Mode only|group=z}} | ||
| + | |Attract{{fileref|SonicRushAdventure DS US manual.pdf|page=34}}{{ref|Battle Mode only|group=z}} | ||
| + | |-style="text-align:center;" | ||
| + | !Japanese name | ||
| + | | | ||
| + | | | ||
| + | | | ||
| + | | | ||
| + | | | ||
| + | | | ||
| + | | | ||
| + | | | ||
| + | | | ||
| + | | | ||
| + | | | ||
| + | | | ||
| + | | | ||
| + | | | ||
| + | | | ||
| + | |} | ||
| + | ====Notes==== | ||
| + | <references group="z" /> | ||
| + | |||
===''[[Sonic Riders: Zero Gravity]]''=== | ===''[[Sonic Riders: Zero Gravity]]''=== | ||
| + | {| | ||
| + | |-style="text-align:center;" | ||
| + | !Render | ||
| + | | | ||
| + | | | ||
| + | | | ||
| + | | | ||
| + | | | ||
| + | | | ||
| + | | | ||
| + | | | ||
| + | | | ||
| + | | | ||
| + | | | ||
| + | |-style="text-align:center;" | ||
| + | !English name | ||
| + | |[[Super Ring|Rings]]{{fileref|SRZG Wii UK manual.pdf|page=21}} | ||
| + | |GP Boost{{fileref|SRZG Wii UK manual.pdf|page=21}} | ||
| + | |[[Shield]]{{fileref|SRZG Wii UK manual.pdf|page=24}}{{ref|Survival Battle only|group=aa}} | ||
| + | |[[Magnetic Barrier]]{{fileref|SRZG Wii UK manual.pdf|page=21}} | ||
| + | |[[High Speed]]{{fileref|SRZG Wii UK manual.pdf|page=21}} | ||
| + | |Speed Down{{fileref|SRZG Wii UK manual.pdf|page=21}} | ||
| + | |Explosion{{fileref|SRZG Wii UK manual.pdf|page=21}} | ||
| + | |Attack{{fileref|SRZG Wii UK manual.pdf|page=21}} | ||
| + | |Colorball{{fileref|SRZG Wii UK manual.pdf|page=21}} | ||
| + | |Parts Lock{{fileref|SRZG Wii UK manual.pdf|page=21}} | ||
| + | |Missile{{fileref|SRZG Wii UK manual.pdf|page=24}}{{ref|Survival Battle only|group=aa}} | ||
| + | |-style="text-align:center;" | ||
| + | !Japanese name | ||
| + | | | ||
| + | | | ||
| + | | | ||
| + | | | ||
| + | | | ||
| + | | | ||
| + | | | ||
| + | | | ||
| + | | | ||
| + | | | ||
| + | | | ||
| + | |} | ||
| + | ====Notes==== | ||
| + | <references group="aa" /> | ||
| + | |||
| + | ===''[[Sonic Superstars Tennis]]''=== | ||
| + | {| | ||
| + | |-style="text-align:center;" | ||
| + | !Render | ||
| + | |[[File:TenRingsSSuperstarsTennis.png|50px]] | ||
| + | |[[File:ShieldSonicSuperstarsTennis.png|50px]] | ||
| + | |[[File:SpeedBoostSSuperstarsTennis.png|50px]] | ||
| + | |[[File:InvincibilitySSuperstarsTennis.png|50px]] | ||
| + | |[[File:ExtraLifeSSuperstarsTennis.png|50px]] | ||
| + | |-style="text-align:center;" | ||
| + | !English name | ||
| + | |[[Super Ring|10 Rings]] | ||
| + | |[[Shield]] | ||
| + | |[[Power Sneakers|Speed Boost]] | ||
| + | |[[Invincibility]] | ||
| + | |Extra Life | ||
| + | |-style="text-align:center;" | ||
| + | !Japanese name | ||
| + | | | ||
| + | | | ||
| + | | | ||
| + | | | ||
| + | | | ||
| + | |} | ||
| + | |||
| + | ===''[[Sonic Unleashed|Sonic Unleashed (PS2/Wii)]]''=== | ||
| + | {| | ||
| + | |-style="text-align:center;" | ||
| + | !Render | ||
| + | |[[File:ItemBoxUnleashed.png|x60px]] | ||
| + | |[[File:SecretMissionBoxUnleashed.png|x60px]] | ||
| + | |[[File:RedOrbsBoxUnleashed.png|x60px]] | ||
| + | |[[File:BlueOrbsBoxUnleashed.png|x60px]] | ||
| + | |[[File:OneUpBoxUnleashed.png|x60px]] | ||
| + | |-style="text-align:center;" | ||
| + | !English name | ||
| + | |[[Secret Item]]{{fileref|SonicUnleashed PS2 US manual.pdf|page=10}} | ||
| + | |[[Secret Mission]]{{fileref|SonicUnleashed PS2 US manual.pdf|page=17}} | ||
| + | |[[Red Orbs]]{{fileref|SonicUnleashed PS2 US manual.pdf|page=13}} | ||
| + | |[[Blue Orbs]]{{fileref|SonicUnleashed PS2 US manual.pdf|page=13}} | ||
| + | |1-Up Item{{fileref|SonicUnleashed PS2 US manual.pdf|page=17}} | ||
| + | |-style="text-align:center;" | ||
| + | !Japanese name | ||
| + | | | ||
| + | | | ||
| + | | | ||
| + | | | ||
| + | | | ||
| + | |} | ||
| + | |||
===''[[Sonic the Hedgehog 4 Episode I]]''=== | ===''[[Sonic the Hedgehog 4 Episode I]]''=== | ||
| + | {| | ||
| + | |-style="text-align:center;" | ||
| + | !Render | ||
| + | |[[File:SplashHillMonitor.png|80px]] | ||
| + | |[[File:Sonic4Episode1 Render Shield.png|80px]] | ||
| + | |[[File:Sonic4Episode1 Render PowerSneakers.png|80px]] | ||
| + | |[[File:Sonic4Episode1 Render Invincible.png|80px]] | ||
| + | |[[File:Sonic4Episode1 Render 1UP.png|80px]] | ||
| + | |-style="text-align:center;" | ||
| + | !English name | ||
| + | |[[Super Ring]]{{fileref|Sonic4Episode1 PC HowToPlay Items1.png}} | ||
| + | |[[Shield]]{{fileref|Sonic4Episode1 PC HowToPlay Items2.png}} | ||
| + | |[[Power Sneakers]]{{fileref|Sonic4Episode1 PC HowToPlay Items1.png}} | ||
| + | |[[Invincible]]{{fileref|Sonic4Episode1 PC HowToPlay Items2.png}} | ||
| + | |One-Up{{fileref|Sonic4Episode1 PC HowToPlay Items2.png}} | ||
| + | |-style="text-align:center;" | ||
| + | !Japanese name | ||
| + | |[[Super Ring|Big 10 Ring]] (ビッグ10リング){{fileref|Sonic4Episode1 PC HowToPlayJP Items1.png}} | ||
| + | |[[Barrier]] (バリア){{fileref|Sonic4Episode1 PC HowToPlayJP Items2.png}} | ||
| + | |[[High Speed]] (ハイスピード){{fileref|Sonic4Episode1 PC HowToPlayJP Items1.png}} | ||
| + | |[[Muteki]] (無敵){{fileref|Sonic4Episode1 PC HowToPlayJP Items2.png}} | ||
| + | |1UP{{fileref|Sonic4Episode1 PC HowToPlayJP Items2.png}} | ||
| + | |} | ||
| + | |||
===''[[Sonic the Hedgehog 4 Episode II]]''=== | ===''[[Sonic the Hedgehog 4 Episode II]]''=== | ||
| + | {| | ||
| + | |-style="text-align:center;" | ||
| + | !Render | ||
| + | |[[File:Sonic4Episode2 Render SuperRing.png|80px]] | ||
| + | |[[File:Sonic4Episode2 Render Shield.png|80px]] | ||
| + | |[[File:Sonic4Episode2 Render PowerSneakers.png|80px]] | ||
| + | |[[File:Sonic4Episode2 Render Invincible.png|80px]] | ||
| + | |[[File:Sonic4Episode2 Render 1UP.png|80px]] | ||
| + | |[[File:Sonic4Episode2 Render SpecialCombination.png|80px]] | ||
| + | |-style="text-align:center;" | ||
| + | !English name | ||
| + | |[[Super Ring]]{{fileref|Sonic4Episode2 PC HowToPlay Items1.png}} | ||
| + | |[[Shield]]{{fileref|Sonic4Episode2 PC HowToPlay Items2.png}} | ||
| + | |[[Power Sneakers]]{{fileref|Sonic4Episode2 PC HowToPlay Items1.png}} | ||
| + | |[[Invincible]]{{fileref|Sonic4Episode2 PC HowToPlay Items2.png}} | ||
| + | |One-Up{{fileref|Sonic4Episode2 PC HowToPlay Items2.png}} | ||
| + | |[[Special Combination]]{{fileref|Sonic4Episode2 PC HowToPlay Items3.png}} | ||
| + | |-style="text-align:center;" | ||
| + | !Japanese name | ||
| + | |[[Super Ring|Big 10 Ring]] (ビッグ10リング){{fileref|Sonic4Episode2 PC HowToPlayJP Items1.png}} | ||
| + | |[[Barrier]] (バリア){{fileref|Sonic4Episode2 PC HowToPlayJP Items2.png}} | ||
| + | |[[High Speed]] (ハイスピード){{fileref|Sonic4Episode2 PC HowToPlayJP Items1.png}} | ||
| + | |[[Muteki]] (ムテキ){{fileref|Sonic4Episode2 PC HowToPlayJP Items2.png}} | ||
| + | |1UP{{fileref|Sonic4Episode2 PC HowToPlayJP Items2.png}} | ||
| + | |[[Special Combination]] (スペシャルコンビネーション){{fileref|Sonic4Episode2 PC HowToPlayJP Items3.png}} | ||
| + | |} | ||
| + | |||
===''[[Sonic Free Riders]]''=== | ===''[[Sonic Free Riders]]''=== | ||
===''[[Sonic Colours (Nintendo DS)]]''=== | ===''[[Sonic Colours (Nintendo DS)]]''=== | ||
| − | |||
| − | |||
| − | |||
{| | {| | ||
|-style="text-align:center;" | |-style="text-align:center;" | ||
| − | ! | + | !Sprite |
| + | |[[File:FiveBonusRingSColors.png]] | ||
| + | |[[File:TenRingBonusColors.png]] | ||
| + | |[[File:RandomRingBonusSColors.png]] | ||
| + | |[[File:BarrierSColors.png]] | ||
| + | |[[File:MagnetBarrierSColors.png]] | ||
| + | |[[File:PowerSneakersSColors.png]] | ||
| + | |[[File:InvincibleSColorsSprite.png]] | ||
| + | |[[File:OneUpSColors.png]] | ||
| + | | | ||
| + | | | ||
| + | | | ||
| + | | | ||
| + | | | ||
| + | | | ||
| + | |-style="text-align:center;" | ||
| + | !English name | ||
| + | |[[Super Ring|5 Ring Bonus]]{{fileref|Colours DS EU Manual.pdf|page=14}} | ||
| + | |[[Super Ring|10 Ring Bonus]]{{fileref|Colours DS EU Manual.pdf|page=14}} | ||
| + | |[[Super Ring|Random Ring Bonus]]{{fileref|Colours DS EU Manual.pdf|page=14}} | ||
| + | |[[Shield|Barrier]] | ||
| + | |[[Magnetic Shield|Magnetic Barrier]] | ||
| + | |[[Power Sneakers]] | ||
| + | |[[Invincible]] | ||
| + | |1UP{{fileref|Colours DS EU Manual.pdf|page=14}} | ||
| + | |Steal Boost{{fileref|Colours DS EU Manual.pdf|page=23}}{{ref|Versus mode only|group=ae}} | ||
| + | |Steal [[Wisp]]{{fileref|Colours DS EU Manual.pdf|page=23}}{{ref|Versus mode only|group=ae}} | ||
| + | |Reaper{{fileref|Colours DS EU Manual.pdf|page=23}}{{ref|Versus mode only|group=ae}} | ||
| + | |Spring{{fileref|Colours DS EU Manual.pdf|page=23}}{{ref|Versus mode only|group=ae}} | ||
| + | |Exploding Balloon{{fileref|Colours DS EU Manual.pdf|page=23}}{{ref|Versus mode only|group=ae}} | ||
| + | |Mine{{fileref|Colours DS EU Manual.pdf|page=23}}{{ref|Versus mode only|group=ae}} | ||
| + | |-style="text-align:center;" | ||
| + | !Japanese name | ||
| + | | | ||
| + | | | ||
| + | | | ||
| + | | | ||
| + | | | ||
| + | | | ||
| | | | ||
| | | | ||
| Line 515: | Line 1,148: | ||
| | | | ||
| | | | ||
| + | |} | ||
| + | ====Notes==== | ||
| + | <references group="ae" /> | ||
| + | |||
| + | ===''[[Sonic the Hedgehog CD (2011)]]''=== | ||
| + | ===''[[Sonic Generations]]''=== | ||
| + | In the console/PC versions of ''Sonic Generations'', Item Boxes are found only in Classic Sonic's Acts. Some of these only appear in specific Challenge Acts. | ||
| + | {| | ||
| + | |-style="text-align:center;" | ||
| + | !Render | ||
| + | |[[File:SonicGenerations Render SuperRing.png|80px]] | ||
| + | |[[File:SonicGenerations Render ThunderShield.png|80px]] | ||
| + | |[[File:SonicGenerations Render FlameShield.png|80px]] | ||
| + | |[[File:SonicGenerations Render AquaShield.png|80px]] | ||
| + | |[[File:SonicGenerations Render PowerSneakers.png|80px]] | ||
| + | |[[File:SonicGenerations Render Invincibility.png|80px]] | ||
| + | |[[File:SonicGenerations Render 1UP.png|80px]] | ||
| + | |[[File:SonicGenerations Render Skateboard.png|80px]] | ||
|-style="text-align:center;" | |-style="text-align:center;" | ||
!English name | !English name | ||
| − | |Super Ring{{fileref|SonicGenerations 360 UK manual.pdf|page=12}} | + | |[[Super Ring]]{{fileref|SonicGenerations 360 UK manual.pdf|page=12}} |
|[[Thunder Shield]]{{ref|Challenge Acts only|group=ag}} | |[[Thunder Shield]]{{ref|Challenge Acts only|group=ag}} | ||
|[[Flame Shield]]{{ref|Challenge Acts only|group=ag}} | |[[Flame Shield]]{{ref|Challenge Acts only|group=ag}} | ||
| Line 524: | Line 1,175: | ||
|[[Invincible]]{{fileref|SonicGenerations 360 UK manual.pdf|page=12}} | |[[Invincible]]{{fileref|SonicGenerations 360 UK manual.pdf|page=12}} | ||
|1-Up{{fileref|SonicGenerations 360 UK manual.pdf|page=12}} | |1-Up{{fileref|SonicGenerations 360 UK manual.pdf|page=12}} | ||
| − | |[[Skateboard]]{{fileref|SonicGenerations 360 UK manual.pdf|page=12}} | + | |[[Skateboard]]{{fileref|SonicGenerations 360 UK manual.pdf|page=12}}{{ref|[[City Escape (Sonic Generations)|City Escape]] Act 1 only|group=ag}} |
|-style="text-align:center;" | |-style="text-align:center;" | ||
!Japanese name | !Japanese name | ||
| Line 540: | Line 1,191: | ||
===''[[Sonic Generations (Nintendo 3DS)]]''=== | ===''[[Sonic Generations (Nintendo 3DS)]]''=== | ||
| − | In the [[Nintendo 3DS]] version of ''Sonic Generations'', monitors | + | In the [[Nintendo 3DS]] version of ''Sonic Generations'', monitors can be found in both Classic and Modern Sonic's Acts. When opening a monitor in this game, an icon of its contents will be displayed briefly underneath the HUD on the top-left corner. |
{| | {| | ||
|-style="text-align:center;" | |-style="text-align:center;" | ||
!Render | !Render | ||
| − | | | + | |[[File:SonicGenerations 3DS Render SuperRing.png]] |
| − | | | + | |[[File:SonicGenerations 3DS Render Shield.png]] |
| − | | | + | |[[File:SonicGenerations 3DS Render MagneticShield.png|44px]] |
| − | | | + | |[[File:SonicGenerations 3DS Render Invincible.png]] |
| + | |[[File:SonicGenerations 3DS Render 1UP.png]] | ||
| + | |[[File:SonicGenerations 3DS Render TimeItem.png]] | ||
|-style="text-align:center;" | |-style="text-align:center;" | ||
!English name | !English name | ||
| − | |Super Ring | + | |[[Super Ring]]s{{fileref|SonicGenerations 3DS UK manual.pdf|page=10}} |
| − | |[[Shield]] | + | |[[Shield]]{{fileref|SonicGenerations 3DS UK manual.pdf|page=10}} |
| − | |[[Invincible]] | + | |[[Magnetic Shield]]{{fileref|SonicGenerations 3DS UK manual.pdf|page=10}} |
| − | | | + | |[[Invincible]]{{fileref|SonicGenerations 3DS UK manual.pdf|page=10}} |
| + | |1UP{{fileref|SonicGenerations 3DS UK manual.pdf|page=10}} | ||
| + | |Time Item{{fileref|SonicGenerations 3DS UK manual.pdf|page=10}}{{ref|"Keep the Pace" missions only|group=ah}} | ||
|-style="text-align:center;" | |-style="text-align:center;" | ||
!Japanese name | !Japanese name | ||
| + | | | ||
| + | | | ||
| | | | ||
| | | | ||
| Line 561: | Line 1,218: | ||
| | | | ||
|} | |} | ||
| + | ====Notes==== | ||
| + | <references group="ah" /> | ||
===''[[Sonic Jump (2012)]]''=== | ===''[[Sonic Jump (2012)]]''=== | ||
| Line 586: | Line 1,245: | ||
|-style="text-align:center;" | |-style="text-align:center;" | ||
!English name | !English name | ||
| − | |Super Ring{{fileref|SM PC DIGITAL MANUAL UK V10 LR.pdf|page=17}} | + | |[[Super Ring]]{{fileref|SM PC DIGITAL MANUAL UK V10 LR.pdf|page=17}} |
|[[Hyper Ring]]{{fileref|SM PC DIGITAL MANUAL UK V10 LR.pdf|page=17}} | |[[Hyper Ring]]{{fileref|SM PC DIGITAL MANUAL UK V10 LR.pdf|page=17}} | ||
|[[Blue Shield]]{{fileref|SM PC DIGITAL MANUAL UK V10 LR.pdf|page=17}} | |[[Blue Shield]]{{fileref|SM PC DIGITAL MANUAL UK V10 LR.pdf|page=17}} | ||
| Line 595: | Line 1,254: | ||
|[[Invincible]]{{fileref|SM PC DIGITAL MANUAL UK V10 LR.pdf|page=17}} | |[[Invincible]]{{fileref|SM PC DIGITAL MANUAL UK V10 LR.pdf|page=17}} | ||
|1-UP{{fileref|SM PC DIGITAL MANUAL UK V10 LR.pdf|page=17}} | |1-UP{{fileref|SM PC DIGITAL MANUAL UK V10 LR.pdf|page=17}} | ||
| − | |Eggman Mark{{fileref|SM PC DIGITAL MANUAL UK V10 LR.pdf|page=17}} | + | |[[Eggman Mark]]{{fileref|SM PC DIGITAL MANUAL UK V10 LR.pdf|page=17}} |
| − | |Player Swap{{fileref|SM PC DIGITAL MANUAL UK V10 LR.pdf|page=21}}{{ref|Competition and Encore Mode only|group=am}} | + | |[[Player Swap]]{{fileref|SM PC DIGITAL MANUAL UK V10 LR.pdf|page=21}}{{ref|Competition and Encore Mode only|group=am}} |
|Random{{fileref|SM PC DIGITAL MANUAL UK V10 LR.pdf|page=21}}{{ref|Competition and Encore Mode only|group=am}} | |Random{{fileref|SM PC DIGITAL MANUAL UK V10 LR.pdf|page=21}}{{ref|Competition and Encore Mode only|group=am}} | ||
|"S"{{ref|[[Edit mode]] only|group=am}} | |"S"{{ref|[[Edit mode]] only|group=am}} | ||
|-style="text-align:center;" | |-style="text-align:center;" | ||
!Japanese name | !Japanese name | ||
| − | |Big 10 Ring (ビッグ10リング){{ | + | |[[Super Ring|Big 10 Ring]] (ビッグ10リング){{fileref|SonicMania consoles JP manual.pdf|page=18}} |
| − | |Hyper Ring (ハイパーリング){{ | + | |[[Hyper Ring]] (ハイパーリング){{fileref|SonicMania consoles JP manual.pdf|page=18}} |
| − | |[[Barrier]] (バリア){{ | + | |[[Barrier]] (バリア){{fileref|SonicMania consoles JP manual.pdf|page=18}} |
| − | |[[Thunder Barrier]] (サンダーバリア){{ | + | |[[Thunder Barrier]] (サンダーバリア){{fileref|SonicMania consoles JP manual.pdf|page=18}} |
| − | |[[Flame Barrier]] (フレイムバリア){{ | + | |[[Flame Barrier]] (フレイムバリア){{fileref|SonicMania consoles JP manual.pdf|page=18}} |
| − | |[[Aqua Barrier]] (アクアバリア){{ | + | |[[Aqua Barrier]] (アクアバリア){{fileref|SonicMania consoles JP manual.pdf|page=18}} |
| − | |[[High Speed]] (ハイスピード){{ | + | |[[High Speed]] (ハイスピード){{fileref|SonicMania consoles JP manual.pdf|page=18}} |
| − | |[[Muteki]] (無敵){{ | + | |[[Muteki]] (無敵){{fileref|SonicMania consoles JP manual.pdf|page=18}} |
| − | |1UP{{ | + | |1UP{{fileref|SonicMania consoles JP manual.pdf|page=18}} |
| − | |Eggman Trap (エッグマントラップ){{ | + | |[[Eggman Trap]] (エッグマントラップ){{fileref|SonicMania consoles JP manual.pdf|page=18}} |
| − | | | + | |[[Teleporter]] (テレポーター){{fileref|SonicMania consoles JP manual.pdf|page=22}} |
| − | | | + | |Random (ランダム){{fileref|SonicMania consoles JP manual.pdf|page=22}} |
|N/A | |N/A | ||
|} | |} | ||
| Line 619: | Line 1,278: | ||
===''[[Sonic Forces]]''=== | ===''[[Sonic Forces]]''=== | ||
| + | Like in the console/PC versions of ''Sonic Generations'', '''Item Boxes'''{{fileref|SF STEAM MANUAL EN LRv5.pdf|page=17}} in ''Sonic Forces'' can only be found in Classic Sonic's stages. | ||
| + | {| | ||
| + | |-style="text-align:center;" | ||
| + | !Render | ||
| + | | | ||
| + | | | ||
| + | | | ||
| + | | | ||
| + | |-style="text-align:center;" | ||
| + | !English name | ||
| + | |[[Super Ring|Rings]]{{fileref|SF STEAM MANUAL EN LRv5.pdf|page=17}} | ||
| + | |"[[Shield]]" | ||
| + | |[[Power Sneakers]]{{fileref|SF STEAM MANUAL EN LRv5.pdf|page=17}} | ||
| + | |[[Invincibility]]{{fileref|SF STEAM MANUAL EN LRv5.pdf|page=17}} | ||
| + | |-style="text-align:center;" | ||
| + | !Japanese name | ||
| + | |[[Super Ring|Ring]] (リング){{fileref|SF PS4-Switch-XB1 JP digital manual.pdf|page=26}} | ||
| + | | | ||
| + | |[[High Speed]] (ハイスピード){{fileref|SF PS4-Switch-XB1 JP digital manual.pdf|page=26}} | ||
| + | |[[Muteki]] (無敵){{fileref|SF PS4-Switch-XB1 JP digital manual.pdf|page=26}} | ||
| + | |} | ||
| + | |||
| + | ===''[[Team Sonic Racing]]''=== | ||
| + | ''Item Boxes'''{{fileref|TeamSonicRacing Steam manual.pdf|page=12}} (アイテムボックス{{fileref|TSR Switch-PS4 JP digital manual.pdf|page=16}}) in ''Team Sonic Racing'' typically placed in strategic locations across each track and can be broken by driving into them, giving drivers random [[Wisp]]s. Once obtained, they can be used or transferred to teammates. Each track also has a hidden Item Box that contains an [[Invincibility]] - these are coloured blue to distinguish them from regular Item Boxes. | ||
| + | {| | ||
| + | |-style="text-align:center;" | ||
| + | !Icon | ||
| + | | | ||
| + | | | ||
| + | | | ||
| + | | | ||
| + | | | ||
| + | | | ||
| + | | | ||
| + | | | ||
| + | | | ||
| + | | | ||
| + | | | ||
| + | | | ||
| + | | | ||
| + | | | ||
| + | | | ||
| + | |-style="text-align:center;" | ||
| + | !English name | ||
| + | |[[Orange Rocket]]{{fileref|TeamSonicRacing Steam manual.pdf|page=12}} | ||
| + | |[[Crimson Eagle]]{{fileref|TeamSonicRacing Steam manual.pdf|page=12}} | ||
| + | |[[White Boost]]{{fileref|TeamSonicRacing Steam manual.pdf|page=12}} | ||
| + | |[[Yellow Drill]]{{fileref|TeamSonicRacing Steam manual.pdf|page=12}} | ||
| + | |[[Pink Spikes]]{{fileref|TeamSonicRacing Steam manual.pdf|page=12}}{{ref|[[Power Type]] characters only|group=an}} | ||
| + | |[[Ivory Lightning]]{{fileref|TeamSonicRacing Steam manual.pdf|page=12}} | ||
| + | |[[Gray Quake]]{{fileref|TeamSonicRacing Steam manual.pdf|page=12}} | ||
| + | |[[Cyan Laser]]{{fileref|TeamSonicRacing Steam manual.pdf|page=12}} | ||
| + | |[[Red Burst]]{{fileref|TeamSonicRacing Steam manual.pdf|page=13}}{{ref|[[Speed Type]] characters only|group=an}} | ||
| + | |[[Violet Void]]{{fileref|TeamSonicRacing Steam manual.pdf|page=13}}{{ref|[[Power Type]] characters only|group=an}} | ||
| + | |[[Black Bomb]]{{fileref|TeamSonicRacing Steam manual.pdf|page=13}} | ||
| + | |[[Blue Cube]]{{fileref|TeamSonicRacing Steam manual.pdf|page=13}} | ||
| + | |[[Jade Ghost]]{{fileref|TeamSonicRacing Steam manual.pdf|page=13}} | ||
| + | |[[Magenta Rhythm]]{{fileref|TeamSonicRacing Steam manual.pdf|page=13}}{{ref|Technique Type characters only|group=an}} | ||
| + | |[[Invincibility]]{{fileref|TeamSonicRacing Steam manual.pdf|page=13}} | ||
| + | |-style="text-align:center;" | ||
| + | !Japanese name | ||
| + | |[[Orange Rocket]] (オレンジ・ロケット){{fileref|TeamSonicRacing Steam manual.pdf|page=21}} | ||
| + | |[[Crimson Eagle]] (クリムゾン・イーグル){{fileref|TeamSonicRacing Steam manual.pdf|page=21}} | ||
| + | |[[White Boost]] (ホワイト・ブースト){{fileref|TeamSonicRacing Steam manual.pdf|page=21}} | ||
| + | |[[Yellow Drill]] (イエロー・ドリル){{fileref|TeamSonicRacing Steam manual.pdf|page=21}} | ||
| + | |[[Pink Spikes]] (ピンク・スパイク){{fileref|TeamSonicRacing Steam manual.pdf|page=21}} | ||
| + | |[[Ivory Lightning]] (アイボリー・ライトニング){{fileref|TeamSonicRacing Steam manual.pdf|page=21}} | ||
| + | |[[Gray Quake]] (グレイ・クエイク){{fileref|TeamSonicRacing Steam manual.pdf|page=21}} | ||
| + | |[[Cyan Laser]] (シアン・レーザー){{fileref|TeamSonicRacing Steam manual.pdf|page=21}} | ||
| + | |[[Red Burst]] (レッド・バースト){{fileref|TeamSonicRacing Steam manual.pdf|page=22}} | ||
| + | |[[Violet Void]] (バイオレット・ボイド){{fileref|TeamSonicRacing Steam manual.pdf|page=22}} | ||
| + | |[[Black Bomb]] (ブラック・ボム){{fileref|TeamSonicRacing Steam manual.pdf|page=22}} | ||
| + | |[[Blue Cube]] (ブルー・キューブ){{fileref|TeamSonicRacing Steam manual.pdf|page=22}} | ||
| + | |[[Jade Ghost]] (ジェイド・ゴースト){{fileref|TeamSonicRacing Steam manual.pdf|page=22}} | ||
| + | |[[Magenta Rhythm]] (マゼンタ・リズム){{fileref|TeamSonicRacing Steam manual.pdf|page=22}} | ||
| + | |[[Muteki|Muteki Capsule]] (無敵カプセル){{fileref|TeamSonicRacing Steam manual.pdf|page=16}} | ||
| + | |} | ||
| + | ====Notes==== | ||
| + | <references group="an" /> | ||
| + | |||
| + | ===''[[Sonic Superstars]]''=== | ||
| + | As a Classic-themed game, ''Sonic Superstars'' once again uses the monitor design for its '''Item Boxes'''{{fileref|Sonic Superstars Web Manual EN.pdf|page=9}}. | ||
| + | {| | ||
| + | |-style="text-align:center;" | ||
| + | !Render | ||
| + | |[[File:SonicSuperstars Render ItemBox SuperRing.png|80px]] | ||
| + | |[[File:SonicSuperstars Render ItemBox Shield.png|80px]] | ||
| + | |[[File:SonicSuperstars Render ItemBox PowerSneakers.png|80px]] | ||
| + | |[[File:SonicSuperstars Render ItemBox Invincibility.png|80px]] | ||
| + | |[[File:SonicSuperstars Render ItemBox Magnet.png|80px]] | ||
| + | |[[File:SonicSuperstars Render ItemBox Random.png|80px]] | ||
| + | |[[File:SonicSuperstars Render ItemBox Bullet.png|80px]] | ||
| + | |-style="text-align:center;" | ||
| + | !English name | ||
| + | |"[[Super Ring]]" | ||
| + | |"[[Shield]]" | ||
| + | |"[[Power Sneakers]]" | ||
| + | |"[[Invincibility]]" | ||
| + | |"Magnet" | ||
| + | |"?"{{ref|Battle mode only|group=ao}} | ||
| + | |"Bullet"{{ref|Battle mode only|group=ao}} | ||
| + | |-style="text-align:center;" | ||
| + | !Japanese name | ||
| + | | | ||
| + | | | ||
| + | | | ||
| + | | | ||
| + | | | ||
| + | | | ||
| + | | | ||
| + | |} | ||
| + | ====Notes==== | ||
| + | <references group="ao" /> | ||
==References== | ==References== | ||
| − | <references /> | + | <references/> |
{{Items}} | {{Items}} | ||
[[Category:Level objects]] | [[Category:Level objects]] | ||
Latest revision as of 17:38, 5 May 2024

Item Boxes[1] (アイテムボックス[2]), also called Item Capsules[3], and known in Western releases of earlier games as Monitors[4], are staple objects in Sonic the Hedgehog games, and are a means for the player to obtain items. They usually take the form of computer monitors or circular containers which are to be broken in-game, awarding the player their contents shortly afterwards. For the latter design, all regions tend to opt for the term "Item Box"[1], though this phrase has been consistently used in Japan since 1991[2], and newer games that use the monitor design have used the term "Item Box"[5] in place of "monitor".
Traditionally Item Boxes are to be broken with some form of Spin Attack, be it jumping, rolling or moves such as the Spin Dash or Homing Attack, though in some later games, they break simply by walking into them. Item Boxes can usally be hit from all sides, though in the early 2D games, hitting one from below causes it to start falling until it hits solid ground. Once an Item Box is broken, it will remain as such until the player loses a life.
Common Item Boxes include the Super Ring (which awards 10 Rings), Shield, Power Sneakers, Invincibility and extra lives. They have also been used to denote checkpoints, and some cases (with Eggman Marks), even obstacles. In the 2006 release of Sonic the Hedgehog, Tails can throw Item Boxes as an attack.
Almost all 2D Sonic platform games contain Item Boxes, though not all 3D games include them, as the gameplay styles seen in Sonic Unleashed (PS3/X-Box version) and later Sonic Colours negated the need for them. Though items are contained in computer monitors in some later games like Sonic Generations, Sonic Mania and Sonic Forces, they are referred to as "Item Boxes" in all regions.
Contents
- 1 Description in the Sonic the Hedgehog Bible
- 2 List of Item Boxes
- 2.1 Sonic the Hedgehog (16-bit)
- 2.2 Sonic the Hedgehog (8-bit)
- 2.3 Sonic the Hedgehog 2 (8-bit)
- 2.4 Sonic the Hedgehog 2 (16-bit)
- 2.5 Sonic the Hedgehog CD
- 2.6 Sonic Chaos
- 2.7 Sonic Spinball (8-bit)
- 2.8 Sonic the Hedgehog 3/Sonic & Knuckles
- 2.9 Sonic the Hedgehog Triple Trouble
- 2.10 Sonic Drift
- 2.11 Sonic Drift 2
- 2.12 Chaotix
- 2.13 Sonic 3D: Flickies' Island
- 2.14 Sonic Blast
- 2.15 Sonic Adventure
- 2.16 Sonic the Hedgehog Pocket Adventure
- 2.17 Sonic Adventure 2
- 2.18 Sonic Advance
- 2.19 Sonic Advance 2
- 2.20 Sonic Advance 3
- 2.21 Sonic Heroes
- 2.22 Shadow the Hedgehog
- 2.23 Sonic Rush
- 2.24 Sonic Riders
- 2.25 Sonic the Hedgehog (2006)
- 2.26 Sonic Rush Adventure
- 2.27 Sonic Riders: Zero Gravity
- 2.28 Sonic Superstars Tennis
- 2.29 Sonic Unleashed (PS2/Wii)
- 2.30 Sonic the Hedgehog 4 Episode I
- 2.31 Sonic the Hedgehog 4 Episode II
- 2.32 Sonic Free Riders
- 2.33 Sonic Colours (Nintendo DS)
- 2.34 Sonic the Hedgehog CD (2011)
- 2.35 Sonic Generations
- 2.36 Sonic Generations (Nintendo 3DS)
- 2.37 Sonic Jump (2012)
- 2.38 Sonic the Hedgehog (2013)
- 2.39 Sonic the Hedgehog 2 (2013)
- 2.40 Sonic Lost World
- 2.41 Sonic Mania
- 2.42 Sonic Forces
- 2.43 Team Sonic Racing
- 2.44 Sonic Superstars
- 3 References
Description in the Sonic the Hedgehog Bible
According to Sega of America's Sonic the Hedgehog Bible, monitors are in fact PCs placed around the planet Mobius by Dr. Ovi Kintobor, in an attempt to locate the "Gray Emerald" (and thus control the Chaos Emeralds)[6]. They are described as part of a bulletin board service, where users could document any Gray Emerald findings, but after the accident that turned Kintobor into Robotnik, the information was wiped and their contents were replaced with "magical objects"[7].
List of Item Boxes
Sonic the Hedgehog (16-bit)
Known in this game as video monitors[4].
| Sprite | |||||||||
|---|---|---|---|---|---|---|---|---|---|
| English name | Super Ring[4] | Shield[4] | Power Sneakers[4] | Invincible[4] | One-Up[4] | "Static"[a 1] | "Robotnik"[a 2] | "S"[a 2] | "Goggles"[a 2] |
| Japanese name | Big 10 Ring (ビッグ10リング)[2] | Barrier (バリア)[2] | High Speed (ハイスピード)[2] | Muteki (無敵)[2] | 1 up[2] | N/A | N/A | N/A | N/A |
Notes
Sonic the Hedgehog (8-bit)
| Sprite | |||||||
|---|---|---|---|---|---|---|---|
| English name | Super Ring[8] | Shield[8] | Power Sneakers[8] | Invincible[8] | One-up[8] | Arrow[9] | Continue[10] |
| Japanese name | Big 10 Ring (ビッグ10リング)[11] | Barrier (バリア)[12] | High Speed (ハイスピード)[11] | Muteki (無敵)[12] | 1 up[11] | Point Marker (ポイントマーカー)[12] | Continue (コンティニュー)[13] |
Sonic the Hedgehog 2 (8-bit)
| Sprite | ||||||||
|---|---|---|---|---|---|---|---|---|
| English name | Super Ring[14] | Power Sneakers[14] | Invincibility[14] | 1-UP[15] | "Continue"[c 1] | "?"[c 2] | "Grey Sneakers"[c 2] | "Arrow"[c 2] |
| Japanese name | Big 10 Ring (ビッグ10リング)[16] | Muteki (無敵)[17] | 1up[17] | N/A | N/A | N/A |
Notes
- ↑ [Exists in Crystal Egg Zone, but is masked by foreground scenery so the image is never seen. Exists in Crystal Egg Zone, but is masked by foreground scenery so the image is never seen.]
- ↑ 2.0 2.1 2.2 Unused
Sonic the Hedgehog 2 (16-bit)
On the Mega Drive, Sonic 2 features monitors which contain "super items"[18]. During normal gameplay, monitors are largely the same as those found in Sonic 1.
| Sprite | |||||||||
|---|---|---|---|---|---|---|---|---|---|
| English name | Super Ring[18] | Shield[18] | Power Sneakers[18] | Invincible[18] | One-Up[18] | Teleporter[19][d 1] | "Robotnik"[d 1] | "?"[d 1] | "Static"[d 2] |
| Japanese name | Big 10 Ring (ビッグ10リング)[20] | Barrier (バリア)[20] | High Speed (ハイスピード)[20] | Muteki (無敵)[20] | 1 up[20] | Teleportation (テレポテーション)[21] | Eggman Mark (エッグマンマーク)[21] | N/A |
Notes
Sonic the Hedgehog CD
| Sprite | ||||||||
|---|---|---|---|---|---|---|---|---|
| English name | Super Ring[22] | Shield[22] | Power Sneakers[22] | Invincible[22] | 1-UP[22] | "S"[e 1] | "Blue ring"[e 1] | "Time"[e 1] |
| Japanese name | Ring 10 (リング10)[23] | Barrier (バリア)[23] | High Speed (ハイスピード)[23] | Muteki (無敵)[23] | 1up[23] | N/A | N/A | N/A |
Notes
Sonic Chaos
| Sprite | ||||||
|---|---|---|---|---|---|---|
| English name | Super Ring[24] | "Power Sneakers" | Invincible[24] | Extra Life[24] | Rocket Shoes[24] | "Time" |
| Japanese name | 10 Ring (10リング)[25] | Speed Shoes (スピードシューズ)[25] | Muteki (無敵)[25] | 1UP[25] | Rocket Shoes (ロケットシューズ)[25] | Time Stop (タイムストップ)[25] |
Sonic Spinball (8-bit)
Sonic the Hedgehog 3/Sonic & Knuckles
The English manuals for Sonic 3 refer to the concept of "Sonic power-ups"[26], but do not explicity name the objects said power-ups come from. Strictly speaking they are not just "monitors" in Sonic 3, but entire computers, as they are (loosely) modelled after the Macintosh Color Classic, a computer released by Apple in early 1993. They even come complete with disk drive and Apple logo.
| Sprite | |||||||||
|---|---|---|---|---|---|---|---|---|---|
| English name | Super Ring[26] | Lightning Shield[27] | Flame Shield[26] | Water Shield[26] | "Power Sneakers" | Invincibility[26] | 1-Up[27] | Robotnik[27] | "S" |
| Japanese name | Big 10 Ring (ビッグ10リング)[28] | Thunder Barrier (サンダーバリア)[28] | Flame Barrier (フレイムバリア)[28] | Aqua Barrier (アクアバリア)[28] | High Speed (ハイスピード)[28] | Muteki (無敵)[28] | 1UP[28] | N/A |
Notes
Sonic the Hedgehog Triple Trouble
| Sprite | ||||||||||||
|---|---|---|---|---|---|---|---|---|---|---|---|---|
| English name | Super Ring[29] | Power Sneakers[29] | Invincibility[29] | 1-UP[29] | Pogo Spring[30] | Rocket Shoes[30] | Propeller Shoes[30] | Jet Board[30] | Marker[31] | Chaos Emerald[29] | Time Bonus[31] | Hyper Heli-Tails[31] |
| Japanese name | 10 Ring (10リング)[32] | High Speed Shoes (ハイスピードシューズ)[33] | Muteki (無敵)[32] | 1UP[32] | Hopping (ホッピング)[34] | Rocket Shoes (ロケットシューズ)[33] | Screw Shoes (スクリューシューズ)[33] | Snowboard (スノーボード)[34] | Marker (マーカー)[32] | Warp Gate (ワープゲート)[32] | Time (タイム)[32] | High Speed Heli-Tail (ハイスピードヘリテイル) [33] |
Sonic Drift
Sonic Drift 2
Chaotix
| Sprite | |||||||||||||
|---|---|---|---|---|---|---|---|---|---|---|---|---|---|
| English name | Super Ring[35] | Shield[35] | Power Sneakers[35] | Invincible[35] | Combine Ring[35] | Swap[35] | Change[35] | Grow[35] | Shrink[35] | Stage Select[36][l 1] | Combi Catcher[37][l 1] | [l 2] | [l 2] |
| Japanese name | Ring 10 (リング10)[38] | Barrier (バリア)[39] | High Speed (ハイスピード)[39] | Muteki (無敵)[39] | Combine Ring (コンバインリング)[38] | Swap (スワップ)[40] | Change (チェンジ)[40] | Big (ビッグ)[39] | Small (スモール)[39] | Slot (スロット)[41] | Combi (コソビ)[41] | N/A | N/A |
Notes
Sonic 3D: Flickies' Island
'Sonic 3D has items which can be found in TVs (as well as other places)[42].
| Sprite | |||||||
|---|---|---|---|---|---|---|---|
| English name | "Rings" | Blue Shield[42] | Gold Shield[42] | Red Shield[42] | "Power Sneakers" | "Invincible" | Extra Life[42] |
| Japanese name | Ring 10 Ko (リング10コ)[43] | Blue Barrier (ブルーバリア)[43] | Gold Barrier (ゴールドバリア)[43] | Red Barrier (レッドバリア)[43] | High Speed (ハイスピード)[43] | Muteki (無敵)[43] | Sonic 1UP (ソニック1UP)[43] |
Sonic Blast
'Sonic Blast features items in TVs[44] just like other games in the series. Note that in this game, the Sonic and Knuckles 1UP items are considered separate items and will only grant an extra life to the corresponding character when broken.
| Sprite | |||||||||
|---|---|---|---|---|---|---|---|---|---|
| English name | "Super Ring" | Shield[44] | Shoe[44] | "Invincibility" | Sonic icon[45] | Knuckles icon[45] | "Robotnik" | "Marker" | "?" |
| Japanese name | 10 Ring (10リング)[46] | Barrier (バリア)[46] | Speed Boots (スピードブーツ)[46] | Muteki (ムテキ)[46] | Sonic 1up (ソニック1up)[46] | Knuckles 1up (ナックルズ1up)[46] | Eggman (エッグマン)[46] | Marker (マーカー)[46] | ???[46] |
Sonic Adventure
'Sonic Adventure radically changed the design of its Item Boxes[1] in order to better suit its 3D world. Rather than resembling computer screens, they are clear tubes with a rotating symbol inside. This makes them visible from more angles, and would be a design shared with future 3D titles.
| Render | 
|

|
|||||||
|---|---|---|---|---|---|---|---|---|---|
| English name | 5 Rings[1] | 10 Rings[1] | Random Rings[1] | Shield[1] | Magnetic Shield[1] | High-Speed Shoes[1] | Invincibility[1] | Extra Life[1] | "Explosion" |
| Japanese name | 5 Ring (5リング)[47] | 10 Ring (10リング)[47] | Random Ring (ランダムリング)[47] | Barrier (バリア)[47] | Jiryoku Barrier (磁力バリア)[47] | High Speed (ハイスピード)[47] | Muteki (無敵)[47] | 1UP[47] | Explosion (エクスプロージョン)[48] |
Sonic the Hedgehog Pocket Adventure
| Sprite | |||||
|---|---|---|---|---|---|
| English name | Super Rings[49] | Shield[49] | Power-Sneaker[49] | Invincible Protect[49] | 1UP[49] |
| Japanese name | Big 10 Ring (ビッグ10リング)[50] | Barrier (バリア)[50] | High Speed (ハイスピード)[50] | Muteki (無敵)[50] | 1UP[50] |
Sonic Adventure 2
| Render | 
|

|

|

|

|

|

|

|

|

|

|
|---|---|---|---|---|---|---|---|---|---|---|---|
| English name | 5 Rings[51] | 10 Rings[51] | 20 Rings[51] | Shield[51] | Magnetic Shield[51] | High-Speed Shoes[51] | Invincibility[51] | Extra Life[51] | Health[51] | Bomb[51] | "Blank" |
| Japanese name | 5 Ring (5リング)[52] | 10 Ring (10リング)[52] | 20 Ring (20リング)[52] | Barrier (バリア)[52] | Jiryoku Barrier (磁力バリア)[52] | High Speed (ハイスピード)[52] | Muteki (無敵)[52] | 1UP[52] | Life (ライフ)[52] | Explosion (エクスプロージョン)[52] | N/A |
Sonic Advance
'Sonic Advance has boxes with items in them[53]. Rather than be contained inside monitors like in the classic games, they are contained in capsules similar to Sonic Adventure's, though they are hexagonal in shape. In a VS Race, the Boxes rotate between items at a steady pace, while in Chao Hunt, monitors containing set items appear throughout the level, disappearing if nobody breaks them after enough time has passed.
| Sprite | |||||||||||||
|---|---|---|---|---|---|---|---|---|---|---|---|---|---|
| English name | 5 Rings[53] | 10 Rings[53] | ? Rings[53] | Barrier[53] | Magnetic Barrier[53] | Speed Boots[53] | Invincible[53] | Extra Try[53] | "Slow"[r 1] | "Confusion"[r 2] | "Attract"[r 1] | "Blind"[r 3] | "Transparent"[r 3] |
| Japanese name | 5 Ring (5リング)[54] | 10 Ring (10リング)[54] | Random Ring (ランダムリング)[[54] | Barrier (バリア)[55] | Jiryoku Barrier (磁力バリア)[55] | High Speed (ハイスピード)[54] | Muteki (無敵)[54] | 1up[55] | Brake (ブレーキ)[56] | Konran (混乱)[56] | Warp (ワープ)[56] | Blind (ブラインド)[56] | Toumei (透明)[56] |
Notes
Sonic Advance 2
'Sonic Advance 2 redesigns the boxes to be rounder in shape to reflect the style in Sonic Adventure more closely. In this game, they can be broken by simply running into them.
| Sprite | |||||||||||||
|---|---|---|---|---|---|---|---|---|---|---|---|---|---|
| English name | 5 Ring Bonus[57] | 10 Ring Bonus[57] | Random Ring Bonus[57] | Shield[57] | Ring Magnet[57] | Maximum Speed[57] | Invincibility[57] | 1-Up[57] | "Slow"[s 1] | "Confusion"[s 1] | "Attract"[s 1] | "Attack"[s 1] | "Mosaic"[s 2] |
| Japanese name | 5 Ring Bonus (5リングボーナス)[58] | 10 Ring Bonus (10リングボーナス)[58] | Random Ring Bonus (ランダムリングボーナス)[58] | Barrier (バリア)[59] | Jiryoku Barrier (磁力バリア)[59] | Max Speed (MAXスピード)[58] | Muteki (無敵)[59] | 1UP[59] |
Notes
Sonic Advance 3
'Sonic Advance 3 retains the same Box[60] design and item contents as the previous game. It should be noted that in Multi-Pak VS play, Box contents rotate between select items at a steady pace, sometimes becoming red and black Boxes with greyed-out upside down contents. Breaking a red and black Box causes a negative effect to happen, such as the opponent(s) getting a boost or the player(s) being on the receiving end of a "power-down" meant to hinder opponents.
| Sprite | ||||||||||||||
|---|---|---|---|---|---|---|---|---|---|---|---|---|---|---|
| English name | 5 Ring Bonus[60] | 10 Ring Bonus[60] | Random Ring Bonus[60] | Shield[60] | Ring Magnet[60] | Maximum Speed[60] | Invincibility[60] | 1-Up[60] | "Slow"[t 1] | "Confusion"[t 1] | "Swap"[t 1] | "Minus Ring"[t 1] | "Transparent"[t 2] | "Mosaic"[t 2] |
| Japanese name | 5 Ring Bonus (5リングボーナス)[61] | 10 Ring Bonus (10リングボーナス)[61] | Random Ring Bonus (ランダムリングボーナス)[61] | Barrier (バリア)[61] | Jiryoku Barrier (磁力バリア)[61] | Max Speed (MAXスピード)[61] | Muteki (無敵)[61] | 1UP[61] | Slow (スロー)[62] | Konran (混乱)[62] | Irekae (入れ替え)[62] | Minus Ring (マイナスリング)[62] | Toumei (透明)[62] | Mosaic (モザイク)[62] |
Notes
Sonic Heroes
| Render | 
|
|||||||||
|---|---|---|---|---|---|---|---|---|---|---|
| English name | 5 Rings[63] | 10 Rings[63] | 20 Rings[63] | Barrier[63] | High Speed[63] | Invincible[63] | 1 UP[63] | Power Core[63] | Team Blast Ring[63] | Fly Change[63] |
| Japanese name |
Shadow the Hedgehog
| Render | |||||||||
|---|---|---|---|---|---|---|---|---|---|
| English name | 5 Rings[64] | 10 Rings[64] | 20 Rings[64] | Barrier[64] | Magnetic Barrier[64] | Heat Barrier[64] | Invincible[64] | 1-Up[64] | Damage Recover[64] |
| Japanese name | Barrier (バリア)[65] | Magnet Barrier (マグネツバリア)[65] | Heat Barrier (ヒートバリア)[65] | Muteki (無敵)[66] | 1UP[65] | Damage Kaifuku (ダメージ回復)[66] |
Sonic Rush
| Sprite | |||||||||||
|---|---|---|---|---|---|---|---|---|---|---|---|
| English name | 5 Ring Bonus[67] | Random Ring Bonus[67] | Barrier[67] | Magnetic Barrier[67] | Invincible[67] | 1 UP[67] | Tension Bonus[67] | Max Tension Bonus[67] | Slow[68][w 1] | Confusion[68][w 1] | Attract[68][w 1] |
| Japanese name | 5 Ring Bonus (5リングボーナス)[69] | Random Ring Bonus (ランダムリングボーナス)[69] | Barrier (バリア)[69] | Jiryoku Barrier (磁力バリア)[69] | Muteki (無敵)[69] | 1UP[69] | Tension Bonus (テンションボーナス)[69] | Max Tension Bonus (MAXテンションボーナス)[69] | Slow (スロー)[70] | [70] | [70] |
Notes
Sonic Riders
| Render | ||||||||
|---|---|---|---|---|---|---|---|---|
| English name | Rings[71] | Air[71] | Magnetic Barrier[71] | High Speed[71] | Speed Down[71] | Invincible Barrier[71] | Explosion[71] | Question Item[71] |
| Japanese name | Ring (リング)[72] | Air (エア)[72] | Jiryoku Barrier (磁力バリア)[73] | High Speed (ハイスピード)[72] | Speed Down (スピードダウン)[73] | Muteki (無敵)[72] | Explosion (エクスプロージョン)[72] | Question (クエスチョン)[73] |
Sonic the Hedgehog (2006)
| Render | ||||||||
|---|---|---|---|---|---|---|---|---|
| English name | 5 Rings[74] | 10 Rings[74] | 20 Rings[74] | Shield[74][y 1] | High Speed[74] | Invincible[74] | 1-Up{[74] | Gauge Up[74] |
| Japanese name | 5 Ring (5リング)[75] | 10 Ring (10リング)[75] | 20 Ring (20リング)[75] | N/A | High Speed (ハイスピード)[75] | Muteki (無敵)[75] | 1UP[75] | Gauge Up (ゲージUP)[75] |
Notes
Sonic Rush Adventure
| Sprite | |||||||||||||||
|---|---|---|---|---|---|---|---|---|---|---|---|---|---|---|---|
| English name | 5 Ring Bonus[76] | Random Ring Bonus[76] | Barrier[76] | Magnetic Barrier[76] | High Speed[76] | Invincible[76] | 1UP[76] | Tension Bonus[76] | Maximum Tension Bonus[76] | Repair[77][z 1] | Boost Up[77][z 1] | Score Bonus[77][z 1] | Slow[78][z 2] | Confusion[78][z 2] | Attract[78][z 2] |
| Japanese name |
Notes
Sonic Riders: Zero Gravity
| Render | |||||||||||
|---|---|---|---|---|---|---|---|---|---|---|---|
| English name | Rings[79] | GP Boost[79] | Shield[80][aa 1] | Magnetic Barrier[79] | High Speed[79] | Speed Down[79] | Explosion[79] | Attack[79] | Colorball[79] | Parts Lock[79] | Missile[80][aa 1] |
| Japanese name |
Notes
Sonic Superstars Tennis
| Render | 
|

|

|

|

|
|---|---|---|---|---|---|
| English name | 10 Rings | Shield | Speed Boost | Invincibility | Extra Life |
| Japanese name |
Sonic Unleashed (PS2/Wii)
| Render | 
|

|

|

|

|
|---|---|---|---|---|---|
| English name | Secret Item[3] | Secret Mission[81] | Red Orbs[82] | Blue Orbs[82] | 1-Up Item[81] |
| Japanese name |
Sonic the Hedgehog 4 Episode I
| Render | 
|

|

|

|

|
|---|---|---|---|---|---|
| English name | Super Ring[83] | Shield[84] | Power Sneakers[83] | Invincible[84] | One-Up[84] |
| Japanese name | Big 10 Ring (ビッグ10リング)[85] | Barrier (バリア)[86] | High Speed (ハイスピード)[85] | Muteki (無敵)[86] | 1UP[86] |
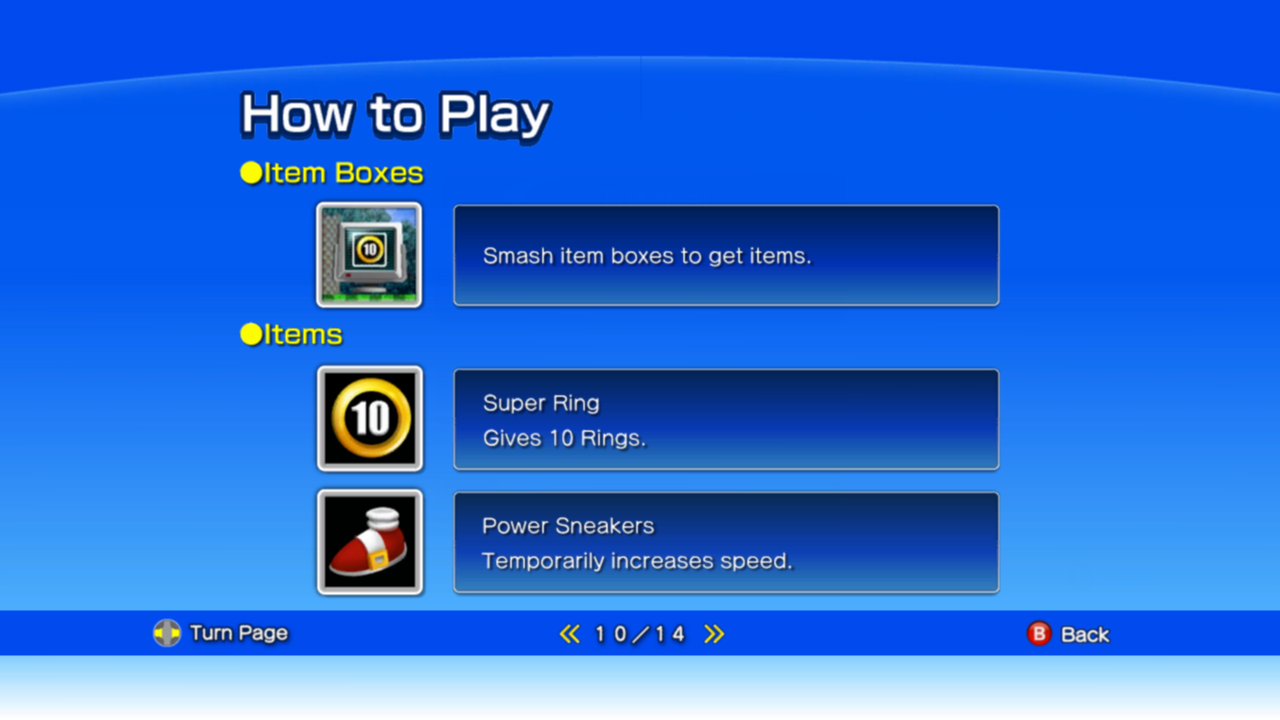
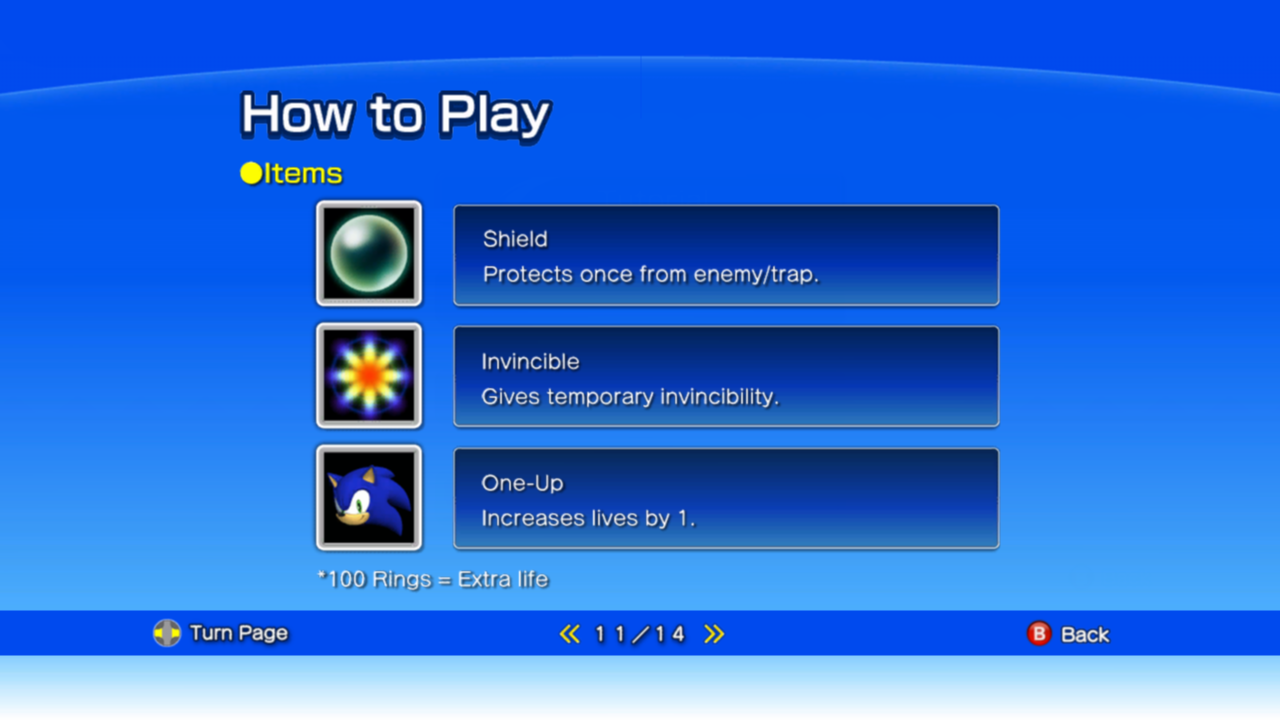
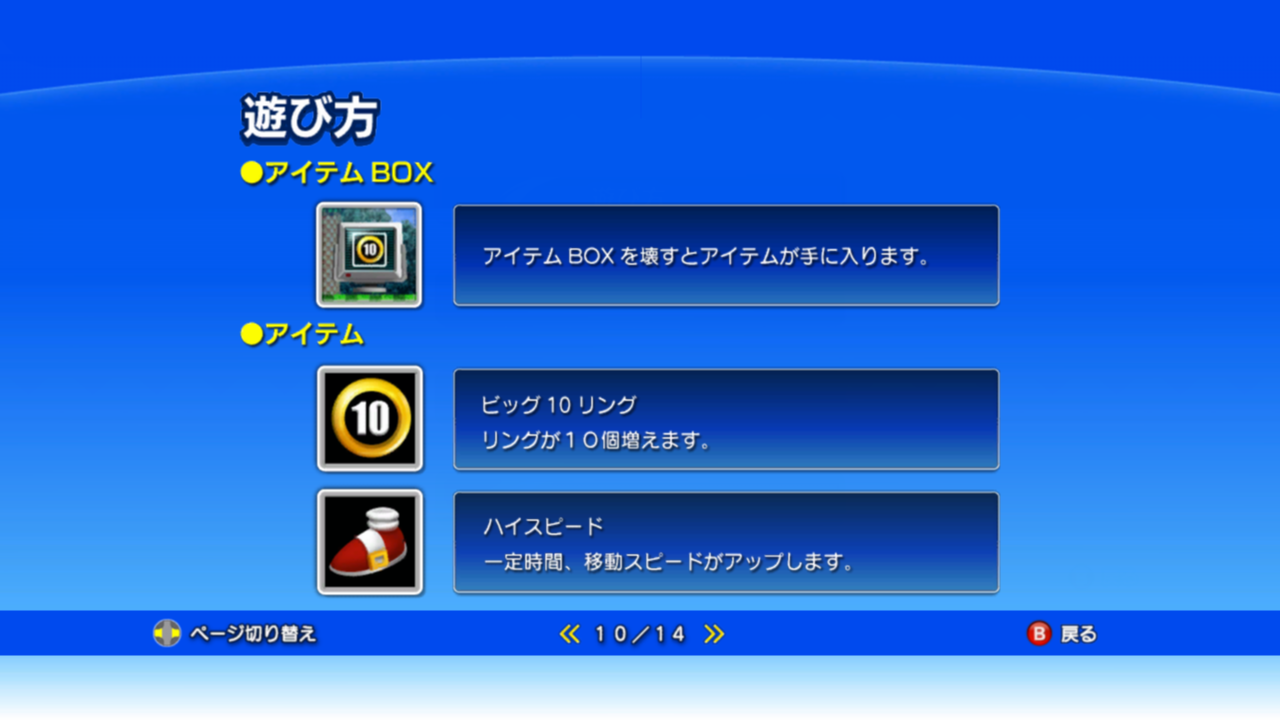
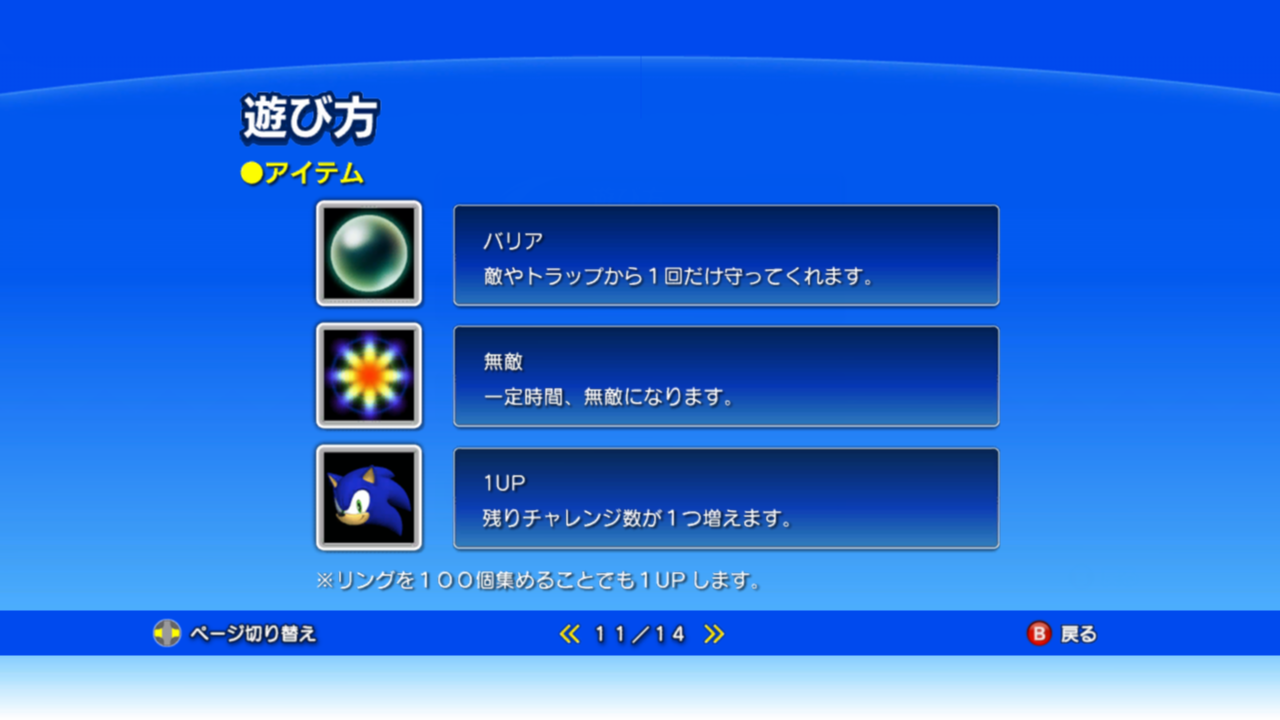
Sonic the Hedgehog 4 Episode II
| Render | 
|

|

|

|

|

|
|---|---|---|---|---|---|---|
| English name | Super Ring[87] | Shield[88] | Power Sneakers[87] | Invincible[88] | One-Up[88] | Special Combination[89] |
| Japanese name | Big 10 Ring (ビッグ10リング)[90] | Barrier (バリア)[91] | High Speed (ハイスピード)[90] | Muteki (ムテキ)[91] | 1UP[91] | Special Combination (スペシャルコンビネーション)[92] |
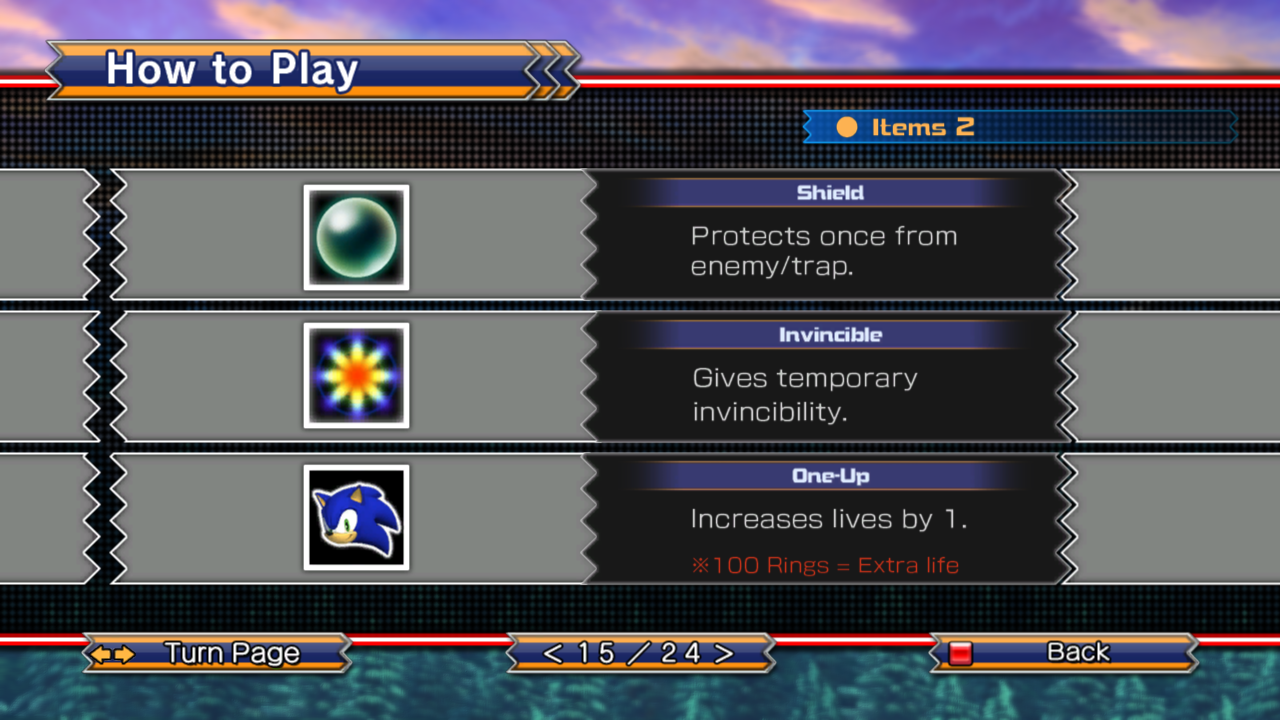
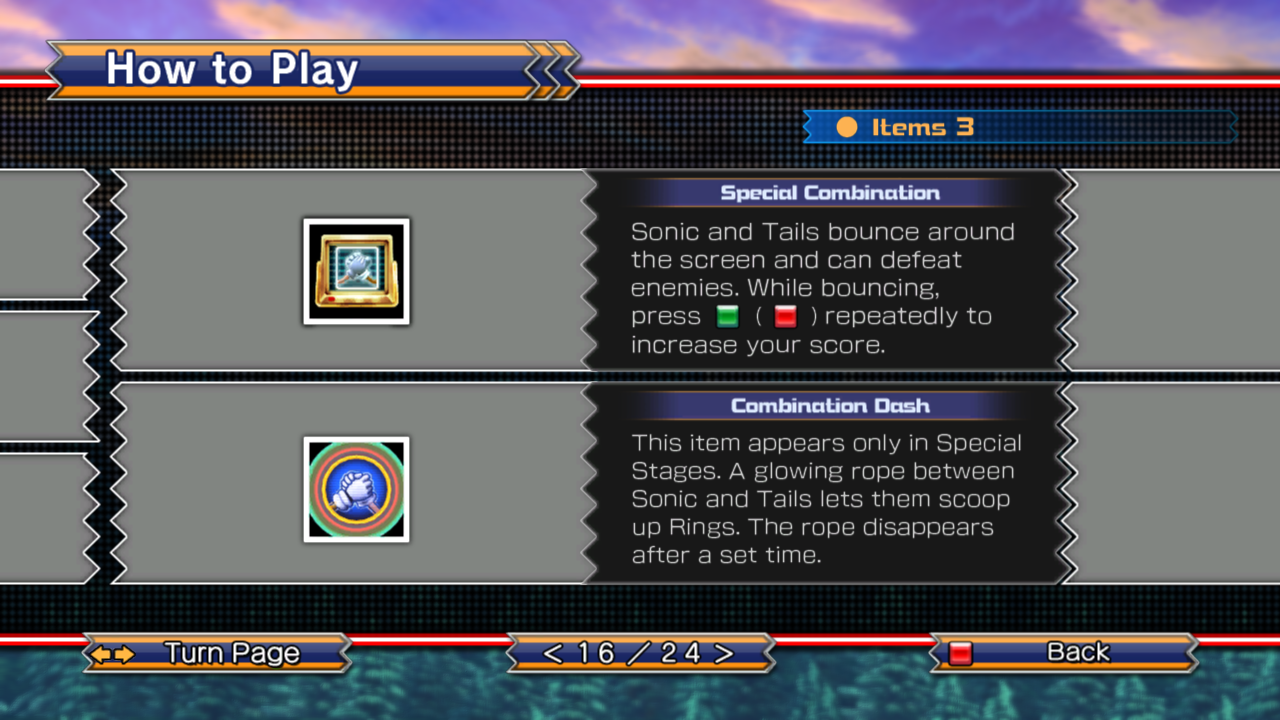
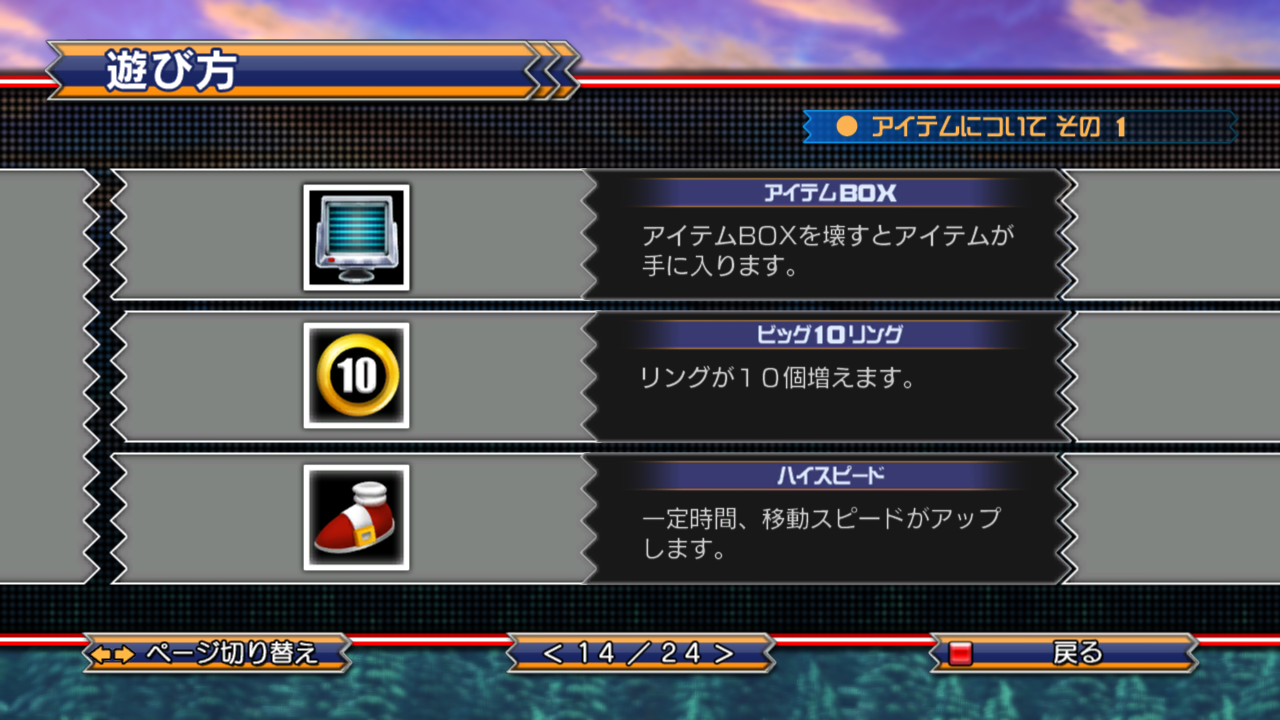
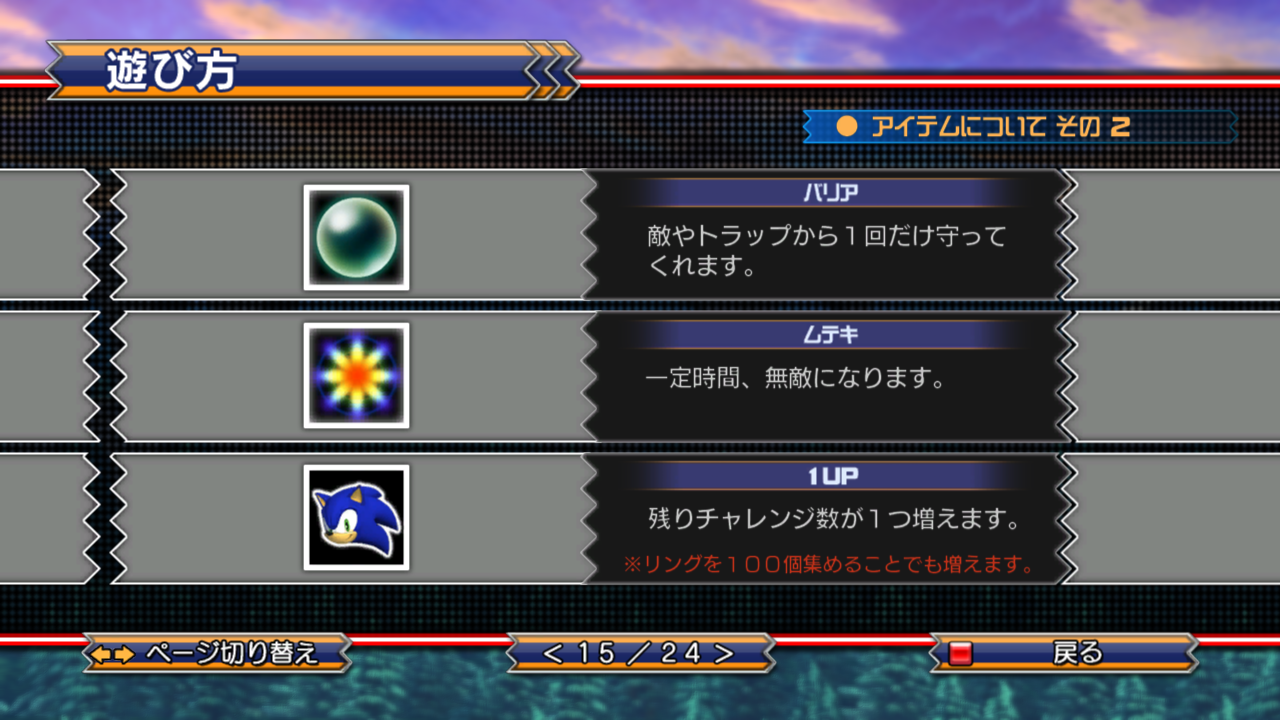
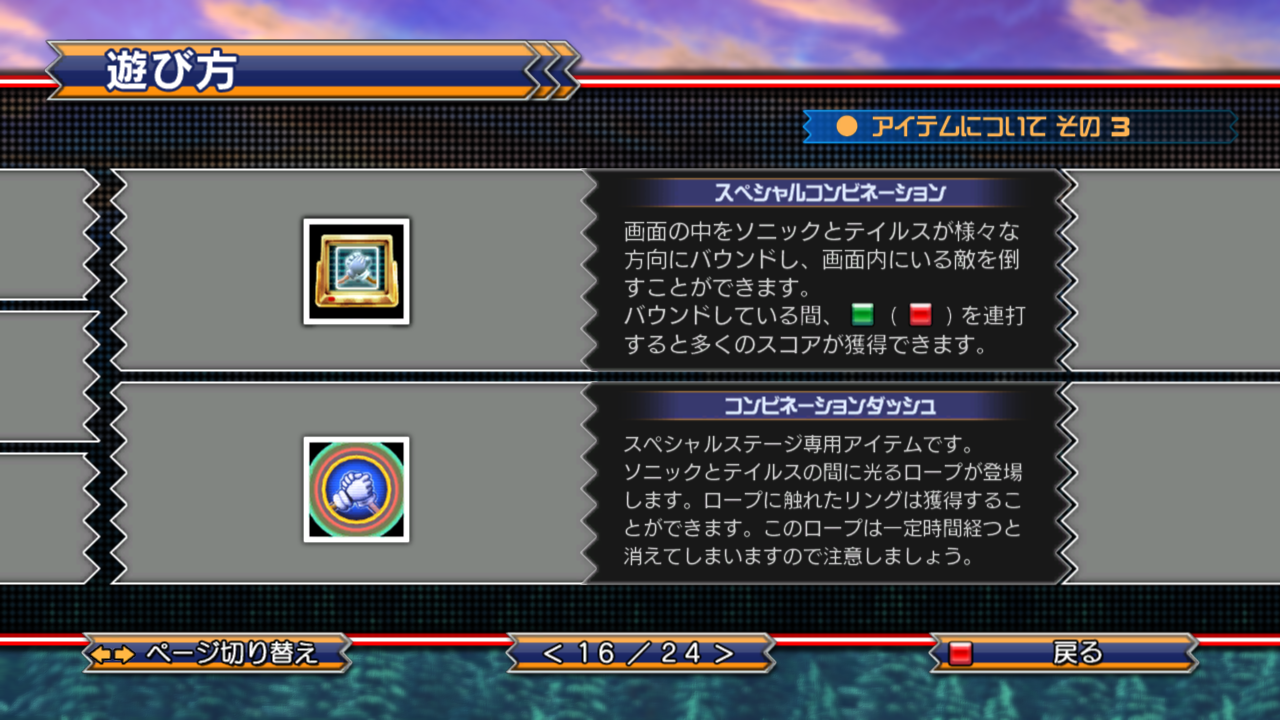
Sonic Free Riders
Sonic Colours (Nintendo DS)
| Sprite | ||||||||||||||
|---|---|---|---|---|---|---|---|---|---|---|---|---|---|---|
| English name | 5 Ring Bonus[93] | 10 Ring Bonus[93] | Random Ring Bonus[93] | Barrier | Magnetic Barrier | Power Sneakers | Invincible | 1UP[93] | Steal Boost[94][ae 1] | Steal Wisp[94][ae 1] | Reaper[94][ae 1] | Spring[94][ae 1] | Exploding Balloon[94][ae 1] | Mine[94][ae 1] |
| Japanese name |
Notes
Sonic the Hedgehog CD (2011)
Sonic Generations
In the console/PC versions of Sonic Generations, Item Boxes are found only in Classic Sonic's Acts. Some of these only appear in specific Challenge Acts.
| Render | 
|

|

|

|

|

|

|

|
|---|---|---|---|---|---|---|---|---|
| English name | Super Ring[95] | Thunder Shield[ag 1] | Flame Shield[ag 1] | Aqua Shield[ag 1] | Power Sneakers[95] | Invincible[95] | 1-Up[95] | Skateboard[95][ag 2] |
| Japanese name |
Notes
- ↑ 1.0 1.1 1.2 [Challenge Acts only Challenge Acts only]
- ↑ City Escape Act 1 only
Sonic Generations (Nintendo 3DS)
In the Nintendo 3DS version of Sonic Generations, monitors can be found in both Classic and Modern Sonic's Acts. When opening a monitor in this game, an icon of its contents will be displayed briefly underneath the HUD on the top-left corner.
| Render | ||||||
|---|---|---|---|---|---|---|
| English name | Super Rings[96] | Shield[96] | Magnetic Shield[96] | Invincible[96] | 1UP[96] | Time Item[96][ah 1] |
| Japanese name |
Notes
- ↑ ["Keep the Pace" missions only "Keep the Pace" missions only]
Sonic Jump (2012)
Sonic the Hedgehog (2013)
Sonic the Hedgehog 2 (2013)
Sonic Lost World
Sonic Mania
Items in Sonic Mania are contained in Item Boxes[5] although they take the appearance of monitors from other classic games.
| Sprite | |||||||||||||
|---|---|---|---|---|---|---|---|---|---|---|---|---|---|
| English name | Super Ring[5] | Hyper Ring[5] | Blue Shield[5] | Lightning Shield[5] | Fire Shield[5] | Bubble Shield[5] | Power Sneakers[5] | Invincible[5] | 1-UP[5] | Eggman Mark[5] | Player Swap[97][am 1] | Random[97][am 1] | "S"[am 2] |
| Japanese name | Big 10 Ring (ビッグ10リング)[98] | Hyper Ring (ハイパーリング)[98] | Barrier (バリア)[98] | Thunder Barrier (サンダーバリア)[98] | Flame Barrier (フレイムバリア)[98] | Aqua Barrier (アクアバリア)[98] | High Speed (ハイスピード)[98] | Muteki (無敵)[98] | 1UP[98] | Eggman Trap (エッグマントラップ)[98] | Teleporter (テレポーター)[99] | Random (ランダム)[99] | N/A |
Notes
Sonic Forces
Like in the console/PC versions of Sonic Generations, Item Boxes[100] in Sonic Forces can only be found in Classic Sonic's stages.
| Render | ||||
|---|---|---|---|---|
| English name | Rings[100] | "Shield" | Power Sneakers[100] | Invincibility[100] |
| Japanese name | Ring (リング)[101] | High Speed (ハイスピード)[101] | Muteki (無敵)[101] |
Team Sonic Racing
Item Boxes'[102] (アイテムボックス[103]) in Team Sonic Racing typically placed in strategic locations across each track and can be broken by driving into them, giving drivers random Wisps. Once obtained, they can be used or transferred to teammates. Each track also has a hidden Item Box that contains an Invincibility - these are coloured blue to distinguish them from regular Item Boxes.
| Icon | |||||||||||||||
|---|---|---|---|---|---|---|---|---|---|---|---|---|---|---|---|
| English name | Orange Rocket[102] | Crimson Eagle[102] | White Boost[102] | Yellow Drill[102] | Pink Spikes[102][an 1] | Ivory Lightning[102] | Gray Quake[102] | Cyan Laser[102] | Red Burst[104][an 2] | Violet Void[104][an 1] | Black Bomb[104] | Blue Cube[104] | Jade Ghost[104] | Magenta Rhythm[104][an 3] | Invincibility[104] |
| Japanese name | Orange Rocket (オレンジ・ロケット)[105] | Crimson Eagle (クリムゾン・イーグル)[105] | White Boost (ホワイト・ブースト)[105] | Yellow Drill (イエロー・ドリル)[105] | Pink Spikes (ピンク・スパイク)[105] | Ivory Lightning (アイボリー・ライトニング)[105] | Gray Quake (グレイ・クエイク)[105] | Cyan Laser (シアン・レーザー)[105] | Red Burst (レッド・バースト)[106] | Violet Void (バイオレット・ボイド)[106] | Black Bomb (ブラック・ボム)[106] | Blue Cube (ブルー・キューブ)[106] | Jade Ghost (ジェイド・ゴースト)[106] | Magenta Rhythm (マゼンタ・リズム)[106] | Muteki Capsule (無敵カプセル)[107] |
Notes
- ↑ 1.0 1.1 Power Type characters only
- ↑ Speed Type characters only
- ↑ [Technique Type characters only Technique Type characters only]
Sonic Superstars
As a Classic-themed game, Sonic Superstars once again uses the monitor design for its Item Boxes[108].
| Render | 
|

|

|

|

|

|

|
|---|---|---|---|---|---|---|---|
| English name | "Super Ring" | "Shield" | "Power Sneakers" | "Invincibility" | "Magnet" | "?"[ao 1] | "Bullet"[ao 1] |
| Japanese name |
Notes
References
- ↑ 1.00 1.01 1.02 1.03 1.04 1.05 1.06 1.07 1.08 1.09 1.10 File:SonicAdventure DC US manual.pdf, page 13
- ↑ 2.0 2.1 2.2 2.3 2.4 2.5 2.6 File:Sonic1 MD JP manual.pdf, page 21
- ↑ 3.0 3.1 File:SonicUnleashed PS2 US manual.pdf, page 10
- ↑ 4.0 4.1 4.2 4.3 4.4 4.5 4.6 File:Sonic1 MD US manual.pdf, page 8
- ↑ 5.00 5.01 5.02 5.03 5.04 5.05 5.06 5.07 5.08 5.09 5.10 5.11 File:SM PC DIGITAL MANUAL UK V10 LR.pdf, page 17
- ↑ File:SonicBibleDraft2 Document.pdf, page 26
- ↑ File:SonicBibleDraft2 Document.pdf, page 33
- ↑ 8.0 8.1 8.2 8.3 8.4 File:Sonic1 GG US manual.pdf, page 9
- ↑ File:Sonic1 GG US manual.pdf, page 8
- ↑ File:Sonic1 GG US manual.pdf, page 11
- ↑ 11.0 11.1 11.2 File:Sonic 1 GG JP Manual.pdf, page 12
- ↑ 12.0 12.1 12.2 File:Sonic 1 GG JP Manual.pdf, page 13
- ↑ File:Sonic 1 GG JP Manual.pdf, page 16
- ↑ 14.0 14.1 14.2 File:Sonic2 GG US manual.pdf, page 8
- ↑ File:Sonic2 GG US manual.pdf, page 9
- ↑ File:Sonic 2 GG JP Manual.pdf, page 14
- ↑ 17.0 17.1 File:Sonic 2 GG JP Manual.pdf, page 15
- ↑ 18.0 18.1 18.2 18.3 18.4 18.5 File:Sonic2 MD US manual.pdf, page 12
- ↑ File:Sonic2 MD US manual.pdf, page 22
- ↑ 20.0 20.1 20.2 20.3 20.4 File:Sonic2 MD JP manual.pdf, page 22
- ↑ 21.0 21.1 File:Sonic2 MD JP manual.pdf, page 28
- ↑ 22.0 22.1 22.2 22.3 22.4 File:SonicCD MCD US manual.pdf, page 12
- ↑ 23.0 23.1 23.2 23.3 23.4 File:SonicCD MCD JP manual.pdf, page 19
- ↑ 24.0 24.1 24.2 24.3 File:SonicChaos GG US manual.pdf, page 10
- ↑ 25.0 25.1 25.2 25.3 25.4 25.5 File:Sonic Chaos Game Gear JP Manual.pdf, page 17
- ↑ 26.0 26.1 26.2 26.3 26.4 File:Sonic3 MD US manual.pdf, page 14
- ↑ 27.0 27.1 27.2 File:Sonic3 MD US manual.pdf, page 15
- ↑ 28.0 28.1 28.2 28.3 28.4 28.5 28.6 File:Sonic3 MD JP manual.pdf, page 18
- ↑ 29.0 29.1 29.2 29.3 29.4 File:SonicTripleTrouble GG US manual.pdf, page 10
- ↑ 30.0 30.1 30.2 30.3 File:SonicTripleTrouble GG US manual.pdf, page 12
- ↑ 31.0 31.1 31.2 File:SonicTripleTrouble GG US manual.pdf, page 11
- ↑ 32.0 32.1 32.2 32.3 32.4 32.5 File:SonicTripleTrouble GG JP manual.pdf, page 19
- ↑ 33.0 33.1 33.2 33.3 File:SonicTripleTrouble GG JP manual.pdf, page 13
- ↑ 34.0 34.1 File:SonicTripleTrouble GG JP manual.pdf, page 12
- ↑ 35.0 35.1 35.2 35.3 35.4 35.5 35.6 35.7 35.8 File:Chaotix 32X US manual.pdf, page 20
- ↑ File:Chaotix 32X US manual.pdf, page 21
- ↑ File:Chaotix 32X US manual.pdf, page 22
- ↑ 38.0 38.1 File:Chaotix 32X JP manual.pdf, page 29
- ↑ 39.0 39.1 39.2 39.3 39.4 File:Chaotix 32X JP manual.pdf, page 30
- ↑ 40.0 40.1 File:Chaotix 32X JP manual.pdf, page 31
- ↑ 41.0 41.1 File:Chaotix 32X JP manual.pdf, page 34
- ↑ 42.0 42.1 42.2 42.3 42.4 File:Sonic3D MD US manual.pdf, page 9
- ↑ 43.0 43.1 43.2 43.3 43.4 43.5 43.6 File:Sonic3D Sat JP manual.pdf, page 16
- ↑ 44.0 44.1 44.2 File:Sonic Blast GG US Manual.pdf, page 8
- ↑ 45.0 45.1 File:Sonic Blast GG US Manual.pdf, page 9
- ↑ 46.0 46.1 46.2 46.3 46.4 46.5 46.6 46.7 46.8 File:SonicBlast GG JP manual.pdf, page 16
- ↑ 47.0 47.1 47.2 47.3 47.4 47.5 47.6 47.7 File:SonicAdventure DC JP manual.pdf, page 12
- ↑ 49.0 49.1 49.2 49.3 49.4 File:SPA NGPC US manual.pdf, page 12
- ↑ 50.0 50.1 50.2 50.3 50.4 File:SPA_NGPC_JP_manual.pdf, page 10
- ↑ 51.0 51.1 51.2 51.3 51.4 51.5 51.6 51.7 51.8 51.9 File:SonicAdventure2 DC US manual.pdf, page 21
- ↑ 52.0 52.1 52.2 52.3 52.4 52.5 52.6 52.7 52.8 52.9 File:SonicAdventure2 DC JP manual.pdf, page 26
- ↑ 53.0 53.1 53.2 53.3 53.4 53.5 53.6 53.7 53.8 File:SonicAdvance GBA US manual.pdf, page 22
- ↑ 54.0 54.1 54.2 54.3 54.4 File:SonicAdvance GBA JP manual.pdf, page 30
- ↑ 55.0 55.1 55.2 File:SonicAdvance GBA JP manual.pdf, page 31
- ↑ 56.0 56.1 56.2 56.3 56.4 File:SonicAdvanceVictoryPerfect JP guide.pdf, page 94
- ↑ 57.0 57.1 57.2 57.3 57.4 57.5 57.6 57.7 File:SonicAdvance2 GBA US manual.pdf, page 24
- ↑ 58.0 58.1 58.2 58.3 File:SonicAdvance2 GBA JP manual.pdf, page 33
- ↑ 59.0 59.1 59.2 59.3 File:SonicAdvance2 GBA JP manual.pdf, page 32
- ↑ 60.0 60.1 60.2 60.3 60.4 60.5 60.6 60.7 60.8 File:SonicAdvance3 GBA US manual.pdf, page 24
- ↑ 61.0 61.1 61.2 61.3 61.4 61.5 61.6 61.7 File:SonicAdvance3 WiiUVC manual.pdf, page 22
- ↑ 62.0 62.1 62.2 62.3 62.4 62.5 File:SonicAdvance3 WiiUVC manual.pdf, page 29
- ↑ 63.0 63.1 63.2 63.3 63.4 63.5 63.6 63.7 63.8 63.9 File:SonicHeroes GC US manual.pdf, page 28
- ↑ 64.0 64.1 64.2 64.3 64.4 64.5 64.6 64.7 64.8 File:Shadow GC US manual.pdf, page 23
- ↑ 65.0 65.1 65.2 65.3 File:Shadow The Hedgehog GC JP Manual.pdf, page 34
- ↑ 66.0 66.1 File:Shadow The Hedgehog GC JP Manual.pdf, page 35
- ↑ 67.0 67.1 67.2 67.3 67.4 67.5 67.6 67.7 File:SonicRush DS US manual.pdf, page 22
- ↑ 68.0 68.1 68.2 File:SonicRush DS US manual.pdf, page 34
- ↑ 69.0 69.1 69.2 69.3 69.4 69.5 69.6 69.7 File:SonicRush DS JP manual.pdf, page 29
- ↑ 70.0 70.1 70.2 File:SonicRush DS JP manual.pdf, page 40
- ↑ 71.0 71.1 71.2 71.3 71.4 71.5 71.6 71.7 File:SonicRiders GC US manual.pdf, page 24
- ↑ 72.0 72.1 72.2 72.3 72.4 File:Sonic Riders GC JP Manual.pdf, page 24
- ↑ 73.0 73.1 73.2 File:Sonic Riders GC JP Manual.pdf, page 25
- ↑ 74.0 74.1 74.2 74.3 74.4 74.5 74.6 74.7 File:Sonic06 360 US manual.pdf, page 13
- ↑ 75.0 75.1 75.2 75.3 75.4 75.5 75.6 File:Sonic06 ps3 jp manual.pdf, page 16
- ↑ 76.0 76.1 76.2 76.3 76.4 76.5 76.6 76.7 76.8 File:SonicRushAdventure DS US manual.pdf, page 24
- ↑ 77.0 77.1 77.2 File:SonicRushAdventure DS US manual.pdf, page 20
- ↑ 78.0 78.1 78.2 File:SonicRushAdventure DS US manual.pdf, page 34
- ↑ 79.0 79.1 79.2 79.3 79.4 79.5 79.6 79.7 79.8 File:SRZG Wii UK manual.pdf, page 21
- ↑ 80.0 80.1 File:SRZG Wii UK manual.pdf, page 24
- ↑ 81.0 81.1 File:SonicUnleashed PS2 US manual.pdf, page 17
- ↑ 82.0 82.1 File:SonicUnleashed PS2 US manual.pdf, page 13
- ↑ 83.0 83.1 File:Sonic4Episode1 PC HowToPlay Items1.png
- ↑ 84.0 84.1 84.2 File:Sonic4Episode1 PC HowToPlay Items2.png
- ↑ 85.0 85.1 File:Sonic4Episode1 PC HowToPlayJP Items1.png
- ↑ 86.0 86.1 86.2 File:Sonic4Episode1 PC HowToPlayJP Items2.png
- ↑ 87.0 87.1 File:Sonic4Episode2 PC HowToPlay Items1.png
- ↑ 88.0 88.1 88.2 File:Sonic4Episode2 PC HowToPlay Items2.png
- ↑ File:Sonic4Episode2 PC HowToPlay Items3.png
- ↑ 90.0 90.1 File:Sonic4Episode2 PC HowToPlayJP Items1.png
- ↑ 91.0 91.1 91.2 File:Sonic4Episode2 PC HowToPlayJP Items2.png
- ↑ File:Sonic4Episode2 PC HowToPlayJP Items3.png
- ↑ 93.0 93.1 93.2 93.3 File:Colours DS EU Manual.pdf, page 14
- ↑ 94.0 94.1 94.2 94.3 94.4 94.5 File:Colours DS EU Manual.pdf, page 23
- ↑ 95.0 95.1 95.2 95.3 95.4 File:SonicGenerations 360 UK manual.pdf, page 12
- ↑ 96.0 96.1 96.2 96.3 96.4 96.5 File:SonicGenerations 3DS UK manual.pdf, page 10
- ↑ 97.0 97.1 File:SM PC DIGITAL MANUAL UK V10 LR.pdf, page 21
- ↑ 98.0 98.1 98.2 98.3 98.4 98.5 98.6 98.7 98.8 98.9 File:SonicMania consoles JP manual.pdf, page 18
- ↑ 99.0 99.1 File:SonicMania consoles JP manual.pdf, page 22
- ↑ 100.0 100.1 100.2 100.3 File:SF STEAM MANUAL EN LRv5.pdf, page 17
- ↑ 101.0 101.1 101.2 File:SF PS4-Switch-XB1 JP digital manual.pdf, page 26
- ↑ 102.0 102.1 102.2 102.3 102.4 102.5 102.6 102.7 102.8 File:TeamSonicRacing Steam manual.pdf, page 12
- ↑ File:TSR Switch-PS4 JP digital manual.pdf, page 16
- ↑ 104.0 104.1 104.2 104.3 104.4 104.5 104.6 File:TeamSonicRacing Steam manual.pdf, page 13
- ↑ 105.0 105.1 105.2 105.3 105.4 105.5 105.6 105.7 File:TeamSonicRacing Steam manual.pdf, page 21
- ↑ 106.0 106.1 106.2 106.3 106.4 106.5 File:TeamSonicRacing Steam manual.pdf, page 22
- ↑ File:TeamSonicRacing Steam manual.pdf, page 16
- ↑ File:Sonic Superstars Web Manual EN.pdf, page 9