
Difference between revisions of "Sonic the Hedgehog 2 (16-bit)/Development/Metropolis Zone"
From Sonic Retro
(→Digitiser art) |
(→Concept art) |
||
| (17 intermediate revisions by the same user not shown) | |||
| Line 1: | Line 1: | ||
{{back}}[[Category:Development]] | {{back}}[[Category:Development]] | ||
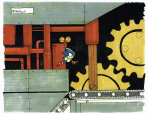
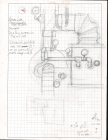
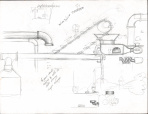
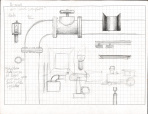
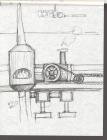
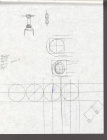
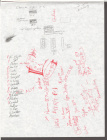
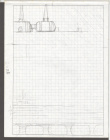
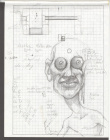
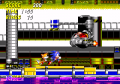
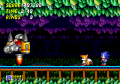
| + | Thanks to Zone artist [[Tom Payne]], almost the entire history of ''[[Sonic the Hedgehog 2 (16-bit)|Sonic the Hedgehog 2]]'''s [[Metropolis Zone]]'s development has been documented. The Zone was originally inspired on the steam-powered factories of the industrial revolution (or "Steam Age Sonic" as one piece of concept art puts it), with steam powered contraptions, furnaces and copper pipes carrying water, though much of the original vision was paired back due to technical and time restraints. It was seen as a "lighter" version of [[Sonic the Hedgehog (16-bit)|the original game's]] [[Scrap Brain Zone]], but "darker" than [[Green Hill Zone]]. | ||
| + | |||
| + | Metropolis is the only Zone in the game to feature three Acts, the third Act's original map reportedly being recycled from (the later scrapped) [[Genocide City Zone]]. This decision was likely made before any art was produced, although Act 3 was seemingly always set to have unique objects not seen in the first two Acts. | ||
| + | |||
==Concept art== | ==Concept art== | ||
<gallery widths="148px" heights="140px" > | <gallery widths="148px" heights="140px" > | ||
| − | + | TomPaynePapers Binder Clip 3 (Sonic 2 Level Work) (Original Order) image1713.jpg|An early piece of concept art for [[Metropolis Zone]]. | |
| − | + | TomPaynePapers Binder Clip 3 (Sonic 2 Level Work) (Original Order) image1715.jpg | |
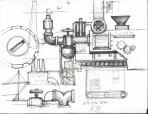
Sonic2_Metropolis_ConceptArt1.jpg|Later revision of the previous concept art. | Sonic2_Metropolis_ConceptArt1.jpg|Later revision of the previous concept art. | ||
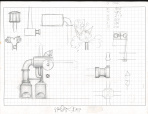
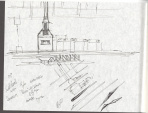
| − | + | TomPaynePapers 8.5x11 Miscellaneous Loose Pages (No Order) image1460.jpg|Early concept art. Windows can be seen. | |
| − | + | TomPaynePapers 8.5x11 Miscellaneous Loose Pages (No Order) image1458.jpg | |
| − | + | TomPaynePapers 8.5x11 Miscellaneous Loose Pages (No Order) image1439.jpg | |
| − | + | TomPaynePapers 8.5x11 Miscellaneous Loose Pages (No Order) image1462.jpg|Early concept art. | |
| − | + | TomPaynePapers 8.5x11 Miscellaneous Loose Pages (No Order) image1464.jpg|Early concept art. Text humorously refer to the level as "Sonic sweat shop." | |
| − | + | ||
| − | + | TomPaynePapers 8.5x11 Miscellaneous Loose Pages (No Order) image1482.jpg | |
| − | + | TomPaynePapers 8.5x11 Miscellaneous Loose Pages (No Order) image1514.jpg | |
| + | TomPaynePapers 8.5x11 Miscellaneous Loose Pages (No Order) image1497.jpg | ||
| + | TomPaynePapers 8.5x11 Miscellaneous Loose Pages (No Order) image1443.jpg | ||
| + | TomPaynePapers 8.5x11 Miscellaneous Loose Pages (No Order) image1512.jpg | ||
| + | TomPaynePapers 8.5x11 Miscellaneous Loose Pages (No Order) image1442.jpg | ||
| + | TomPaynePapers 8.5x11 Miscellaneous Loose Pages (No Order) image1454.jpg | ||
| + | TomPaynePapers 8.5x11 Miscellaneous Loose Pages (No Order) image1456.jpg | ||
| + | TomPaynePapers 8.5x11 Miscellaneous Loose Pages (No Order) image1466.jpg | ||
| + | TomPaynePapers 8.5x11 Miscellaneous Loose Pages (No Order) image1461.jpg | ||
| + | TomPaynePapers 8.5x11 Miscellaneous Loose Pages (No Order) image1491.jpg | ||
| + | TomPaynePapers 8.5x11 Miscellaneous Loose Pages (No Order) image1489.jpg | ||
| + | |||
| + | TomPaynePapers 8.5x11 Miscellaneous Loose Pages (No Order) image1472.jpg | ||
| + | TomPaynePapers 8.5x11 Miscellaneous Loose Pages (No Order) image1465.jpg | ||
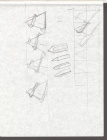
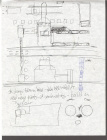
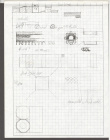
| + | TomPaynePapers 8.5x11 Miscellaneous Loose Pages (No Order) image1495.jpg|A list of obstacles slated for use. | ||
| + | TomPaynePapers 8.5x11 Miscellaneous Loose Pages (No Order) image1471.jpg | ||
| + | |||
| + | TomPaynePapers 8.5x11 Miscellaneous Loose Pages (No Order) image1455.jpg | ||
| + | TomPaynePapers 8.5x11 Miscellaneous Loose Pages (No Order) image1470.jpg | ||
| + | TomPaynePapers 8.5x11 Miscellaneous Loose Pages (No Order) image1467.jpg | ||
| + | TomPaynePapers 8.5x11 Miscellaneous Loose Pages (No Order) image1481.jpg | ||
| + | TomPaynePapers 8.5x11 Miscellaneous Loose Pages (No Order) image1459.jpg | ||
| + | |||
| + | TomPaynePapers 8.5x11 Miscellaneous Loose Pages (No Order) image1474.jpg | ||
| + | |||
| + | TomPaynePapers 8.5x11 Miscellaneous Loose Pages (No Order) image1440.jpg|Early concept art of the background. Furnaces can be seen. | ||
| + | TomPaynePapers 8.5x11 Miscellaneous Loose Pages (No Order) image1473.jpg | ||
| + | TomPaynePapers 8.5x11 Miscellaneous Loose Pages (No Order) image1513.jpg | ||
| + | |||
| + | TomPaynePapers STI Notepad Loose Pages (No Order) image1432.jpg | ||
| + | TomPaynePapers STI Notepad Loose Pages (No Order) image1433.jpg | ||
| + | |||
| + | TomPaynePapers 8.5x11 Blank Paper (Bound, Original Order) 2023-04-07-0060.jpg | ||
| + | TomPaynePapers 8.5x11 Blank Paper (Bound, Original Order) 2023-04-07-0061.jpg | ||
| + | TomPaynePapers 8.5x11 Blank Paper (Bound, Original Order) 2023-04-07-0062.jpg | ||
| + | TomPaynePapers 8.5x11 Blank Paper (Bound, Original Order) 2023-04-07-0063.jpg | ||
| + | TomPaynePapers 8.5x11 Blank Paper (Bound, Original Order) 2023-04-07-0064.jpg | ||
| + | TomPaynePapers 8.5x11 Blank Paper (Bound, Original Order) 2023-04-07-0065.jpg | ||
| + | TomPaynePapers 8.5x11 Blank Paper (Bound, Original Order) 2023-04-07-0066.jpg | ||
| + | TomPaynePapers 8.5x11 Blank Paper (Bound, Original Order) 2023-04-07-0067.jpg | ||
| + | TomPaynePapers 8.5x11 Blank Paper (Bound, Original Order) 2023-04-07-0068.jpg | ||
| + | TomPaynePapers 8.5x11 Blank Paper (Bound, Original Order) 2023-04-07-0069.jpg | ||
| + | TomPaynePapers 8.5x11 Blank Paper (Bound, Original Order) 2023-04-07-0070.jpg | ||
| + | TomPaynePapers 8.5x11 Graph Paper (Bound, Original Order) 2023-04-07-0047.jpg | ||
| + | TomPaynePapers 8.5x11 Graph Paper (Bound, Original Order) 2023-04-07-0048.jpg | ||
| + | TomPaynePapers 8.5x11 Graph Paper (Bound, Original Order) 2023-04-07-0049.jpg | ||
| + | TomPaynePapers 8.5x11 Graph Paper (Bound, Original Order) 2023-04-07-0050.jpg | ||
| + | TomPaynePapers 8.5x11 Graph Paper (Bound, Original Order) 2023-04-07-0051.jpg | ||
| + | TomPaynePapers 8.5x11 Graph Paper (Bound, Original Order) 2023-04-07-0052.jpg | ||
| + | TomPaynePapers 8.5x11 Graph Paper (Bound, Original Order) 2023-04-07-0053.jpg | ||
| + | TomPaynePapers 8.5x11 Graph Paper (Bound, Original Order) 2023-04-07-0054.jpg | ||
| + | TomPaynePapers 8.5x11 Graph Paper (Bound, Original Order) 2023-04-07-0055.jpg | ||
| + | TomPaynePapers 8.5x11 Graph Paper (Bound, Original Order) 2023-04-07-0056.jpg | ||
| + | TomPaynePapers 8.5x11 Graph Paper (Bound, Original Order) 2023-04-07-0057.jpg | ||
| + | TomPaynePapers 8.5x11 Graph Paper (Bound, Original Order) 2023-04-07-0058.jpg | ||
| − | + | TomPaynePapers Small Blank Notepad (Bound, Original Order) 2023-04-07-0022.jpg | |
| − | + | TomPaynePapers Small Blank Notepad (Bound, Original Order) 2023-04-07-0023.jpg | |
| − | + | TomPaynePapers Small Blank Notepad (Bound, Original Order) 2023-04-07-0024.jpg | |
| − | + | TomPaynePapers Small Blank Notepad (Bound, Original Order) 2023-04-07-0025.jpg | |
| − | + | TomPaynePapers Small Blank Notepad (Bound, Original Order) 2023-04-07-0026.jpg | |
| − | + | TomPaynePapers Small Blank Notepad (Bound, Original Order) 2023-04-07-0027.jpg | |
| − | |||
</gallery> | </gallery> | ||
| − | == | + | ==Chunks== |
<gallery widths="148px" heights="140px" > | <gallery widths="148px" heights="140px" > | ||
| − | + | TomPaynePapers Binder Clip 3 (Sonic 2 Level Work) (Original Order) image1717.jpg | |
| − | + | TomPaynePapers Binder Clip 3 (Sonic 2 Level Work) (Original Order) image1718.jpg | |
| − | + | TomPaynePapers Binder Clip 3 (Sonic 2 Level Work) (Original Order) image1719.jpg | |
| − | + | TomPaynePapers Binder Clip 3 (Sonic 2 Level Work) (Original Order) image1720.jpg | |
| − | + | TomPaynePapers Binder Clip 3 (Sonic 2 Level Work) (Original Order) image1722.jpg | |
| − | + | TomPaynePapers Binder Clip 3 (Sonic 2 Level Work) (Original Order) image1723.jpg | |
| − | + | TomPaynePapers Binder Clip 3 (Sonic 2 Level Work) (Original Order) image1724.jpg | |
| − | + | TomPaynePapers Binder Clip 3 (Sonic 2 Level Work) (Original Order) image1725.jpg | |
| − | + | TomPaynePapers Binder Clip 3 (Sonic 2 Level Work) (Original Order) image1733.jpg | |
| − | + | TomPaynePapers Binder Clip 3 (Sonic 2 Level Work) (Original Order) image1734.jpg | |
| − | + | TomPaynePapers Binder Clip 3 (Sonic 2 Level Work) (Original Order) image1735.jpg | |
| − | + | TomPaynePapers Binder Clip 3 (Sonic 2 Level Work) (Original Order) image1736.jpg | |
| − | + | TomPaynePapers Binder Clip 3 (Sonic 2 Level Work) (Original Order) image1737.jpg | |
| − | + | TomPaynePapers Binder Clip 3 (Sonic 2 Level Work) (Original Order) image1738.jpg | |
| − | + | TomPaynePapers Binder Clip 3 (Sonic 2 Level Work) (Original Order) image1739.jpg | |
| − | + | TomPaynePapers Binder Clip 3 (Sonic 2 Level Work) (Original Order) image1740.jpg | |
| − | + | TomPaynePapers Binder Clip 3 (Sonic 2 Level Work) (Original Order) image1741.jpg | |
| − | + | TomPaynePapers Binder Clip 3 (Sonic 2 Level Work) (Original Order) image1741a.jpg | |
| − | + | TomPaynePapers Binder Clip 3 (Sonic 2 Level Work) (Original Order) image1742.jpg | |
| − | + | TomPaynePapers Binder Clip 3 (Sonic 2 Level Work) (Original Order) image1744.jpg | |
| + | TomPaynePapers Binder Clip 3 (Sonic 2 Level Work) (Original Order) image1745.jpg | ||
| + | TomPaynePapers Binder Clip 3 (Sonic 2 Level Work) (Original Order) image1746.jpg | ||
| + | TomPaynePapers Binder Clip 3 (Sonic 2 Level Work) (Original Order) image1747.jpg | ||
| + | TomPaynePapers Binder Clip 3 (Sonic 2 Level Work) (Original Order) image1748.jpg | ||
| + | TomPaynePapers Binder Clip 3 (Sonic 2 Level Work) (Original Order) image1749.jpg | ||
| + | </gallery> | ||
| + | |||
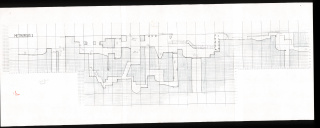
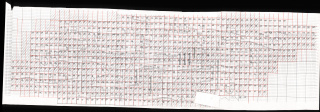
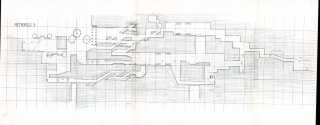
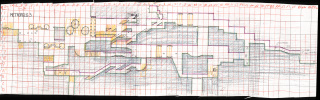
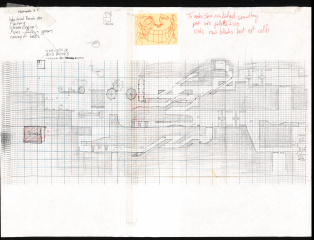
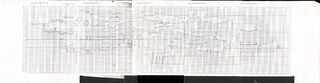
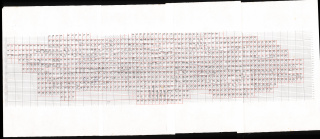
| + | ==Maps== | ||
| + | <gallery widths="320px" heights="240px" > | ||
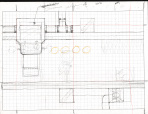
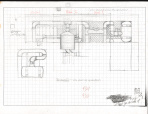
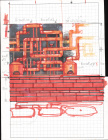
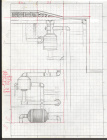
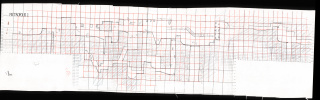
| + | TomPaynePapers Level Maps (Binder Clip, Original Order) image1267.jpg|Act 1. Has diagonally slanted rotating steel drums. Only two things seem very similar to final; the general positioning of the starting area, and the short downward ramp leading to a flat area with the end sign. | ||
| + | TomPaynePapers Level Maps (Binder Clip, Original Order) image1268.jpg|Act 1 | ||
| + | TomPaynePapers Level Maps (Binder Clip, Original Order) image1273.jpg|Act 1, revised, with chunk IDs | ||
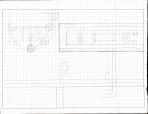
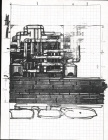
| + | TomPaynePapers Level Maps (Binder Clip, Original Order) image1269.jpg|Act 2. Has giant crusher. Aside from the immediate starting area and an area with a half-loop leading to a ramp in the top-left, almost nothing recognizable remains. | ||
| + | TomPaynePapers Level Maps (Binder Clip, Original Order) image1270.jpg|Act 2 | ||
| + | TomPaynePapers Level Maps (Binder Clip, Original Order) image1274.jpg|Act 2, revised, with chunk IDs | ||
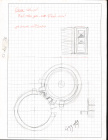
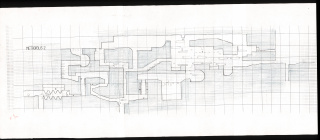
| + | TomPaynePapers Level Maps (Loose, No Order) image1263.jpg|Act 3. Features a horizontal spike obstacle, similar to the ones removed from [[Marble Zone]] of the first game. | ||
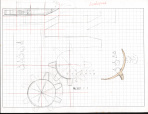
| + | TomPaynePapers Level Maps (Binder Clip, Original Order) image1271.jpg|Act 3, with annotations | ||
| + | TomPaynePapers Level Maps (Binder Clip, Original Order) image1272.jpg|Half of Act 3, with iterative changes | ||
| + | TomPaynePapers Level Maps (Loose, No Order) image1262.jpg|Act 3, revised | ||
| + | TomPaynePapers Level Maps (Binder Clip, Original Order) image1275.jpg|Act 3, revised, with chunk IDs | ||
</gallery> | </gallery> | ||
| Line 50: | Line 127: | ||
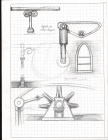
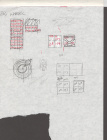
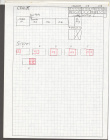
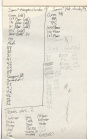
These are arranged roughly in the order of Tom Payne's list{{fileref|TomPaynePapers 8.5x11 Miscellaneous Loose Pages (No Order) image1474.jpg}}. | These are arranged roughly in the order of Tom Payne's list{{fileref|TomPaynePapers 8.5x11 Miscellaneous Loose Pages (No Order) image1474.jpg}}. | ||
<gallery widths="148px" heights="140px" > | <gallery widths="148px" heights="140px" > | ||
| − | TomPaynePapers Digitizer Pages image1561.jpg | + | TomPaynePapers Digitizer Pages image1561.jpg|<tt>GRTEETH</tt> (gear teeth) |
| − | TomPaynePapers Digitizer Pages image1562.jpg | + | |
| − | TomPaynePapers Digitizer Pages image1560.jpg | + | TomPaynePapers Digitizer Pages image1562.jpg|<tt>PILEDRVR</tt> (pile driver) |
| − | TomPaynePapers Digitizer Pages image1573.jpg | + | TomPaynePapers Digitizer Pages image1560.jpg|<tt>PILEDRVR</tt> (pile driver) |
| − | TomPaynePapers Digitizer Pages image1544.jpg | + | |
| − | TomPaynePapers Digitizer Pages image1558.jpg | + | TomPaynePapers Digitizer Pages image1573.jpg|<tt>STMTRAP</tt> (steam trap), early version |
| − | TomPaynePapers Digitizer Pages image1257.jpg | + | TomPaynePapers Digitizer Pages image1544.jpg|<tt>STMTRAP</tt> (steam trap), early version |
| − | TomPaynePapers Digitizer Pages image1553.jpg | + | TomPaynePapers Digitizer Pages image1558.jpg|<tt>STMTRAP</tt> (steam trap), early version |
| − | TomPaynePapers Digitizer Pages image1258.jpg | + | |
| − | TomPaynePapers Digitizer Pages image1572.jpg | + | TomPaynePapers Digitizer Pages image1257.jpg|<tt>CRANK</tt> (crank), early version, separated |
| + | TomPaynePapers Digitizer Pages image1553.jpg|<tt>CRANK</tt> (crank), early version, combined | ||
| + | TomPaynePapers Digitizer Pages image1258.jpg|<tt>CRANK</tt> (crank), revised, separated | ||
| + | TomPaynePapers Digitizer Pages image1572.jpg|<tt>CRANK</tt> (crank), revised, combined | ||
| + | |||
| + | TomPaynePapers Digitizer Pages image1580.jpg|<tt>SCRWPLAT</tt> (screw platform) | ||
| + | TomPaynePapers Digitizer Pages image1552.jpg|<tt>SCRWPLAT</tt> (screw platform) | ||
| + | TomPaynePapers Digitizer Pages image1571.jpg|<tt>SCRWPLAT</tt> (screw platform) | ||
| + | TomPaynePapers Digitizer Pages image1578.jpg|<tt>SCRWPLAT</tt> (screw platform), bad print | ||
| + | |||
| + | TomPaynePapers Digitizer Pages image1563.jpg|<tt>VSCREW</tt> (vertical screw) | ||
| + | |||
| + | TomPaynePapers Digitizer Pages image1574.jpg|<tt>VSCRDOOR</tt> (vertical screw door) | ||
| + | TomPaynePapers Digitizer Pages image1548.jpg|<tt>VSCRDOOR</tt> (vertical screw door) | ||
| + | TomPaynePapers Digitizer Pages image1551.jpg|<tt>VSCRDOOR</tt> (vertical screw door) | ||
| + | |||
| + | TomPaynePapers Digitizer Pages image1546.jpg|<tt>PLATFORM</tt> (platform) | ||
| + | |||
| + | TomPaynePapers Digitizer Pages image1575.jpg|<tt>VDOOR</tt> (vertical door) | ||
| + | TomPaynePapers Digitizer Pages image1547.jpg|<tt>VDOOR</tt> (vertical door) | ||
| + | TomPaynePapers Digitizer Pages image1549.jpg|<tt>VDOOR</tt> (vertical door) | ||
| + | TomPaynePapers Digitizer Pages image1543.jpg|<tt>VDOOR</tt> (vertical door) | ||
| + | |||
| + | TomPaynePapers Digitizer Pages image1535.jpg|<tt>STEAM</tt> (steam) | ||
| + | TomPaynePapers Digitizer Pages image1556.jpg|<tt>STEAM</tt> (steam), revised | ||
| + | |||
| + | TomPaynePapers Digitizer Pages image1569.jpg|<tt>SPIKEBLK</tt> (spike block) | ||
| + | TomPaynePapers Digitizer Pages image1545.jpg|<tt>SPIKEBLK</tt> (block) | ||
| + | |||
| + | TomPaynePapers Digitizer Pages image1570.jpg|<tt>NUT</tt> (nut) | ||
| + | |||
| + | TomPaynePapers Digitizer Pages image1566.jpg|<tt>ELDOOR</tt> (elevator door) | ||
| + | TomPaynePapers Digitizer Pages image1568.jpg|<tt>ELDOOR</tt> (elevator door), revised | ||
| + | TomPaynePapers Digitizer Pages image1576.jpg|<tt>ELDOOR</tt> (elevator door), revised | ||
| + | |||
| + | TomPaynePapers Digitizer Pages image1567.jpg|<tt>HSPIKE</tt> (horizontal spike) | ||
| + | TomPaynePapers Digitizer Pages image1564.jpg|<tt>VSPIKE</tt> (vertical spike) | ||
| + | |||
| + | TomPaynePapers Digitizer Pages image1550.jpg|<tt>PULLCAR</tt> (pull car) | ||
| + | TomPaynePapers Digitizer Pages image1565.jpg|<tt>PULLCAR</tt> (pull car) | ||
| − | TomPaynePapers Digitizer Pages | + | TomPaynePapers Digitizer Pages image1539.jpg|<tt>BUTTON</tt> (button), replaced with "standard" Yamaguchi version |
| − | |||
| − | |||
| − | |||
| − | |||
| − | |||
| − | |||
| − | |||
| − | |||
| − | |||
| − | |||
| − | |||
| − | |||
| − | TomPaynePapers Digitizer Pages | + | TomPaynePapers Digitizer Pages image1256.jpg|<tt>PISTON</tt> (piston), early version, separated |
| − | TomPaynePapers Digitizer Pages | + | TomPaynePapers Digitizer Pages image1533.jpg|<tt>PISTON</tt> (piston), early version, combined |
| − | TomPaynePapers Digitizer Pages | + | TomPaynePapers Digitizer Pages image1538.jpg|<tt>PISTON</tt> (piston), revised version, combined |
| − | |||
| − | |||
| − | |||
| − | |||
| − | TomPaynePapers Digitizer Pages | + | TomPaynePapers Digitizer Pages image1542.jpg|<tt>LAVABUB</tt> (lava bubble) |
| − | |||
| − | |||
| − | TomPaynePapers Digitizer Pages | + | TomPaynePapers Digitizer Pages image1559.jpg|<tt>RHOMBUS</tt> (rhombus), early version, separated |
| − | TomPaynePapers Digitizer Pages | + | TomPaynePapers Digitizer Pages image1577.jpg|<tt>RHOMBUS</tt> (rhombus), early version, combined |
| + | TomPaynePapers Digitizer Pages image1259.jpg|<tt>RHOMBUS</tt> (rhombus), revised version, separated | ||
| − | TomPaynePapers Digitizer Pages | + | TomPaynePapers Digitizer Pages image1261.jpg|<tt>COLOR2</tt> (palette) |
| − | + | </gallery> | |
| − | |||
| − | |||
| − | TomPaynePapers | + | ==Miscellaneous documents== |
| − | + | <gallery> | |
| − | + | TomPaynePapers STI Notepad Loose Pages (No Order) image1419.jpg | |
| + | Sonic2 MD TomPayne spritelist.jpg | ||
| + | </gallery> | ||
| − | + | ==Blocks== | |
| + | Work in progress blocks obtained from one of Tom Payne's floppy disks: | ||
| + | <gallery> | ||
| + | TomPayneDisks metropolis block000.out.png | ||
| + | TomPayneDisks metropolis block001.out.png | ||
| + | TomPayneDisks metropolis block002.out.png | ||
| + | TomPayneDisks metropolis block003.out.png | ||
| + | TomPayneDisks metropolis block004.out.png | ||
| + | TomPayneDisks metropolis block005.out.png | ||
| + | TomPayneDisks metropolis piston.df.png | ||
| + | TomPayneDisks metropolis zone04.pc.png | ||
</gallery> | </gallery> | ||
| + | |||
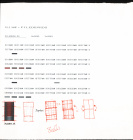
| + | ==Palettes== | ||
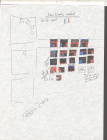
| + | [[File:TomPaynePapers 8.5x11 Miscellaneous Loose Pages (No Order) image1501.jpg|320px]] | ||
| + | {{MDPalette|----|0000|0422|0644|0A88|----|0EEE|04AC|006A|0026|0048|0004|----|----|000E|---- | ||
| + | |----|0000|0EC6|0CA0|0480|0460|0EEE|068E|046C|0028|024A|0004|0420|0200|000E|----}} | ||
| + | |||
| + | |||
| + | [[File:TomPaynePapers 8.5x11 Miscellaneous Loose Pages (No Order) image1502.jpg|320px]] | ||
| + | {{MDPalette|0000|----|0866|0ECC|0048|04AC|0EEE|068E|046C|0028|024A|0002|----|----|000E|0008 | ||
| + | |----|0000|0CE2|08C0|0480|0260|0EEE|0EE0|0AA0|0440|0660|0220|0060|0020|0008|000E}} | ||
| + | |||
| + | |||
| + | [[File:TomPaynePapers 8.5x11 Miscellaneous Loose Pages (No Order) image1504.jpg|320px]] | ||
| + | {{MDPalette|0000|0422|0866|0ECC|0048|0006|0ACE|----|----|0A46|0602|0200|0002|008E|000E|0008 | ||
| + | |----|0000|0CE2|08C0|0480|0260|0EEE|04AC|006A|0026|0048|0004|0020|0008|000E}} | ||
==References== | ==References== | ||
Latest revision as of 12:53, 19 December 2023
Thanks to Zone artist Tom Payne, almost the entire history of Sonic the Hedgehog 2's Metropolis Zone's development has been documented. The Zone was originally inspired on the steam-powered factories of the industrial revolution (or "Steam Age Sonic" as one piece of concept art puts it), with steam powered contraptions, furnaces and copper pipes carrying water, though much of the original vision was paired back due to technical and time restraints. It was seen as a "lighter" version of the original game's Scrap Brain Zone, but "darker" than Green Hill Zone.
Metropolis is the only Zone in the game to feature three Acts, the third Act's original map reportedly being recycled from (the later scrapped) Genocide City Zone. This decision was likely made before any art was produced, although Act 3 was seemingly always set to have unique objects not seen in the first two Acts.
Contents
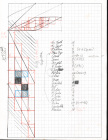
Concept art
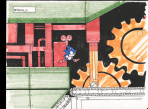
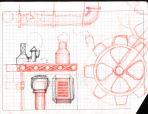
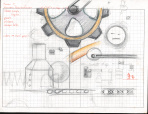
An early piece of concept art for Metropolis Zone.
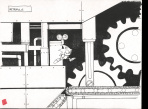
Later revision of the previous concept art.
Early concept art. Windows can be seen.
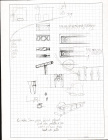
Early concept art.
Early concept art. Text humorously refer to the level as "Sonic sweat shop."


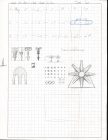
A list of obstacles slated for use.
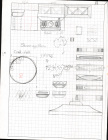
Early concept art of the background. Furnaces can be seen.


_(Original_Order)_image1713.jpg)
_(Original_Order)_image1715.jpg)

_image1460.jpg)
_image1458.jpg)
_image1439.jpg)
_image1462.jpg)
_image1464.jpg)
_image1482.jpg)
_image1514.jpg)
_image1497.jpg)
_image1443.jpg)
_image1512.jpg)
_image1442.jpg)
_image1454.jpg)
_image1456.jpg)
_image1466.jpg)
_image1461.jpg)
_image1491.jpg)
_image1489.jpg)
_image1472.jpg)
_image1465.jpg)
_image1495.jpg)
_image1471.jpg)
_image1455.jpg)
_image1470.jpg)
_image1467.jpg)
_image1481.jpg)
_image1459.jpg)
_image1474.jpg)
_image1440.jpg)
_image1473.jpg)
_image1513.jpg)
_image1432.jpg)
_image1433.jpg)
_2023-04-07-0060.jpg)
_2023-04-07-0061.jpg)
_2023-04-07-0062.jpg)
_2023-04-07-0063.jpg)
_2023-04-07-0064.jpg)
_2023-04-07-0065.jpg)
_2023-04-07-0066.jpg)
_2023-04-07-0067.jpg)
_2023-04-07-0068.jpg)
_2023-04-07-0069.jpg)
_2023-04-07-0070.jpg)
_2023-04-07-0047.jpg)
_2023-04-07-0048.jpg)
_2023-04-07-0049.jpg)
_2023-04-07-0050.jpg)
_2023-04-07-0051.jpg)
_2023-04-07-0052.jpg)
_2023-04-07-0053.jpg)
_2023-04-07-0054.jpg)
_2023-04-07-0055.jpg)
_2023-04-07-0056.jpg)
_2023-04-07-0057.jpg)
_2023-04-07-0058.jpg)
_2023-04-07-0022.jpg)
_2023-04-07-0023.jpg)
_2023-04-07-0024.jpg)
_2023-04-07-0025.jpg)
_2023-04-07-0026.jpg)
_2023-04-07-0027.jpg)
Chunks
_(Original_Order)_image1717.jpg)
_(Original_Order)_image1718.jpg)
_(Original_Order)_image1719.jpg)
_(Original_Order)_image1720.jpg)
_(Original_Order)_image1722.jpg)
_(Original_Order)_image1723.jpg)
_(Original_Order)_image1724.jpg)
_(Original_Order)_image1725.jpg)
_(Original_Order)_image1733.jpg)
_(Original_Order)_image1734.jpg)
_(Original_Order)_image1735.jpg)
_(Original_Order)_image1736.jpg)
_(Original_Order)_image1737.jpg)
_(Original_Order)_image1738.jpg)
_(Original_Order)_image1739.jpg)
_(Original_Order)_image1740.jpg)
_(Original_Order)_image1741.jpg)
_(Original_Order)_image1741a.jpg)
_(Original_Order)_image1742.jpg)
_(Original_Order)_image1744.jpg)
_(Original_Order)_image1745.jpg)
_(Original_Order)_image1746.jpg)
_(Original_Order)_image1747.jpg)
_(Original_Order)_image1748.jpg)
_(Original_Order)_image1749.jpg)
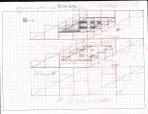
Maps
Act 1. Has diagonally slanted rotating steel drums. Only two things seem very similar to final; the general positioning of the starting area, and the short downward ramp leading to a flat area with the end sign.
Act 1
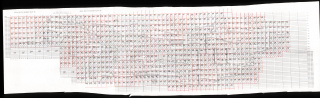
Act 1, revised, with chunk IDs
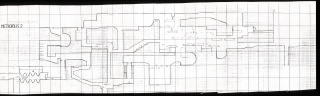
Act 2. Has giant crusher. Aside from the immediate starting area and an area with a half-loop leading to a ramp in the top-left, almost nothing recognizable remains.
Act 2
Act 2, revised, with chunk IDs
Act 3. Features a horizontal spike obstacle, similar to the ones removed from Marble Zone of the first game.
Act 3, with annotations
Half of Act 3, with iterative changes
Act 3, revised
Act 3, revised, with chunk IDs
_image1267.jpg)
_image1268.jpg)
_image1273.jpg)
_image1269.jpg)
_image1270.jpg)
_image1274.jpg)
_image1263.jpg)
_image1271.jpg)
_image1272.jpg)
_image1262.jpg)
_image1275.jpg)
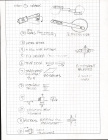
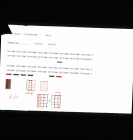
Digitiser art
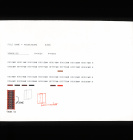
These are arranged roughly in the order of Tom Payne's list[1].

GRTEETH (gear teeth)
PILEDRVR (pile driver)
PILEDRVR (pile driver)
STMTRAP (steam trap), early version
STMTRAP (steam trap), early version
STMTRAP (steam trap), early version
CRANK (crank), early version, separated
CRANK (crank), early version, combined

CRANK (crank), revised, separated
CRANK (crank), revised, combined
SCRWPLAT (screw platform)

SCRWPLAT (screw platform)
SCRWPLAT (screw platform)

SCRWPLAT (screw platform), bad print
VSCREW (vertical screw)
VSCRDOOR (vertical screw door)

VSCRDOOR (vertical screw door)
VSCRDOOR (vertical screw door)
PLATFORM (platform)

VDOOR (vertical door)
VDOOR (vertical door)
VDOOR (vertical door)
VDOOR (vertical door)
STEAM (steam)

STEAM (steam), revised
SPIKEBLK (spike block)
SPIKEBLK (block)
NUT (nut)
ELDOOR (elevator door)
ELDOOR (elevator door), revised
ELDOOR (elevator door), revised
HSPIKE (horizontal spike)
VSPIKE (vertical spike)
PULLCAR (pull car)

PULLCAR (pull car)
BUTTON (button), replaced with "standard" Yamaguchi version
PISTON (piston), early version, separated
PISTON (piston), early version, combined
PISTON (piston), revised version, combined
LAVABUB (lava bubble)

RHOMBUS (rhombus), early version, separated
RHOMBUS (rhombus), early version, combined
RHOMBUS (rhombus), revised version, separated
COLOR2 (palette)


Miscellaneous documents
_image1419.jpg)
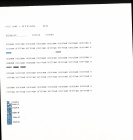
Blocks
Work in progress blocks obtained from one of Tom Payne's floppy disks:


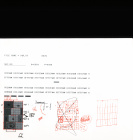
Palettes
_image1501.jpg)
_image1502.jpg)
_image1504.jpg)
References
| Sonic the Hedgehog 2 (16-bit) | |
|---|---|
|
Main page (KiS2|2013|3D|Ages) Manuals Development |
show;hide
Scrapped Levels: Scrapped Enemies: 2013 remake only: 2013 remake only: Knuckles in Sonic 2 Prototypes: |


