Difference between revisions of "Sonic the Hedgehog 2 (Nick Arcade prototype)/Comparisons/Spring Yard Zone"
From Sonic Retro
(Created page with "{{back|Sonic the Hedgehog 2 (Nick Arcade prototype)/Comparisons}} "Spring Yard Zone" is likely the most interesting level in the Nick Arcade prototype as it houses one of the...") |
(→Act 1) |
||
| Line 6: | Line 6: | ||
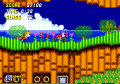
==Act 1== | ==Act 1== | ||
{{Comparison | {{Comparison | ||
| − | | image1= | + | | image1=Sonic2NA MD Comparison HPZ Act1Start.png |
| image2=Z hpf01.png | | image2=Z hpf01.png | ||
| game1=Nick Arcade prototype | | game1=Nick Arcade prototype | ||
| Line 13: | Line 13: | ||
}} | }} | ||
{{Comparison | {{Comparison | ||
| − | | image1= | + | | image1=Sonic2NA MD Comparison HPZ Dinosaur.png |
| image2=Notavailable.svg | | image2=Notavailable.svg | ||
| game1=Nick Arcade prototype | | game1=Nick Arcade prototype | ||
| Line 20: | Line 20: | ||
}} | }} | ||
{{Comparison | {{Comparison | ||
| − | | image1= | + | | image1=Sonic2NA MD Comparison HPZ Tube.png |
| image2=Notavailable.svg | | image2=Notavailable.svg | ||
| game1=Nick Arcade prototype | | game1=Nick Arcade prototype | ||
| Line 27: | Line 27: | ||
}} | }} | ||
{{Comparison | {{Comparison | ||
| − | | image1=Notavailable.svg | + | | image1=Sonic2NA MD Comparison HPZ Water.png |
| + | | image2=Notavailable.svg | ||
| + | | game1=Nick Arcade prototype | ||
| + | | game2=Final game | ||
| + | | desc=At the bottom, water and a emerald coloured bridge. | ||
| + | }} | ||
| + | {{Comparison | ||
| + | | image1=Sonic2NA MD Comparison HPZ Underwater.png | ||
| image2=Notavailable.svg | | image2=Notavailable.svg | ||
| game1=Nick Arcade prototype | | game1=Nick Arcade prototype | ||
| Line 41: | Line 48: | ||
}} | }} | ||
{{Comparison | {{Comparison | ||
| − | | image1= | + | | image1=Sonic2NA MD Comparison HPZ Platforms.png |
| image2=Notavailable.svg | | image2=Notavailable.svg | ||
| game1=Nick Arcade prototype | | game1=Nick Arcade prototype | ||
| Line 55: | Line 62: | ||
}} | }} | ||
{{Comparison | {{Comparison | ||
| − | | image1= | + | | image1=Sonic2NA MD Comparison HPZ GlowingBridge.png |
| image2=Z hpf03.png | | image2=Z hpf03.png | ||
| image3=Notavailable.svg | | image3=Notavailable.svg | ||
| Line 64: | Line 71: | ||
}} | }} | ||
{{Comparison | {{Comparison | ||
| − | | image1= | + | | image1=Sonic2NA MD Comparison HPZ Curve.png |
| − | | image2=Notavailable.svg | + | | image2=Mag compare1a.jpg |
| + | | image3=Notavailable.svg | ||
| game1=Nick Arcade prototype | | game1=Nick Arcade prototype | ||
| − | | game2=Final game | + | | game2=Pre-release mock-up |
| + | | game3=Final game | ||
| desc=This curved platform appeared in a mock-up screenshot of the zone. | | desc=This curved platform appeared in a mock-up screenshot of the zone. | ||
}} | }} | ||
| Line 78: | Line 87: | ||
}} | }} | ||
{{Comparison | {{Comparison | ||
| − | | image1= | + | | image1=Sonic2NA MD Comparison HPZ Emerald.png |
| image2=Notavailable.svg | | image2=Notavailable.svg | ||
| game1=Nick Arcade prototype | | game1=Nick Arcade prototype | ||
| Line 99: | Line 108: | ||
}} | }} | ||
{{Comparison | {{Comparison | ||
| − | | image1= | + | | image1=Sonic2NA MD Comparison HPZ Slope.png |
| image2=Notavailable.svg | | image2=Notavailable.svg | ||
| game1=Nick Arcade prototype | | game1=Nick Arcade prototype | ||
| Line 106: | Line 115: | ||
}} | }} | ||
{{Comparison | {{Comparison | ||
| − | | image1= | + | | image1=Sonic2NA MD Comparison HPZ SlopeRings.png |
| image2=Notavailable.svg | | image2=Notavailable.svg | ||
| game1=Nick Arcade prototype | | game1=Nick Arcade prototype | ||
| Line 113: | Line 122: | ||
}} | }} | ||
{{Comparison | {{Comparison | ||
| − | | image1= | + | | image1=Sonic2NA MD Comparison HPZ SlopeUnderwater.png |
| image2=Notavailable.svg | | image2=Notavailable.svg | ||
| game1=Nick Arcade prototype | | game1=Nick Arcade prototype | ||
| Line 120: | Line 129: | ||
}} | }} | ||
{{Comparison | {{Comparison | ||
| − | | image1= | + | | image1=Sonic2NA MD Comparison HPZ Rapids.png |
| image2=Notavailable.svg | | image2=Notavailable.svg | ||
| game1=Nick Arcade prototype | | game1=Nick Arcade prototype | ||
| Line 127: | Line 136: | ||
}} | }} | ||
{{Comparison | {{Comparison | ||
| − | | image1= | + | | image1=Sonic2NA MD Comparison HPZ End.png |
| image2=Notavailable.svg | | image2=Notavailable.svg | ||
| game1=Nick Arcade prototype | | game1=Nick Arcade prototype | ||
| game2=Final game | | game2=Final game | ||
| − | | desc=And finally, a | + | | desc=And finally, a submerged platform where the stage ends. |
}} | }} | ||
{{Comparison | {{Comparison | ||
| Line 141: | Line 150: | ||
}} | }} | ||
{{Comparison | {{Comparison | ||
| − | | image1= | + | | image1=Sonic2NA MD Comparison HPZ Background.png |
| image2=Notavailable.svg | | image2=Notavailable.svg | ||
| game1=''Sonic 2'' Nick Arcade prototype | | game1=''Sonic 2'' Nick Arcade prototype | ||
Revision as of 15:26, 18 April 2018
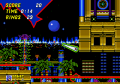
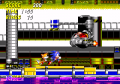
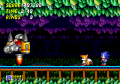
"Spring Yard Zone" is likely the most interesting level in the Nick Arcade prototype as it houses one of the most infamous scrapped levels in Sonic history; the fabled Hidden Palace Zone. It's existence here not only shows that it was one of the first levels planned, but that it was one of the first levels scrapped, as very little development was put into the stage after this prototype was built.
Only remnants of Hidden Palace Zone remain in the final game. The palettes, ring and object locations exist, but the graphics have been removed, replaced by corrupted tiles from Oil Ocean Zone.
Act 1
| Nick Arcade prototype |
|---|

| Final game |
|---|

Hidden Palace is an incomplete, and very linear level. While sections of the layout suggest more was planned, the majority of this zone was demonstrated in prototype videos and magazines from the era.
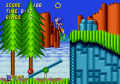
| Nick Arcade prototype |
|---|

| Final game |
|---|
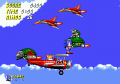
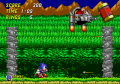
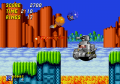
The stage nevertheless has more going for it than others in this prototype. It has badniks, such as this red dinosaur that walks back and forth.
| Nick Arcade prototype |
|---|

| Final game |
|---|
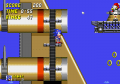
After a brief bit of jumping, a tube and a shield monitor. Sonic does not automatically curl into a ball when entering.
| Nick Arcade prototype |
|---|

| Final game |
|---|
At the bottom, water and a emerald coloured bridge.
| Nick Arcade prototype |
|---|

| Final game |
|---|
Below this section, and only accessible through debug mode, are a few platforms that lead nowhere.
| Nick Arcade prototype |
|---|

| Final game |
|---|
At the top of a half pipe, the infamous Tails 1-up monitor which grants Sonic an extra life. Given what has been learned in this prototype's version of Green Hill Zone (where the monitors use Sonic 1 mappings despite changes made for Sonic 2), it is suspected that once upon a time, this was a Sonic 1-up monitor.
| Nick Arcade prototype |
|---|

| Final game |
|---|
Collapsing platforms.
| Nick Arcade prototype |
|---|
| Final game |
|---|
A bat enemy, which swoops down in an arc motion.
| Sonic 2 Nick Arcade prototype |
|---|

| Sonic the Hedgehog 2 |
|---|

| Sonic the Hedgehog 3 |
|---|
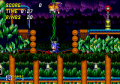
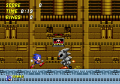
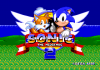
Another Hidden Palace staple; the glowing bridge, which lights up when Sonic or Tails stands on it. This effect is never used in Sonic 2, however does appear in Sonic the Hedgehog 3's IceCap Zone.
| Nick Arcade prototype |
|---|

| Pre-release mock-up |
|---|

| Final game |
|---|
This curved platform appeared in a mock-up screenshot of the zone.
| Nick Arcade prototype |
|---|
| Final game |
|---|
The zone's level design gets a bit wonky here. If you don't jump to the left and immediately aim for the platform below by holding right, you will fall to your death.
| Nick Arcade prototype |
|---|

| Final game |
|---|
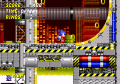
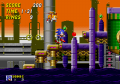
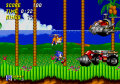
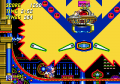
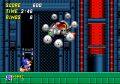
This emerald was designed to block tubes, much like those found in Chemical Plant Zone in the final game. It's completely solid in this prototype.
| Nick Arcade prototype |
|---|
| Final game |
|---|
There is a strange bit of collision detection going on here. If you spindash from the left, you will be taken into the tube.
| Nick Arcade prototype |
|---|
| Final game |
|---|
...and promptly die, because the tube leads nowhere.
| Nick Arcade prototype |
|---|

| Final game |
|---|
Eventually you will reach this extremely steep slope. With debug mode you can get a foothold on it, but it is thought to have been designed for some sort of lift.
| Nick Arcade prototype |
|---|

| Final game |
|---|
Horizontal rings start appearing as you go up. But the path stops at the ceiling.
| Nick Arcade prototype |
|---|

| Final game |
|---|
...only to continue at the very bottom of the level. It suggests that Hidden Palace Zone was meant to have a wrap-around feature, similar to Labyrinth Zone in Sonic 1 (and eventually Metropolis Zone in Sonic 2).
| Nick Arcade prototype |
|---|

| Final game |
|---|
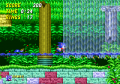
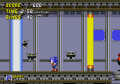
Then there are some animated waterways. They have no effect on Sonic or Tails.
| Nick Arcade prototype |
|---|

| Final game |
|---|
And finally, a submerged platform where the stage ends.
| Nick Arcade prototype |
|---|
| Final game |
|---|
A handful of extra enemies are placeable in debug mode, most spawning with corrupt graphics. It is a mixture of scrapped enemies and robots set to appear in Oil Ocean Zone. Curiously the Buzzer is completely in-tact and functional.
| Sonic 2 Nick Arcade prototype |
|---|

| Sonic the Hedgehog Spinball |
|---|
While this iteration of Hidden Palace never saw the light of day (at least, until the 2013 remake), sections of it were recycled for other projects. The background for example, drawn by Craig Stitt, appeared as part of Toxic Caves in Sonic the Hedgehog Spinball.

|
| Nick Arcade prototype |
|---|
|
|
| Final game |
Act 2 and 3
| Nick Arcade prototype |
|---|
| Final game |
|---|
Act 2 and 3 share the same layout as Act 1, but without any objects or rings. They cannot be played through normal means - Sonic and Tails spawn inside a wall. The level dimensions are also different, being brought over from the original Sonic the Hedgehog.
| Nick Arcade prototype |
|---|
| Final game |
|---|
Remnants of Labyrinth Zone exist in Act 3. At certain points, a rumbling noise is triggered (which in the original game signifies a new route has opened), and the water height is raised and lowered. At the very end, the boss theme starts playing as this is where Eggman would usually spawn, but as the boss has been removed, nothing is seen.
References
| Sonic the Hedgehog 2 (16-bit) | |
|---|---|
|
Main page (KiS2|2013|3D|Ages) Manuals Development |
show;hide
Scrapped Levels: Scrapped Enemies: 2013 remake only: 2013 remake only: Knuckles in Sonic 2 Prototypes: |