Difference between revisions of "Sonic the Hedgehog CD/Maps"
From Sonic Retro
(New page: Below are a list of '''Sonic the Hedgehog CD Level Maps'''. Click on a thumbnail to pull up a full view. Made with qiuu's converter and Stealth's SonED2. ==[[Palmtree Panic Zon...) |
(Sonic CD has "Rounds" and "Zones" instead of "Zones" and "Acts") |
||
| (10 intermediate revisions by 6 users not shown) | |||
| Line 1: | Line 1: | ||
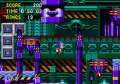
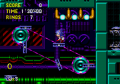
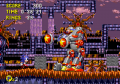
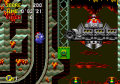
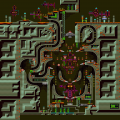
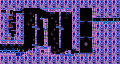
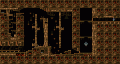
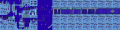
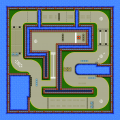
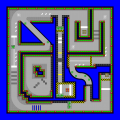
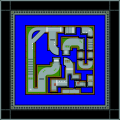
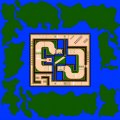
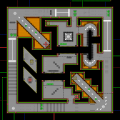
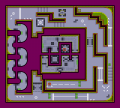
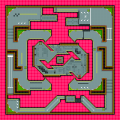
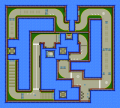
| − | + | The following are '''''[[Sonic the Hedgehog CD]]'' level maps'''. Click on a thumbnail to pull up a full view. Made by superjupi of [[The Sonic Center]]. | |
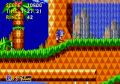
| − | ==[[Palmtree Panic | + | ==[[Palmtree Panic]]== |
<gallery>Image:SCD_map_R11A.png|Palmtree Panic Zone 1 Present | <gallery>Image:SCD_map_R11A.png|Palmtree Panic Zone 1 Present | ||
Image:SCD_map_R11B.png|Palmtree Panic Zone 1 Past | Image:SCD_map_R11B.png|Palmtree Panic Zone 1 Past | ||
| Line 11: | Line 11: | ||
Image:SCD_map_R13C.png|Palmtree Panic Zone 3 Good Future | Image:SCD_map_R13C.png|Palmtree Panic Zone 3 Good Future | ||
Image:SCD_map_R13D.png|Palmtree Panic Zone 3 Bad Future</gallery> | Image:SCD_map_R13D.png|Palmtree Panic Zone 3 Bad Future</gallery> | ||
| − | ==[[Collision Chaos | + | ==[[Collision Chaos]]== |
<gallery>Image:SCD_map_R31A.png|Collision Chaos Zone 1 Present | <gallery>Image:SCD_map_R31A.png|Collision Chaos Zone 1 Present | ||
Image:SCD_map_R31B.png|Collision Chaos Zone 1 Past | Image:SCD_map_R31B.png|Collision Chaos Zone 1 Past | ||
| Line 22: | Line 22: | ||
Image:SCD_map_R33C.png|Collision Chaos Zone 3 Good Future | Image:SCD_map_R33C.png|Collision Chaos Zone 3 Good Future | ||
Image:SCD_map_R33D.png|Collision Chaos Zone 3 Bad Future</gallery> | Image:SCD_map_R33D.png|Collision Chaos Zone 3 Bad Future</gallery> | ||
| − | ==[[Tidal Tempest | + | ==[[Tidal Tempest]]== |
<gallery>Image:SCD_map_R41A.png|Tidal Tempest Zone 1 Present | <gallery>Image:SCD_map_R41A.png|Tidal Tempest Zone 1 Present | ||
Image:SCD_map_R41B.png|Tidal Tempest Zone 1 Past | Image:SCD_map_R41B.png|Tidal Tempest Zone 1 Past | ||
| Line 33: | Line 33: | ||
Image:SCD_map_R43C.png|Tidal Tempest Zone 3 Good Future | Image:SCD_map_R43C.png|Tidal Tempest Zone 3 Good Future | ||
Image:SCD_map_R43D.png|Tidal Tempest Zone 3 Bad Future</gallery> | Image:SCD_map_R43D.png|Tidal Tempest Zone 3 Bad Future</gallery> | ||
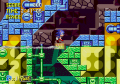
| − | ==[[Quartz Quadrant | + | ==[[Quartz Quadrant]]== |
<gallery>Image:SCD_map_R51A.png|Quartz Quadrant Zone 1 Present | <gallery>Image:SCD_map_R51A.png|Quartz Quadrant Zone 1 Present | ||
Image:SCD_map_R51B.png|Quartz Quadrant Zone 1 Past | Image:SCD_map_R51B.png|Quartz Quadrant Zone 1 Past | ||
| Line 44: | Line 44: | ||
Image:SCD_map_R53C.png|Quartz Quadrant Zone 3 Good Future | Image:SCD_map_R53C.png|Quartz Quadrant Zone 3 Good Future | ||
Image:SCD_map_R53D.png|Quartz Quadrant Zone 3 Bad Future</gallery> | Image:SCD_map_R53D.png|Quartz Quadrant Zone 3 Bad Future</gallery> | ||
| − | ==[[Wacky Workbench | + | ==[[Wacky Workbench]]== |
<gallery>Image:SCD_map_R61A.png|Wacky Workbench Zone 1 Present | <gallery>Image:SCD_map_R61A.png|Wacky Workbench Zone 1 Present | ||
Image:SCD_map_R61B.png|Wacky Workbench Zone 1 Past | Image:SCD_map_R61B.png|Wacky Workbench Zone 1 Past | ||
| Line 55: | Line 55: | ||
Image:SCD_map_R63C.png|Wacky Workbench Zone 3 Good Future | Image:SCD_map_R63C.png|Wacky Workbench Zone 3 Good Future | ||
Image:SCD_map_R63D.png|Wacky Workbench Zone 3 Bad Future</gallery> | Image:SCD_map_R63D.png|Wacky Workbench Zone 3 Bad Future</gallery> | ||
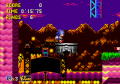
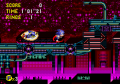
| − | ==[[Stardust Speedway | + | ==[[Stardust Speedway]]== |
<gallery>Image:SCD_map_R71A.png|Stardust Speedway Zone 1 Present | <gallery>Image:SCD_map_R71A.png|Stardust Speedway Zone 1 Present | ||
Image:SCD_map_R71B.png|Stardust Speedway Zone 1 Past | Image:SCD_map_R71B.png|Stardust Speedway Zone 1 Past | ||
| Line 66: | Line 66: | ||
Image:SCD_map_R73C.png|Stardust Speedway Zone 3 Good Future | Image:SCD_map_R73C.png|Stardust Speedway Zone 3 Good Future | ||
Image:SCD_map_R73D.png|Stardust Speedway Zone 3 Bad Future</gallery> | Image:SCD_map_R73D.png|Stardust Speedway Zone 3 Bad Future</gallery> | ||
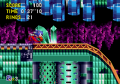
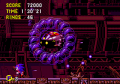
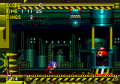
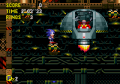
| − | ==[[Metallic Madness | + | ==[[Metallic Madness]]== |
<gallery>Image:SCD_map_R81A.png|Metallic Madness Zone 1 Present | <gallery>Image:SCD_map_R81A.png|Metallic Madness Zone 1 Present | ||
Image:SCD_map_R81B.png|Metallic Madness Zone 1 Past | Image:SCD_map_R81B.png|Metallic Madness Zone 1 Past | ||
| Line 76: | Line 76: | ||
Image:SCD_map_R82D.png|Metallic Madness Zone 2 Bad Future | Image:SCD_map_R82D.png|Metallic Madness Zone 2 Bad Future | ||
Image:SCD_map_R83C.png|Metallic Madness Zone 3 Good Future | Image:SCD_map_R83C.png|Metallic Madness Zone 3 Good Future | ||
| − | Image:SCD_map_R83D.png|Metallic Madness Zone 3 Bad Future</gallery>[[Category: | + | Image:SCD_map_R83D.png|Metallic Madness Zone 3 Bad Future</gallery> |
| + | ==[[Special Stage (Sonic the Hedgehog CD)|Special Stage]]== | ||
| + | <gallery>Image:SCDSS1.png|Special Stage 1 | ||
| + | Image:SCDSS2.png|Special Stage 2 | ||
| + | Image:SCDSS3.png|Special Stage 3 | ||
| + | Image:SCDSS4.png|Special Stage 4 | ||
| + | Image:SCDSS5.png|Special Stage 5 | ||
| + | Image:SCDSS6.png|Special Stage 6 | ||
| + | Image:SCDSS7.png|Special Stage 7 | ||
| + | Image:SCDSS8.png|Special Stage 8</gallery> | ||
| + | |||
| + | {{SonicCDOmni}} | ||
| + | [[Category:Maps]] | ||
Latest revision as of 06:54, 23 July 2020
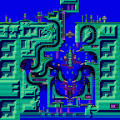
The following are Sonic the Hedgehog CD level maps. Click on a thumbnail to pull up a full view. Made by superjupi of The Sonic Center.
Contents
Palmtree Panic

Palmtree Panic Zone 1 Present

Palmtree Panic Zone 1 Past

Palmtree Panic Zone 1 Good Future

Palmtree Panic Zone 1 Bad Future

Palmtree Panic Zone 2 Present

Palmtree Panic Zone 2 Past

Palmtree Panic Zone 2 Good Future

Palmtree Panic Zone 2 Bad Future

Palmtree Panic Zone 3 Good Future

Palmtree Panic Zone 3 Bad Future
Collision Chaos

Collision Chaos Zone 1 Present

Collision Chaos Zone 1 Past

Collision Chaos Zone 1 Good Future

Collision Chaos Zone 1 Bad Future

Collision Chaos Zone 2 Present

Collision Chaos Zone 2 Past

Collision Chaos Zone 2 Good Future

Collision Chaos Zone 2 Bad Future
Collision Chaos Zone 3 Good Future
Collision Chaos Zone 3 Bad Future


Tidal Tempest

Tidal Tempest Zone 1 Present

Tidal Tempest Zone 1 Past

Tidal Tempest Zone 1 Good Future

Tidal Tempest Zone 1 Bad Future

Tidal Tempest Zone 2 Present

Tidal Tempest Zone 2 Past

Tidal Tempest Zone 2 Good Future

Tidal Tempest Zone 2 Bad Future

Tidal Tempest Zone 3 Good Future

Tidal Tempest Zone 3 Bad Future


Quartz Quadrant

Quartz Quadrant Zone 1 Present

Quartz Quadrant Zone 1 Past

Quartz Quadrant Zone 1 Good Future

Quartz Quadrant Zone 1 Bad Future

Quartz Quadrant Zone 2 Present

Quartz Quadrant Zone 2 Past

Quartz Quadrant Zone 2 Good Future

Quartz Quadrant Zone 2 Bad Future

Quartz Quadrant Zone 3 Good Future

Quartz Quadrant Zone 3 Bad Future
Wacky Workbench

Wacky Workbench Zone 1 Present

Wacky Workbench Zone 1 Past

Wacky Workbench Zone 1 Good Future

Wacky Workbench Zone 1 Bad Future

Wacky Workbench Zone 2 Present

Wacky Workbench Zone 2 Past

Wacky Workbench Zone 2 Good Future

Wacky Workbench Zone 2 Bad Future
Wacky Workbench Zone 3 Good Future
Wacky Workbench Zone 3 Bad Future


Stardust Speedway

Stardust Speedway Zone 1 Present

Stardust Speedway Zone 1 Past

Stardust Speedway Zone 1 Good Future

Stardust Speedway Zone 1 Bad Future

Stardust Speedway Zone 2 Present

Stardust Speedway Zone 2 Past

Stardust Speedway Zone 2 Good Future

Stardust Speedway Zone 2 Bad Future

Stardust Speedway Zone 3 Good Future

Stardust Speedway Zone 3 Bad Future
Metallic Madness

Metallic Madness Zone 1 Present

Metallic Madness Zone 1 Past

Metallic Madness Zone 1 Good Future

Metallic Madness Zone 1 Bad Future

Metallic Madness Zone 2 Present

Metallic Madness Zone 2 Past

Metallic Madness Zone 2 Good Future

Metallic Madness Zone 2 Bad Future
Metallic Madness Zone 3 Good Future

Metallic Madness Zone 3 Bad Future
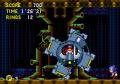
Special Stage
Special Stage 1
Special Stage 2
Special Stage 3
Special Stage 4
Special Stage 5
Special Stage 6
Special Stage 7
Special Stage 8


| Sonic the Hedgehog CD | |
|---|---|
|
Main page (2011) Manuals |
show;hide
Scrapped Enemies: Scrapped Bosses: Mega-CD: Windows PC:
Books:
Music: |