
Difference between revisions of "Sonic the Hedgehog 2 (16-bit)/Development"
From Sonic Retro
(→Time Travel) |
|||
| Line 29: | Line 29: | ||
===Levels=== | ===Levels=== | ||
<gallery widths="148px" heights="140px" perrow="4"> | <gallery widths="148px" heights="140px" perrow="4"> | ||
| − | Image:Metropolis concept.jpg|Metropolis Zone. Looks like diagonal conveyor belts were originally planned. | + | Image:Metropolis concept.jpg|An early piece of concept art for [[Metropolis Zone]]. Looks like diagonal conveyor belts were originally planned. |
| − | Image:S2concept-1.png| | + | Image:S2concept-1.png|Sonic and Tails near a large ramp. |
| − | Image:S2concept-2.png| | + | Image:S2concept-2.png|The familiar "moving blocks" area from [[Chemical Plant Zone]]. |
| − | Image:S2concept-3.png|Sky Chase Zone and possibly Hill Top Zone. | + | Image:S2concept-3.png|Various ideas for [[Sky Chase Zone]] and possibly [[Hill Top Zone]]. |
</gallery> | </gallery> | ||
===Objects=== | ===Objects=== | ||
<gallery widths="148px" heights="140px" perrow="4"> | <gallery widths="148px" heights="140px" perrow="4"> | ||
| − | Image:Sket ball.png| | + | Image:Sket ball.png|A bouncing ball which was scrapped before release. Its sprites can actually be found in a prototype version in Oil Ocean Zone. |
</gallery> | </gallery> | ||
| Line 44: | Line 44: | ||
===Various=== | ===Various=== | ||
<gallery widths="140px" heights="140px" perrow="4"> | <gallery widths="140px" heights="140px" perrow="4"> | ||
| − | Image:mag_compare8a.png| | + | Image:mag_compare8a.png|One of the last minute changes to Sonic 2 was its title screen. The old one even made it to the game's manual. |
| − | Image:mag gamepro 2.jpg|Same Title screen in color. | + | Image:mag gamepro 2.jpg|Same Title screen in color. This one is a bit older as it lacks the menu options. |
| − | Image:mag_compare10a.jpg| | + | Image:mag_compare10a.jpg|With the old title screen came an old level select, similar to [[Sonic 1]]'s. As you can see, a few cut zones are selectable here. |
</gallery> | </gallery> | ||
===Emerald Hill Zone=== | ===Emerald Hill Zone=== | ||
<gallery widths="140px" heights="140px" perrow="4"> | <gallery widths="140px" heights="140px" perrow="4"> | ||
| − | Image:mag_compare4a.jpg| | + | Image:mag_compare4a.jpg|An early mockup of the zone with an off-center Sonic. Note the [[Green Hill Zone]] clouds in the background, and the Sonic 1 HUD. |
Image:EHZ mockup hires.jpg|Better quality version of the mockup, albeit with the top and bottom missing. | Image:EHZ mockup hires.jpg|Better quality version of the mockup, albeit with the top and bottom missing. | ||
| − | Image:mag_compare14a.jpg|Tails | + | Image:mag_compare14a.jpg|Tails' life counter says "Sonic". |
Image:mag_compare21a.jpg|Tails lives counter says Sonic still. | Image:mag_compare21a.jpg|Tails lives counter says Sonic still. | ||
| − | Image:mag_compare15a.jpg|Eggman flying straight down | + | Image:mag_compare25a.gif|Another thing about these shots are the fact they contain a score counter - this was removed in the final version of the 2-player mode. |
| − | + | Image:mag_compare15a.jpg|Eggman appears to be flying straight down as opposed to diagonally. | |
</gallery> | </gallery> | ||
===Aquatic Ruin Zone=== | ===Aquatic Ruin Zone=== | ||
<gallery widths="140px" heights="140px" perrow="4"> | <gallery widths="140px" heights="140px" perrow="4"> | ||
| − | Image:ARZ ramp.png|Sonic's prototype walking animation. | + | Image:ARZ ramp.png|Another common feature of old screenshots are Sonic's prototype walking animation. |
Image:ARZ ramp2.png|Walking animation again. | Image:ARZ ramp2.png|Walking animation again. | ||
| − | Image:mag_compare12a.jpg| | + | Image:mag_compare12a.jpg|Looks like the title card was broken at some point as it's using graphics from the underwater bubbles. It also reads "Neo Green Hill Zone". |
| − | Image:ARZ underwater.jpg| | + | Image:ARZ underwater.jpg|Here Sonic's animations seem to be final. |
Image:ARZ floating log.jpg|Log floating on water. | Image:ARZ floating log.jpg|Log floating on water. | ||
Image:ARZ big log.jpg|Sonic's corner animation. | Image:ARZ big log.jpg|Sonic's corner animation. | ||
| Line 71: | Line 71: | ||
===Casino Night Zone=== | ===Casino Night Zone=== | ||
<gallery widths="140px" heights="140px" perrow="4"> | <gallery widths="140px" heights="140px" perrow="4"> | ||
| − | Image:mag_compare6a.jpg| | + | Image:mag_compare6a.jpg|As seen in the Simon Wai beta, Casino Night Zone was once very different and empty.. The smoke in this shot however means this is from a later prototype. |
| − | Image:CNZ pink.jpg| | + | Image:CNZ pink.jpg|This design also seems to be more complete than in the Simon Wai prototype. |
</gallery> | </gallery> | ||
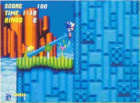
===Hill Top Zone=== | ===Hill Top Zone=== | ||
<gallery widths="140px" heights="140px" perrow="4"> | <gallery widths="140px" heights="140px" perrow="4"> | ||
| − | Image:mag_compare9a.gif|Green balls on see-saws. | + | Image:mag_compare9a.gif|Green balls on see-saws instead of enemies. This is consistant with the [[Sonic the Hedgehog 2 Nick Arcade Prototype|"Nick Arcade" prototype]]. |
Image:HTZ ride.jpg| | Image:HTZ ride.jpg| | ||
Image:HTZ magma.jpg| | Image:HTZ magma.jpg| | ||
| Line 86: | Line 86: | ||
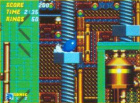
===Mystic Cave Zone=== | ===Mystic Cave Zone=== | ||
<gallery widths="140px" heights="140px" perrow="4"> | <gallery widths="140px" heights="140px" perrow="4"> | ||
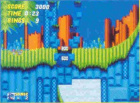
| − | Image:mag gamepro 3.jpg| | + | Image:mag gamepro 3.jpg|Mystic Cave was often mistakenly refered to as "Dust Hill Zone", due to some unfinished level select titles. |
Image:MCZ enemy.jpg| | Image:MCZ enemy.jpg| | ||
Image:MCZ plank.jpg| | Image:MCZ plank.jpg| | ||
| Line 95: | Line 95: | ||
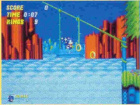
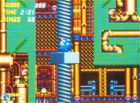
===Oil Ocean Zone=== | ===Oil Ocean Zone=== | ||
<gallery widths="140px" heights="140px" perrow="4"> | <gallery widths="140px" heights="140px" perrow="4"> | ||
| − | Image:OOZ sun.png| | + | Image:OOZ sun.png|Older Oil Ocean shots show a different sun which can be found in the Simon Wai prototype. |
| − | Image:OOZ walk.png| | + | Image:OOZ walk.png|More of the prototype walking animation and switch that causes a ridable ball to appear. |
| − | Image:OOZ ball.jpg|A ridable ball. These are accessable using debug in final. | + | Image:OOZ ball.jpg|A ridable ball. These are only accessable using debug in final. |
</gallery> | </gallery> | ||
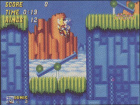
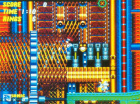
===Metropolis Zone=== | ===Metropolis Zone=== | ||
<gallery widths="140px" heights="140px" perrow="4"> | <gallery widths="140px" heights="140px" perrow="4"> | ||
| − | Image:MetZ crank.jpg| | + | Image:MetZ crank.jpg|Early Metropolis screenshots show a more complicated background that relied more on rotating palettes. |
Image:MetZ bumpers.jpg| | Image:MetZ bumpers.jpg| | ||
Image:MetZ gear.jpg| | Image:MetZ gear.jpg| | ||
| Line 112: | Line 112: | ||
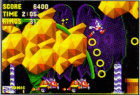
===Hidden Palace Zone=== | ===Hidden Palace Zone=== | ||
<gallery widths="140px" heights="140px" perrow="4"> | <gallery widths="140px" heights="140px" perrow="4"> | ||
| − | Image:mag_compare1a.jpg| | + | Image:mag_compare1a.jpg|Here's a mockup screenshot of Hidden Palace Zone. Sonic is off center and there is a background not seen in any of the dumped prototypes or later screenshots. |
| − | Image:HPZ diffBG.png| | + | Image:HPZ diffBG.png|A different scan of the previous image. |
| − | Image:HPZ Bat.jpg|Bat | + | Image:HPZ Bat.jpg|Bat Badniks which were removed along with the zone. |
| − | Image:HPZ Dino.jpg|Dino | + | Image:HPZ Dino.jpg|Dino Badniks. |
| − | Image:mag_compare2a.jpg| | + | Image:mag_compare2a.jpg|The shield glows through tube - something that would be later fixed in later versions. |
| − | Image:mag_compare7a.gif| | + | Image:mag_compare7a.gif|This screenshot has a green watermark (TV logo?) above lives icon - it isn't part of the background. |
| − | Image:mag_compare13a.jpg| | + | Image:mag_compare13a.jpg|Sonic has his final walking animations, suggesting this zone lasted longer than the Simon Wai prototype. |
| − | Image:HPZ Bridge.JPG| | + | Image:HPZ Bridge.JPG|Another similar shot. |
</gallery> | </gallery> | ||
===Wood Zone=== | ===Wood Zone=== | ||
<gallery widths="140px" heights="140px" perrow="4"> | <gallery widths="140px" heights="140px" perrow="4"> | ||
| − | Image:mag_compare11a.jpg|Sonic | + | Image:mag_compare11a.jpg|Sonic lying down in the scrapped Wood Zone, an animation not seen in the Simon Wai prototype. |
Image:S2 WoodZone.jpg|On the ramp. | Image:S2 WoodZone.jpg|On the ramp. | ||
</gallery> | </gallery> | ||
| Line 130: | Line 130: | ||
===Dust Hill Zone=== | ===Dust Hill Zone=== | ||
<gallery widths="140px" heights="140px" perrow="4"> | <gallery widths="140px" heights="140px" perrow="4"> | ||
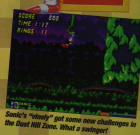
| − | Image:mag_compare3a.jpg| | + | Image:mag_compare3a.jpg|The only shot of Dust Hill Zone is this mockup. Like the Emerald Hill mockup above, it borrows graphics from Sonic 1. The crocodile badnik exists within early prototypes of the game. |
</gallery> | </gallery> | ||
Revision as of 13:23, 25 September 2009
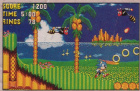
Sonic the Hedgehog 2 has gone through several changes over its development process. There are several rejected ideas, levels, and other things that were left on the cutting room floor. The following details several of these things.
Contents
Prototype Versions
Several prototypes have been found over the years. The first prototype discovered, the Simon Wai prototype, found by Simon Wai, is famous for its deleted levels. This particular prototype was stolen during a toy show in New York in 1992 according to Yuji Naka. It was recently stated in an interview with Yuji Naka that this beta was from a demonstration cartridge that was stolen at a toy show in New York in 1992.[1]
Another much earlier beta was found by drx and looks similar to the one featured on the TV show Nick Arcade. This was followed later by drx's discovery and release of five more betas, named Beta 4, Beta 5, Beta 6, Beta 7, and Beta 8. These seem to be very similar to the final version.
Time Travel
The concept of Time Travel in Sonic 2 was referred to in early concept art, as well as several gaming magazines including a August 1992 EGM article. Only past and present timezones are referred to in the concept art, so it may not have had as many alternate time zones as Sonic the Hedgehog CD. It isn't known at what point the time travel concept was dropped, but the 1992 EGM article refers to the game as being 40% complete whilst mentioning time travel being associated with the game. The concept art refers to the scrapped level Rock Zone as being the past version of the scrapped Desert Zone.
Allusions to Time Travel in the Simon Wai prototype
Although time travel is not present whatsoever in the final game there are possible leftovers in the Simon Wai prototype that indicate it was present in the game at one point.
- Aquatic Ruin Zone's name is listed as Neo Green Hill Zone, possibly indicating it as a future version of Emerald Hill Zone (which was listed as Green Hill in this prototype).
- Some prototype zones share soundtracks, Wood Zone shares the same music as Metropolis Zone and Genocide City Zone shares music with Chemical Plant Zone.
- The level design for Wood Zone and Metropolis Zone are similar.
- An unused futuristic looking Star post can be found using debug.
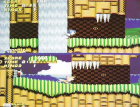
Deleted Levels

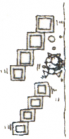
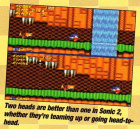
Sonic the Hedgehog 2 was originally envisioned to have many more levels than those included in the final version. Three levels, Wood Zone, Hidden Palace Zone, and Genocide City Zone, were found in the the "Simon Wai prototype" in unfinished form. There was also Dust Hill Zone which had a single mockup image printed in several gaming magazines but was dropped very early in the games development. Lastly, two other levels, Winter level and Rock Zone, were also dropped early in development and the only references to their existence come from concept art and interviews by Sonic Team staff members. More info on these Zones can be found in their respective articles.
Scrapped Badniks
There are several Badniks which can be found in concept art which cannot be found in the final game. This includes: Banper, Bee, Bubbler, Bubbler's Mother and Frog. There are also badniks whose object code has actually been found in prototypes, this includes: BBat, BFish, Gator, Redz, Snail and Stego.
Concept Art
The following is concept art for the game which doesn't fit in any of the preceding sections.
Levels
- Metropolis concept.jpg
An early piece of concept art for Metropolis Zone. Looks like diagonal conveyor belts were originally planned.

Sonic and Tails near a large ramp.
The familiar "moving blocks" area from Chemical Plant Zone.

Various ideas for Sky Chase Zone and possibly Hill Top Zone.


Objects
- Sket ball.png
A bouncing ball which was scrapped before release. Its sprites can actually be found in a prototype version in Oil Ocean Zone.
Early Game Design
These scans come from various magazines. Many things found in these images can be found in the multiple Sonic 2 prototypes that have been discovered. For in depth comparisons of which prototypes contain what is seen in the scans see Magazine Preview Scans.
Various
One of the last minute changes to Sonic 2 was its title screen. The old one even made it to the game's manual.

Same Title screen in color. This one is a bit older as it lacks the menu options.
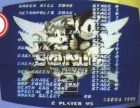
With the old title screen came an old level select, similar to Sonic 1's. As you can see, a few cut zones are selectable here.


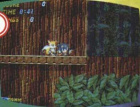
Emerald Hill Zone
An early mockup of the zone with an off-center Sonic. Note the Green Hill Zone clouds in the background, and the Sonic 1 HUD.
Better quality version of the mockup, albeit with the top and bottom missing.
Tails' life counter says "Sonic".
Tails lives counter says Sonic still.
- Mag compare25a.gif
Another thing about these shots are the fact they contain a score counter - this was removed in the final version of the 2-player mode.
Eggman appears to be flying straight down as opposed to diagonally.


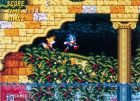
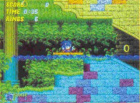
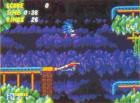
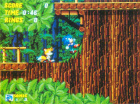
Aquatic Ruin Zone
Another common feature of old screenshots are Sonic's prototype walking animation.
Walking animation again.
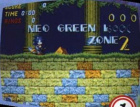
Looks like the title card was broken at some point as it's using graphics from the underwater bubbles. It also reads "Neo Green Hill Zone".
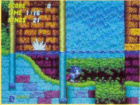
Here Sonic's animations seem to be final.
Log floating on water.
Sonic's corner animation.


Casino Night Zone
As seen in the Simon Wai beta, Casino Night Zone was once very different and empty.. The smoke in this shot however means this is from a later prototype.
This design also seems to be more complete than in the Simon Wai prototype.


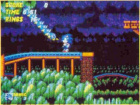
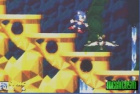
Hill Top Zone
Green balls on see-saws instead of enemies. This is consistant with the "Nick Arcade" prototype.
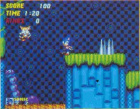


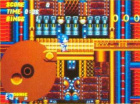
Mystic Cave Zone
Mystic Cave was often mistakenly refered to as "Dust Hill Zone", due to some unfinished level select titles.


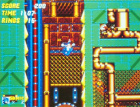
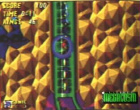
Oil Ocean Zone
- OOZ sun.png
Older Oil Ocean shots show a different sun which can be found in the Simon Wai prototype.
- OOZ walk.png
More of the prototype walking animation and switch that causes a ridable ball to appear.

A ridable ball. These are only accessable using debug in final.

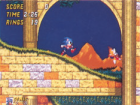
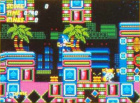
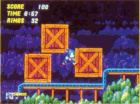
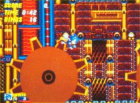
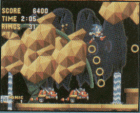
Metropolis Zone
Early Metropolis screenshots show a more complicated background that relied more on rotating palettes.


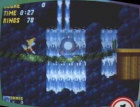
Hidden Palace Zone
Here's a mockup screenshot of Hidden Palace Zone. Sonic is off center and there is a background not seen in any of the dumped prototypes or later screenshots.
A different scan of the previous image.
Bat Badniks which were removed along with the zone.
Dino Badniks.
The shield glows through tube - something that would be later fixed in later versions.
- Mag compare7a.gif
This screenshot has a green watermark (TV logo?) above lives icon - it isn't part of the background.
Sonic has his final walking animations, suggesting this zone lasted longer than the Simon Wai prototype.
Another similar shot.


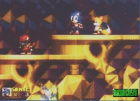
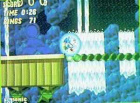
Wood Zone
Sonic lying down in the scrapped Wood Zone, an animation not seen in the Simon Wai prototype.
On the ramp.


Dust Hill Zone
The only shot of Dust Hill Zone is this mockup. Like the Emerald Hill mockup above, it borrows graphics from Sonic 1. The crocodile badnik exists within early prototypes of the game.
