Difference between revisions of "Launch Base Zone"
From Sonic Retro
m (Text replacement - "==Sonic Team Commentary (from ''Sonic Jam'' Official Guide)== {{quote|1=" to "{{quote|") |
BSonirachi (talk | contribs) |
||
| Line 29: | Line 29: | ||
| next=Mushroom Hill Zone | | next=Mushroom Hill Zone | ||
}} | }} | ||
| + | '''{{PAGENAME}}''' is the sixth [[Zone]] of ''[[Sonic the Hedgehog 3]]''. All characters would enter from [[IceCap Zone]] by popping out of a patch of snow at the beginning. | ||
| − | + | ==Overview== | |
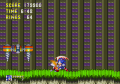
| + | Unlike most of [[Dr. Eggman]]'s bases, this one isn't a completely robotic fortress of machines; instead, it is basically a very large construction site where he is repairing the [[Death Egg]]. During [[Sonic the Hedgehog|Sonic]] and [[Miles "Tails" Prower|Tails]]' adventure, the Death Egg itself can be seen half-submerged in the giant lake in the background for Act 1, surrounded by large cranes; in [[Knuckles the Echidna|Knuckles]]' adventure, the Death Egg is no longer there. | ||
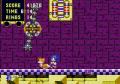
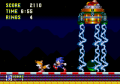
| − | + | Throughout Act 1, the kind of gimmicks the player will come across include huge cylinders that the player will revolve around and a variety of elevators, such as spinning yellow cups that travel up or down thin metal corkscrews (though some will spin out of control and fling the player into walls), and rapidly-spinning elevators inside glass tubes that will transport the player to other parts of the Act. Security alarms are placed around the Act, and will summon [[Flybot767]] [[Badnik]]s to attack the player if they pass through one. Outdoor sections are very fast-paced, as they are filled with long slopes to roll down, as well as [[Speed Booster]]s and tube-loops that will instantly propel the player into high speeds. Hooks attached to rails will carry the player at high speeds, and some walls require the player to [[Spin Jump]] into switch boxes to toggle them. | |
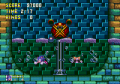
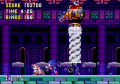
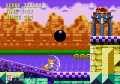
| − | The Zone is rendered slightly less dangerous when played as part of ''[[Sonic 3 & Knuckles]]'' as opposed to just ''Sonic 3'', with several enemies and several sets of spikes above doorways removed from Act 1, and [[ | + | The Zone uses a technique for showing/hiding [[tiles]] indoors and outdoors when the player enters the large towers in Act 1. This effect was originally used in ''[[Sonic the Hedgehog 2 (16-bit)|Sonic the Hedgehog 2]]''<nowiki>'</nowiki>s [[Wing Fortress Zone]] as a one-off, but like many of ''Sonic 2''<nowiki>'</nowiki>s one-off features, it appears several times in ''Sonic 3'' and ''Sonic & Knuckles'', being used in [[Angel Island Zone]] (Act 1), this Zone and [[Flying Battery Zone]]. At the end of Act 1 for Sonic and Tails, Knuckles would drop a bomb in one of these towers, causing it to crumble to pieces as the heroes escape and deal with the [[Twin Hammer]] placed by Eggman. In Knuckles' story, the echidna would climb up the destroyed remains of the tower and fight his mini-bosses in a different area. |
| + | |||
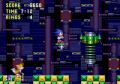
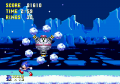
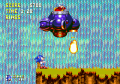
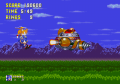
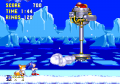
| + | Act 2 takes the player into the giant lake seen in Act 1's background, and is composed of a complex network of water pipes that the player will run along at high speeds throughout the Act. Some of the water pipes can also be entered into by [[Spin Dash]]ing into the barricades that connect the pipes together, then entering the flushing water. Following lower routes will take the player into the lake water, which generally has no means of replenishing air but are otherwise not very long. While Sonic and Tails run around the surface and sky, Knuckles would instead explore the sewers beneath the lake, which will eventually flood after destroying one of the pipe barricades. At the end of Act 2, Sonic and Tails will make it to the Death Egg and fight a series of [[Launch Base Zone bosses|boss machines]]. | ||
| + | |||
| + | This Zone is rendered slightly less dangerous when played as part of ''[[Sonic the Hedgehog 3 & Knuckles]]'' as opposed to just ''Sonic 3'', with several enemies and several sets of spikes above doorways removed from Act 1, and [[Eggman Mark|Robotnik]] [[Monitor]]s and some of the boss fights dropped from Act 2. Additionally, once the Zone is cleared, the game will continue on into [[Mushroom Hill Zone]], with Tails flying Sonic into the next Zone after taking down the Death Egg, and the pipe where Knuckles would face his bosses being blown up, sending the echidna falling to the next Zone. | ||
==Quotes== | ==Quotes== | ||
| − | {{quote|1=You're getting close to where Dr. Robotnik is repairing his Death Egg ship. This is your last chance to stop the Doc's evil scheme.}} | + | {{quote|1=You're getting close to where Dr. Robotnik is repairing his Death Egg ship. This is your last chance to stop the Doc's evil scheme.|2=''Sonic the Hedgehog 3'' US manual|ref={{fileref|Sonic3 MD US manual.pdf|page=19}}}} |
{{quote|This is the place where you can see the construction site where Eggman is rebuilding the Death Egg, hidden among the various ruins on the island. You never really see the Death Egg in Sonic 2, but here you can see it quite clearly. This is the climax at the midpoint of the story.|[[Takashi Iizuka]]|''[[Sonic Jam Official Guide]]''}} | {{quote|This is the place where you can see the construction site where Eggman is rebuilding the Death Egg, hidden among the various ruins on the island. You never really see the Death Egg in Sonic 2, but here you can see it quite clearly. This is the climax at the midpoint of the story.|[[Takashi Iizuka]]|''[[Sonic Jam Official Guide]]''}} | ||
==Enemies== | ==Enemies== | ||
| − | + | {| style="width:auto;" | |
| − | + | |style="text-align:center;"|{{spriteImage|Corkey-spr.png}} | |
| − | + | |'''[[Corkey]]''' — A gray energy cannon, found attached to rails or ceilings. | |
| − | + | |- | |
| − | + | |style="text-align:center;"|{{spriteImage|Flybot767-spr.png}} | |
| − | + | |'''[[Flybot767]]''' — Silver bird Badnik that flies into the player. | |
| − | = | + | |- |
| − | + | |style="text-align:center;"|{{spriteImage|Orbinauts3-spr.png}} | |
| − | + | |'''[[Orbinaut]]''' — A silver orb surrounded by four spiked orbs. Moves only when the player moves. | |
| − | + | |- | |
| − | + | |style="text-align:center;"|{{spriteImage|Ribot-spr.png}} | |
| − | = | + | |'''[[Ribot]]''' — Robotic frog that swings or flings metallic orbs. |
| − | + | |- | |
| − | + | |style="text-align:center;"|{{spriteImage|Snailblaster-spr.png}} | |
| − | = | + | |'''[[Snail Blaster]]''' — A snail with a protective shell that covers blaster cannons. |
| − | + | |} | |
| − | |||
| − | |||
==References== | ==References== | ||
Revision as of 12:09, 17 August 2019
| |
Sonic the Hedgehog 3 |
| Levels |
| Launch Base Zone |
| show;hide
|
| Launch Base Zone |
|---|
| Sixth Zone, Sonic the Hedgehog 3 |
| Number of Acts: 2 |
| Level themes: industrial, underwater |
| Sub-boss: Twin Hammer |
| Boss: Launch Base Zone bosses |
| Maximum rings, Act 1: 294 + 130 |
| Maximum rings, Act 2: 409 + 160 |
| Underwater areas: Act 2 |
| Non-English names: |
| ← IceCap Zone | Mushroom Hill Zone → |


Launch Base Zone is the sixth Zone of Sonic the Hedgehog 3. All characters would enter from IceCap Zone by popping out of a patch of snow at the beginning.
Contents
Overview
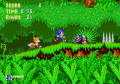
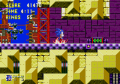
Unlike most of Dr. Eggman's bases, this one isn't a completely robotic fortress of machines; instead, it is basically a very large construction site where he is repairing the Death Egg. During Sonic and Tails' adventure, the Death Egg itself can be seen half-submerged in the giant lake in the background for Act 1, surrounded by large cranes; in Knuckles' adventure, the Death Egg is no longer there.
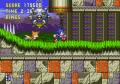
Throughout Act 1, the kind of gimmicks the player will come across include huge cylinders that the player will revolve around and a variety of elevators, such as spinning yellow cups that travel up or down thin metal corkscrews (though some will spin out of control and fling the player into walls), and rapidly-spinning elevators inside glass tubes that will transport the player to other parts of the Act. Security alarms are placed around the Act, and will summon Flybot767 Badniks to attack the player if they pass through one. Outdoor sections are very fast-paced, as they are filled with long slopes to roll down, as well as Speed Boosters and tube-loops that will instantly propel the player into high speeds. Hooks attached to rails will carry the player at high speeds, and some walls require the player to Spin Jump into switch boxes to toggle them.
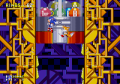
The Zone uses a technique for showing/hiding tiles indoors and outdoors when the player enters the large towers in Act 1. This effect was originally used in Sonic the Hedgehog 2's Wing Fortress Zone as a one-off, but like many of Sonic 2's one-off features, it appears several times in Sonic 3 and Sonic & Knuckles, being used in Angel Island Zone (Act 1), this Zone and Flying Battery Zone. At the end of Act 1 for Sonic and Tails, Knuckles would drop a bomb in one of these towers, causing it to crumble to pieces as the heroes escape and deal with the Twin Hammer placed by Eggman. In Knuckles' story, the echidna would climb up the destroyed remains of the tower and fight his mini-bosses in a different area.
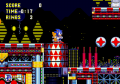
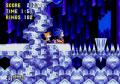
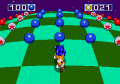
Act 2 takes the player into the giant lake seen in Act 1's background, and is composed of a complex network of water pipes that the player will run along at high speeds throughout the Act. Some of the water pipes can also be entered into by Spin Dashing into the barricades that connect the pipes together, then entering the flushing water. Following lower routes will take the player into the lake water, which generally has no means of replenishing air but are otherwise not very long. While Sonic and Tails run around the surface and sky, Knuckles would instead explore the sewers beneath the lake, which will eventually flood after destroying one of the pipe barricades. At the end of Act 2, Sonic and Tails will make it to the Death Egg and fight a series of boss machines.
This Zone is rendered slightly less dangerous when played as part of Sonic the Hedgehog 3 & Knuckles as opposed to just Sonic 3, with several enemies and several sets of spikes above doorways removed from Act 1, and Robotnik Monitors and some of the boss fights dropped from Act 2. Additionally, once the Zone is cleared, the game will continue on into Mushroom Hill Zone, with Tails flying Sonic into the next Zone after taking down the Death Egg, and the pipe where Knuckles would face his bosses being blown up, sending the echidna falling to the next Zone.
Quotes
| “ | You're getting close to where Dr. Robotnik is repairing his Death Egg ship. This is your last chance to stop the Doc's evil scheme. | „ |
| — Sonic the Hedgehog 3 US manual[4] | ||
| “ | This is the place where you can see the construction site where Eggman is rebuilding the Death Egg, hidden among the various ruins on the island. You never really see the Death Egg in Sonic 2, but here you can see it quite clearly. This is the climax at the midpoint of the story. | „ |
Enemies
| Corkey — A gray energy cannon, found attached to rails or ceilings. | |
| Flybot767 — Silver bird Badnik that flies into the player. | |
| Orbinaut — A silver orb surrounded by four spiked orbs. Moves only when the player moves. | |
| Ribot — Robotic frog that swings or flings metallic orbs. | |
| Snail Blaster — A snail with a protective shell that covers blaster cannons. |
References
| Sonic the Hedgehog 3 | |
|---|---|
|
Main page (S3&K) Manuals Development |
show;hide
Competition Levels: Sub-Bosses: Level Bosses: Sonic 3C Prototypes: |