Difference between revisions of "Bead Worm"
From Sonic Retro
m (Text replacement - "\[\[Category:.* bosses\]\]" to "") |
|||
| (12 intermediate revisions by 3 users not shown) | |||
| Line 1: | Line 1: | ||
| + | {{Breadcrumb | ||
| + | |Sonic Chaos|:Category:Sonic Chaos bosses|l2=Bosses|{{PAGENAME}}}} | ||
{{BossInfo | {{BossInfo | ||
| image=ggz_boss.png | | image=ggz_boss.png | ||
| Line 4: | Line 6: | ||
| name= | | name= | ||
| game=Sonic Chaos | | game=Sonic Chaos | ||
| − | | level= | + | | level=Gigalopolis Zone |
| rings= | | rings= | ||
| − | | hits= | + | | hits={{SMS}} 5-10, {{GG}} 3-6 |
| playedas= | | playedas= | ||
| nextform= | | nextform= | ||
}} | }} | ||
| − | + | {{otherPage|redirect=Dangerous Ball Tower|desc=the version of this boss fought in ''[[Sonic Mania]]''<nowiki>'</nowiki>s [[Mirage Saloon Zone]]|page=Dangerous Ball Tower (Sonic Mania boss)}} | |
| + | '''{{PAGENAME}}'''{{fileref|SonicChaos GG US manual.pdf|page=15}}, known as '''Dangerous Ball Tower''' (デンジャラス・ボールタワー) in the Japanese manual{{fileref|Sonic Chaos Game Gear JP Manual.pdf|page=29}}, is the second boss of ''[[Sonic Chaos]]'', fought at the end of [[Gigalopolis Zone]]. | ||
| − | [[ | + | This boss reappears in [[Knuckles the Echidna|Knuckles]]<nowiki>'</nowiki> Act 1 of ''[[Sonic Mania]]''<nowiki>'</nowiki>s [[Mirage Saloon Zone]], as an [[Dangerous Ball Tower (Sonic Mania boss)|exclusive mini-boss]] for the echidna. |
| − | + | ||
| + | ==Strategy== | ||
| + | [[File:4_segments.png|thumb|right|A four-ball fight in the Master System version.]] | ||
| + | The {{PAGENAME}} rises up in the beginning, sways back and forth, launches its segments at the player, and then replaces them to begin the cycle anew. The first and third segments are thrown diagonally into the air, bouncing off the ground, while the second segment is launched horizontally on the ground. Luckily, the head's top is weak, and so the player can destroy the boss by jumping at it and landing squarely on the top of its head. It'll throw its bottom-most body segment in the air, so they must stay on the ground when attacking. | ||
| + | |||
| + | The difficulty of the Bead Worm is determined by three horizontal tubes Sonic and Tails must travel through just before the boss area. Taking the top tube presents an easy challenge, the middle tube a medium one, and the bottom tube, hard: | ||
| + | |||
| + | {|class="prettytable" style="width:auto;" | ||
| + | !rowspan="2"|Tube | ||
| + | !colspan="2" style="text-align:center;"|Master System | ||
| + | !colspan="2" style="text-align:center;"|Game Gear | ||
| + | |- | ||
| + | !Balls | ||
| + | !Hits required | ||
| + | !Balls | ||
| + | !Hits required | ||
| + | |- | ||
| + | |Top | ||
| + | |3 | ||
| + | |5 | ||
| + | |3 | ||
| + | |3 | ||
| + | |- | ||
| + | |Middle | ||
| + | |3 | ||
| + | |8 | ||
| + | |3 | ||
| + | |4 | ||
| + | |- | ||
| + | |Bottom | ||
| + | |4 | ||
| + | |10 | ||
| + | |3 | ||
| + | |6 | ||
| + | |} | ||
| + | |||
| + | ==Gallery== | ||
| + | <gallery> | ||
| + | Sonic_%26_tails_ballTower.png|Artwork from the Japanese manual | ||
| + | </gallery> | ||
| − | |||
==References== | ==References== | ||
<references /> | <references /> | ||
{{SonicChaosOmni|3}} | {{SonicChaosOmni|3}} | ||
Latest revision as of 16:48, 14 June 2022
| |
Sonic Chaos |
| Bosses |
| Bead Worm |
| Bead Worm |
|---|
| Game: Sonic Chaos |
| Level: Gigalopolis Zone |
| Hits to defeat: 5-10, 3-6 |
- "Dangerous Ball Tower" redirects here. For the version of this boss fought in Sonic Mania's Mirage Saloon Zone, see Dangerous Ball Tower (Sonic Mania boss).
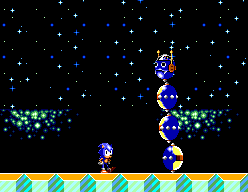
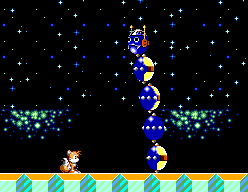
Bead Worm[1], known as Dangerous Ball Tower (デンジャラス・ボールタワー) in the Japanese manual[2], is the second boss of Sonic Chaos, fought at the end of Gigalopolis Zone.
This boss reappears in Knuckles' Act 1 of Sonic Mania's Mirage Saloon Zone, as an exclusive mini-boss for the echidna.
Strategy
The Bead Worm rises up in the beginning, sways back and forth, launches its segments at the player, and then replaces them to begin the cycle anew. The first and third segments are thrown diagonally into the air, bouncing off the ground, while the second segment is launched horizontally on the ground. Luckily, the head's top is weak, and so the player can destroy the boss by jumping at it and landing squarely on the top of its head. It'll throw its bottom-most body segment in the air, so they must stay on the ground when attacking.
The difficulty of the Bead Worm is determined by three horizontal tubes Sonic and Tails must travel through just before the boss area. Taking the top tube presents an easy challenge, the middle tube a medium one, and the bottom tube, hard:
| Tube | Master System | Game Gear | ||
|---|---|---|---|---|
| Balls | Hits required | Balls | Hits required | |
| Top | 3 | 5 | 3 | 3 |
| Middle | 3 | 8 | 3 | 4 |
| Bottom | 4 | 10 | 3 | 6 |
Gallery
References
| Sonic Chaos | |
|---|---|
|
Main page Manuals |
show;hide
|


