Difference between revisions of "Bead Worm"
From Sonic Retro
| Line 1: | Line 1: | ||
| + | {{otherPage|desc=the version of this boss fought in ''[[Sonic Mania]]''<nowiki>'</nowiki>s [[Mirage Saloon Zone]]|page=Dangerous Ball Tower (Sonic Mania boss)}} | ||
{{BossInfo | {{BossInfo | ||
| image=ggz_boss.png | | image=ggz_boss.png | ||
| Line 10: | Line 11: | ||
| nextform= | | nextform= | ||
}} | }} | ||
| − | + | '''{{PAGENAME}}''' (デンジャラス・ボールタワー){{fileref|Sonic Chaos Game Gear JP Manual.pdf|page=29}}, known as '''Bead Worm''' in the US{{fileref|SonicChaos GG US manual.pdf|page=15}} is the boss of the second stage of ''[[Sonic Chaos]]'', [[Gigalopolis Zone]]. | |
| − | + | Dangerous Ball Tower rises up in the beginning, sways back and forth, launches its segments at you, and then replaces them to begin the cycle anew. Luckily, the head’s top is weak, and so you can destroy the tower in just three hits by jumping at it and landing squarely on the top of its head. It'll throw its bottom-most body segment in the air, so stay on the ground. Repeat this process two more times to defeat the boss. | |
| − | |||
This boss reappears in [[Knuckles the Echidna|Knuckles]]<nowiki>'</nowiki> Act 1 of ''[[Sonic Mania]]''<nowiki>'</nowiki>s [[Mirage Saloon Zone]], as an [[Dangerous Ball Tower (Sonic Mania boss)|exclusive mini-boss]] for the echidna. | This boss reappears in [[Knuckles the Echidna|Knuckles]]<nowiki>'</nowiki> Act 1 of ''[[Sonic Mania]]''<nowiki>'</nowiki>s [[Mirage Saloon Zone]], as an [[Dangerous Ball Tower (Sonic Mania boss)|exclusive mini-boss]] for the echidna. | ||
| + | |||
| + | ==Gallery== | ||
| + | <gallery> | ||
| + | Sonic_%26_tails_ballTower.png|Artwork from the Japanese manual | ||
| + | </gallery> | ||
| + | |||
==References== | ==References== | ||
<references /> | <references /> | ||
{{SonicChaosOmni|3}} | {{SonicChaosOmni|3}} | ||
Revision as of 14:01, 4 November 2019
- For the version of this boss fought in Sonic Mania's Mirage Saloon Zone, see Dangerous Ball Tower (Sonic Mania boss).
| Bead Worm |
|---|
| Game: Sonic Chaos |
| Level: Gigalopolis Zone |
| Hits to defeat: 9 |

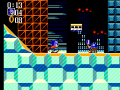
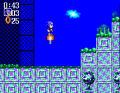
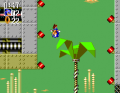
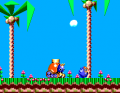
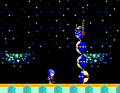
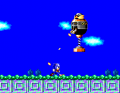
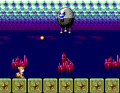
Bead Worm (デンジャラス・ボールタワー)[1], known as Bead Worm in the US[2] is the boss of the second stage of Sonic Chaos, Gigalopolis Zone.
Dangerous Ball Tower rises up in the beginning, sways back and forth, launches its segments at you, and then replaces them to begin the cycle anew. Luckily, the head’s top is weak, and so you can destroy the tower in just three hits by jumping at it and landing squarely on the top of its head. It'll throw its bottom-most body segment in the air, so stay on the ground. Repeat this process two more times to defeat the boss.
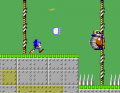
This boss reappears in Knuckles' Act 1 of Sonic Mania's Mirage Saloon Zone, as an exclusive mini-boss for the echidna.
Gallery

Artwork from the Japanese manual

References
| Sonic Chaos | |
|---|---|
|
Main page Manuals |
show;hide
|