Difference between revisions of "Sonic Advance 2/Maps"
From Sonic Retro
BSonirachi (talk | contribs) m (→Special Stages (the areas schemes)) |
BSonirachi (talk | contribs) |
||
| Line 1: | Line 1: | ||
| + | {{back}}[[Category:Maps]] | ||
| + | {{cleanup|There are poor quality map rips on this page that need improvement/replacing.}} | ||
The following are '''''[[Sonic Advance 2]]'' level maps'''. Click on a thumbnail to pull up a full view. | The following are '''''[[Sonic Advance 2]]'' level maps'''. Click on a thumbnail to pull up a full view. | ||
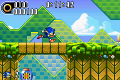
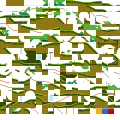
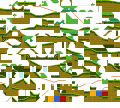
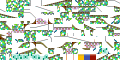
==[[Leaf Forest]]== | ==[[Leaf Forest]]== | ||
<gallery> | <gallery> | ||
| − | Image:SAdv2_map11.png| | + | Image:SAdv2_map11.png|Act 1 |
| − | Image:SAdv2_map12.png| | + | Image:SAdv2_map12.png|Act 2 |
| − | Image:SAdv2_map13.png| | + | Image:SAdv2_map13.png|Act 3 (Boss Attack) |
| + | Leaf Forest Act 1.png|96x96 metatiles (Act 1) | ||
| + | Leaf Forest Act 2.png|96x96 metatiles (Act 2) | ||
| + | Leaf Forest Act 3.png|96x96 metatiles (Boss) | ||
</gallery> | </gallery> | ||
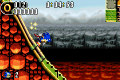
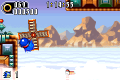
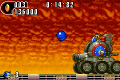
==[[Hot Crater]]== | ==[[Hot Crater]]== | ||
<gallery> | <gallery> | ||
| − | Image:SAdv2_map21.png| | + | Image:SAdv2_map21.png|Act 1 |
| − | Image:SAdv2_map22.png| | + | Image:SAdv2_map22.png|Act 2 |
| − | Image:SAdv2_map23.png| | + | Image:SAdv2_map23.png|Act 3 (Boss Attack) |
| + | Hot Crater Act 1.png|96x96 metatiles (Act 1) | ||
| + | Hot Crater Act 2.png|96x96 metatiles (Act 2) | ||
| + | Hot Crater Act 3.png|96x96 metatiles (Boss) | ||
</gallery> | </gallery> | ||
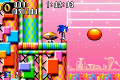
==[[Music Plant]]== | ==[[Music Plant]]== | ||
<gallery> | <gallery> | ||
| − | Image:SAdv2_map31.png| | + | Image:SAdv2_map31.png|Act 1 |
| − | Image:SAdv2_map32.png| | + | Image:SAdv2_map32.png|Act 2 |
| − | Image:SAdv2_map33.png| | + | Image:SAdv2_map33.png|Act 3 (Boss Attack) |
| + | Music Plant Act 1.png|96x96 metatiles (Act 1) | ||
| + | Music Plant Act 2.png|96x96 metatiles (Act 2) | ||
| + | Music Plant Act 3.png|96x96 metatiles (Boss) | ||
</gallery> | </gallery> | ||
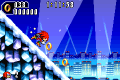
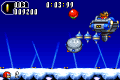
==[[Ice Paradise]]== | ==[[Ice Paradise]]== | ||
<gallery> | <gallery> | ||
| − | Image:SAdv2_map41.png| | + | Image:SAdv2_map41.png|Act 1 |
| − | Image:SAdv2_map42.png| | + | Image:SAdv2_map42.png|Act 2 |
| − | Image:SAdv2_map43.png| | + | Image:SAdv2_map43.png|Act 3 (Boss Attack) |
| + | Ice Paradise Act 1.png|96x96 metatiles (Act 1) | ||
| + | Ice Paradise Act 2.png|96x96 metatiles (Act 2) | ||
| + | Ice Paradise Act 3.png|96x96 metatiles (Boss) | ||
</gallery> | </gallery> | ||
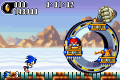
==[[Sky Canyon]]== | ==[[Sky Canyon]]== | ||
<gallery> | <gallery> | ||
| − | Image:SAdv2_map51.png| | + | Image:SAdv2_map51.png|Act 1 |
| − | Image:SAdv2_map52.png| | + | Image:SAdv2_map52.png|Act 2 |
| − | Image:SAdv2_map53.png| | + | Image:SAdv2_map53.png|Act 3 (Boss Attack) |
| + | Sky Canyon Act 1.png|96x96 metatiles (Act 1) | ||
| + | Sky Canyon Act 2.png|96x96 metatiles (Act 2) | ||
| + | Sky Canyon Act 3.png|96x96 metatiles (Boss) | ||
</gallery> | </gallery> | ||
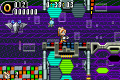
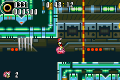
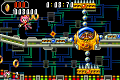
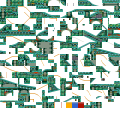
==[[Techno Base]]== | ==[[Techno Base]]== | ||
<gallery> | <gallery> | ||
| − | Image:SAdv2_map61.png| | + | Image:SAdv2_map61.png|Act 1 |
| − | Image:SAdv2_map62.png| | + | Image:SAdv2_map62.png|Act 2 |
| − | Image:SAdv2_map63.png| | + | Image:SAdv2_map63.png|Act 3 (Boss Attack) |
| + | Techno Base Act 1.png|96x96 metatiles (Act 1) | ||
| + | Techno Base Act 2.png|96x96 metatiles (Act 2) | ||
| + | Techno Base Act 3.png|96x96 metatiles (Boss) | ||
</gallery> | </gallery> | ||
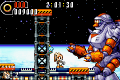
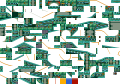
==[[Egg Utopia]]== | ==[[Egg Utopia]]== | ||
<gallery> | <gallery> | ||
| − | Image:SAdv2_map71.png| | + | Image:SAdv2_map71.png|Act 1 |
| − | Image:SAdv2_map72.png| | + | Image:SAdv2_map72.png|Act 2 |
| − | Image:SAdv2_map73.png| | + | Image:SAdv2_map73.png|Act 3 (Boss Attack) |
| + | Egg Utopia Act 1.png|96x96 metatiles (Act 1) | ||
| + | Egg Utopia Act 2.png|96x96 metatiles (Act 2) | ||
| + | Egg Utopia Act 3.png|96x96 metatiles (Boss) | ||
</gallery> | </gallery> | ||
==[[XX]]== | ==[[XX]]== | ||
<gallery> | <gallery> | ||
| − | Image:SAdv2_map81.png| | + | Image:SAdv2_map81.png|Act 1 (Boss Attack) |
| + | Xx Zone.png|96x96 metatiles (Act 1) | ||
</gallery> | </gallery> | ||
==[[True Area 53]]== | ==[[True Area 53]]== | ||
<gallery> | <gallery> | ||
| − | Image:SAdv2_map82.png| | + | Image:SAdv2_map82.png|Act 1 (Boss Attack) |
</gallery> | </gallery> | ||
==[[Special Stage (Sonic Advance 2)|Special Stages]]== | ==[[Special Stage (Sonic Advance 2)|Special Stages]]== | ||
<gallery> | <gallery> | ||
| − | Image:SAdv2_mapS01.png| | + | Image:SAdv2_mapS01.png|Stage 1 |
| − | Image:SAdv2_mapS02.png| | + | Image:SAdv2_mapS02.png|Stage 2 |
| − | Image:SAdv2_mapS03.png| | + | Image:SAdv2_mapS03.png|Stage 3 |
| − | Image:SAdv2_mapS04.png| | + | Image:SAdv2_mapS04.png|Stage 4 |
| − | Image:SAdv2_mapS05.png| | + | Image:SAdv2_mapS05.png|Stage 5 |
| − | Image:SAdv2_mapS06.png| | + | Image:SAdv2_mapS06.png|Stage 6 |
| − | Image:SAdv2_mapS07.png| | + | Image:SAdv2_mapS07.png|Stage 7 |
</gallery> | </gallery> | ||
| − | {{SAdv2Omni}} | + | {{SAdv2Omni}} |
| − | |||
Revision as of 11:02, 6 February 2021
- Back to: Sonic Advance 2.

|
This article needs cleanup. This article needs to be edited to conform to a higher standard of article quality. Specifically, issues with this article are:
There are poor quality map rips on this page that need improvement/replacing.
After the article has been cleaned up, you may remove this message. See How to Edit a Page for help. |
The following are Sonic Advance 2 level maps. Click on a thumbnail to pull up a full view.
Contents
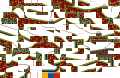
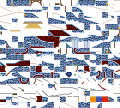
Leaf Forest

Act 1

Act 2

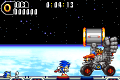
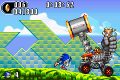
Act 3 (Boss Attack)
96x96 metatiles (Act 1)
96x96 metatiles (Act 2)

96x96 metatiles (Boss)


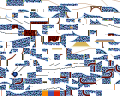
Hot Crater

Act 1

Act 2

Act 3 (Boss Attack)
96x96 metatiles (Act 1)
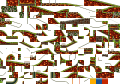
96x96 metatiles (Act 2)

96x96 metatiles (Boss)


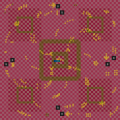
Music Plant

Act 1

Act 2

Act 3 (Boss Attack)
96x96 metatiles (Act 1)
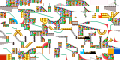
96x96 metatiles (Act 2)

96x96 metatiles (Boss)


Ice Paradise

Act 1

Act 2

Act 3 (Boss Attack)
96x96 metatiles (Act 1)
96x96 metatiles (Act 2)

96x96 metatiles (Boss)


Sky Canyon

Act 1

Act 2

Act 3 (Boss Attack)
96x96 metatiles (Act 1)
96x96 metatiles (Act 2)

96x96 metatiles (Boss)


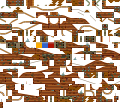
Techno Base

Act 1

Act 2

Act 3 (Boss Attack)
96x96 metatiles (Act 1)
- Techno Base Act 2.png
96x96 metatiles (Act 2)

96x96 metatiles (Boss)

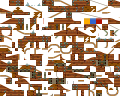
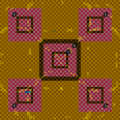
Egg Utopia

Act 1

Act 2

Act 3 (Boss Attack)
96x96 metatiles (Act 1)
96x96 metatiles (Act 2)

96x96 metatiles (Boss)


XX

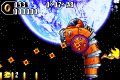
Act 1 (Boss Attack)

96x96 metatiles (Act 1)
True Area 53

Act 1 (Boss Attack)
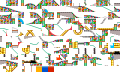
Special Stages
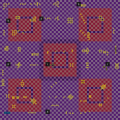
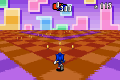
Stage 1
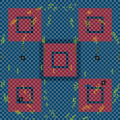
Stage 2
Stage 3

Stage 4
Stage 5
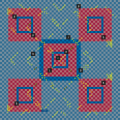
Stage 6
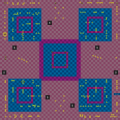
Stage 7


| Sonic Advance 2 | |
|---|---|
|
Main page Manuals |
show;hide
|