Sonic the Hedgehog (16-bit)/Hidden content
From Sonic Retro
(Redirected from Cheat Codes:Sonic the Hedgehog (16-bit))
- Back to: Sonic the Hedgehog (16-bit).
Contents
Level select

On the title screen, press ![]()
![]()
![]()
![]() . A Ring sound will play - holding
. A Ring sound will play - holding ![]() +
+![]() will bring up the menu, which also includes a sound test.
will bring up the menu, which also includes a sound test.
If running REV01 on a Japanese system, the code is ![]()
![]()
![]()
![]()
![]()
![]() , then
, then ![]() +
+![]() .
.
The screen in REV00 suggests the intended level order was different to what is seen in the final game, with every Zone save for Green Hill Zone and Scrap Brain Zone (and Final Zone) changing positions. This order is reflected internally, as shown in the Action Replay codes at the bottom of this page.
Commentary found in the Sonic Jam Official Guide also confirms that Labyrinth Zone was originally intended to be the second Zone but was moved due to its difficulty relative to Green Hill Zone.[1]
Edit mode

On the title screen, press ![]()
![]()
![]()
![]()
![]()
![]() . A Ring sound will play - holding
. A Ring sound will play - holding ![]() +
+![]() until the title card appears will activate debug mode. Sonic will also be invincible.
until the title card appears will activate debug mode. Sonic will also be invincible.
If running REV01 on a Japanese system, the code is ![]()
![]()
![]()
![]()
![]()
![]()
![]()
![]()
![]()
![]() , then
, then ![]() +
+![]() .
.
Due to a quirk in Sonic 1, other sources will give variations of this code. The game looks for two (or four) ![]() presses during the sequence, but is not concerned about where they are placed - this means, for example, the hint in Sonic Jam, which specifies edit mode as
presses during the sequence, but is not concerned about where they are placed - this means, for example, the hint in Sonic Jam, which specifies edit mode as ![]()
![]()
![]()
![]()
![]()
![]()
![]()
![]() ,
, ![]() +
+![]() is equally valid.
is equally valid.
It is possible to activate both edit mode and the level select by separating the two codes (before ![]() +
+![]() ) with an
) with an ![]() button press. Alternatively, activating debug mode, pausing during gameplay and pressing
button press. Alternatively, activating debug mode, pausing during gameplay and pressing ![]() will return to the title screen with the feature still activated. Holding
will return to the title screen with the feature still activated. Holding ![]() during paused gameplay will activate slow-motion, and pressing
during paused gameplay will activate slow-motion, and pressing ![]() will display the next frame (it can be pressed more times to show other frames).
will display the next frame (it can be pressed more times to show other frames).
Note that in the case of running REV01 on a Japanese system, these "pause options" will require an other code which is ![]()
![]()
![]()
![]()
![]()
![]()
![]()
![]() (it can be used in addition to "Debug Mode" and "Level Select" like other versions).
(it can be used in addition to "Debug Mode" and "Level Select" like other versions).
Hidden Japanese credits

On the Sonic Team Presents screen, text showing the full names of key staff members and their roles in development is placed behind the Sonic Team Presents text. Players cannot see this, however, because both the text and the background color are black.
With a cheat code, however, the game will hide the Sonic Team Presents text and change the background color to white, showing the hidden credits. With the region set to Japan, press ![]() ,
, ![]() ,
, ![]() ,
, ![]() ,
, ![]() ,
, ![]() ,
, ![]() ,
, ![]() ,
, ![]() ,
, ![]() ,
, ![]() ,
, ![]() for REV01, or
for REV01, or ![]() ,
, ![]() ,
, ![]() ,
, ![]() ,
, ![]() ,
, ![]() ,
, ![]() ,
, ![]() ,
, ![]() ,
, ![]() on REV00; a Ring sound will confirm correct entry. Then, when the demo starts, hold
on REV00; a Ring sound will confirm correct entry. Then, when the demo starts, hold ![]() +
+ ![]() +
+ ![]() +
+ ![]() and either press
and either press ![]() or wait for the demo to end.
or wait for the demo to end.
| Japanese | |
|---|---|
| プログラム | 中 裕司 |
| プラン | 安原 広和 |
| デザイン | 大島 直人 石渡 爾奈 片岡 理恵子 |
| サウンドプロデュース | 中村 正人 |
| サウンドプログラム | 久保田 浩 牧野 幸文 |
| English | |
|---|---|
| Program | Naka Yuuji |
| Plan | Yasuhara Hirokazu |
| Design | Ooshima Naoto Ishiwatari Jina Kataoka Rieko |
| Sound Produce | Nakamura Masato |
| Sound Program | Kubota Hiroshi Makino Yukifumi |
Staff roll and ending sequence from level select
REV01 on Japanese hardware
![]()
![]()
![]()
![]()
![]()
![]()
![]()
![]()
![]()
![]()
![]()
![]()
![]()
![]()
![]()
![]()
![]()
![]()
![]()
![]() +
+![]()
Alternatively:


 , wait until the demo starts, press
  to stop the demo, enter Zone Select cheat.
- In the Sound Select, select 9E and press
 /
/ / to go to the Staff Roll, or select 9F and press // to go to the Ending Sequence (which will lead to the Staff Roll).
REV00 on Japanese hardware
![]()
![]()
![]()
![]()
![]()
![]()
![]()
![]()
![]()
![]()
![]()
![]()
![]()
![]()
![]()
![]() +
+![]()
Alternatively:
- , wait until the demo starts, press to stop the demo, enter Zone Select cheat.
- In the Sound Select, select 9E and press // to go to the Staff Roll, or select 9F and press // to go to the Ending Sequence (which will lead to the Staff Roll).
Unused content
Art
Sonic
| Art | Description |
|---|---|
| This sprite shows Sonic standing while gasping for air. This was presumably used in Labyrinth Zone. | |
| This animation shows Sonic holding his breath while running. It is speculated that this was used during the countdown to signify that Sonic must find air as soon as possible. | |
| This unused sliding sprite is similar to the one used in Sonic CD's Wacky Workbench Zone. | |
| As seen in the prototype as well as in prerelease screenshots in magazines and in video footage from | |
| These Spin Dash–esque sprites are present in the final ROM, but their use is unknown. Some theories are that they were used for a move similar to the Spin Dash or that they are animations for some sort of warp movement, perhaps through winding tunnels. It’s also possible that a teleporter like the one found in the 8-bit version of Scrap Brain Zone would have played the animation. | |
| This set of sprites showing Sonic falling or shrinking are not used in the game, and their intended purpose is unknown. They might have been designed to simulate falling in the death animation, or for a speed tunnel that would extend into the background. | |
| A greyscale version of Sonic's death animation. His left foot is placed slightly differently. |
Levels
Tiles
These 16x16 tiles are loaded into VRAM as part of level tilesets, but are never drawn on-screen:
| Art | Description |
|---|---|
| Various grass and rock tiles in Green Hill Zone, and one background water tile.
Tile IDs: 006, 00C, 00E, 017, 018, 022, 028, 02B, 02C, 044, 048, 049, 055, 05C, 05E, 086, 087, 0BD, 0BE, 0F4, 0F5, 0F7, 146, 161, 187. | |
| Green Hill Zone tile IDs 057, 058 and 059 appear similar to the areas used in the underground areas of Sonic the Hedgehog (8-bit)'s Green Hill Zone. These may have also been used for a cut underground area. An unused level chunk in the prototype used these tiles for a ledge. | |
| Green Hill Zone tile IDs 159 and 15A are two faces, presumed to be earlier versions of the totem poles. Whether this was the intended palette is not known. | |
| Background tiles for Marble Zone.
Tile IDs: 058, 059, 05A, 05B, 065, 069, 06A, 06B, 06C, 08A, 08C, 094, 095, 096, 097, 09A, 09B, 09D, 09E, 0A3, 0A4, 0B7, 0B8, 0B9, 0BA, 0BB, 0BC, 0C8, 0C9, 0CA, 0CB, 0CC, 0CD, 0CE, 0D1, 0D2, 0D3, 0D8, 0EE, 11A, 11B, 130, 143, 144, 145, 146, 147, 149, 14A, 14B, 14C | |
| Foreground and background tiles for Spring Yard Zone.
Tile IDs: 01C, 01D, 02B, 06A, 06B, 072, 08B, 08D, 0AC, 0BA, 0BB, 0D2, 0DD, 0F6, 0FB, 104, 10C, 10D, 16F, 171, 191, 192, 197, 1A5, 1A6, 1A9 | |
| Two slanted tiles and some water spray in Labyrinth Zone.
Tile IDs: 03C, 03D, 04F | |
| Flashing lights for Star Light Zone. They were used in the prototype versions of the game, but are unseen in the final ROM. | |
| Machinery parts in Star Light Zone. They appear to have been background objects rather than obstacles. | |
| Other unused foreground and background tiles in Star Light Zone.
Tile IDs: 018, 019, 01A, 01B, 01C, 01D, 01E, 01F, 021, 022, 023, 024, 025, 026, 027, 028, 029, 02A, 02B, 02C, 02D, 02E, 02F, 031, 032, 033, 034, 035, 036, 037, 038, 039, 081, 085, 086, 088, 089, 0F7, 0FA, 103, 109, 10A, 10B, 10C, 10D, 10E, 10F, 110 111, 112, 113, 114, 117, 11A, 11D, 11E, 11F, 121, 124, 125, 128, 129, 13B, 13C, 13D, 13E, 140, 141, 186, 187, 188, 198, 19B | |
| Unused foreground and background tiles in Scrap Brain Zone. Some were used in prototypes.
Tile IDs: 01A, 01B, 01C, 01D, 029, 02A, 034, 03E, 047, 048, 06A, 074, 07B, 085, 086, 0C0, 0D2, 0DC, 0EA, 128, 132, 13F, 141, 16C, 172, 173, 17C, 182, 188, 189, 223, 224, |


Sprites
| Art | Description |
|---|---|
| This unused graphic can be found in the tileset for Spring Yard Zone. It is unused in the final game, and can be found in several prototype screenshots shown in magazine previews. The sign itself says "Let’s Go." | |
| An unused frame of the switch sprite. When bit 5 of a switch's subtype is set, it makes the object flash, using this sprite. In Labyrinth Zone, this sprite's data is partially overwritten by the cork sprite in VRAM. Marble Zone's switch has no equivalent sprite. | |
| This is a horizontal sprite of the Burrobot. Perhaps the Burrobot dug back into the ground after a certain amount of time? | |
| The left image shows the back of the Egg Mobile's legs, which can’t be seen normally. The right image is what is normally seen. | |
| A Bumper that appears to be a rosebud with an incorrect palette. The ending level shares its debug item list with the Special Stage, so the bumper is usable in both. | |
| Unused section of grass which does not seem to match with any palette in the game. | |
| Splats, a prototype Badnik that was cut late in the game's development. Splats is unique in that it went on to be featured in merchandise and comic books, but only the art remains in the final game. | |
| Some yellow goggles, possibly intended for Labyrinth Zone. Each frame of the graphic fits together with one of Sonic's poses. | |
| Unused graphics of Eggman exploding, possibly as part of an alternative ending sequence. | |
| The letter "K" meant for the title cards. Originally used in the prototype, this letter became unused after Sparkling Zone and Clock Work Zone were renamed respectively, and nothing else in the game calls for it. |


Special Stage
Note: All of these items can be seen in-game by using edit mode to fall outside the playing area of the special stage. It is easier to see them when advancing frame-by-frame by pausing and pressing ![]() .
.
| Art | Description |
|---|---|
| Although these icons are found in the object list for the Special Stages and their graphics exist in the ROM, they are unused in the final game and have no known function; when placed, they act like normal solid blocks. They are labeled Zones 1–6, suggesting that they may have warped Sonic to another Zone from within the Special Stage as a sort of shortcut, or they were likely to indicate which Special Stage the player was in or which stage they came from after reaching the signpost. | |
| Extra life icon for the Special Stages. It is listed in the North American and European manuals for the game[2][3], but it never actually appears in any of the Special Stages. It is, however, fully functional, and can be placed in any Special Stage; when touched, Sonic gains an extra life and the icon disappears like a ring. | |
| An icon with the letter W on it. Its use is unknown, and it has no function when placed in-game. This block is solid. The letter "W" is often associated with "double" in Japan, which may give clues about its use. |
Objects
| Art | Description |
|---|---|
| Static monitor that does nothing. This can be placed with debug mode, and is found in various walls of Scrap Brain Zone. Its object subtype is $00. | |
| Eggman monitor that does nothing. Is likely intended to hurt the player, as it does in Sonic the Hedgehog 2 (16-bit)'s 2-player mode. To add a functional Eggman monitor in the game, see the SCHG page on how to add it. Its object subtype is $01. | |
| "S" monitor that does nothing. This monitor also appears in Sonic CD prototype 510, where it grants the player both extra speed and invincibility. That is most likely the intended function of the monitor here, as an issue of Computer & Video Games alludes to a powerup which grants extra speed and invincibility.[4] This suggests that the "S" monitors were functional at that point in development. In the 2013 remake, it can be placed and once destroyed the player's character transforms into their Super form regardless of how many Chaos Emeralds have been collected. Its object subtype is $07. | |
| Goggle monitor that does nothing. Had it been used, it would most likely have been accompanied by the unused goggle graphics and may have provided the ability to breathe underwater. To add a monitor which adds a goggle Monitor that uses the goggle sprites, use this SCHG page. Its object subtype is $08. | |
| The checkered ball seen on the Green Hill Zone Boss was originally a separate object that could roll down hills in the prototype. In the final game, this is still in Green Hill Zone's object list in debug mode but can no longer be placed. Its associated code has been removed from the ROM. | |
| This spike crusher is horizontal, rather than the vertical spike crusher used in the final Marble Zone, and are also slightly thinner. However, they can be placed and are fully functional. Its object ID is $45. | |
| The prototype and many early previews of Sonic the Hedgehog showed the text "PRESS START BUTTON" on the title screen. In the final version, it does not show up due to an oversight with the "Sonic Team Presents" screen, but the graphics can be found inside the ROM. It is also possible to get them to display in the Japanese version: this occurs after accessing the secret credits screen via a cheat code (in emulators, the region of the emulator must be set to Japan), or an easier way is to enter the Game Genie code AB3A-DADV. | |
| The swinging platforms of Green Hill Zone will carry a wrecking ball when the highest bit of their subtype value is set. The object is fully functional, and can hurt Sonic. Technically, the swinging platforms of Marble Zone, Star Light Zone, and the swinging spikeball of Scrap Brain Zone are capable of doing this, too, but the wrecking ball graphics are not loaded, suggesting this feature was only intended for Green Hill Zone. | |
| Variant of the floating blocks (object $56) in Spring Yard Zone. A similar-looking 2x2 version is used in Act 3, but the 1x3 block is never used. Its object subtype is $4x, where the object's behaviour is determined by x. |

Audio
Music
Sound effects
| Audio | ID | Description |
|---|---|---|
| A5 | This was used by the early Ball Hog in the prototype and earlier builds when its bombs exploded. The final Ball Hog's bombs use a different sound effect, rendering this one unused. | |
| B8 | Similar to the sound of moving spikes. |
Warping effect

Thought to be the original method of accessing the Special Stage, this warp effect activates when Sonic touches the area in which its associated object is placed (object ID 4A). Sonic disappears as he runs into it, and a warping noise plays. Sonic then reappears a few seconds later, likely as a method of testing the object.[5] Giant Rings are programmed to load this object in the prototype, proving its original intention.
Level chunks
Marble Zone

Labyrinth Zone

Star Light Zone

Several chunks shown here are in the prototype.
Scrap Brain Zone

Misplaced objects
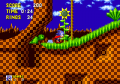
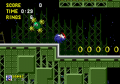
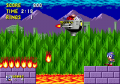
Green Hill Zone Act 2

The above picture shows a misplaced Crabmeat in Green Hill Zone Act 2, located under the section with moving pillars and spikes before the Lamppost. As there is no solid ground beneath it, it simply unloads. It can be found at coordinates 10D0 0370.
Green Hill Zone Act 3

There is a rock placed way below the level boundaries between both spiked log bridges, and is impossible to reach it without debug mode. The rock's coordinates are 18C0 0760

At coordinates 21B0 0000, located shortly before the boss area, is a Buzz Bomber that is placed too high for it to be reached.
Labyrinth Zone Act 1

A group of spikes are buried in the ground at coordinates 12D3 0675. Because they are placed below the camera boundaries and the foreground tiles are a layer above the sprites, they cannot be seen. There are spikes at the exact same coordinates in Act 3, which is part of the long water current tunnel.
Oddities
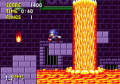
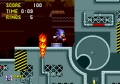
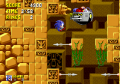
Wall monitor

Throughout Scrap Brain Zone, static monitors can be found inside walls and other areas the player cannot access. One notable example is in the screenshot, located above and to the right of a Super Ring monitor in Act 2. By "digging" into the wall in a jump, it can be broken during normal play, but it does nothing. The graphics are largely obscured by the wall, but it is just about possible to see the explosion and a corrupted tile when it is broken (the tile in question is a portion of the ‘zappers’).
Missing shoe stripes
A couple of animations are missing the white stripes from Sonic's shoes. This could suggest stripes were added after much of the artwork was ready.
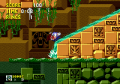
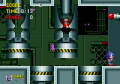
Exception handler

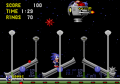
Sonic the Hedgehog uses a basic exception handler in the event a 68000 exception occurs, in which the game stops while unloading all sprites and printing basic information about the exception on the screen. Pressing ![]() can attempt to advance the game past the exception handler, though in most cases will not work properly, leading to further occurrences of the exception handler or freezing completely. The screenshot above shows an example of the exception handler occurring during gameplay, which is caused by a bug in Labyrinth Zone.
can attempt to advance the game past the exception handler, though in most cases will not work properly, leading to further occurrences of the exception handler or freezing completely. The screenshot above shows an example of the exception handler occurring during gameplay, which is caused by a bug in Labyrinth Zone.
Listed below are the exceptions covered by the handler, located at ROM address 000004E0:
ERROR EXCEPTION
BUS ERROR
ADDRESS ERROR
ILLEGAL INSTRUCTION
ZERO DIVIDE
CHK INSTRUCTION
TRAPV INSTRUCTION
PRIVILEGE VIOLATION
TRACE
LINE 1010 EMULATOR
LINE 1111 EMULATOR
Cheat device codes
These are cheat codes that can only be used with game enhancer devices. Support for these codes is available in most emulators.
Game Genie
Official codes
| Code | Effect | Reference |
|---|---|---|
| ATBT-AA32 | Master Code (Not needed in emulators). | |
| AE3T-AACL | You start with 1 life. | |
| AY3T-AACL | You start with 5 lives. | |
| AE0T-CABE | Once you gain Invincibility, you stay invincible until the stage ends, or when you die. | |
| AE0T-CABY | Once you gain Speed Shoes, you keep them until the stage ends, or when you die. | |
| SCRA-BJX0 | Each ring is worth 2. | |
| SCRA-BNX0 | Each ring is worth 3. | |
| SCRA-BTX0 | Each ring is worth 4. | |
| SCRA-BYX0 | Each ring is worth 5. | |
| SCRA-B2X0 | Each ring is worth 6. | |
| SCRA-B6X0 | Each ring is worth 7. | |
| SCRA-BAX0 | Each ring is worth 8. | |
| SCRA-B9X0 | Each ring is worth a crazy amount of rings. | |
| GJ6A-CA7A | Infinite lives. | |
| AJ3A-AA4G | Access to the Level Select menu. | |
| AY3T-BA4R | Start with 5 Chaos Emeralds in possession. | |
| DDLT-AAGL | Jump higher than your regular jump. | |
| KDLT-AAGL | Jump lower than your regular jump. | |
| BDLT-AAGL | Jump VERY high and "float" in the air. | |
| NCLT-BYE6 | Some Crabmeats go berserk. | |
| NCLT-B9E6 | Some Crabmeats disappear altogether. |
Unofficial codes
| Code | Effect |
|---|---|
| 663T-BA4R | Max out score with one kill. |
| 663T-B64R | Start with 2 continues. |
| A23T-BA4R | Start with all Chaos Emeralds. |
| AE2T-AAAL | Enable Debug mode. |
| GLRT-AADY | Ring count resets to 50 if Hit (Must have at least 1 ring). |
| NRRT-AADY | Ring count resets to 99 if Hit (Must have at least 1 ring). |
| AA2A-ACC8 | Start on Labyrinth Zone. |
| AA2A-AEC8 | Start on Marble Zone. |
| AA2A-AGC8 | Start on Star Light Zone. |
Action Replay
Unofficial codes
| Code | Effect |
|---|---|
| 00A35E:6042 | Every Monitor Powerup gives Speed Shoes. |
| FFFE20:00C8 | Infinite Rings (Turn off before passing end of level sign). |
| FFFE15:00FA | Never run out of air Underwater. |
| FFFE2C:0001 | Always have Shield. |
| FFFE24:0000 | Infinite Time. |
| FFFE2D:0001 | Invincibility (Monitor Effect without speed boost). |
| FFFFD0:0100 | Enable Stage Select ( |
| FFFE10:XXYY | Stage/Act Modifier (XX: Zone, YY: Level).
Note: Scrap Brain Zone act 3 is accessed by using level code 03 for Labyrinth Zone (i.e. it is treated as the fourth act of Labyrinth Zone). Final Zone is considered to be the third act of Scrap Brain. |
| FFD861:0001 | Final zone's first boss health equals 1. |
User-found codes
| Code | Effect |
|---|---|
| 00D5CA:0005 | Very Low Gravity |
| 00CAA8:0532 | Corrupted Spring Yard Title Card |
| FFF600:00YY | Game Mode Modifier (YY: Mode).
|
References
- ↑ File:SonicJamOfficialGuide Book JP.pdf, page 23
- ↑ File:Sonic1 MD US SonicJam manual.pdf, page 6
- ↑ File:Sonic1 MD EU manual.pdf, page 27
- ↑ [cvg, issue 115, page 122 cvg, issue 115, page 122]
- ↑ http://www.sonicdatabase.com/Mods/modif.htm (Wayback Machine: 2019-11-19 22:32)
| Sonic the Hedgehog (16-bit) | |
|---|---|
|
Main page (Gen|2013|3D|Ages) Manuals Development |
show;hide
Scrapped Enemies: |