Difference between revisions of "Sonic the Hedgehog 3 (prototype; 1993-11-03)/Hidden content"
From Sonic Retro
(→Placeable in edit mode) |
BSonirachi (talk | contribs) m (Text replacement - "{{UnusedRow | sprite=" to "{{UnusedRow | content=") |
||
| (8 intermediate revisions by the same user not shown) | |||
| Line 39: | Line 39: | ||
==Unused content== | ==Unused content== | ||
===Art=== | ===Art=== | ||
| − | {{UnusedTable| | + | {{UnusedTable|type=Art| |
{{UnusedRow | {{UnusedRow | ||
| − | | | + | | content={{SpriteImage|Sonic3 MD Sprite UnusedButton.png}} |
| + | | desc=A button-like object that is loaded early on in the space used for the burning Angel Island Zone stage graphics. Also unused in the final. | ||
| + | }} | ||
| + | {{UnusedRow | ||
| + | | content={{SpriteImage|Sonic31993-11-03 MD Sprite MiniTurboSpiker.png}} | ||
| desc=A smaller version of the [[Turbo Spiker]]. These sprites were found in a seemingly unreferenced KosM archive that contains most of [[Hydrocity Zone]]'s [[Badnik]]s at offset '''$132802'''.{{ref|{{LinkRetro|post=951918|title=Sonic Retro forum thread: Sonic 3 (Nov 3, 1993 prototype) - Technical Analysis & Research thread; post #951918 by Fred}}}} | | desc=A smaller version of the [[Turbo Spiker]]. These sprites were found in a seemingly unreferenced KosM archive that contains most of [[Hydrocity Zone]]'s [[Badnik]]s at offset '''$132802'''.{{ref|{{LinkRetro|post=951918|title=Sonic Retro forum thread: Sonic 3 (Nov 3, 1993 prototype) - Technical Analysis & Research thread; post #951918 by Fred}}}} | ||
}} | }} | ||
{{UnusedRow | {{UnusedRow | ||
| − | | | + | | content={{SpriteImage|Sonic3Proto MD Sprite SlotMachineIcons.png}} |
| desc=Icons for the reels in the [[Bonus Stage (Sonic the Hedgehog 3 & Knuckles)#Slot Machine|Slot Machine Bonus Stage]]. While the Sonic, Tails and Knuckles icons can be seen in-game, the rest of the icons, including the Super Sonic icon that would remain unused even in ''[[Sonic & Knuckles]]'', cannot be seen but are loaded in VRAM. Curiously, the icons in this prototype are more detailed than they normally are in the final version.{{ref|{{LinkRetro|post=951603|title=Sonic Retro forum thread: Sonic Month 2019: Sonic 3; post #951603 by GoldS}}}} | | desc=Icons for the reels in the [[Bonus Stage (Sonic the Hedgehog 3 & Knuckles)#Slot Machine|Slot Machine Bonus Stage]]. While the Sonic, Tails and Knuckles icons can be seen in-game, the rest of the icons, including the Super Sonic icon that would remain unused even in ''[[Sonic & Knuckles]]'', cannot be seen but are loaded in VRAM. Curiously, the icons in this prototype are more detailed than they normally are in the final version.{{ref|{{LinkRetro|post=951603|title=Sonic Retro forum thread: Sonic Month 2019: Sonic 3; post #951603 by GoldS}}}} | ||
| + | }} | ||
| + | {{UnusedRow | ||
| + | | content={{SpriteImage|S3-signpost-unused.png}} | ||
| + | | desc=Leftover [[signpost]] sprites identical to ''Sonic 2'''s that remain in both this game and Sonic and Knuckles. Additionally, there's art for Knuckles, which is close to the final art, but with less shading. His nose is thinner and more of his spines cover the signpost. These are also unused in the final. | ||
}} | }} | ||
}} | }} | ||
| Line 52: | Line 60: | ||
===Objects=== | ===Objects=== | ||
====Placeable in [[edit mode]]==== | ====Placeable in [[edit mode]]==== | ||
| − | {{UnusedTable| | + | {{UnusedTable|type=Art| |
{{UnusedRow | {{UnusedRow | ||
| − | | | + | | content= |
| − | | desc=A level-breaking object in the first Act of [[Angel Island Zone]] that shrinks and grows. | + | | desc=A level-breaking object in the first Act of [[Angel Island Zone]] that shrinks and grows, presumably to test sprite scaling. |
}} | }} | ||
{{UnusedRow | {{UnusedRow | ||
| − | | | + | | content= |
| − | | desc=A cluster of spinning red balls in the first Act of Angel Island Zone, which can be manipulated with the second | + | | desc=A cluster of spinning red balls in the first Act of Angel Island Zone, which can be manipulated with the second Control Pad. |
}} | }} | ||
{{UnusedRow | {{UnusedRow | ||
| − | | | + | | content={{SpriteImage|Sonic3 MD Sprite AIZ2BreakableWall.png}} |
| + | | desc=A breakable wall in [[Angel Island Zone]] Act 2, which can only be placed with debug mode and is destroyed with a [[Spin Dash]] on the ground. A similar object is used as a wall that is opened with a switch. | ||
| + | }} | ||
| + | {{UnusedRow | ||
| + | | content={{SpriteImage|Sonic3K MD Sprite Monitors.png|crop_width=28|crop_x=140}} | ||
| desc=An "S" [[monitor]], which transforms Sonic into [[Super Sonic]] when broken. It can only be placed in [[Hydrocity Zone]] in this prototype. | | desc=An "S" [[monitor]], which transforms Sonic into [[Super Sonic]] when broken. It can only be placed in [[Hydrocity Zone]] in this prototype. | ||
}} | }} | ||
{{UnusedRow | {{UnusedRow | ||
| − | | | + | | content={{SpriteImage|Sonic3 MD Sprite CNZLightbulb.png}} |
| − | | desc= | + | | desc=Light bulb that appears broken if placed underwater in Carnival Night Zone. The water level never changes in this prototype, so this is never seen. The final places this light bulb in the area where Knuckles would turn off the power. |
}} | }} | ||
{{UnusedRow | {{UnusedRow | ||
| − | | | + | | content={{SpriteImage|Sonic3 MD Sprite CNZButton.png}} |
| − | | desc= | + | | desc=An unused switch in Carnival Night Zone. |
}} | }} | ||
{{UnusedRow | {{UnusedRow | ||
| − | | | + | | content={{SpriteImage|Sonic3 MD Sprite CNZDebugRing.png|2}} |
| − | | desc=An | + | | desc=An unknown [[Ring]]-like object that appears to spawn slope collision when placed. It is placeable in Carnival Night Zone. |
}} | }} | ||
{{UnusedRow | {{UnusedRow | ||
| − | | | + | | content= |
| desc=Air bubbles are available for Carnival Night Zone and [[Launch Base Zone]] Act 2. Strictly speaking this is not an unused object as they can be seen in Hydrocity Zone, but they're not used in Carnival Night, and aren't in use in Launch Base as the Knuckles path is not finished. | | desc=Air bubbles are available for Carnival Night Zone and [[Launch Base Zone]] Act 2. Strictly speaking this is not an unused object as they can be seen in Hydrocity Zone, but they're not used in Carnival Night, and aren't in use in Launch Base as the Knuckles path is not finished. | ||
}} | }} | ||
{{UnusedRow | {{UnusedRow | ||
| − | | | + | | content={{SpriteImage|Blaster.png}} |
| desc=[[Blaster]], placeable in [[Flying Battery Zone]]. Like in ''Sonic 3'' final, its projectiles can be destroyed like regular [[Badnik]]s. | | desc=[[Blaster]], placeable in [[Flying Battery Zone]]. Like in ''Sonic 3'' final, its projectiles can be destroyed like regular [[Badnik]]s. | ||
}} | }} | ||
{{UnusedRow | {{UnusedRow | ||
| − | | | + | | content={{SpriteImage|Technosqueek.png}} |
| desc=[[Technosqueek]], placeable in [[Flying Battery Zone]]. | | desc=[[Technosqueek]], placeable in [[Flying Battery Zone]]. | ||
}} | }} | ||
{{UnusedRow | {{UnusedRow | ||
| − | | | + | | content={{SpriteImage|Sonic3 MD Sprite ICZBreakableBlock.png}} |
| desc=Breakable blocks in [[IceCap Zone]]. | | desc=Breakable blocks in [[IceCap Zone]]. | ||
}} | }} | ||
{{UnusedRow | {{UnusedRow | ||
| − | | | + | | content= |
| desc=[[Dragonfly]], placeable in [[Mushroom Valley Zone]]. | | desc=[[Dragonfly]], placeable in [[Mushroom Valley Zone]]. | ||
}} | }} | ||
{{UnusedRow | {{UnusedRow | ||
| − | | | + | | content= |
| desc=[[Cluckoid]], placeable in Mushroom Valley Zone. | | desc=[[Cluckoid]], placeable in Mushroom Valley Zone. | ||
}} | }} | ||
{{UnusedRow | {{UnusedRow | ||
| − | | | + | | content= |
| desc=[[Butterdroid]], placeable in Mushroom Valley Zone. | | desc=[[Butterdroid]], placeable in Mushroom Valley Zone. | ||
}} | }} | ||
{{UnusedRow | {{UnusedRow | ||
| − | | | + | | content= |
| desc=[[Madmole]], placeable in Mushroom Valley Zone. | | desc=[[Madmole]], placeable in Mushroom Valley Zone. | ||
}} | }} | ||
{{UnusedRow | {{UnusedRow | ||
| − | | | + | | content={{SpriteImage|Sonic3 MD Sprite CompetitionSpikes.png}} |
| desc=Spikes for competition mode. | | desc=Spikes for competition mode. | ||
}} | }} | ||
| Line 116: | Line 128: | ||
====Others==== | ====Others==== | ||
| − | {{UnusedTable| | + | {{UnusedTable|type=Art| |
| + | {{UnusedRow | ||
| + | | content={{SpriteImage|Sonic1 MD Sprite GiantRing.gif}} | ||
| + | | desc=The [[Giant Ring]], which is actually left over from ''[[Sonic the Hedgehog (16-bit)|Sonic the Hedgehog]]'' though its graphics are long gone. It can be placed into the game with debug mode using PAR code '''04B47C:0C60''' to replace AIZ1's debug [[Ring]] with it, while '''010CDC:FF4C''' adds the object to the collision response list{{ref|{{LinkYoutube|video=rYskr-ovITU|title=Special stage entry ring ; video by Fred Bronze}}}}. Its offset is '''$10C60'''. | ||
| + | }} | ||
| + | {{UnusedRow | ||
| + | | content={{SpriteImage|S3ArrowLift.png}} | ||
| + | | desc=A glitched platform that appears to belong to [[Launch Base Zone]], which would remain unused in the final ''Sonic 3'' and even in ''[[Sonic the Hedgehog 3 & Knuckles]]''. Its object ID is '''12''', and its offset is '''$1C6A0'''. | ||
| + | }} | ||
| + | {{UnusedRow | ||
| + | | content= | ||
| + | | desc=A seesaw-like cannon that locks the player in the center of the object, and propels them extremely far when pressing a button. Remains unused in the final. Its object ID is '''1A''', and its offset is '''$1DFCE'''. | ||
| + | }} | ||
| + | {{UnusedRow | ||
| + | | content= | ||
| + | | desc=A strange, spinning object that hurts the player when jumped on, and swings when hit from underneath. Remains unused in the final. Its object ID is '''1C''', and its offset is '''$1E6C6'''. | ||
| + | }} | ||
| + | {{UnusedRow | ||
| + | | content= | ||
| + | | desc=A Launch Base Zone platform that can be grabbed from underneath. Remains unused in the final. Its object ID is '''1D''', and its offset is '''$1C228'''. | ||
| + | }} | ||
| + | {{UnusedRow | ||
| + | | content= | ||
| + | | desc=[[Hey Ho]], normally reserved as the mini-boss of Mushroom Valley Zone. It appears to be in a very early state as it simply floats in place and performs its swinging animations, and cannot be interacted with by the player. Its graphics have also been removed from the game. Its object ID is '''84''', and its offset is '''$40704'''. | ||
| + | }} | ||
| + | {{UnusedRow | ||
| + | | content= | ||
| + | | desc=The [[Beam Rocket]] boss for [[Launch Base Zone]] Act 2. Compared to the final, it has no sound effects, its collision is incomplete as the player cannot get hurt by touching the sections or exhaust, it does not speed up when hit, and the spiked orb that orbits the cockpit is missing. The final section is destroyed in two hits instead of one, and once defeated the game softlocks. Its object ID is '''86'''. | ||
| + | }} | ||
{{UnusedRow | {{UnusedRow | ||
| − | | | + | | content= |
| − | | desc=[[Fireworm]], normally for Lava Reef Zone. Can potentially crash the game when spawned. Its object ID is '''90'''. | + | | desc=[[Fireworm]], normally for [[Lava Reef Zone]]. Can potentially crash the game while trying to DMA non-existent sprites when spawned. Its object ID is '''90''', and its offset is '''$49FB6'''. |
}} | }} | ||
{{UnusedRow | {{UnusedRow | ||
| − | | | + | | content= |
| − | | desc=[[Iwamodoki]], normally for Lava Reef Zone. In this prototype, it can be destroyed like any other Badnik before it explodes. Its object ID is '''91'''. | + | | desc=[[Iwamodoki]], normally for Lava Reef Zone. In this prototype, it can be destroyed like any other Badnik before it explodes. Its object ID is '''91''', and its offset is '''$4A29C'''. |
}} | }} | ||
{{UnusedRow | {{UnusedRow | ||
| − | | | + | | content= |
| − | | desc=[[Toxomister]], normally for | + | | desc=[[Toxomister]], normally for Lava Reef Zone. Its toxic gas cannot kill the player or drain their [[Ring]]s, and the gas sprite is slower at following the player. Its object ID is '''92''', and its offset is '''$4A400'''. |
}} | }} | ||
{{UnusedRow | {{UnusedRow | ||
| − | | | + | | content= |
| − | | desc=[[ | + | | desc=The [[Guardian]], normally reserved as the mini-boss of [[Sandopolis Zone]]. This boss is fully functional, albeit it moves forward more slowly and has no sound effects, and its graphics have been removed from the game. As there is no quicksand pit in the game, it cannot be defeated. Its object ID is '''98''', and its offset is '''$4107E'''. |
}} | }} | ||
{{UnusedRow | {{UnusedRow | ||
| − | | | + | | content= |
| − | | desc= | + | | desc=Knuckles' version of the [[Drill Mobile]] for [[Marble Garden Zone]] Act 2. Like in the final ''Sonic 3'', it functions identically to how it does in ''Sonic 3 & Knuckles'', except it is invincible as it has no death routine implemented. Curiously, it plays the Act 2 boss theme when loaded. Its object ID is '''B1'''. |
}} | }} | ||
{{UnusedRow | {{UnusedRow | ||
| − | | | + | | content= |
| − | | desc=The [[Barrier Eggman (Sonic & Knuckles)|Barrier Eggman]] mini-boss for [[Flying Battery Zone]] Act 2. Its object ID is '''B6'''. | + | | desc=The [[Barrier Eggman (Sonic & Knuckles)|Barrier Eggman]] mini-boss for [[Flying Battery Zone]] Act 2. Despite being coded and FBZ2 being accessible by normal means, it's not actually placed in the level. Its object ID is '''B6''', and its offset is '''$4107E'''. |
}} | }} | ||
}} | }} | ||
| Line 156: | Line 196: | ||
| image1=Sonic3Proto MD AirDash.png | | image1=Sonic3Proto MD AirDash.png | ||
| image2=Sonic3Proto MD RingAttack.png | | image2=Sonic3Proto MD RingAttack.png | ||
| − | | desc=Two unused moves for Sonic exist in the code and can be enabled using [[sega:Game Genie|Game Genie]]/[[sega:Action Replay|PAR]] codes{{ref|https://hiddenpalace.org/Sonic_the_Hedgehog_3_(Nov_3,_1993_prototype)}}: | + | | desc=Two unused moves for Sonic exist in the code and can be enabled using [[sega:Game Genie (Mega Drive)|Game Genie]]/[[sega:Action Replay (Mega Drive)|PAR]] codes{{ref|https://hiddenpalace.org/Sonic_the_Hedgehog_3_(Nov_3,_1993_prototype)}}: |
* '''RG6A-A6Z0''' / '''00B8B6:4E71''' enables a multi-directional Air Dash that can be peformed by pressing {{A}} in conjunction with the D-Pad while jumping, similar to that of [[Hyper Sonic]]. This move is buggy in that the camera will struggle to track Sonic if he dashes at an angle. | * '''RG6A-A6Z0''' / '''00B8B6:4E71''' enables a multi-directional Air Dash that can be peformed by pressing {{A}} in conjunction with the D-Pad while jumping, similar to that of [[Hyper Sonic]]. This move is buggy in that the camera will struggle to track Sonic if he dashes at an angle. | ||
* '''RG5T-A6Z2''' / '''00B7B8:4E71''' & '''RG5T-A6Z4''' / '''00B7BA:4E71''' will enable the ability to shoot [[Ring]]s as projectiles by pressing {{B}} while jumping to shoot a single Ring in the direction Sonic is facing, or {{C}} to shoot Rings from both sides of Sonic. The Rings can take out Badniks as well as collect other Rings, and shooting them will not deplete Sonic's Ring count, though he cannot pick up the shot Rings themselves. When using {{B}} for the move, Sonic will uncurl from his jump and have a slight recoil in the opposite direction he shoots. | * '''RG5T-A6Z2''' / '''00B7B8:4E71''' & '''RG5T-A6Z4''' / '''00B7BA:4E71''' will enable the ability to shoot [[Ring]]s as projectiles by pressing {{B}} while jumping to shoot a single Ring in the direction Sonic is facing, or {{C}} to shoot Rings from both sides of Sonic. The Rings can take out Badniks as well as collect other Rings, and shooting them will not deplete Sonic's Ring count, though he cannot pick up the shot Rings themselves. When using {{B}} for the move, Sonic will uncurl from his jump and have a slight recoil in the opposite direction he shoots. | ||
| Line 162: | Line 202: | ||
===Cutscenes=== | ===Cutscenes=== | ||
| − | Unfinished versions of cutscenes seen in the final game can be enabled using PAR codes, found by [[User:Neo| | + | Unfinished versions of cutscenes seen in the final game can be enabled using PAR codes, found by [[User:Neo|Fred Bronze]]: |
====AIZ1 Tornado intro==== | ====AIZ1 Tornado intro==== | ||
{{HiddenContent | {{HiddenContent | ||
| image1=Sonic3Proto MD AIZPlane1 Unused.png | | image1=Sonic3Proto MD AIZPlane1 Unused.png | ||
| image2=Sonic3Proto MD AIZPlane2 Unused.png | | image2=Sonic3Proto MD AIZPlane2 Unused.png | ||
| − | | desc=PAR codes '''003CC6:0003''' and '''003CC8:5AD2''' will enable an early version of the introductory cutscene in [[Angel Island Zone]] Act 1. Compared to the final, the [[Tornado]] does not move up and down as it approaches the island, and Super Sonic takes a little longer to reach the beach. Knuckles, however, will be a static object in the ground, and Sonic will stop on a dime and lose his Super form on the spot and remain there, softlocking the game.{{ref|{{LinkYoutube|video=Q1n3A88oMQs|title=AIZ plane intro; video by | + | | desc=PAR codes '''003CC6:0003''' and '''003CC8:5AD2''' will enable an early version of the introductory cutscene in [[Angel Island Zone]] Act 1. Compared to the final, the [[Tornado]] does not move up and down as it approaches the island, and Super Sonic takes a little longer to reach the beach. Knuckles, however, will be a static object in the ground, and Sonic will stop on a dime and lose his Super form on the spot and remain there, softlocking the game.{{ref|{{LinkYoutube|video=Q1n3A88oMQs|title=AIZ plane intro; video by Fred Bronze}}}} |
}} | }} | ||
| Line 173: | Line 213: | ||
{{HiddenContent | {{HiddenContent | ||
| image1=Sonic3Proto MD CNZ2KnuxCutscene Unused.png | | image1=Sonic3Proto MD CNZ2KnuxCutscene Unused.png | ||
| − | | desc=PAR codes '''1FC022:1DE0''', '''1FC024:032C''', '''1FC026:C70C''', '''1FC028:1E00''', '''1FC02A:0338''' and '''1FC02C:C904''' will enable the first Knuckles cutscene encountered during [[Carnival Night Zone]] Act 2. The cutscene plays out as intended, except the switch will not turn off the lights or raise the water level, and Knuckles' theme will continue to play after the cutscene has ended.{{ref|{{LinkYoutube|video=vUklX9fQMkc|title=Cutscene Knuckles CNZ2A; video by | + | | desc=PAR codes '''1FC022:1DE0''', '''1FC024:032C''', '''1FC026:C70C''', '''1FC028:1E00''', '''1FC02A:0338''' and '''1FC02C:C904''' will enable the first Knuckles cutscene encountered during [[Carnival Night Zone]] Act 2. The cutscene plays out as intended, except the switch will not turn off the lights or raise the water level, and Knuckles' theme will continue to play after the cutscene has ended.{{ref|{{LinkYoutube|video=vUklX9fQMkc|title=Cutscene Knuckles CNZ2A; video by Fred Bronze}}}} |
}} | }} | ||
Latest revision as of 18:25, 3 December 2022
Contents
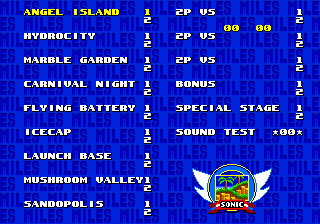
Level select
Enabled by default. Simply press ![]() on the title screen. Mushroom Valley and Sandopolis do not lead anywhere. Pressing
on the title screen. Mushroom Valley and Sandopolis do not lead anywhere. Pressing ![]() increments a counter that determines the players' characters in the Competition mode Zones, with the first controller incrementing the left counter and the second counter incrementing the right:
increments a counter that determines the players' characters in the Competition mode Zones, with the first controller incrementing the left counter and the second counter incrementing the right:
Character selection
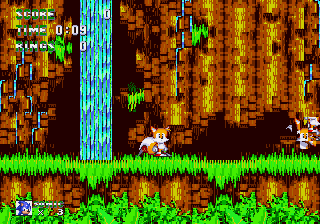
Normally, the player controls Sonic with Tails following, but it is possible to play as different characters by pressing different button combinations at the title screen:
- Press
 +
+ to play as Sonic and Tails together.
 - Press
 +
+ to play as Sonic alone.
 - Press
 +
+ to play as Tails alone.
Edit mode
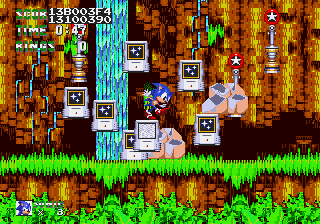
Play sounds 01, 03, 05, 07 in the sound test, or press ![]()
![]()
![]()
![]()
![]()
![]() on the title screen, then highlight a Zone and press
on the title screen, then highlight a Zone and press ![]() +
+![]() .
.
Night mode
Enable the edit mode code above and hold ![]() +
+![]() when selecting a level.
when selecting a level.
All Chaos Emeralds
Play sounds 02, 04, 05, 06 in the sound test. A Chaos Emerald sound will confirm correct entry. However, transformation into Super Sonic is not possible.
Unused content
Art
| Art | Description |
|---|---|
| A button-like object that is loaded early on in the space used for the burning Angel Island Zone stage graphics. Also unused in the final. | |
| A smaller version of the Turbo Spiker. These sprites were found in a seemingly unreferenced KosM archive that contains most of Hydrocity Zone's Badniks at offset $132802.[1] | |
| Icons for the reels in the Slot Machine Bonus Stage. While the Sonic, Tails and Knuckles icons can be seen in-game, the rest of the icons, including the Super Sonic icon that would remain unused even in Sonic & Knuckles, cannot be seen but are loaded in VRAM. Curiously, the icons in this prototype are more detailed than they normally are in the final version.[2] | |
| Leftover signpost sprites identical to Sonic 2's that remain in both this game and Sonic and Knuckles. Additionally, there's art for Knuckles, which is close to the final art, but with less shading. His nose is thinner and more of his spines cover the signpost. These are also unused in the final. |
Objects
Placeable in edit mode
| Art | Description |
|---|---|
| A level-breaking object in the first Act of Angel Island Zone that shrinks and grows, presumably to test sprite scaling. | |
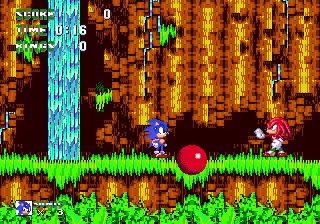
| A cluster of spinning red balls in the first Act of Angel Island Zone, which can be manipulated with the second Control Pad. | |
| A breakable wall in Angel Island Zone Act 2, which can only be placed with debug mode and is destroyed with a Spin Dash on the ground. A similar object is used as a wall that is opened with a switch. | |
| An "S" monitor, which transforms Sonic into Super Sonic when broken. It can only be placed in Hydrocity Zone in this prototype. | |
| Light bulb that appears broken if placed underwater in Carnival Night Zone. The water level never changes in this prototype, so this is never seen. The final places this light bulb in the area where Knuckles would turn off the power. | |
| An unused switch in Carnival Night Zone. | |
| An unknown Ring-like object that appears to spawn slope collision when placed. It is placeable in Carnival Night Zone. | |
| Air bubbles are available for Carnival Night Zone and Launch Base Zone Act 2. Strictly speaking this is not an unused object as they can be seen in Hydrocity Zone, but they're not used in Carnival Night, and aren't in use in Launch Base as the Knuckles path is not finished. | |
| Blaster, placeable in Flying Battery Zone. Like in Sonic 3 final, its projectiles can be destroyed like regular Badniks. | |
| Technosqueek, placeable in Flying Battery Zone. | |
| Breakable blocks in IceCap Zone. | |
| Dragonfly, placeable in Mushroom Valley Zone. | |
| Cluckoid, placeable in Mushroom Valley Zone. | |
| Butterdroid, placeable in Mushroom Valley Zone. | |
| Madmole, placeable in Mushroom Valley Zone. | |
| Spikes for competition mode. |
Others
| Art | Description |
|---|---|
| The Giant Ring, which is actually left over from Sonic the Hedgehog though its graphics are long gone. It can be placed into the game with debug mode using PAR code 04B47C:0C60 to replace AIZ1's debug Ring with it, while 010CDC:FF4C adds the object to the collision response list[3]. Its offset is $10C60. | |
| A glitched platform that appears to belong to Launch Base Zone, which would remain unused in the final Sonic 3 and even in Sonic the Hedgehog 3 & Knuckles. Its object ID is 12, and its offset is $1C6A0. | |
| A seesaw-like cannon that locks the player in the center of the object, and propels them extremely far when pressing a button. Remains unused in the final. Its object ID is 1A, and its offset is $1DFCE. | |
| A strange, spinning object that hurts the player when jumped on, and swings when hit from underneath. Remains unused in the final. Its object ID is 1C, and its offset is $1E6C6. | |
| A Launch Base Zone platform that can be grabbed from underneath. Remains unused in the final. Its object ID is 1D, and its offset is $1C228. | |
| Hey Ho, normally reserved as the mini-boss of Mushroom Valley Zone. It appears to be in a very early state as it simply floats in place and performs its swinging animations, and cannot be interacted with by the player. Its graphics have also been removed from the game. Its object ID is 84, and its offset is $40704. | |
| The Beam Rocket boss for Launch Base Zone Act 2. Compared to the final, it has no sound effects, its collision is incomplete as the player cannot get hurt by touching the sections or exhaust, it does not speed up when hit, and the spiked orb that orbits the cockpit is missing. The final section is destroyed in two hits instead of one, and once defeated the game softlocks. Its object ID is 86. | |
| Fireworm, normally for Lava Reef Zone. Can potentially crash the game while trying to DMA non-existent sprites when spawned. Its object ID is 90, and its offset is $49FB6. | |
| Iwamodoki, normally for Lava Reef Zone. In this prototype, it can be destroyed like any other Badnik before it explodes. Its object ID is 91, and its offset is $4A29C. | |
| Toxomister, normally for Lava Reef Zone. Its toxic gas cannot kill the player or drain their Rings, and the gas sprite is slower at following the player. Its object ID is 92, and its offset is $4A400. | |
| The Guardian, normally reserved as the mini-boss of Sandopolis Zone. This boss is fully functional, albeit it moves forward more slowly and has no sound effects, and its graphics have been removed from the game. As there is no quicksand pit in the game, it cannot be defeated. Its object ID is 98, and its offset is $4107E. | |
| Knuckles' version of the Drill Mobile for Marble Garden Zone Act 2. Like in the final Sonic 3, it functions identically to how it does in Sonic 3 & Knuckles, except it is invincible as it has no death routine implemented. Curiously, it plays the Act 2 boss theme when loaded. Its object ID is B1. | |
| The Barrier Eggman mini-boss for Flying Battery Zone Act 2. Despite being coded and FBZ2 being accessible by normal means, it's not actually placed in the level. Its object ID is B6, and its offset is $4107E. |
Lava Reef Zone
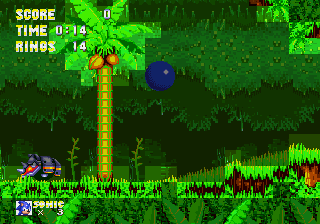
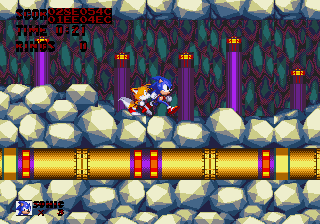
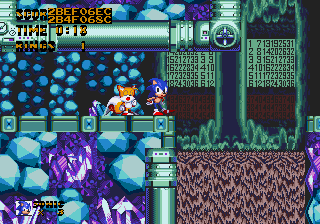
While Lava Reef Zone has been culled like most of the Zones from Sonic & Knuckles, leftover data from an earlier build of Sonic 3 exists at the end of the ROM, containing data for Lava Reef. Act 1 has full layout data, palettes, and graphics intact, though Act 2 only has layout data and palettes. Multiple maps for Act 1 are also contained within the prototype, with 6 full maps at offsets 0x1EC4CE, 0x1ED2F6, 0x1EE11E, 0x1EEF46, 0x1EFD6E and 0x1F0B96, and 2 fragmented maps at offsets 0x1EAF4A and 0x1F3EC4.[4]
Through hacking, it is possible to restore the Zone and explore what the Zone could have looked like before the split. The screenshots shown here are from hacked versions of the prototype that attempt to restore the Zone using the leftover data combined with data imported from the Sonic 3C 0408 prototype.
Moves
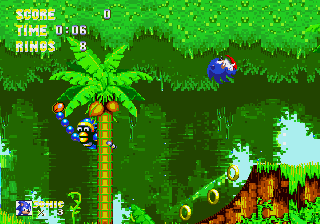
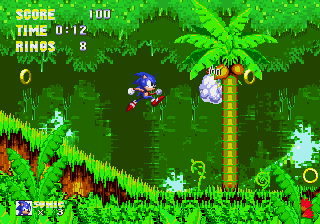
Two unused moves for Sonic exist in the code and can be enabled using Game Genie/PAR codes[5]:
- RG6A-A6Z0 / 00B8B6:4E71 enables a multi-directional Air Dash that can be peformed by pressing
 in conjunction with the D-Pad while jumping, similar to that of Hyper Sonic. This move is buggy in that the camera will struggle to track Sonic if he dashes at an angle.
 - RG5T-A6Z2 / 00B7B8:4E71 & RG5T-A6Z4 / 00B7BA:4E71 will enable the ability to shoot Rings as projectiles by pressing
 while jumping to shoot a single Ring in the direction Sonic is facing, or
  to shoot Rings from both sides of Sonic. The Rings can take out Badniks as well as collect other Rings, and shooting them will not deplete Sonic's Ring count, though he cannot pick up the shot Rings themselves. When using
  for the move, Sonic will uncurl from his jump and have a slight recoil in the opposite direction he shoots.
Cutscenes
Unfinished versions of cutscenes seen in the final game can be enabled using PAR codes, found by Fred Bronze:
AIZ1 Tornado intro
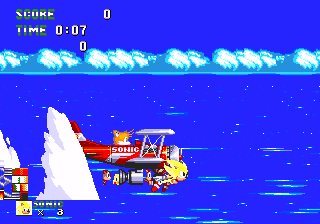
PAR codes 003CC6:0003 and 003CC8:5AD2 will enable an early version of the introductory cutscene in Angel Island Zone Act 1. Compared to the final, the Tornado does not move up and down as it approaches the island, and Super Sonic takes a little longer to reach the beach. Knuckles, however, will be a static object in the ground, and Sonic will stop on a dime and lose his Super form on the spot and remain there, softlocking the game.[6]
CNZ2 Knuckles cutscene
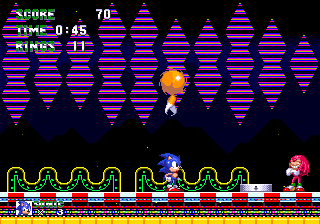
PAR codes 1FC022:1DE0, 1FC024:032C, 1FC026:C70C, 1FC028:1E00, 1FC02A:0338 and 1FC02C:C904 will enable the first Knuckles cutscene encountered during Carnival Night Zone Act 2. The cutscene plays out as intended, except the switch will not turn off the lights or raise the water level, and Knuckles' theme will continue to play after the cutscene has ended.[7]
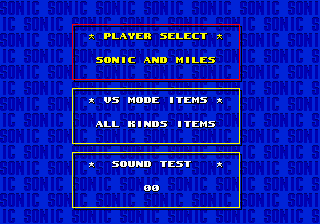
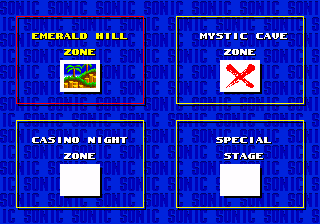
Just like in the final game, the Options and 2-Player menus from Sonic the Hedgehog 2 remain left over in the prototype ROM. Use PAR code 00039A:0024 to load the Options menu on boot, and 00039A:001C to load the 2-Player menu on boot.
The Options screen can be used to change the player's character to play as Sonic alone or Tails alone. The 2-Player menu functions differently than in the final Sonic 3 in that not all of the Zone choices are disabled, though selecting any Zone with ![]() will send the player to the Sega screen.
will send the player to the Sega screen.
Cheat device codes
These are cheat codes that can only be used with game enhancer devices. Support for these codes is available in most emulators.
Action Replay
Unofficial codes
| Code | Effect | Reference |
|---|---|---|
| FFFFFA:0100 | Force debug mode. | [8] |
| FFFF0B:00?? | Character modifier (??: Character).
|
[8] |
| 00039A:0004 | Jump directly to Title Screen (on boot). | [8] |
| 00039A:0028 | Jump directly to Level Select (on boot). | [8] |
| 00039A:0024 | Jump directly to Sonic 2 Options Screen (on boot). | [8] |
| 04B488:??01 | Force debug monitors for Angel Island Zone Act 1 (??: Monitor subtype).
|
[8] |
| 04B5C0:??01 | Force debug monitors for Angel Island Zone Act 2 (??: Monitor subtype). | [8] |
| 04B734:??01 | Force debug monitors for Hydrocity Zone (??: Monitor subtype). | [8] |
| 04B952:??01 | Force debug monitors for Marble Garden Zone (??: Monitor subtype). | [8] |
| 04BAB2:??01 | Force debug monitors for Carnival Night Zone (??: Monitor subtype). | [8] |
| 04BC1C:??01 | Force debug monitors for Flying Battery Zone (??: Monitor subtype). | [8] |
| 04BC96:??01 | Force debug monitors for IceCap Zone Act 1 (??: Monitor subtype). | [8] |
| 04BDEC:??01 | Force debug monitors for IceCap Zone Act 2 (??: Monitor subtype). | [8] |
| 04BF42:??01 | Force debug monitors for Launch Base Zone Act 1 (??: Monitor subtype). | [8] |
| 04C0AC:??01 | Force debug monitors for Launch Base Zone Act 2 (??: Monitor subtype). | [8] |
| 04C23E:??01 | Force debug monitors for Mushroom Valley Zone (??: Monitor subtype). | [8] |
| 04C312:??01 | Force debug monitors for Sandopolis Zone(??: Monitor subtype). | [8] |
| 04C364:??01 | Force debug monitors for Lava Reef Zone/Hidden Palace Zone (??: Monitor subtype). | [8] |
| 04C3D4:??01 | Force debug monitors for Sky Sanctuary Zone/Death Egg Zone Act 1 (??: Monitor subtype). | [8] |
| 04C426:??01 | Force debug monitors for Death Egg Zone Act 2 (??: Monitor subtype). | [8] |
| 04C478:??01 | Force debug monitors for The Doomsday Zone (??: Monitor subtype). | [8] |
| 04C4CA:??01 | Force debug monitors for the Special Stage (??: Monitor subtype). | [8] |
| 04C922:??01 | Force debug monitors for the Bonus Stage (??: Monitor subtype). | [8] |
| 04A8D0:46EE 04A8D4:46EE 04A8E8:46EE 04A8EC:46EE |
Mushroom Valley 1 decompression fix. | [8] |
| 04A930:46EE 04A934:46EE 04A948:46EE 04A94C:46EE |
Lava Reef 1 decompression fix. | [8] |
References
- ↑ [Sonic Retro forum thread: Sonic 3 (Nov 3, 1993 prototype) - Technical Analysis & Research thread; post #951918 by Fred Sonic Retro forum thread: Sonic 3 (Nov 3, 1993 prototype) - Technical Analysis & Research thread; post #951918 by Fred]
- ↑ [Sonic Retro forum thread: Sonic Month 2019: Sonic 3; post #951603 by GoldS Sonic Retro forum thread: Sonic Month 2019: Sonic 3; post #951603 by GoldS]
- ↑ [Special stage entry ring ; video by Fred Bronze Special stage entry ring ; video by Fred Bronze]
- ↑ The Cutting Room Floor: Proto:Sonic the Hedgehog 3#Lava Reef
- ↑ [AIZ plane intro; video by Fred Bronze AIZ plane intro; video by Fred Bronze]
- ↑ [Cutscene Knuckles CNZ2A; video by Fred Bronze Cutscene Knuckles CNZ2A; video by Fred Bronze]
- ↑ 8.00 8.01 8.02 8.03 8.04 8.05 8.06 8.07 8.08 8.09 8.10 8.11 8.12 8.13 8.14 8.15 8.16 8.17 8.18 8.19 8.20 8.21 8.22 8.23 8.24 [Sonic Retro forum thread: Sonic Month 2019: Sonic 3; post #951025 by You-Are-Pwned Sonic Retro forum thread: Sonic Month 2019: Sonic 3; post #951025 by You-Are-Pwned]
| Sonic the Hedgehog 3 (prototype; 1993-11-03), prototype version of Sonic the Hedgehog 3 | |
|---|---|
|
Main page | Comparisons | Maps | Hidden content | |
