|
|
| (5 intermediate revisions by the same user not shown) |
| Line 1: |
Line 1: |
| | {{GuideBy|Lightning}}<br> | | {{GuideBy|Lightning}}<br> |
| | | | |
| − | This tutorial was made possible thanks to the references, guides, and information found at [[Hacking CulT]], [[The Sonic 2 Beta Page]], [[Sonic Retro]], and [[Sonicology]]. It was inspired by the [[SCHG How-to:S1 Split Guides/Basic ASM Editing (Spin Dash)|guide]] at [[The Glowing Bridge]] that details porting the simpler Spin Dash from the [[Sonic the Hedgehog 2 (Nick Arcade prototype)|''Sonic 2'' early beta]]. | + | This tutorial was made possible thanks to the references, guides, and information found at [[Hacking CulT]], [[The Sonic 2 Beta Page]], [[Sonic Retro]], and [[Sonicology]]. I made this for the newest Github Disassembly. Thanks to [[User:Kramlat|Kramlat]] for the latest guide before this one. |
| | | | |
| − | This SCHG is property of [[User:DikinBaus|DikinBaus]]. Sonic and all related characters and graphics that appear on this page are property of Sega and are used without permission for no profit. | + | This SCHG is property of [[User:DikinBaus|DikinBaus]]. Sonic and all related characters and graphics that appear on this page are property of SEGA and are used without permission for no profit. |
| | | | |
| | ==Requirements== | | ==Requirements== |
| | | | |
| | * [https://github.com/sonicretro/s1disasm Sonic 1 Disassembly Main] | | * [https://github.com/sonicretro/s1disasm Sonic 1 Disassembly Main] |
| − | * [https://cdn.discordapp.com/attachments/1166564744149336064/1189065271030325298/Sonic_1_Sprites.zip?ex=659cce54&is=658a5954&hm=b01276ab0c2c0bd2c5a2ee02f69a83a038fff46ed04d64c1e8c0bac1b0710486& Sonic 1 Sprites] | + | * A plain text editor of your choice |
| − | * [https://cdn.discordapp.com/attachments/1166564744149336064/1189074034084806688/Spindash_Sprites.zip?ex=659cd67d&is=658a617d&hm=87addb1beefdbec79b8b11e34194f41d0d73c7c6e7e2444e2b64938e51246396& Sonic SpinDash Sprites] | + | * [https://github.com/kirjavascript/Flex2/releases/tag/1.3.3 Flex 2] |
| − | * A plain text editor of your choice (I know this sounds weird but Windows' notepad is recommended)
| + | * A Sega Genesis Emulator ([https://retrocdn.net/images/6/6c/Fusion364.7z Kega Fusion] or [https://www.retrodev.com/blastem/ BlastEm] recommended) |
| − | * [https://info.sonicretro.org/Flex_2 Flex 2]
| |
| − | * A Sega Genesis emulator ([https://retrocdn.net/images/6/6c/Fusion364.7z Kega Fusion] or [https://www.retrodev.com/blastem/ BlastEm] recommended) | |
| | | | |
| | In making this tutorial, I used: | | In making this tutorial, I used: |
| | | | |
| − | * Clownacys Sonic 1 Disassembly | + | * Clownacys Sonic 1 Disassembly (newest) |
| − | * Sonic 1 Sprites
| |
| − | * Sonic SpinDash Sprites
| |
| | * Windows' Notepad | | * Windows' Notepad |
| | * Flex 2 | | * Flex 2 |
| | * Kega Fusion | | * Kega Fusion |
| | | | |
| | + | == Importing the Spindash == |
| | | | |
| − | == GitHub Disassembly == | + | |
| | + | ===Adding a New Flag=== |
| | Alright, lets get started shall we? Open Constants.asm and scroll down to line 154. Now make a new space (or press enter) and define a new RAM equate by adding this line: | | Alright, lets get started shall we? Open Constants.asm and scroll down to line 154. Now make a new space (or press enter) and define a new RAM equate by adding this line: |
| | | | |
| Line 30: |
Line 28: |
| | | | |
| | | | |
| − | ===Directly copying the object code=== | + | ===Adding the SpinDash to the Player=== |
| | Open sonic.asm in your text editor, and search for the phrase '''Sonic_MdNormal:''' (line 6948) and above '''bsr.w Sonic_Jump''', make a new line and add '''bsr.w Sonic_SpinDash''' to it you should end up with this: <syntaxhighlight lang="asm">Sonic_MdNormal: | | Open sonic.asm in your text editor, and search for the phrase '''Sonic_MdNormal:''' (line 6948) and above '''bsr.w Sonic_Jump''', make a new line and add '''bsr.w Sonic_SpinDash''' to it you should end up with this: <syntaxhighlight lang="asm">Sonic_MdNormal: |
| | bsr.w Sonic_SpinDash | | bsr.w Sonic_SpinDash |
| Line 36: |
Line 34: |
| | </syntaxhighlight> the code below '''bsr.w Sonic_Jump''' should not be worried about. | | </syntaxhighlight> the code below '''bsr.w Sonic_Jump''' should not be worried about. |
| | | | |
| − | Now, to actually copy the Spin Dash subroutine. You have to add a new .asm file. To do that go into Sonic 1's disassembly, create a new file within '''_incObj''' folder named Sonic Spindash.asm, for the sake of this SCHG I will add a download [https://cdn.discordapp.com/attachments/1166564744149336064/1188752933941153812/Sonic_Spindash.asm?ex=659bab71&is=65893671&hm=52ff2413b09201d6cc6fa636a8b36d5bc1e23da2bd5a5972be85d8b3ce86ce37& right here] with all the code. (please put it in the '''_incObj''' folder) | + | Now, to actually copy the Spin Dash subroutine. You have to add a new .asm file. To do that go into Sonic 1's disassembly, create a new file within '''_incObj''' folder named Sonic Spindash.asm, for the sake of this SCHG I will add a download [https://cdn.discordapp.com/attachments/1166564744149336064/1188752933941153812/Sonic_Spindash.asm?ex=659bab71&is=65893671&hm=52ff2413b09201d6cc6fa636a8b36d5bc1e23da2bd5a5972be85d8b3ce86ce37& right here] with all the code. |
| − | | + | after that has been download and put in the '''_incObj''' folder. Go back to sonic.asm and go to '''loc_12EA6:''' (line 6996) scroll until you see '''include "_incObj/Sonic JumpDirection.asm"'''. |
| − | after that has been download and put in the '''_incObj''' folder. Go back to sonic.asm and go to '''loc_12EA6:''' (line 6996 lol) scroll until you see '''include "_incObj/Sonic JumpDirection.asm"'''. | |
| | Copy it, and right below it paste it but replace '''Sonic JumpDirection''' with '''Sonic SpinDash''' it should look something like this: | | Copy it, and right below it paste it but replace '''Sonic JumpDirection''' with '''Sonic SpinDash''' it should look something like this: |
| | <syntaxhighlight lang="asm"> include "_incObj/Sonic Move.asm" | | <syntaxhighlight lang="asm"> include "_incObj/Sonic Move.asm" |
| Line 46: |
Line 43: |
| | Save your changes, navigate back to the main part of the disassembly and run build.bat | | Save your changes, navigate back to the main part of the disassembly and run build.bat |
| | | | |
| − | [[Image:testing-1.png|Spin Dashing with a strange animation]]
| + | ===First Bug=== |
| − | ===First Error=== | + | Uh-oh, so, as expected, there's bugs. The first being, if you collect a few rings then start SpinDashing, as you can see, the badnik(s) can hurt you in your SpinDash state. If you get hit while in state as said before, you'll still be in the SpinDashing state when you land, Sonic will charge forward (depends which way you got hit, forwards or backwards) usually it would destroy whatever badnik touches you in the first place, but that didn't happen. Second, go to high ground or somewhere where the camera can pan downward. Wait for the camera to fully pan down and start SpinDashing. The camera will continue to stay downwards until you stop SpinDashing/Rolling. Third, if you hold the Spindash button for long enough, your game will crash. Another problem that the camera can result is that if you SpinDash before an area where your vertical position radically changes (a great example is the double S-Tube in GHZ1), the camera is too slow to catch up to Sonic in time. |
| − | That's no good, as you can see on the image, sonic is displaying an "unused" animation. Let's address the bugs. First of all, and the obvious Sonic's Spin Dashing animation isn't present in Sonic 1, of course, therefore it's a messed up version of what seems like the drop dash. If you haven't noticed, collect a few rings then start SpinDashing, as you can see, the badnik(s) can hurt you in your SpinDash state. If you get hit while in state as said before, you'll still be in the SpinDashing state when you land, Sonic will charge forward (depends which way you got hit, forwards or backwards) usually it would destroy whatever badnik touches you in the first place, but that didn't happen. Second, go to high ground or somewhere where the camera can pan downward. Wait for the camera to fully pan down and start SpinDashing. The camera will continue to stay downwards until you stop SpinDashing/Rolling.
| + | |
| − | [[Image:testing-2a.png|Spin Dashing with low camera]]
| |
| − | Another problem that the camera can result is that if you SpinDash before an area where your vertical position radically changes (a great example is the double S-Tube in GHZ1), the camera is too slow to catch up to Sonic in time. | |
| | [[Image:testing-2b.png|camera lagging behind]] | | [[Image:testing-2b.png|camera lagging behind]] |
| − | Other than that, it works! Great start so far, but let's not get our hopes up.
| |
| | | | |
| − | ===Animations and Sounds=== | + | ===Animation Bugs=== |
| − | Now, usually you'd need to worry about changing the sound and allat. But since you already downloaded the '''Sonic_Spindash.asm''' we don't have to worry so let's go to the animation. | + | Now, you'll see that if you hold the Spindash button for long enough, it will show a few varieties of animations. Don't worry as we will fix this later on. |
| − | | |
| − | The animation is kind of the same as the sound. Since you already downloaded the '''Sonic_Spindash.asm''' we aight. The animation is currently set to $1F, we'll worry about that later. But for now you're okay. Therefore this section is useless (Mostly).
| |
| | | | |
| | | | |
| | ===Fixing Bugs/Errors=== | | ===Fixing Bugs/Errors=== |
| − | First of all, the camera issue is already fixed. But there is one thing. The camera is still too slow. So, if you go down an S-Tube, you die. | + | First of all, the camera issue is already fixed. But there is one thing, the camera is still too slow. So, if you go down an S-Tube, the camera will be too slow and you'll die due to the bottom boundary. Now for the Spindash badnik hurt bug. Go to '''_incObj/sub ReactToItem''' and look for '''React_Enemy:''' (line 167) and find this peice of code: |
| | + | <syntaxhighlight lang="asm">React_Enemy: |
| | + | tst.b (v_invinc).w ; is Sonic invincible? |
| | + | bne.s .donthurtsonic ; if yes, branch |
| | + | cmpi.b #id_Roll,obAnim(a0) ; is Sonic rolling/jumping? |
| | + | bne.w React_ChkHurt ; if not, branch</syntaxhighlight> |
| | + | and replace it with this, |
| | + | <syntaxhighlight lang="asm">React_Enemy: |
| | + | tst.b (v_invinc).w ; is Sonic invincible? |
| | + | bne.s .donthurtsonic ; if yes, branch |
| | + | cmpi.b #$1F,$1C(a0) ; is Sonic Spin Dashing? |
| | + | beq.w .donthurtsonic ; if yes, branch |
| | + | cmpi.b #id_Roll,obAnim(a0) ; is Sonic rolling/jumping? |
| | + | bne.w React_ChkHurt ; if not, branch</syntaxhighlight> |
| | | | |
| | So, to fix this go into the '''_incObj''' folder and look for '''Sonic LevelBound''' once you find it, open it. Look for '''.bottom:''' (line 48) You should see this, | | So, to fix this go into the '''_incObj''' folder and look for '''Sonic LevelBound''' once you find it, open it. Look for '''.bottom:''' (line 48) You should see this, |
| Line 91: |
Line 96: |
| | | | |
| | ===Sonic Spindash Sprites=== | | ===Sonic Spindash Sprites=== |
| − | As you can see, Sonic doesn't have a SpinDash sprite as it's not present in Sonic 1, so open up [https://info.sonicretro.org/Flex_2 Flex 2], | + | As you can see, Sonic doesn't have a SpinDash sprite as it's not present in Sonic 1, so open up Flex 2. |
| − | now, remember how you downloaded a Sonic 1 Sprites? This is where it comes in handy. Extract that boy if not yet, and go back in Flex 2. Now, go to the File section in Flex, and make sure to turn on DPLCs (look to the right until you see it) and put the following sprites as shown in this picture.
| + | Now, [https://cdn.discordapp.com/attachments/1213547116480172034/1213547665204322304/Sonic_1_Sprites.zip?ex=65f5df56&is=65e36a56&hm=1773aa71cb69861752e56625bcb18384bc3c1acb5c108e110442eac4426aca83& download] Sonic 1 Sprites (needed) and [https://cdn.discordapp.com/attachments/1213547116480172034/1213547949963870281/Spindash_Sprites.zip?ex=65f5df99&is=65e36a99&hm=bdda9188ada07f22415ca0672ef4fe1a0520f562c061a8151c486f9c7ac67bed& the Spindash sprites.] Extract the file if not yet, and go back in Flex 2. Now, go to the File section in Flex, and make sure to turn on DPLCs (look to the right until you see it) and put the following sprites as shown in this picture. |
| | [[File:Sonic-Flex.png]] | | [[File:Sonic-Flex.png]] |
| − | If all is well, your sprites should be correct. So good so far eh? Here comes the part if gets confusing. Find the SpinDash sprites you downloaded earlier, if not then [https://cdn.discordapp.com/attachments/1166564744149336064/1189074034084806688/Spindash_Sprites.zip?ex=659cd67d&is=658a617d&hm=87addb1beefdbec79b8b11e34194f41d0d73c7c6e7e2444e2b64938e51246396& here] it is, | + | If all is well, your sprites should be correct. Here comes the part if gets confusing. Find the SpinDash sprites you downloaded earlier, and extract them if not yet, |
| − | once downloaded and extracted. Go to the Mappings section in Flex 2 and scroll down until you see a '''Import Spritesheet''' button (It's in the blue buttons to the right) and select the SpinDash sprite. (You have to do it for each SpinDash sprite.) Once finished, while on the '''Mapping''' go on the right where the sprites are and scroll to the bottom until you see the SpinDash sprites you added. Select the sprites, and on the display select the whole sprite and press the down arrow key 9 times. (Do this for each sprite.) If you're confused, I'll add an image right below. | + | once extracted. Go to the Mappings section in Flex 2 and scroll down until you see a '''Import Spritesheet''' button (It's in the blue buttons to the right) and select the SpinDash sprite. Click '''Detect Sprites''' and then '''Import Sprites''' (You have to do it for each SpinDash sprite.) Once finished, while on the '''Mapping''' section, go on the right where the sprites are and scroll to the bottom until you see the SpinDash sprites you added. Select the sprites, and on the display select the whole sprite and press the down arrow key 9 times. (Do this for each sprite.) If you're confused, I'll add an image right below. |
| | + | |
| | [[File:Sonic-spindash-flex.png]] | | [[File:Sonic-spindash-flex.png]] |
| − | Once that's finished, go back and build your ROM. Awesome! You now have a functional SpinDash with animations! But wait! You still get hurt when you're in your SpinDash state! But don't worry, there's an easy fix. Go to '''_incObj/sub ReactToItem''' and look for '''React_Enemy:''' (line 167) and find this peice of code:
| |
| − | <syntaxhighlight lang="asm">React_Enemy:
| |
| − | tst.b (v_invinc).w ; is Sonic invincible?
| |
| − | bne.s .donthurtsonic ; if yes, branch
| |
| − | cmpi.b #id_Roll,obAnim(a0) ; is Sonic rolling/jumping?
| |
| − | bne.w React_ChkHurt ; if not, branch</syntaxhighlight>
| |
| − | and replace it with this,
| |
| − | <syntaxhighlight lang="asm">React_Enemy:
| |
| − | tst.b (v_invinc).w ; is Sonic invincible?
| |
| − | bne.s .donthurtsonic ; if yes, branch
| |
| − | cmpi.b #$1F,$1C(a0) ; is Sonic Spin Dashing?
| |
| − | beq.w .donthurtsonic ; if yes, branch
| |
| − | cmpi.b #id_Roll,obAnim(a0) ; is Sonic rolling/jumping?
| |
| − | bne.w React_ChkHurt ; if not, branch</syntaxhighlight>
| |
| | | | |
| − | and press the '''Save''' button on the '''Object'' text. Now go and build your ROM!
| + | Once that's finished, go back and build your ROM. Awesome! You now have a functional SpinDash! Remember when I said, "Now, you'll see that if you hold the Spindash button for long enough, it will show a few varieties of animations. Don't worry as we will fix this later on."? This is later on, go to '''_anim/Sonic.asm''' and go to the very bottom. Once there, paste this in. |
| | | | |
| − | Now, you'll fix the problem where Sonic is still in his Spin Dashing state after he gets injured. Open '''_incObj\sub ReactToItem.asm''' and findghe subroutine '''HurtSonic'''. This is the code that handles hurting Sonic, if you couldn't guess. You're going to have it clear the flag in memory that stores whether or not Sonic is Spin Dashing. Scroll to the label '''@isleft''' and add the line '''move.b #0,(a0)''' directly below it. You should end up with:
| + | <syntaxhighlight lang="asm">id_Spindash: equ (ptr_Spindash-Ani_Sonic)/2 ; $1F</syntaxhighlight> |
| | | | |
| − | <syntaxhighlight lang="asm">@isleft:
| + | Once that's done, go below the line, |
| − | move.b #0,f_spindash(a0) ; clear Spin Dash flag
| |
| − | move.w #0,obInertia(a0)
| |
| − | move.b #id_Hurt,obAnim(a0)
| |
| − | move.w #$120,$30(a0)
| |
| − | </syntaxhighlight>
| |
| | | | |
| − | Save, build, and test. If all is well, those bugs should be gone! Now you have a functioning Spin Dash in Sonic 1. However, it doesn't look like the Spin Dash from Sonic 2. In the next sections, we will rectify this.
| + | <syntaxhighlight lang="asm">SonAni_Float4: dc.b 3, fr_Float1, afChange, id_Walk |
| | + | even</syntaxhighlight> (line ''101'') |
| | | | |
| − | ===Adding new tiles===
| + | and paste this in. |
| − | Now, you'll need to add the Spin Dash tiles from Sonic 2's tiles to Sonic 1's; However, you'll need to pad the file '''artunc/sonic.bin''' to get room for the new tiles first.
| |
| | | | |
| − | ====On Windows====
| + | <syntaxhighlight lang="asm">SonAni_SpinDash: dc.b 0, $5A, $59, $5A, $5A, $5A, $5B, $5A, $5C, $5A, $5D, afEnd |
| − | To do this, you have to create a batch file (.bat) with following code in the project folder:
| + | even</syntaxhighlight> |
| − | <syntaxhighlight lang="batch">
| |
| − | cd artunc
| |
| − | | |
| − | fsutil file createnew padding.bin 16384
| |
| − | :: Create a file called "padding.bin" with 16KB
| |
| − | | |
| − | ren sonic.bin sonic_old.bin
| |
| − | :: Rename the original "sonic.bin" to "sonic_old.bin"
| |
| − | | |
| − | copy /b sonic_old.bin+padding.bin sonic.bin
| |
| − | :: Copy the 2 files into a new "sonic.bin"
| |
| − | | |
| − | cd ..
| |
| − | </syntaxhighlight>
| |
| − | | |
| − | ====On Linux/BSD/Unix/Mac====
| |
| − | To do this, you have to create a shell script (.sh) with following code in the project folder:
| |
| − | <syntaxhighlight lang="shell">
| |
| − | #!/bin/bash
| |
| − | | |
| − | cd artunc
| |
| − | | |
| − | # Create a file called "padding.bin" with 16KB
| |
| − | dd if=/dev/zero of=padding.bin bs=1024 count=16
| |
| − | | |
| − | # Rename the original "Sonic.bin" to "Sonic.bin.orig"
| |
| − | mv Sonic.bin{,.orig}
| |
| − | | |
| − | # Copy the 2 files into a new "Sonic.bin"
| |
| − | dd if=padding.bin of=Sonic.bin oflag=append conv=notrunc
| |
| − | | |
| − | cd ..
| |
| − | </syntaxhighlight>
| |
| − | | |
| − | Run it and you will find your sonic.bin 16KB bigger. If anything went wrong, use the backup file named as sonic_old.bin (or Sonic.bin.orig of not on Windows).
| |
| − | | |
| − | | |
| − | Now, in your tile editor, open the padded artunc/sonic.bin and Sonic 2's art/uncompressed/Sonic's art.bin. These are the tiles you're after:
| |
| − | | |
| − | [[Image:copy-tiles.png|copying sonic's Spin Dash tiles]]
| |
| − | | |
| − | Copy them from the Sonic 2 tiles to the end of the Sonic 1 tiles. Do note that it shouldn't matter if you use the default palette of your tile editor, as long as the one you're using for Sonic 2's tiles matches the one you're using for Sonic 1's tiles.
| |
| − | | |
| − | Save the Sonic 1 file artunc/sonic.bin and close your tile editor. You may rebuild the ROM, but there shouldn't be any noticeable changes, since the game isn't coded to actually do anything with the tiles we put there yet.
| |
| − | | |
| − | ===Making PLCs for the tiles===
| |
| − | Now, you'll add the pattern load cues to tell the game to load the tiles you just added. Open '''_maps/Sonic -Dynamic Gfx Script.asm''' in your text editor. At the bottom of the big table of offsets, and just before the label '''SonPLC_Null''', add the following lines:
| |
| − | | |
| − | <syntaxhighlight lang="asm"> dc.w SonPLC_SpinDash1-SonicDynPLC ;58 | |
| − | dc.w SonPLC_SpinDash2-SonicDynPLC ;59
| |
| − | dc.w SonPLC_SpinDash3-SonicDynPLC ;5A
| |
| − | dc.w SonPLC_SpinDash4-SonicDynPLC ;5B
| |
| − | dc.w SonPLC_SpinDash5-SonicDynPLC ;5C
| |
| − | dc.w SonPLC_SpinDash6-SonicDynPLC ;5D
| |
| − | </syntaxhighlight>
| |
| − | | |
| − | Note that the hex numbers commented to the side are indeces. If you were to number each line in the list you just added to in hex, starting at zero, those would be the numbers for those lines. These will be important later because they are the frame numbers that will be used in your animation.
| |
| − | | |
| − | Now, at the very bottom of the file, but just before the even, insert the following lines:
| |
| − | | |
| − | <syntaxhighlight lang="asm">SonPLC_SpinDash1: dc.b 1, $F5, $10 ; 01 F 510
| |
| − | SonPLC_SpinDash2: dc.b 1, $F5, $20 ; 01 F 520
| |
| − | SonPLC_SpinDash3: dc.b 1, $F5, $30 ; 01 F 530
| |
| − | SonPLC_SpinDash4: dc.b 1, $F5, $40 ; 01 F 540
| |
| − | SonPLC_SpinDash5: dc.b 1, $F5, $50 ; 01 F 550
| |
| − | SonPLC_SpinDash6: dc.b 1, $F5, $60 ; 01 F 560
| |
| − | </syntaxhighlight>
| |
| − | | |
| − | These lines will be built in the ROM as the hex strings found commented beside each one. The format for mappings in Sonic 1 is NN(STTT), where NN is how many times (STTT) is repeated after it. S is one less than the number of tiles to be loaded in order, and TTT is the tile index from which the game should start loading. In each of your PLCs, NN is 01, meaning there is only one instance of (STTT) after it. Also, in each of your PLCs, S is $F, which means that $10 tiles will be loaded for each. The remaining TTT is the number of the first tile in the pattern (the first row of Spin Dash tiles you copied starts at tile number $510, the second at $520, etc.).
| |
| − | | |
| − | For more information about pattern load cues in Sonic 1, visit [[Sonicology]].
| |
| − | | |
| − | ===Mappings===
| |
| − | | |
| − | Now you will make the mappings for the Spin Dash, which define the shape and size of the area to be used in placing the tiles. Open the file '''_maps/Sonic.asm''' in your text editor. Again, you're going to add some entries in the big table at the beginning of the file, much like you did in editing the PLCs. Just above the line '''MS_Null: dc.b 0''', add the following lines:
| |
| − | | |
| − | <syntaxhighlight lang="asm">ptr_MS_Spindash1: dc.w MS_Spindash1-Map_Sonic
| |
| − | ptr_MS_Spindash2: dc.w MS_Spindash2-Map_Sonic
| |
| − | ptr_MS_Spindash3: dc.w MS_Spindash3-Map_Sonic
| |
| − | ptr_MS_Spindash4: dc.w MS_Spindash4-Map_Sonic
| |
| − | ptr_MS_Spindash5: dc.w MS_Spindash5-Map_Sonic
| |
| − | ptr_MS_Spindash6: dc.w MS_Spindash6-Map_Sonic</syntaxhighlight>
| |
| − | | |
| − | Then, at the end of the second table, just before the '''even''', add:
| |
| − | | |
| − | <syntaxhighlight lang="asm">MS_Spindash1: dc.b 1 ; Spindash 1
| |
| − | dc.b $F8, $F, 0, 0, $F4
| |
| − | MS_Spindash2: dc.b 1 ; Spindash 2
| |
| − | dc.b $F8, $F, 0, 0, $F4
| |
| − | MS_Spindash3: dc.b 1 ; Spindash 3
| |
| − | dc.b $F8, $F, 0, 0, $F4
| |
| − | MS_Spindash4: dc.b 1 ; Spindash 4
| |
| − | dc.b $F8, $F, 0, 0, $F4
| |
| − | MS_Spindash5: dc.b 1 ; Spindash 5
| |
| − | dc.b $F8, $F, 0, 0, $F4
| |
| − | MS_Spindash6: dc.b 1 ; Spindash 6
| |
| − | dc.b $F8, $F, 0, 0, $F4 </syntaxhighlight> | |
| − | | |
| − | You might notice that these are all identical to each other, and are also very similar to the mappings for the jumping/rolling frames. The format of these mappings is structurally similar to the format of the PLCs: the first byte defines how many mapping pieces there are following it. The format is NN(YYSSFFTTXX), where NN is the number of (YYSSFFTTXX) following, YY is the Y position of the piece, SS is the size and shape (in this case, $F is a 4x4 tile square), FF is the control for certain flip and palette changes (0 in this case means not to touch it), TT is the first tile in VRAM to start reading (in this case 0 is the first tile), and XX is the X position of the piece. The Y position of these mappings, $F8, is slightly greater than that of the jumping/rolling animation, $F0. This is so Sonic doesn't appear to be hovering slightly above the ground while charging the Spin Dash.
| |
| − | | |
| − | These mappings use 4x4 pieces to hold 16 tiles. You might have noticed while you were copying the Spin Dash tiles before that each frame of the animation had a row of 16 tiles, one after the other. With these mappings, those tiles will be loaded in order in four columns of four, starting with the top left and working toward the bottom right. Try arranging the tiles yourself in your tile editor in a scratch file if you want to understand how they are arranged. Just don't save over any files we're using!
| |
| − | | |
| − | Then open constants.asm, scroll down to the end of the file add these lines:
| |
| − | | |
| − | <syntaxhighlight lang="asm">fr_Spindash1: equ (ptr_MS_Spindash1-Map_Sonic)/2 ; $58
| |
| − | fr_Spindash2: equ (ptr_MS_Spindash2-Map_Sonic)/2 ; $59
| |
| − | fr_Spindash3: equ (ptr_MS_Spindash3-Map_Sonic)/2 ; $5A
| |
| − | fr_Spindash4: equ (ptr_MS_Spindash4-Map_Sonic)/2 ; $5B
| |
| − | fr_Spindash5: equ (ptr_MS_Spindash5-Map_Sonic)/2 ; $5C
| |
| − | fr_Spindash6: equ (ptr_MS_Spindash6-Map_Sonic)/2 ; $5D</syntaxhighlight>
| |
| | | | |
| − | For more information on mappings in Sonic 1, visit [[Sonicology]].
| + | We're one step away from getting a functioning Spindash! Now go below, |
| | | | |
| − | ===Animation sequence===
| + | <syntaxhighlight lang="asm">ptr_Float4: dc.w SonAni_Float4-Ani_Sonic</syntaxhighlight> (line ''36'') |
| − | You're almost done adding in the Spin Dash graphics! Now you will add the animation sequence containing the list of frames to be used. Open the file _anim/Sonic.asm in your text editor. Yet again, we will be adding a line to the bottom of the table in the beginning, just before the line
| + | and paste this in. |
| − | | |
| − | <syntaxhighlight lang="asm">SonAni_Walk: dc.b $FF, fr_walk13, fr_walk14, fr_walk15, fr_walk16, fr_walk11, fr_walk12, afEnd</syntaxhighlight> | |
| − | | |
| − | you will add
| |
| | | | |
| | <syntaxhighlight lang="asm">ptr_Spindash: dc.w SonAni_SpinDash-Ani_Sonic ;1F</syntaxhighlight> | | <syntaxhighlight lang="asm">ptr_Spindash: dc.w SonAni_SpinDash-Ani_Sonic ;1F</syntaxhighlight> |
| | | | |
| − | The ;1F comment after it is again an index in the table. If you were to enumerate all of the lines in this table, starting at zero, this new line would be the $1Fth line. Notice that at index 2 is the rolling animation that we are currently using, and at index 9 is the warping one that it used before we fixed it!
| + | We did it! We successfully imported the Spindash into Sonic 1! It's still not fully complete though. No need to worry for Pu7o has written a [[SCHG How-to:Add Spin Dash to Sonic 1/Part 2|wonderful guide that picks up from this point.]] |
| − | | |
| − | Now, you will again add data just after the even at the end of the second table:
| |
| − | | |
| − | <syntaxhighlight lang="asm">SonAni_SpinDash: dc.b 0, fr_Spindash1, fr_spindash2, fr_spindash1, fr_spindash3, fr_spindash1, fr_spindash4, fr_spindash1, fr_spindash5, fr_spindash1, fr_spindash6, afEnd
| |
| − | even</syntaxhighlight>
| |
| − | | |
| − | The first byte in this animation script tells the game to use the fastest speed in this animation. Each subsequent word until the afEnd tells the game which animation frame to use. Notice that you could have use numbers ($58, $59, etc...) as they are the indeces of your Spin Dash PLCs. The afEnd at the end tells the game to loop the entire animation. Basically, this script will have the game cycle through the 1st, 2nd, 1st, 3rd, ..., 1st, 6th, 1st, 2nd, ... frames.
| |
| − | | |
| − | Now go to the very end of the file and add this line:
| |
| − | | |
| − | <syntaxhighlight lang="asm">id_Spindash: equ (ptr_Spindash-Ani_Sonic)/2 ; $1F</syntaxhighlight>
| |
| − | | |
| − | ===Changing the animation again===
| |
| − | Now that you have added all the necessary information for using the new Spin Dash tiles in an animation, it's time for the last step in adding this animation: actually having the game use it! Open Sonic Spindash.asm in your text editor (if you haven't already) and change the line you changed before,
| |
| − | | |
| − | <syntaxhighlight lang="asm"> move.b #id_roll,obAnim(a0) ; changed from #9</syntaxhighlight>
| |
| − | | |
| − | to use your new animation found at $1F:
| |
| − | | |
| − | <syntaxhighlight lang="asm"> move.b #id_Spindash,obAnim(a0) ; changed from #9</syntaxhighlight>
| |
| − | | |
| − | Then, find the line you commented out before,
| |
| | | | |
| − | <syntaxhighlight lang="asm">; move.w #$900,obAnim(a0)</syntaxhighlight>
| |
| − |
| |
| − | uncomment it, and change the value to $1F00.
| |
| − |
| |
| − | <syntaxhighlight lang="asm"> move.w #$1F00,obAnim(a0) ; changed from #$900</syntaxhighlight>
| |
| − |
| |
| − | Finally, save your code, build your ROM, and try it out.
| |
| − |
| |
| − | [[Image:testing-3.png|Spin Dashing with Spin Dash animation]]
| |
| − |
| |
| − | Success! However, there's a new bug that occurs now that the game is using this new animation: while charging a Spin Dash, let an enemy touch you. Sonic gets injured, when instead the enemy should be destroyed.
| |
| − |
| |
| − | ===Another fix===
| |
| − | This is a relatively easy bug to fix. Go back to sub ReactToItem.asm and search for the routine React_Enemy. Just above the line
| |
| − |
| |
| − | <syntaxhighlight lang="asm"> cmpi.b #id_Roll,obAnim(a0) ; is Sonic rolling/jumping?</syntaxhighlight>
| |
| − |
| |
| − | add the following two lines:
| |
| − |
| |
| − | <syntaxhighlight lang="asm"> cmpi.b #id_Spindash,obAnim(a0) ; is Sonic Spin Dashing?
| |
| − | beq.w @donthurtsonic ; if yes, branch </syntaxhighlight>
| |
| − |
| |
| − | You should end up with something like this:
| |
| − |
| |
| − | <syntaxhighlight lang="asm">React_Enemy:
| |
| − | tst.b (v_invinc).w ; is Sonic invincible?
| |
| − | bne.s @donthurtsonic ; if yes, branch
| |
| − | cmpi.b #id_Spindash,obAnim(a0) ; is Sonic Spin Dashing?
| |
| − | beq.w @donthurtsonic ; if yes, branch
| |
| − | cmpi.b #id_Roll,obAnim(a0) ; is Sonic rolling/jumping?
| |
| − | bne.w React_ChkHurt ; if not, branch</syntaxhighlight>
| |
| − |
| |
| − | This code adds a check to see if the animation is #$1F, our new animation. If it is, it branches over the code that jumps to the routine to hurt Sonic. Notice that there is another comparison for if the animation is #2 present, which concealed this bug before, since we were using that animation.
| |
| − |
| |
| − | Save, build, and test.
| |
| − |
| |
| − | [[Image:testing-4.png|killing an enemy while Spin Dashing]]
| |
| − |
| |
| − | Pop! Congratulations, you've successfully ported the Spin Dash from Sonic 2 into Sonic 1, complete with animations. The only thing remaining to add is the Spin Dash smoke object, and fix a few more bugs.
| |
| − |
| |
| − | ===Appendix===
| |
| − |
| |
| − | The '''Sonic_SpinDash''' routine in its entirety, with comments:
| |
| − |
| |
| − | <syntaxhighlight lang="asm">
| |
| − | ; ---------------------------------------------------------------------------
| |
| − | ; Subroutine to make Sonic perform a spindash
| |
| − | ; ---------------------------------------------------------------------------
| |
| − |
| |
| − | ; ||||||||||||||| S U B R O U T I N E |||||||||||||||||||||||||||||||||||||||
| |
| − |
| |
| − |
| |
| − | Sonic_SpinDash:
| |
| − | tst.b f_spindash(a0) ; already Spin Dashing?
| |
| − | bne.s loc2_1AC8E ; if set, branch
| |
| − | cmpi.b #id_duck,obAnim(a0) ; is anim duck
| |
| − | bne.s locret2_1AC8C ; if not, return
| |
| − | move.b (v_jpadpress2).w,d0 ; read controller
| |
| − | andi.b #$70,d0 ; pressing A/B/C ?
| |
| − | beq.w locret2_1AC8C ; if not, return
| |
| − | move.b #id_spindash,obAnim(a0) ; set Spin Dash anim (9 in s2)
| |
| − | move.w #$BE,d0 ; spin sound ($E0 in s2)
| |
| − | jsr (PlaySound_Special).l ; play spin sound
| |
| − | addq.l #4,sp ; Add 4 bytes to the stack return address to skip Sonic_Jump on next rts to Obj01_MdNormal, preventing conflicts with button presses.
| |
| − | move.b #1,f_spindash(a0) ; set Spin Dash flag
| |
| − | move.w #0,$3A(a0) ; set charge count to 0
| |
| − | cmpi.b #$C,$28(a0) ; ??? oxygen remaining?
| |
| − | bcs.s loc2_1AC84 ; ??? branch if carry
| |
| − | move.b #2,($FFFFD11C).w ; ??? $D11C is used for
| |
| − | ; the smoke/dust object
| |
| − | loc2_1AC84:
| |
| − | bsr.w Sonic_LevelBound
| |
| − | bsr.w Sonic_AnglePos
| |
| − |
| |
| − | locret2_1AC8C:
| |
| − | rts
| |
| − | ; ---------------------------------------------------------------------------
| |
| − |
| |
| − | loc2_1AC8E:
| |
| − | move.b (v_jpadhold2).w,d0 ; read controller
| |
| − | btst #1,d0 ; check down button
| |
| − | bne.w loc2_1AD30 ; if set, branch
| |
| − | move.b #$E,$16(a0) ; $16(a0) is height/2
| |
| − | move.b #7,$17(a0) ; $17(a0) is width/2
| |
| − | move.b #id_roll,obAnim(a0) ; set animation to roll
| |
| − | addq.w #5,$C(a0) ; $C(a0) is Y coordinate
| |
| − | move.b #0,f_spindash(a0) ; clear Spin Dash flag
| |
| − | moveq #0,d0
| |
| − | move.b $3A(a0),d0 ; copy charge count
| |
| − | add.w d0,d0 ; double it
| |
| − | move.w Dash_Speeds(pc,d0.w),obInertia(a0) ; get normal speed
| |
| − | move.w obInertia(a0),d0 ; get inertia
| |
| − | subi.w #$800,d0 ; subtract $800
| |
| − | add.w d0,d0 ; double it
| |
| − | andi.w #$1F00,d0 ; mask it against $1F00
| |
| − | neg.w d0 ; negate it
| |
| − | addi.w #$2000,d0 ; add $2000
| |
| − | move.w d0,($FFFFEED0).w ; move to $EED0
| |
| − | btst #0,$22(a0) ; is sonic facing right?
| |
| − | beq.s loc2_1ACF4 ; if not, branch
| |
| − | neg.w obInertia(a0) ; negate inertia
| |
| − |
| |
| − | loc2_1ACF4:
| |
| − | bset #2,$22(a0) ; set unused (in s1) flag
| |
| − | move.b #0,($FFFFD11C).w ; clear $D11C (smoke)
| |
| − | move.w #$BC,d0 ; spin release sound
| |
| − | jsr (PlaySound_Special).l ; play it!
| |
| − | bra.s loc2_1AD78
| |
| − | ; ===========================================================================
| |
| − | Dash_Speeds:
| |
| − | dc.w $800 ; 0
| |
| − | dc.w $880 ; 1
| |
| − | dc.w $900 ; 2
| |
| − | dc.w $980 ; 3
| |
| − | dc.w $A00 ; 4
| |
| − | dc.w $A80 ; 5
| |
| − | dc.w $B00 ; 6
| |
| − | dc.w $B80 ; 7
| |
| − | dc.w $C00 ; 8
| |
| − | ; ===========================================================================
| |
| − |
| |
| − | loc2_1AD30: ; If still charging the dash...
| |
| − | tst.w $3A(a0) ; check charge count
| |
| − | beq.s loc2_1AD48 ; if zero, branch
| |
| − | move.w $3A(a0),d0 ; otherwise put it in d0
| |
| − | lsr.w #5,d0 ; shift right 5 (divide it by 32)
| |
| − | sub.w d0,$3A(a0) ; subtract from charge count
| |
| − | bcc.s loc2_1AD48 ; ??? branch if carry clear
| |
| − | move.w #0,$3A(a0) ; set charge count to 0
| |
| − |
| |
| − | loc2_1AD48:
| |
| − | move.b (v_jpadpress2).w,d0 ; read controller
| |
| − | andi.b #$70,d0 ; pressing A/B/C?
| |
| − | beq.w loc2_1AD78 ; if not, branch
| |
| − | move.w #$1F00,obAnim(a0) ; reset spdsh animation
| |
| − | move.w #$BE,d0 ; was $E0 in sonic 2
| |
| − | jsr (PlaySound_Special).l ; play charge sound
| |
| − | addi.w #$200,$3A(a0) ; increase charge count
| |
| − | cmpi.w #$800,$3A(a0) ; check if it's maxed
| |
| − | bcs.s loc2_1AD78 ; if not, then branch
| |
| − | move.w #$800,$3A(a0) ; reset it to max
| |
| − |
| |
| − | loc2_1AD78:
| |
| − | addq.l #4,sp ; Add 4 bytes to the stack return address to skip Sonic_Jump on next rts to Obj01_MdNormal, preventing conflicts with button presses.
| |
| − | cmpi.w #$60,($FFFFEED8).w ; $EED8 only ever seems
| |
| − | beq.s loc2_1AD8C ; to be used in Spin Dash
| |
| − | bcc.s loc2_1AD88
| |
| − | addq.w #4,($FFFFEED8).w
| |
| − |
| |
| − | loc2_1AD88:
| |
| − | subq.w #2,($FFFFEED8).w
| |
| − |
| |
| − | loc2_1AD8C:
| |
| − | bsr.w Sonic_LevelBound
| |
| − | bsr.w Sonic_AnglePos
| |
| − | move.w #$60,(v_lookshift).w ; reset looking up/down
| |
| − | rts
| |
| − | ; End of subroutine Sonic_SpinDash
| |
| − | </syntaxhighlight>
| |
| | | | |
| − | Note: while not necessary, the '''loc_''', '''locret_''', etc. labels from the Sonic 2 disassembly were replaced with '''loc2_''', '''locret2_''', etc. to avoid potential conflict.
| |
| | | | |
| − | ==Pu7o's continuation==
| |
| | | | |
| − | Pu7o has written a [[SCHG How-to:Add Spin Dash to Sonic 1/Part 2|wonderful guide that picks up from this point.]]
| |
| | | | |
| | | | |
| | {{S1Howtos}} | | {{S1Howtos}} |
| − | |Add Spin Dash to Sonic 1/Part 1]] | + | |Add Spin Dash to Sonic 1 (GitHub)]] |
(Original guide by Lightning)
This tutorial was made possible thanks to the references, guides, and information found at Hacking CulT, The Sonic 2 Beta Page, Sonic Retro, and Sonicology. I made this for the newest Github Disassembly. Thanks to Kramlat for the latest guide before this one.
This SCHG is property of DikinBaus. Sonic and all related characters and graphics that appear on this page are property of SEGA and are used without permission for no profit.
Requirements
In making this tutorial, I used:
- Clownacys Sonic 1 Disassembly (newest)
- Windows' Notepad
- Flex 2
- Kega Fusion
Importing the Spindash
Adding a New Flag
Alright, lets get started shall we? Open Constants.asm and scroll down to line 154. Now make a new space (or press enter) and define a new RAM equate by adding this line:
Adding the SpinDash to the Player
Open sonic.asm in your text editor, and search for the phrase
Sonic_MdNormal: (line 6948) and above
bsr.w Sonic_Jump, make a new line and add
bsr.w Sonic_SpinDash to it you should end up with this:
Sonic_MdNormal:
		bsr.w	Sonic_SpinDash
		bsr.w	Sonic_Jump
the code below
bsr.w Sonic_Jump should not be worried about.
Now, to actually copy the Spin Dash subroutine. You have to add a new .asm file. To do that go into Sonic 1's disassembly, create a new file within _incObj folder named Sonic Spindash.asm, for the sake of this SCHG I will add a download right here with all the code.
after that has been download and put in the _incObj folder. Go back to sonic.asm and go to loc_12EA6: (line 6996) scroll until you see include "_incObj/Sonic JumpDirection.asm".
Copy it, and right below it paste it but replace Sonic JumpDirection with Sonic SpinDash it should look something like this:
		include	"_incObj/Sonic Move.asm"
		include	"_incObj/Sonic RollSpeed.asm"
		include	"_incObj/Sonic JumpDirection.asm"
		include	"_incObj/Sonic SpinDash.asm"
Save your changes, navigate back to the main part of the disassembly and run build.bat
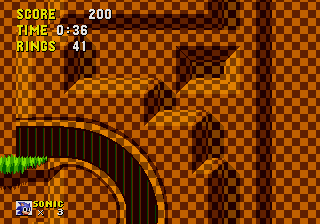
First Bug
Uh-oh, so, as expected, there's bugs. The first being, if you collect a few rings then start SpinDashing, as you can see, the badnik(s) can hurt you in your SpinDash state. If you get hit while in state as said before, you'll still be in the SpinDashing state when you land, Sonic will charge forward (depends which way you got hit, forwards or backwards) usually it would destroy whatever badnik touches you in the first place, but that didn't happen. Second, go to high ground or somewhere where the camera can pan downward. Wait for the camera to fully pan down and start SpinDashing. The camera will continue to stay downwards until you stop SpinDashing/Rolling. Third, if you hold the Spindash button for long enough, your game will crash. Another problem that the camera can result is that if you SpinDash before an area where your vertical position radically changes (a great example is the double S-Tube in GHZ1), the camera is too slow to catch up to Sonic in time.
Animation Bugs
Now, you'll see that if you hold the Spindash button for long enough, it will show a few varieties of animations. Don't worry as we will fix this later on.
Fixing Bugs/Errors
First of all, the camera issue is already fixed. But there is one thing, the camera is still too slow. So, if you go down an S-Tube, the camera will be too slow and you'll die due to the bottom boundary. Now for the Spindash badnik hurt bug. Go to _incObj/sub ReactToItem and look for React_Enemy: (line 167) and find this peice of code:
React_Enemy:
		tst.b	(v_invinc).w	; is Sonic invincible?
		bne.s	.donthurtsonic	; if yes, branch
		cmpi.b	#id_Roll,obAnim(a0) ; is Sonic rolling/jumping?
		bne.w	React_ChkHurt	; if not, branch
and replace it with this,
React_Enemy:
		tst.b	(v_invinc).w	; is Sonic invincible?
		bne.s	.donthurtsonic	; if yes, branch
		cmpi.b	#$1F,$1C(a0)	; is Sonic Spin Dashing?
		beq.w	.donthurtsonic	; if yes, branch
		cmpi.b	#id_Roll,obAnim(a0) ; is Sonic rolling/jumping?
		bne.w	React_ChkHurt	; if not, branch
So, to fix this go into the _incObj folder and look for Sonic LevelBound once you find it, open it. Look for .bottom: (line 48) You should see this,
.bottom:
		cmpi.w	#(id_SBZ<<8)+1,(v_zone).w ; is level SBZ2 ?
		bne.w	KillSonic	; if not, kill Sonic
		cmpi.w	#$2000,(v_player+obX).w
		blo.w	KillSonic
		clr.b	(v_lastlamp).w	; clear	lamppost counter
		move.w	#1,(f_restart).w ; restart the level
		move.w	#(id_LZ<<8)+3,(v_zone).w ; set level to SBZ3 (LZ4)
		rts
Replace that whole code with this one
.bottom:
		move.w (v_limitbtm1).w,d0
		move.w (v_limitbtm2).w,d1
		cmp.w d0,d1 ; screen still scrolling down?
		blt.s .dontkill; if so, don't kill Sonic
		cmpi.w	#(id_SBZ<<8)+1,(v_zone).w ; is level SBZ2 ?
		bne.w	KillSonic	; if not, kill Sonic
		cmpi.w	#$2000,(v_player+obX).w
		blo.w	KillSonic
		clr.b	(v_lastlamp).w	; clear	lamppost counter
		move.w	#1,(f_restart).w ; restart the level
		move.w	#(id_LZ<<8)+3,(v_zone).w ; set level to SBZ3 (LZ4)
		rts
.dontkill:
		rts
Now, if you go back to build your ROM. As you can see, you don't die even if the camera doesn't catch up to Sonic.
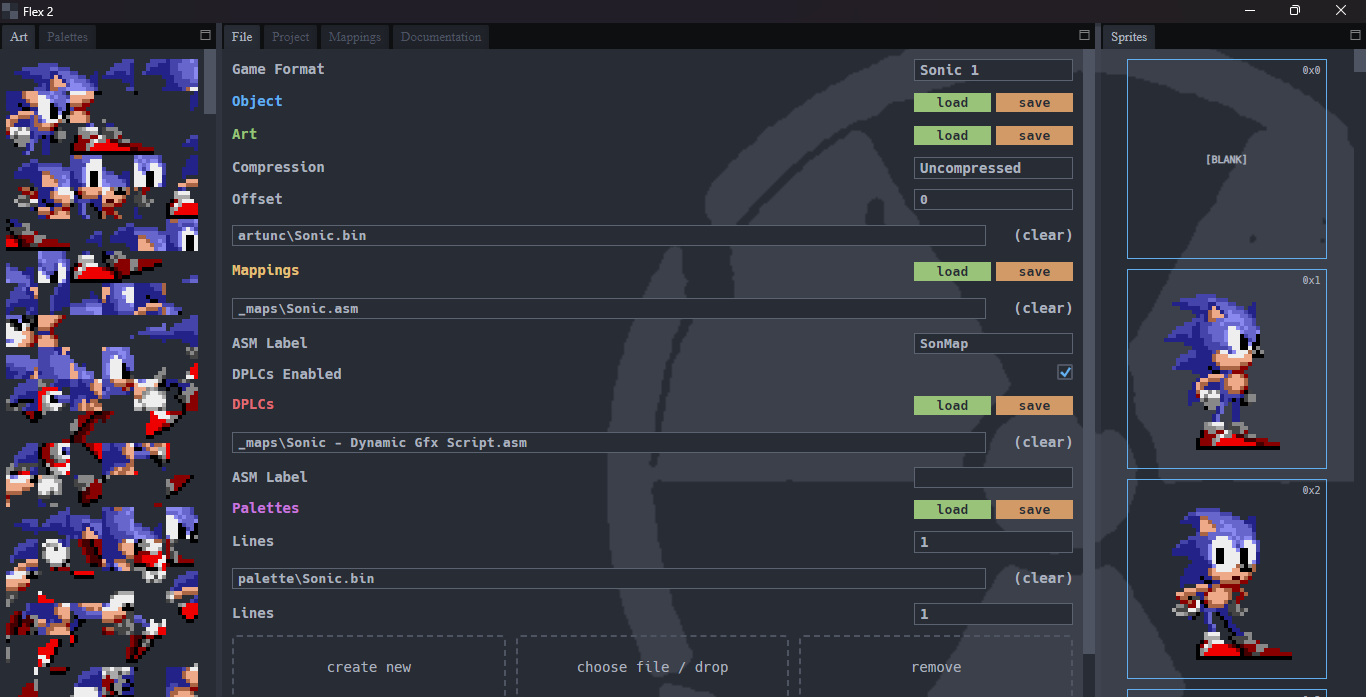
Sonic Spindash Sprites
As you can see, Sonic doesn't have a SpinDash sprite as it's not present in Sonic 1, so open up Flex 2.
Now, download Sonic 1 Sprites (needed) and the Spindash sprites. Extract the file if not yet, and go back in Flex 2. Now, go to the File section in Flex, and make sure to turn on DPLCs (look to the right until you see it) and put the following sprites as shown in this picture.
 If all is well, your sprites should be correct. Here comes the part if gets confusing. Find the SpinDash sprites you downloaded earlier, and extract them if not yet,
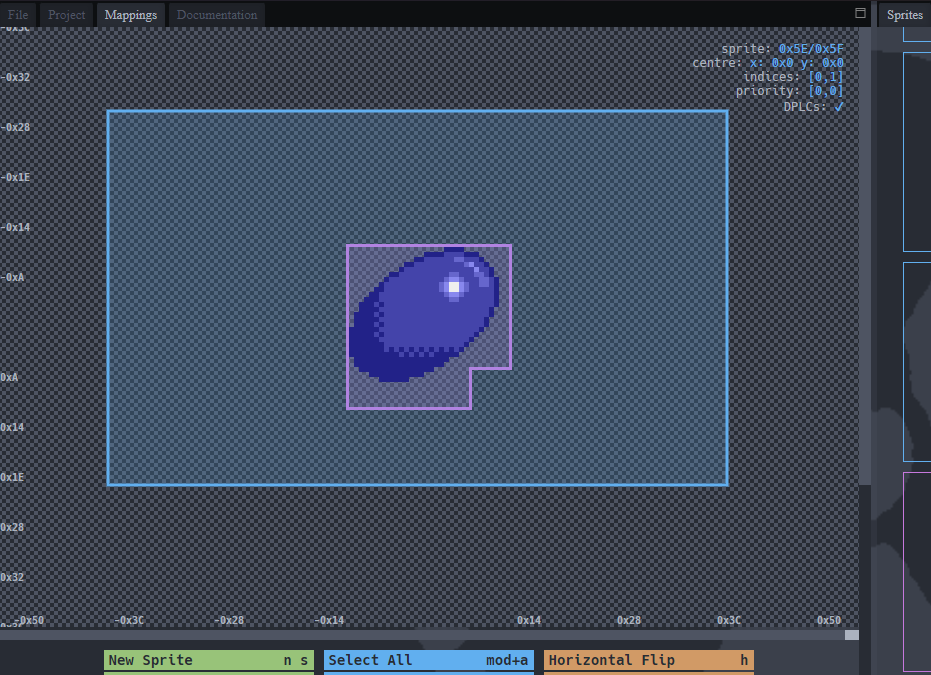
once extracted. Go to the Mappings section in Flex 2 and scroll down until you see a Import Spritesheet button (It's in the blue buttons to the right) and select the SpinDash sprite. Click Detect Sprites and then Import Sprites (You have to do it for each SpinDash sprite.) Once finished, while on the Mapping section, go on the right where the sprites are and scroll to the bottom until you see the SpinDash sprites you added. Select the sprites, and on the display select the whole sprite and press the down arrow key 9 times. (Do this for each sprite.) If you're confused, I'll add an image right below.
If all is well, your sprites should be correct. Here comes the part if gets confusing. Find the SpinDash sprites you downloaded earlier, and extract them if not yet,
once extracted. Go to the Mappings section in Flex 2 and scroll down until you see a Import Spritesheet button (It's in the blue buttons to the right) and select the SpinDash sprite. Click Detect Sprites and then Import Sprites (You have to do it for each SpinDash sprite.) Once finished, while on the Mapping section, go on the right where the sprites are and scroll to the bottom until you see the SpinDash sprites you added. Select the sprites, and on the display select the whole sprite and press the down arrow key 9 times. (Do this for each sprite.) If you're confused, I'll add an image right below.
Once that's finished, go back and build your ROM. Awesome! You now have a functional SpinDash! Remember when I said, "Now, you'll see that if you hold the Spindash button for long enough, it will show a few varieties of animations. Don't worry as we will fix this later on."? This is later on, go to _anim/Sonic.asm and go to the very bottom. Once there, paste this in.
id_Spindash: equ (ptr_Spindash-Ani_Sonic)/2 ; $1F
Once that's done, go below the line,
SonAni_Float4:	dc.b 3,	fr_Float1, afChange, id_Walk
		even
(line
101)
and paste this in.
SonAni_SpinDash: dc.b 0, $5A, $59, $5A, $5A, $5A, $5B, $5A, $5C, $5A, $5D, afEnd
		even
We're one step away from getting a functioning Spindash! Now go below,
ptr_Float4: dc.w SonAni_Float4-Ani_Sonic
(line
36)
and paste this in.
ptr_Spindash: dc.w SonAni_SpinDash-Ani_Sonic ;1F
We did it! We successfully imported the Spindash into Sonic 1! It's still not fully complete though. No need to worry for Pu7o has written a wonderful guide that picks up from this point.
|Add Spin Dash to Sonic 1 (GitHub)]]


 If all is well, your sprites should be correct. Here comes the part if gets confusing. Find the SpinDash sprites you downloaded earlier, and extract them if not yet,
once extracted. Go to the Mappings section in Flex 2 and scroll down until you see a Import Spritesheet button (It's in the blue buttons to the right) and select the SpinDash sprite. Click Detect Sprites and then Import Sprites (You have to do it for each SpinDash sprite.) Once finished, while on the Mapping section, go on the right where the sprites are and scroll to the bottom until you see the SpinDash sprites you added. Select the sprites, and on the display select the whole sprite and press the down arrow key 9 times. (Do this for each sprite.) If you're confused, I'll add an image right below.
If all is well, your sprites should be correct. Here comes the part if gets confusing. Find the SpinDash sprites you downloaded earlier, and extract them if not yet,
once extracted. Go to the Mappings section in Flex 2 and scroll down until you see a Import Spritesheet button (It's in the blue buttons to the right) and select the SpinDash sprite. Click Detect Sprites and then Import Sprites (You have to do it for each SpinDash sprite.) Once finished, while on the Mapping section, go on the right where the sprites are and scroll to the bottom until you see the SpinDash sprites you added. Select the sprites, and on the display select the whole sprite and press the down arrow key 9 times. (Do this for each sprite.) If you're confused, I'll add an image right below.
