Difference between revisions of "The Final Fight"
From Sonic Retro
BSonirachi (talk | contribs) m (BSonirachi moved page Final Fight to The Final Fight: correct name as displayed on its title card) |
BSonirachi (talk | contribs) |
||
| Line 7: | Line 7: | ||
| levelscreen2title=Saturn | | levelscreen2title=Saturn | ||
| screenwidth= | | screenwidth= | ||
| − | | levelno= | + | | levelno=Eighth |
| game=Sonic 3D: Flickies' Island | | game=Sonic 3D: Flickies' Island | ||
| theme1=cyberspace | | theme1=cyberspace | ||
| Line 18: | Line 18: | ||
{{BossInfo | {{BossInfo | ||
| image=Finalfight_md.png | | image=Finalfight_md.png | ||
| − | | name=Final Fight | + | | name=The Final Fight |
| game=Sonic 3D: Flickies' Island | | game=Sonic 3D: Flickies' Island | ||
}}</div> <!-- required for DPL boss listing --> | }}</div> <!-- required for DPL boss listing --> | ||
| − | The true | + | '''The Final Fight''' is the eighth and true final [[Zone]] of ''[[Sonic 3D: Flickies' Island]]'' for the [[Sega Mega Drive]] and [[Sega Saturn]], coming after [[Panic Puppet Zone]]. The entire Zone is a single Act with just a boss battle against [[Dr. Eggman]]'s final weapon, a multi-capable robot which has many ways to attack [[Sonic the Hedgehog|Sonic]]. This boss requires 10 hits to defeat, making it the longest and most challenging boss in the game. This Zone is only accessible if the player finishes the game with all seven [[Chaos Emeralds]]. |
The level itself is simple in layout as the player is only given a limited space to move around in. As the battle goes on, more land is opened up to be travelled on. | The level itself is simple in layout as the player is only given a limited space to move around in. As the battle goes on, more land is opened up to be travelled on. | ||
==Strategy== | ==Strategy== | ||
| − | This boss fight is split into 2 rounds consisting of 5 phases. In each phase, | + | This boss fight is split into 2 rounds consisting of 5 phases. In each phase, the player must first avoid Eggman's assault, then jump on his head as he briefly moves into the platform. If the player successfully lands a hit, Eggman will retreat, and they can continue to the next phase. If they miss this window to attack, the phase will repeat. |
'''PHASE 1:''' Lasers | '''PHASE 1:''' Lasers | ||
| − | + | The player should begin this fight by obtaining 3 of the 6 [[Ring]]s on the southeastern edge. These are the only Rings available in this level. | |
| − | + | Eggman will make his entrance from the bottom of the screen, and park at the northwestern edge of the grid, just out of reach. His first method of attack will be lasers fired from his fingertips. He will slide his hands along the northwestern edge for a couple of seconds, adjusting to Sonic's position, and then open fire. The southwestern hand will fire first, followed by the northeastern hand, and continue to alternate until six lasers have been fired. Eggman will then adjust his hands and fire a second time. After this, he will move into the grid, exposing himself to attack. Attack him to move on to the next phase. | |
'''PHASE 2:''' Flamethrower | '''PHASE 2:''' Flamethrower | ||
| − | + | Eggman will appear on the northwestern edge and spew a trail of flames which chases Sonic. He will then leave and reappear on the northeastern edge to send out a second trail of flames. Luckily, the previous trail of flames disappears when he deploys a new one. Eggman will appear once more on the northeastern edge and send out a third trail of flames. Immediately after, he will move into the grid. Attack him to move to the next phase. | |
'''PHASE 3:''' Armored Hands | '''PHASE 3:''' Armored Hands | ||
| − | Sonic must battle on a 2x8 grid for this phase. | + | Sonic must battle on a 2x8 grid for this phase. Eggman will deploy two autonomous hands and fly away. One hand will hover over the northwestern half of the grid, and the other will take to the southeastern half. They will attempt to move directly above Sonic in order to crush him. After a "charging up" sound effect plays, the hand closest to Sonic will slam down. After three attempts to crush Sonic, the hands will move to the ends of the grid and quickly sweep across. Eggman will reappear and move into the grid after the player dodges this attack. Attack him to move to the next phase. |
'''PHASE 4:''' Aerial Bombs | '''PHASE 4:''' Aerial Bombs | ||
| − | + | Eggman will shoot 6 missiles into the air. The player should just keep moving, and avoid the shadows which appear. When all six missiles have fallen, Eggman will move into the grid. Attack him to move to the next phase. | |
'''PHASE 5:''' Ball Bearings | '''PHASE 5:''' Ball Bearings | ||
| − | This is the most intimidating phase, but | + | This is the most intimidating phase, but can also be the easiest if the player stays in the west corner while Eggman deploys a large quantity of bouncing projectiles. After firing three rounds, he will move into the grid so the player can attack him once more. |
| − | If this is the first time through the phases, | + | If this is the first time through the phases, Eggman will flee, and all five phases must be played through a second time. If this is the second time through, then Eggman will be defeated. |
==References== | ==References== | ||
| Line 56: | Line 56: | ||
{{S3DOmni|3}} | {{S3DOmni|3}} | ||
| − | + | {{TheTitle}} | |
| − | |||
[[Category:Final bosses]] | [[Category:Final bosses]] | ||
Revision as of 16:13, 2 October 2021
| |
Sonic 3D: Flickies' Island |
| The Final Fight |
| show;hide
|
| The Final Fight |
|---|
| Eighth Zone, Sonic 3D: Flickies' Island |
| Number of Acts: 1 |
| Level theme: cyberspace |
| Maximum rings: 6 |
| Prerequisite: Obtain 7 Chaos Emeralds |
| ← Panic Puppet Zone |


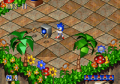
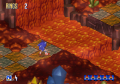
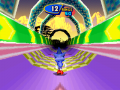
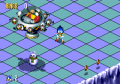
The Final Fight is the eighth and true final Zone of Sonic 3D: Flickies' Island for the Sega Mega Drive and Sega Saturn, coming after Panic Puppet Zone. The entire Zone is a single Act with just a boss battle against Dr. Eggman's final weapon, a multi-capable robot which has many ways to attack Sonic. This boss requires 10 hits to defeat, making it the longest and most challenging boss in the game. This Zone is only accessible if the player finishes the game with all seven Chaos Emeralds.
The level itself is simple in layout as the player is only given a limited space to move around in. As the battle goes on, more land is opened up to be travelled on.
Strategy
This boss fight is split into 2 rounds consisting of 5 phases. In each phase, the player must first avoid Eggman's assault, then jump on his head as he briefly moves into the platform. If the player successfully lands a hit, Eggman will retreat, and they can continue to the next phase. If they miss this window to attack, the phase will repeat.
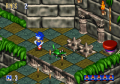
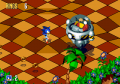
PHASE 1: Lasers
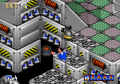
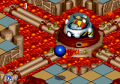
The player should begin this fight by obtaining 3 of the 6 Rings on the southeastern edge. These are the only Rings available in this level.
Eggman will make his entrance from the bottom of the screen, and park at the northwestern edge of the grid, just out of reach. His first method of attack will be lasers fired from his fingertips. He will slide his hands along the northwestern edge for a couple of seconds, adjusting to Sonic's position, and then open fire. The southwestern hand will fire first, followed by the northeastern hand, and continue to alternate until six lasers have been fired. Eggman will then adjust his hands and fire a second time. After this, he will move into the grid, exposing himself to attack. Attack him to move on to the next phase.
PHASE 2: Flamethrower
Eggman will appear on the northwestern edge and spew a trail of flames which chases Sonic. He will then leave and reappear on the northeastern edge to send out a second trail of flames. Luckily, the previous trail of flames disappears when he deploys a new one. Eggman will appear once more on the northeastern edge and send out a third trail of flames. Immediately after, he will move into the grid. Attack him to move to the next phase.
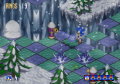
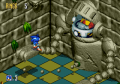
PHASE 3: Armored Hands
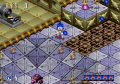
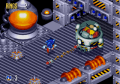
Sonic must battle on a 2x8 grid for this phase. Eggman will deploy two autonomous hands and fly away. One hand will hover over the northwestern half of the grid, and the other will take to the southeastern half. They will attempt to move directly above Sonic in order to crush him. After a "charging up" sound effect plays, the hand closest to Sonic will slam down. After three attempts to crush Sonic, the hands will move to the ends of the grid and quickly sweep across. Eggman will reappear and move into the grid after the player dodges this attack. Attack him to move to the next phase.
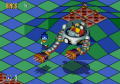
PHASE 4: Aerial Bombs
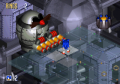
Eggman will shoot 6 missiles into the air. The player should just keep moving, and avoid the shadows which appear. When all six missiles have fallen, Eggman will move into the grid. Attack him to move to the next phase.
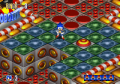
PHASE 5: Ball Bearings
This is the most intimidating phase, but can also be the easiest if the player stays in the west corner while Eggman deploys a large quantity of bouncing projectiles. After firing three rounds, he will move into the grid so the player can attack him once more.
If this is the first time through the phases, Eggman will flee, and all five phases must be played through a second time. If this is the second time through, then Eggman will be defeated.
References
| Sonic 3D: Flickies' Island | |
|---|---|
|
Main page Manuals Development |
show;hide
Scrapped Enemies: Mega Drive:
Saturn: |