Difference between revisions of "Sonic the Hedgehog 2 (beta 4)/Comparisons"
From Sonic Retro
(→Gameplay comparisons) |
|||
| (7 intermediate revisions by 4 users not shown) | |||
| Line 1: | Line 1: | ||
| − | {{back | + | {{back}}[[Category:Comparisons]] |
==General comparisons== | ==General comparisons== | ||
| Line 7: | Line 7: | ||
| game1=Beta 4 | | game1=Beta 4 | ||
| game2=Final game | | game2=Final game | ||
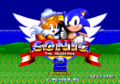
| − | | desc=This is the last known version of ''Sonic 2'' to use this different title screen. | + | | desc=This is the last known version of ''Sonic 2'' to use this different title screen. All differences here are the same as in the [[Sonic the Hedgehog 2 (CENSOR prototype)|CENSOR prototype]]: there is no introduction, Sonic and Tails are not animated, and the background is borrowed from [[Emerald Hill Zone]], scrolling to the left in a similar manner to the original ''Sonic the Hedgehog''. While the menu exists in beta 4, there is no options screen to select. |
}} | }} | ||
{{Comparison | {{Comparison | ||
| Line 16: | Line 16: | ||
| game2=''Sonic the Hedgehog'' (REV01) | | game2=''Sonic the Hedgehog'' (REV01) | ||
| game3=''Sonic 2'' final | | game3=''Sonic 2'' final | ||
| − | | desc=The level select screen is | + | | desc=The level select screen is laid out in the same way as the CENSOR prototype, and uses older names for some of the levels (which are different to the in-game title cards, all of which are using the final zone names). [[Hidden Palace Zone]] is listed, but is not selectable. |
| + | }} | ||
| + | {{Comparison | ||
| + | | image1=Notavailable.svg | ||
| + | | image2=Notavailable.svg | ||
| + | | game1=Beta 4 | ||
| + | | game2=Final game | ||
| + | | desc=Through hacking, Hidden Palace Zone can be accessed and it is a garbled mess just like in the final, but Badniks and object art are still intact. Though it uses its original object layout, it uses [[Hill Top Zone]] Act 2's level layout for some reason. | ||
}} | }} | ||
| Line 23: | Line 30: | ||
| image1=Notavailable.svg | | image1=Notavailable.svg | ||
| image2=Notavailable.svg | | image2=Notavailable.svg | ||
| + | | game1=Beta 4 | ||
| + | | game2=Final game | ||
| + | | desc=Level select is activated with {{A}} + {{Start}}, no code is required. | ||
| + | }} | ||
| + | {{Comparison | ||
| + | | image1=Notavailable.svg | ||
| + | | image2=Notavailable.svg | ||
| + | | game1=Beta 4 | ||
| + | | game2=Final game | ||
| + | | desc=Debug is activated by holding {{A}} when selecting a level on the level select screen. It can also be activated by holding {{A}} when you die, no code is required. | ||
| + | }} | ||
| + | {{Comparison | ||
| + | | image1=Notavailable.svg | ||
| + | | image2=Notavailable.svg | ||
| + | | game1=Beta 4 | ||
| + | | game2=Final game | ||
| + | | desc=Some of the zones that play after the Title Screen are still using the demos from the [[Nick Arcade]]/[[Simon Wai]] builds. | ||
| + | }} | ||
| + | {{Comparison | ||
| + | | image1=Notavailable.svg | ||
| + | | image2=Notavailable.svg | ||
| + | | game1=Beta 4 | ||
| + | | game2=Final game | ||
| + | | desc=This build also features a severely limited debug mode. Item placement mode is not accessible, nor is Sonic invulnerable. The coordinate display functions are working, however. Item placement mode can be forced using patch codes, but debug remains limited as the player cannot move in item placement mode and items can be placed once. | ||
| + | }} | ||
| + | {{Comparison | ||
| + | | image1=Notavailable.svg | ||
| + | | image2=Notavailable.svg | ||
| + | | game1=Beta 4 | ||
| + | | game2=Final game | ||
| + | | desc=Even with debug or level select off, you can still restart the game by pressing {{A}} when the game is paused. | ||
| + | }} | ||
| + | {{Comparison | ||
| + | | image1=Sonic2CENSOR MD Comparison ButtonStart.png | ||
| + | | image2=Sonic2 MD Comparison ButtonStart.png | ||
| game1=Beta 4 | | game1=Beta 4 | ||
| game2=Final game | | game2=Final game | ||
| desc=Holding {{A}}, {{B}} or {{C}} during the title card causes Sonic and Tails to start in mid-air. | | desc=Holding {{A}}, {{B}} or {{C}} during the title card causes Sonic and Tails to start in mid-air. | ||
| + | }} | ||
| + | {{Comparison | ||
| + | | image1=Notavailable.svg | ||
| + | | image2=Notavailable.svg | ||
| + | | game1=Beta 4 | ||
| + | | game2=Final game | ||
| + | | desc=The camera doesn't pan up nor down when either {{Up}} or {{Down}} are held in this build. | ||
}} | }} | ||
{{Comparison | {{Comparison | ||
| Line 32: | Line 81: | ||
| game1=Beta 4 | | game1=Beta 4 | ||
| game2=Final game | | game2=Final game | ||
| − | | desc=The infamous "spike | + | | desc=The infamous "[[Spike damage behavior|spike behavior]]" is still present in beta 4. |
}} | }} | ||
{{Comparison | {{Comparison | ||
| Line 39: | Line 88: | ||
| game1=Beta 4 | | game1=Beta 4 | ||
| game2=Final game | | game2=Final game | ||
| − | | desc=The camera follows Sonic when he dies, instead of being locked. | + | | desc=The camera still follows Sonic when he dies, instead of being locked. |
}} | }} | ||
{{Comparison | {{Comparison | ||
| Line 46: | Line 95: | ||
| game1=Beta 4 | | game1=Beta 4 | ||
| game2=Final game | | game2=Final game | ||
| − | | desc=The camera locks itself for 20 frames after a spin dash is released, regardless of the character's speed. This means it is very easy to out-run the camera and skip obstacles. | + | | desc=The camera still locks itself for 20 frames after a spin dash is released, regardless of the character's speed. This means it is very easy to out-run the camera and skip obstacles. |
}} | }} | ||
{{Comparison | {{Comparison | ||
| Line 53: | Line 102: | ||
| game1=Beta 4 | | game1=Beta 4 | ||
| game2=Final game | | game2=Final game | ||
| − | | desc=Spin | + | | desc=[[Spin Dash]]ing on a collapsing platform still won't cause Sonic and Tails to fall until {{down}} is let go. |
}} | }} | ||
{{Comparison | {{Comparison | ||
| Line 60: | Line 109: | ||
| game1=Beta 4 | | game1=Beta 4 | ||
| game2=Final game | | game2=Final game | ||
| − | | desc=There is an extra full stop after "Act" in the score card, and no concept of a "perfect bonus", so the gap for it is missing here. The "T" was also moved slightly to the left in the final version. | + | | desc=There is still an extra full stop after "Act" in the score card, and no concept of a "perfect bonus", so the gap for it is missing here. The "T" was also moved slightly to the left in the final version. |
}} | }} | ||
{{Comparison | {{Comparison | ||
| Line 67: | Line 116: | ||
| game1=Beta 4 | | game1=Beta 4 | ||
| game2=Final game | | game2=Final game | ||
| − | | desc= | + | | desc=The camera will still lock earlier whenever a [[capsule]] appears on-screen, leading to them appearing off-centre in a number of zones. |
| + | }} | ||
| + | ===2 Player comparisons=== | ||
| + | {{Comparison | ||
| + | | image1=Notavailable.svg | ||
| + | | image2=Notavailable.svg | ||
| + | | game1=Beta 4 | ||
| + | | game2=Final game | ||
| + | | desc=Player 1 cannot jump over Player 2 in the special stages. However, hitting a mine puts you in front. | ||
| + | }} | ||
| + | {{Comparison | ||
| + | | image1=Notavailable.svg | ||
| + | | image2=Notavailable.svg | ||
| + | | game1=Beta 4 | ||
| + | | game2=Final game | ||
| + | | desc=The Eggman monitor doesn't work. | ||
| + | }} | ||
| + | {{Comparison | ||
| + | | image1=Notavailable.svg | ||
| + | | image2=Notavailable.svg | ||
| + | | game1=Beta 4 | ||
| + | | game2=Final game | ||
| + | | desc=Tails' icon is always listed as "Miles", regardless of region. | ||
| + | }} | ||
| + | {{Comparison | ||
| + | | image1=Notavailable.svg | ||
| + | | image2=Notavailable.svg | ||
| + | | game1=Beta 4 | ||
| + | | game2=Final game | ||
| + | | desc=There are no invincibility stars. | ||
| + | }} | ||
| + | {{Comparison | ||
| + | | image1=Notavailable.svg | ||
| + | | image2=Notavailable.svg | ||
| + | | game1=Beta 4 | ||
| + | | game2=Final game | ||
| + | | desc=There is no one minute countdown displayed on the other player's screen if the opposite player finishes. | ||
| + | }} | ||
| + | |||
| + | ==Graphic comparisons== | ||
| + | {{Comparison | ||
| + | | image1=Notavailable.svg | ||
| + | | image2=Notavailable.svg | ||
| + | | game1=Beta 4 | ||
| + | | game2=Final game | ||
| + | | desc=Invincibility stars are different. | ||
}} | }} | ||
Latest revision as of 05:24, 9 February 2021
- Back to: Sonic the Hedgehog 2 (beta 4).
Contents
General comparisons
| Beta 4 |
|---|

| Final game |
|---|

This is the last known version of Sonic 2 to use this different title screen. All differences here are the same as in the CENSOR prototype: there is no introduction, Sonic and Tails are not animated, and the background is borrowed from Emerald Hill Zone, scrolling to the left in a similar manner to the original Sonic the Hedgehog. While the menu exists in beta 4, there is no options screen to select.
| Sonic 2 beta 4 |
|---|

| Sonic the Hedgehog (REV01) |
|---|

| Sonic 2 final |
|---|

The level select screen is laid out in the same way as the CENSOR prototype, and uses older names for some of the levels (which are different to the in-game title cards, all of which are using the final zone names). Hidden Palace Zone is listed, but is not selectable.
| Beta 4 |
|---|

| Final game |
|---|
Through hacking, Hidden Palace Zone can be accessed and it is a garbled mess just like in the final, but Badniks and object art are still intact. Though it uses its original object layout, it uses Hill Top Zone Act 2's level layout for some reason.
Gameplay comparisons
| Beta 4 |
|---|
| Final game |
|---|
Level select is activated with ![]() +
+ ![]() , no code is required.
, no code is required.
| Beta 4 |
|---|
| Final game |
|---|
Debug is activated by holding ![]() when selecting a level on the level select screen. It can also be activated by holding
when selecting a level on the level select screen. It can also be activated by holding ![]() when you die, no code is required.
when you die, no code is required.
| Beta 4 |
|---|
| Final game |
|---|
Some of the zones that play after the Title Screen are still using the demos from the Nick Arcade/Simon Wai builds.
| Beta 4 |
|---|
| Final game |
|---|
This build also features a severely limited debug mode. Item placement mode is not accessible, nor is Sonic invulnerable. The coordinate display functions are working, however. Item placement mode can be forced using patch codes, but debug remains limited as the player cannot move in item placement mode and items can be placed once.
| Beta 4 |
|---|
| Final game |
|---|
Even with debug or level select off, you can still restart the game by pressing ![]() when the game is paused.
when the game is paused.
| Beta 4 |
|---|

| Final game |
|---|

Holding ![]() ,
, ![]() or
or ![]() during the title card causes Sonic and Tails to start in mid-air.
during the title card causes Sonic and Tails to start in mid-air.
| Beta 4 |
|---|
| Final game |
|---|
The camera doesn't pan up nor down when either ![]() or
or ![]() are held in this build.
are held in this build.
| Beta 4 |
|---|

| Final game |
|---|

The infamous "spike behavior" is still present in beta 4.
| Beta 4 |
|---|

| Final game |
|---|

The camera still follows Sonic when he dies, instead of being locked.
| Beta 4 |
|---|
| Final game |
|---|
The camera still locks itself for 20 frames after a spin dash is released, regardless of the character's speed. This means it is very easy to out-run the camera and skip obstacles.
| Beta 4 |
|---|

| Final game |
|---|

Spin Dashing on a collapsing platform still won't cause Sonic and Tails to fall until ![]() is let go.
is let go.
| Beta 4 |
|---|

| Final game |
|---|

There is still an extra full stop after "Act" in the score card, and no concept of a "perfect bonus", so the gap for it is missing here. The "T" was also moved slightly to the left in the final version.
| Beta 4 |
|---|

| Final game |
|---|

The camera will still lock earlier whenever a capsule appears on-screen, leading to them appearing off-centre in a number of zones.
2 Player comparisons
| Beta 4 |
|---|
| Final game |
|---|
Player 1 cannot jump over Player 2 in the special stages. However, hitting a mine puts you in front.
| Beta 4 |
|---|
| Final game |
|---|
The Eggman monitor doesn't work.
| Beta 4 |
|---|
| Final game |
|---|
Tails' icon is always listed as "Miles", regardless of region.
| Beta 4 |
|---|
| Final game |
|---|
There are no invincibility stars.
| Beta 4 |
|---|
| Final game |
|---|
There is no one minute countdown displayed on the other player's screen if the opposite player finishes.
Graphic comparisons
| Beta 4 |
|---|
| Final game |
|---|
Invincibility stars are different.
Level comparisons
References
| Sonic the Hedgehog 2 (beta 4), prototype version of Sonic the Hedgehog 2 (16-bit) | |
|---|---|
|
Main page | Comparisons | Maps | |