Difference between revisions of "Sonic the Hedgehog 3 (prototype; 1993-11-03)/Comparisons/Angel Island Zone"
From Sonic Retro
(→Act 1) |
BSonirachi (talk | contribs) |
||
| (19 intermediate revisions by 4 users not shown) | |||
| Line 1: | Line 1: | ||
{{back}} | {{back}} | ||
| + | Despite being the first [[Zone]] of ''[[Sonic the Hedgehog 3]]'', [[Angel Island Zone]] has seen many changes between this prototype and the final game in both level structure and gameplay. | ||
==Act 1== | ==Act 1== | ||
{{Comparison | {{Comparison | ||
| − | | image1= | + | | image1=Sonic31993-11-03 MD AIZ1 Intro.png |
| − | | image2= | + | | image2=Sonic3 MD AIZ1 Intro.png |
| game1=Prototype | | game1=Prototype | ||
| game2=Final game | | game2=Final game | ||
| − | | desc=Angel Island is introduced by Sonic riding a (broken) surfboard. There is no [[Tails]], [[Tornado]] or [[Super Sonic]]. | + | | desc=Angel Island is introduced by [[Sonic the Hedgehog|Sonic]] riding a (broken) surfboard. There is no [[Miles "Tails" Prower|Tails]], [[Tornado]] or [[Super Sonic]]. Starting from the level select skips this intro, so the only way to see it would be to let the demo play at the title screen. |
}} | }} | ||
{{Comparison | {{Comparison | ||
| − | | image1= | + | | image1=Sonic31993-11-03 MD AIZ1 Knuckles.png |
| − | | image2= | + | | image2=Sonic3 MD AIZ1 Knuckles.png |
| game1=Prototype | | game1=Prototype | ||
| game2=Final game | | game2=Final game | ||
| − | | desc=The hedgehog abandons his board and meets a very different looking Knuckles. Rather than attack, Knuckles stands around making some gestures then runs off to the right. | + | | desc=The hedgehog abandons his board and meets a very different looking [[Knuckles the Echidna|Knuckles]]. Rather than attack, Knuckles stands around making some gestures then runs off to the right. |
}} | }} | ||
{{Comparison | {{Comparison | ||
| − | | image1= | + | | image1=Sonic31993-11-03 MD AIZ1 BlueKnuckles.png |
| − | | image2= | + | | image2=Sonic3 MD AIZ1 BlueKnuckles.png |
| game1=Prototype | | game1=Prototype | ||
| game2=Final game | | game2=Final game | ||
| Line 24: | Line 25: | ||
}} | }} | ||
{{Comparison | {{Comparison | ||
| − | | image1= | + | | image1=Sonic31993-11-03 MD AIZ1 TailsKnuckles.png |
| − | | image2= | + | | image2=Sonic3 MD AIZ1 TailsKnuckles.png |
| + | | game1=Prototype | ||
| + | | game2=Final game | ||
| + | | desc=When playing as Tails, Knuckles becomes a jumbled mess of sprites. This sequence doesn't occur in the final game, so it's unlikely the developers fixed it. | ||
| + | }} | ||
| + | {{Comparison | ||
| + | | image1=Sonic31993-11-03 MD AIZ1 TitleCard.png | ||
| + | | image2=Sonic3 MD AIZ1 TitleCard2.png | ||
| game1=Prototype | | game1=Prototype | ||
| game2=Final game | | game2=Final game | ||
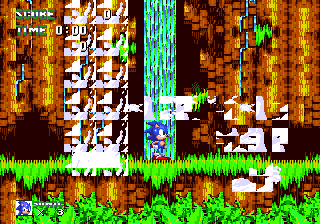
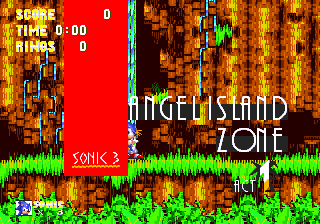
| desc=Title cards are not perfect in any Zone in this prototype, but the Angel Island one seems especially bad. | | desc=Title cards are not perfect in any Zone in this prototype, but the Angel Island one seems especially bad. | ||
| + | }} | ||
| + | {{Comparison | ||
| + | | image1=Sonic31993-11-03 MD AIZ1 Left.png | ||
| + | | image2=Sonic3 MD AIZ1 Left.png | ||
| + | | game1=Prototype | ||
| + | | game2=Final game | ||
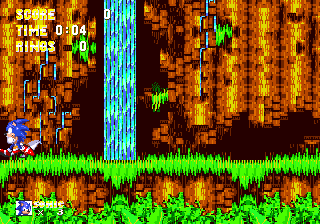
| + | | desc=The left hand side of the screen is not locked, meaning the player can backtrack to the beach as soon as they start and promptly die. | ||
| + | }} | ||
| + | {{Comparison | ||
| + | | image1=Sonic31993-11-03 MD AIZ1 BlankMonitors.png | ||
| + | | image2=Sonic3 MD AIZ1 BlankMonitors.png | ||
| + | | game1=Prototype | ||
| + | | game2=Final game | ||
| + | | desc=Monitors have strange contents in this Zone. Early ones are blank and act like [[Eggman Mark]]s, the rest contain extra lives. | ||
}} | }} | ||
{{Comparison | {{Comparison | ||
| Line 35: | Line 57: | ||
| game1=Prototype | | game1=Prototype | ||
| game2=Final game | | game2=Final game | ||
| − | | desc= | + | | desc=In Sonic's game, Tails will not appear when gameplay begins. Instead, he initially appears at a specific point, following a set flight pattern to airlift Sonic up to the (difficult to reach) upper path, before reverting to his normal AI patterns a little further into the Act. |
| + | }} | ||
| + | {{Comparison | ||
| + | | image1=Sonic31993-11-03 MD AIZ1 TailsVine.png | ||
| + | | image2=Sonic3 MD AIZ1 TailsVine.png | ||
| + | | game1=Prototype | ||
| + | | game2=Final game | ||
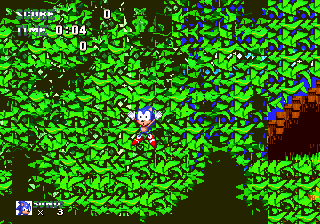
| + | | desc=Grab onto a vine as Tails and the game will crash, possibly with full screen corruption and, on hardware, loss of sync. On emulators that don't handle this correctly, the game will keep running, but you'll get graphical noise, followed by every ring graphic in the level being corrupted (something that will continue over to Act 2 unless you die). | ||
| + | }} | ||
| + | {{Comparison | ||
| + | | sprite1=Notavailable.svg | ||
| + | | sprite1w= | ||
| + | | sprite1h= | ||
| + | | sprite1x= | ||
| + | | sprite1y= | ||
| + | | sprite2=Sonic3 MD Map Ai1.png | ||
| + | | sprite2w=640 | ||
| + | | sprite2h=512 | ||
| + | | sprite2x=1792 | ||
| + | | sprite2y=128 | ||
| + | | game1=Prototype | ||
| + | | game2=Final game | ||
| + | | desc=The first "open" area of the Act had no ceiling whatsoever. Along with the addition of the ceiling was this ledge with a Super Ring on the upper path. | ||
| + | }} | ||
| + | {{Comparison | ||
| + | | sprite1=Notavailable.svg | ||
| + | | sprite1w= | ||
| + | | sprite1h= | ||
| + | | sprite1x= | ||
| + | | sprite1y= | ||
| + | | sprite2=Sonic3 MD Map Ai1.png | ||
| + | | sprite2w=768 | ||
| + | | sprite2h=384 | ||
| + | | sprite2x=2432 | ||
| + | | sprite2y=256 | ||
| + | | game1=Prototype | ||
| + | | game2=Final game | ||
| + | | vertical=yes | ||
| + | | desc=Along this path, the tree was later removed, and the steps were replaced with a single, larger step to jump over. | ||
| + | }} | ||
| + | {{Comparison | ||
| + | | sprite1=Notavailable.svg | ||
| + | | sprite1w= | ||
| + | | sprite1h= | ||
| + | | sprite1x= | ||
| + | | sprite1y= | ||
| + | | sprite2=Sonic3 MD Map Ai1.png | ||
| + | | sprite2w=768 | ||
| + | | sprite2h=512 | ||
| + | | sprite2x=3200 | ||
| + | | sprite2y=128 | ||
| + | | game1=Prototype | ||
| + | | game2=Final game | ||
| + | | vertical=yes | ||
| + | | desc=There were originally two trees here, each with their own [[Monkey Dude]]s. The final cuts this down to one, changes the static monitor to a [[Fire Shield]], and adds in some [[Spikes (obstacle)|spikes]] for good measure. | ||
| + | }} | ||
| + | {{Comparison | ||
| + | | sprite1=Notavailable.svg | ||
| + | | sprite1w= | ||
| + | | sprite1h= | ||
| + | | sprite1x= | ||
| + | | sprite1y= | ||
| + | | sprite2=Sonic3 MD Map Ai1.png | ||
| + | | sprite2w=896 | ||
| + | | sprite2h=256 | ||
| + | | sprite2x=3584 | ||
| + | | sprite2y=640 | ||
| + | | game1=Prototype | ||
| + | | game2=Final game | ||
| + | | vertical=yes | ||
| + | | desc=A number of object changes were later made here. Breakable rocks were added before the monitor, which was changed from an Eggman Mark to an [[Invincibility]]. The [[RhinoBot]] was replaced with a [[Bloominator]], and the spikes were swapped out for a rock. | ||
| + | }} | ||
| + | {{Comparison | ||
| + | | sprite1=Notavailable.svg | ||
| + | | sprite1w= | ||
| + | | sprite1h= | ||
| + | | sprite1x= | ||
| + | | sprite1y= | ||
| + | | sprite2=Sonic3 MD Map Ai1.png | ||
| + | | sprite2w=640 | ||
| + | | sprite2h=512 | ||
| + | | sprite2x=4864 | ||
| + | | sprite2y=256 | ||
| + | | game1=Prototype | ||
| + | | game2=Final game | ||
| + | | desc=This section later saw the addition of a floating piece of land with a [[Star Post]], and the rock concealing a spring was shifted to the left a bit. | ||
| + | }} | ||
| + | {{Comparison | ||
| + | | sprite1=Notavailable.svg | ||
| + | | sprite1w= | ||
| + | | sprite1h= | ||
| + | | sprite1x= | ||
| + | | sprite1y= | ||
| + | | sprite2=Sonic3 MD Map Ai1.png | ||
| + | | sprite2w=768 | ||
| + | | sprite2h=512 | ||
| + | | sprite2x=5504 | ||
| + | | sprite2y=384 | ||
| + | | game1=Prototype | ||
| + | | game2=Final game | ||
| + | | vertical=yes | ||
| + | | desc=There is only one loop at this section, and the monitor on top is a 1-Up rather than a Super Ring. The tree to the left was later bulldozed to make way for the second loop. | ||
}} | }} | ||
{{Comparison | {{Comparison | ||
| − | | | + | | sprite1=Notavailable.svg |
| − | | | + | | sprite1w= |
| + | | sprite1h= | ||
| + | | sprite1x= | ||
| + | | sprite1y= | ||
| + | | sprite2=Sonic3 MD Map Ai1.png | ||
| + | | sprite2w=640 | ||
| + | | sprite2h=256 | ||
| + | | sprite2x=4864 | ||
| + | | sprite2y=896 | ||
| game1=Prototype | | game1=Prototype | ||
| game2=Final game | | game2=Final game | ||
| − | | desc= | + | | vertical=yes |
| + | | desc=This upward slope on the lower path, which was originally seen in a magazine screenshot, was completely swapped out for a tree, ramp and ledge. The RhinoBot was also swapped out for a Monkey Dude. | ||
}} | }} | ||
{{Comparison | {{Comparison | ||
| − | | image1= | + | | image1=Sonic31993-11-03 MD AIZ1 Rock.png |
| − | | image2= | + | | image2=Sonic3 MD AIZ1 Rock.png |
| game1=Prototype | | game1=Prototype | ||
| game2=Final game | | game2=Final game | ||
| − | | desc=This rock can be destroyed by jumping on it. In the final, | + | | desc=This rock can be destroyed by jumping on it. In the final, the player has to push it. There's nothing down here but a [[spring]]. |
}} | }} | ||
{{Comparison | {{Comparison | ||
| − | | image1= | + | | image1=Sonic31993-11-03 MD AIZ1 FireBreathIntro.png |
| − | | image2= | + | | image2=Sonic3 MD AIZ1 FireBreathIntro.png |
| game1=Prototype | | game1=Prototype | ||
| game2=Final game | | game2=Final game | ||
| − | | desc=[[Fire Breath]] breathes fire in the first encounter. In the final it just launches missiles. | + | | desc=[[Fire Breath]] breathes fire in the first encounter. In the final, it just launches missiles. |
}} | }} | ||
{{Comparison | {{Comparison | ||
| − | | image1= | + | | image1=Sonic31993-11-03 MD AIZ1 Logs.png |
| image2=Notavailable.svg | | image2=Notavailable.svg | ||
| game1=Prototype | | game1=Prototype | ||
| Line 66: | Line 198: | ||
}} | }} | ||
{{Comparison | {{Comparison | ||
| − | | image1=Notavailable.svg | + | | image1=Sonic31993-11-03 MD AIZ1 SonicUnderwater.png |
| − | | | + | | image2=Sonic3 MD AIZ1 SonicUnderwater.png |
| + | | game1=Prototype | ||
| + | | game2=Final game | ||
| + | | desc=Sonic and Tails do not have a dedicated underwater palette when Angel Island catches fire. | ||
| + | }} | ||
| + | {{Comparison | ||
| + | | sprite1=Notavailable.svg | ||
| + | | sprite1w= | ||
| + | | sprite1h= | ||
| + | | sprite1x= | ||
| + | | sprite1y= | ||
| + | | sprite2=Sonic3 MD Map Ai1.png | ||
| + | | sprite2w=640 | ||
| + | | sprite2h=384 | ||
| + | | sprite2x=9984 | ||
| + | | sprite2y=768 | ||
| + | | game1=Prototype | ||
| + | | game2=Final game | ||
| + | | desc=A loop was later added to this section. | ||
| + | }} | ||
| + | {{Comparison | ||
| + | | sprite1=Notavailable.svg | ||
| + | | sprite1w= | ||
| + | | sprite1h= | ||
| + | | sprite1x= | ||
| + | | sprite1y= | ||
| + | | sprite2=Sonic3 MD Map Ai1.png | ||
| + | | sprite2w=640 | ||
| + | | sprite2h=512 | ||
| + | | sprite2x=9984 | ||
| + | | sprite2y=1152 | ||
| + | | game1=Prototype | ||
| + | | game2=Final game | ||
| + | | desc=This section was originally a simple tunnel leading to a spring. | ||
| + | }} | ||
| + | {{Comparison | ||
| + | | image1=Sonic31993-11-03 MD AIZ1 FireBreath.png | ||
| + | | image2=Aizsubboss.png | ||
| game1=Prototype | | game1=Prototype | ||
| game2=Final game | | game2=Final game | ||
| − | | desc= | + | | desc=During the [[Fire Breath]] fight, the fire graphics on the sides of the background trees are corrupted. |
}} | }} | ||
| + | |||
===Map=== | ===Map=== | ||
{{Comparison | {{Comparison | ||
| Line 82: | Line 252: | ||
==Act 2== | ==Act 2== | ||
| + | {{Comparison | ||
| + | | sprite1=Notavailable.svg | ||
| + | | sprite1w= | ||
| + | | sprite1h= | ||
| + | | sprite1x= | ||
| + | | sprite1y= | ||
| + | | sprite2=S3 map AIZ2.png | ||
| + | | sprite2w=1408 | ||
| + | | sprite2h=512 | ||
| + | | sprite2x=640 | ||
| + | | sprite2y=768 | ||
| + | | spritescale=0.75 | ||
| + | | game1=Prototype | ||
| + | | game2=Final game | ||
| + | | vertical=yes | ||
| + | | desc=The starting tunnel only has one bump compared to the final. There are also 11 Rings to collect, all near the tunnel's exit, which was reduced to 5 Rings near the exit and 3 at the entrance. | ||
| + | }} | ||
| + | {{Comparison | ||
| + | | sprite1=Notavailable.svg | ||
| + | | sprite1w= | ||
| + | | sprite1h= | ||
| + | | sprite1x= | ||
| + | | sprite1y= | ||
| + | | sprite2=S3 map AIZ2.png | ||
| + | | sprite2w=1024 | ||
| + | | sprite2h=512 | ||
| + | | sprite2x=1920 | ||
| + | | sprite2y=1024 | ||
| + | | game1=Prototype | ||
| + | | game2=Final game | ||
| + | | vertical=yes | ||
| + | | desc=This underwater passageway was changed to an underwater half-pipe later on. The waterfall here was also shortened in width and had falling logs added to it. | ||
| + | }} | ||
| + | {{Comparison | ||
| + | | sprite1=Notavailable.svg | ||
| + | | sprite1w= | ||
| + | | sprite1h= | ||
| + | | sprite1x= | ||
| + | | sprite1y= | ||
| + | | sprite2=S3 map AIZ2.png | ||
| + | | sprite2w=768 | ||
| + | | sprite2h=640 | ||
| + | | sprite2x=2816 | ||
| + | | sprite2y=768 | ||
| + | | game1=Prototype | ||
| + | | game2=Final game | ||
| + | | vertical=yes | ||
| + | | desc=The terrain on the upper path was adjusted, moving the collapsing ledge back and adding a floating piece of land underneath the start of the zipwire. The lower path had breakable rocks added, and the 1-Up was changed to a [[Water Shield]]. | ||
| + | }} | ||
| + | {{Comparison | ||
| + | | sprite1=Notavailable.svg | ||
| + | | sprite1w= | ||
| + | | sprite1h= | ||
| + | | sprite1x= | ||
| + | | sprite1y= | ||
| + | | sprite2=S3 map AIZ2.png | ||
| + | | sprite2w=896 | ||
| + | | sprite2h=384 | ||
| + | | sprite2x=3328 | ||
| + | | sprite2y=1152 | ||
| + | | game1=Prototype | ||
| + | | game2=Final game | ||
| + | | vertical=yes | ||
| + | | desc=This waterlogged section saw a change in terrain layout, with a lump of land being raised above water. | ||
| + | }} | ||
| + | {{Comparison | ||
| + | | sprite1=Notavailable.svg | ||
| + | | sprite1w= | ||
| + | | sprite1h= | ||
| + | | sprite1x= | ||
| + | | sprite1y= | ||
| + | | sprite2=S3 map AIZ2.png | ||
| + | | sprite2w=896 | ||
| + | | sprite2h=384 | ||
| + | | sprite2x=4224 | ||
| + | | sprite2y=1024 | ||
| + | | game1=Prototype | ||
| + | | game2=Final game | ||
| + | | vertical=yes | ||
| + | | desc=Originally, accessing the top route was done by springs hidden in a rock and a tree. This section was redesigned so the terrain is raised, and a floating platform takes the player up instead. | ||
| + | }} | ||
| + | {{Comparison | ||
| + | | sprite1=Notavailable.svg | ||
| + | | sprite1w= | ||
| + | | sprite1h= | ||
| + | | sprite1x= | ||
| + | | sprite1y= | ||
| + | | sprite2=S3 map AIZ2.png | ||
| + | | sprite2w=1280 | ||
| + | | sprite2h=384 | ||
| + | | sprite2x=4352 | ||
| + | | sprite2y=640 | ||
| + | | game1=Prototype | ||
| + | | game2=Final game | ||
| + | | vertical=yes | ||
| + | | desc=Up on the top route, this section is vastly different from the final. Swinging vines were added here later on, along with a bonus room containing a [[Lightning Shield]]. | ||
| + | }} | ||
| + | {{Comparison | ||
| + | | sprite1=Notavailable.svg | ||
| + | | sprite1w= | ||
| + | | sprite1h= | ||
| + | | sprite1x= | ||
| + | | sprite1y= | ||
| + | | sprite2=S3 map AIZ2.png | ||
| + | | sprite2w=1152 | ||
| + | | sprite2h=512 | ||
| + | | sprite2x=5120 | ||
| + | | sprite2y=1024 | ||
| + | | game1=Prototype | ||
| + | | game2=Final game | ||
| + | | vertical=yes | ||
| + | | desc=This section was redesigned as a whole, adding in an S-tube to accommodate the raised land to the left. The descending logs in the waterfall and the rock blocking the button were removed. | ||
| + | }} | ||
| + | {{Comparison | ||
| + | | sprite1=Notavailable.svg | ||
| + | | sprite1w= | ||
| + | | sprite1h= | ||
| + | | sprite1x= | ||
| + | | sprite1y= | ||
| + | | sprite2=S3 map AIZ2.png | ||
| + | | sprite2w=1024 | ||
| + | | sprite2h=768 | ||
| + | | sprite2x=5376 | ||
| + | | sprite2y=256 | ||
| + | | spritescale=0.75 | ||
| + | | game1=Prototype | ||
| + | | game2=Final game | ||
| + | | desc=And up above, this entire section was changed to not only add a roof and a [[Fire Shield]], but to also add another wall that must be cleared by pressing a button. | ||
| + | }} | ||
| + | {{Comparison | ||
| + | | image1=Notavailable.svg | ||
| + | | image2=Notavailable.svg | ||
| + | | game1=Prototype | ||
| + | | game2=Final game | ||
| + | | desc=Tails takes less of a beating from the Flying Battery as it drops bombs. This is because unlike the final game, Tails is not pushed forward by the moving camera, so he will just be knocked off-screen. | ||
| + | }} | ||
| + | {{Comparison | ||
| + | | image1=Notavailable.svg | ||
| + | | image2=Notavailable.svg | ||
| + | | game1=Prototype | ||
| + | | game2=Final game | ||
| + | | desc=The bug allowing the player to jump off the bridge and back onto the ledge as soon as Knuckles hits the switch doesn't work as well here, because if Tails drops off-screen, [[Hydrocity Zone]] will begin. In the final, it's only Sonic that matters (unless the player is Tails). | ||
| + | }} | ||
| + | |||
===Map=== | ===Map=== | ||
{{Comparison | {{Comparison | ||
| image1=Notavailable.svg | | image1=Notavailable.svg | ||
| − | | image2= | + | | image2=S3 map AIZ2.png |
| game1=Prototype | | game1=Prototype | ||
| game2=Final game | | game2=Final game | ||
Latest revision as of 17:54, 16 June 2022
Despite being the first Zone of Sonic the Hedgehog 3, Angel Island Zone has seen many changes between this prototype and the final game in both level structure and gameplay.
Contents
Act 1
| Prototype |
|---|
| Final game |
|---|
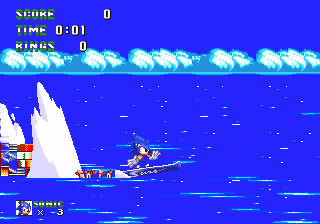
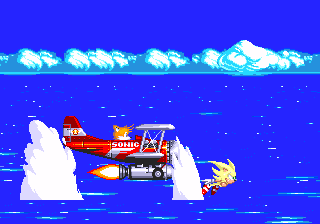
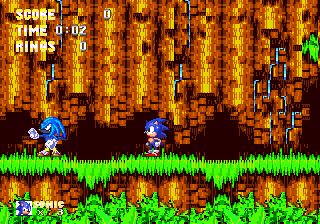
Angel Island is introduced by Sonic riding a (broken) surfboard. There is no Tails, Tornado or Super Sonic. Starting from the level select skips this intro, so the only way to see it would be to let the demo play at the title screen.
| Prototype |
|---|
| Final game |
|---|
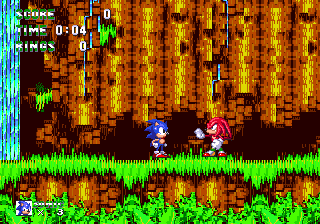
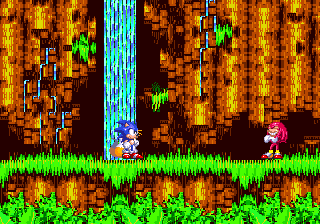
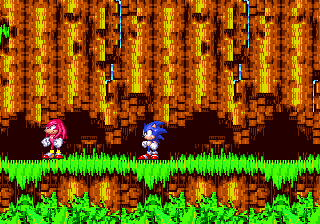
The hedgehog abandons his board and meets a very different looking Knuckles. Rather than attack, Knuckles stands around making some gestures then runs off to the right.
| Prototype |
|---|
| Final game |
|---|
Jump ahead of Knuckles and he'll turn blue.
| Prototype |
|---|
| Final game |
|---|
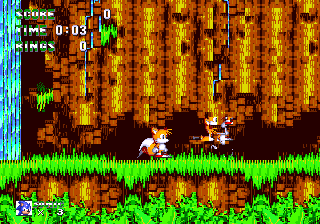
When playing as Tails, Knuckles becomes a jumbled mess of sprites. This sequence doesn't occur in the final game, so it's unlikely the developers fixed it.
| Prototype |
|---|
| Final game |
|---|
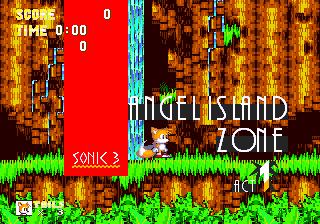
Title cards are not perfect in any Zone in this prototype, but the Angel Island one seems especially bad.
| Prototype |
|---|
| Final game |
|---|
The left hand side of the screen is not locked, meaning the player can backtrack to the beach as soon as they start and promptly die.
| Prototype |
|---|
| Final game |
|---|
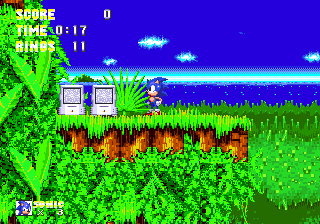
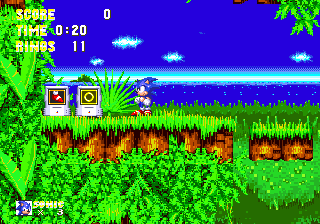
Monitors have strange contents in this Zone. Early ones are blank and act like Eggman Marks, the rest contain extra lives.
| Prototype |
|---|
| Final game |
|---|
In Sonic's game, Tails will not appear when gameplay begins. Instead, he initially appears at a specific point, following a set flight pattern to airlift Sonic up to the (difficult to reach) upper path, before reverting to his normal AI patterns a little further into the Act.
| Prototype |
|---|
| Final game |
|---|
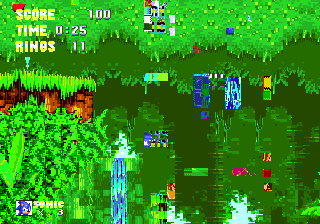
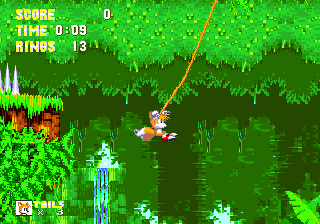
Grab onto a vine as Tails and the game will crash, possibly with full screen corruption and, on hardware, loss of sync. On emulators that don't handle this correctly, the game will keep running, but you'll get graphical noise, followed by every ring graphic in the level being corrupted (something that will continue over to Act 2 unless you die).
| Prototype |
|---|
| Final game |
|---|
The first "open" area of the Act had no ceiling whatsoever. Along with the addition of the ceiling was this ledge with a Super Ring on the upper path.
| Prototype |
|---|
| Final game |
Along this path, the tree was later removed, and the steps were replaced with a single, larger step to jump over.
| Prototype |
|---|
| Final game |
There were originally two trees here, each with their own Monkey Dudes. The final cuts this down to one, changes the static monitor to a Fire Shield, and adds in some spikes for good measure.
| Prototype |
|---|
| Final game |
A number of object changes were later made here. Breakable rocks were added before the monitor, which was changed from an Eggman Mark to an Invincibility. The RhinoBot was replaced with a Bloominator, and the spikes were swapped out for a rock.
| Prototype |
|---|
| Final game |
|---|
This section later saw the addition of a floating piece of land with a Star Post, and the rock concealing a spring was shifted to the left a bit.
| Prototype |
|---|
| Final game |
There is only one loop at this section, and the monitor on top is a 1-Up rather than a Super Ring. The tree to the left was later bulldozed to make way for the second loop.
| Prototype |
|---|
| Final game |
This upward slope on the lower path, which was originally seen in a magazine screenshot, was completely swapped out for a tree, ramp and ledge. The RhinoBot was also swapped out for a Monkey Dude.
| Prototype |
|---|
| Final game |
|---|
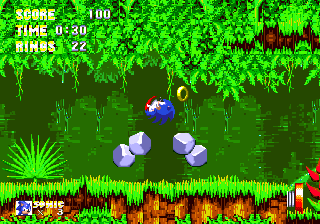
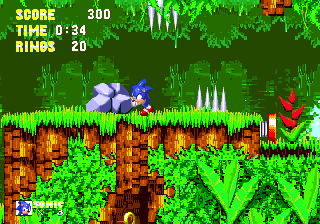
This rock can be destroyed by jumping on it. In the final, the player has to push it. There's nothing down here but a spring.
| Prototype |
|---|
| Final game |
|---|
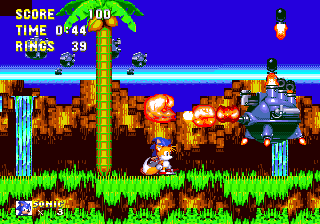
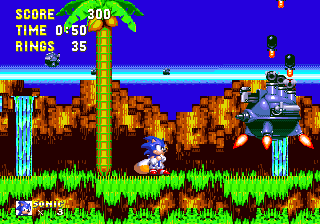
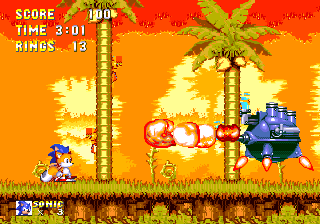
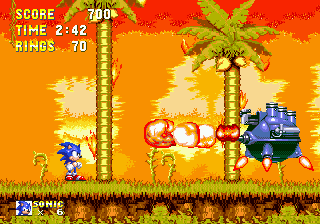
Fire Breath breathes fire in the first encounter. In the final, it just launches missiles.
| Prototype |
|---|
| Final game |
|---|
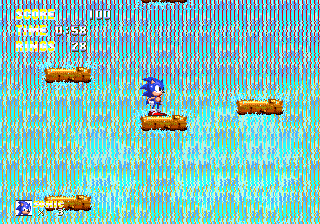
After Angel Island catches fire, Sonic and Tails are presented with some very different layout changes. There are falling logs to jump on.
| Prototype |
|---|
| Final game |
|---|
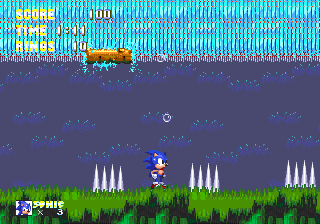
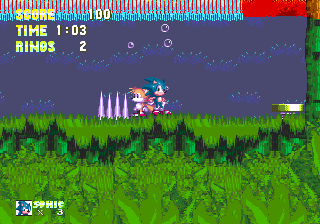
Sonic and Tails do not have a dedicated underwater palette when Angel Island catches fire.
| Prototype |
|---|
| Final game |
|---|
A loop was later added to this section.
| Prototype |
|---|
| Final game |
|---|
This section was originally a simple tunnel leading to a spring.
| Prototype |
|---|
| Final game |
|---|
During the Fire Breath fight, the fire graphics on the sides of the background trees are corrupted.
Map

|
| Prototype |
|---|

|
| Final game |
Act 2
| Prototype |
|---|
| Final game |
The starting tunnel only has one bump compared to the final. There are also 11 Rings to collect, all near the tunnel's exit, which was reduced to 5 Rings near the exit and 3 at the entrance.
| Prototype |
|---|
| Final game |
This underwater passageway was changed to an underwater half-pipe later on. The waterfall here was also shortened in width and had falling logs added to it.
| Prototype |
|---|
| Final game |
The terrain on the upper path was adjusted, moving the collapsing ledge back and adding a floating piece of land underneath the start of the zipwire. The lower path had breakable rocks added, and the 1-Up was changed to a Water Shield.
| Prototype |
|---|
| Final game |
This waterlogged section saw a change in terrain layout, with a lump of land being raised above water.
| Prototype |
|---|
| Final game |
Originally, accessing the top route was done by springs hidden in a rock and a tree. This section was redesigned so the terrain is raised, and a floating platform takes the player up instead.
| Prototype |
|---|
| Final game |
Up on the top route, this section is vastly different from the final. Swinging vines were added here later on, along with a bonus room containing a Lightning Shield.
| Prototype |
|---|
| Final game |
This section was redesigned as a whole, adding in an S-tube to accommodate the raised land to the left. The descending logs in the waterfall and the rock blocking the button were removed.
| Prototype |
|---|
| Final game |
|---|
And up above, this entire section was changed to not only add a roof and a Fire Shield, but to also add another wall that must be cleared by pressing a button.
| Prototype |
|---|
| Final game |
|---|
Tails takes less of a beating from the Flying Battery as it drops bombs. This is because unlike the final game, Tails is not pushed forward by the moving camera, so he will just be knocked off-screen.
| Prototype |
|---|
| Final game |
|---|
The bug allowing the player to jump off the bridge and back onto the ledge as soon as Knuckles hits the switch doesn't work as well here, because if Tails drops off-screen, Hydrocity Zone will begin. In the final, it's only Sonic that matters (unless the player is Tails).
Map

|
| Prototype |
|---|

|
| Final game |
References
| Sonic the Hedgehog 3 (prototype; 1993-11-03), prototype version of Sonic the Hedgehog 3 | |
|---|---|
|
Main page | Comparisons | Maps | Hidden content | |
