Difference between revisions of "Labyrinth Zone boss (8-bit)"
From Sonic Retro
m (Text replacement - "{{S1GGOmni|2}} Category:Sonic the Hedgehog (8-bit) bosses" to "==References== <references /> {{S1GGOmni|2}}") |
BSonirachi (talk | contribs) m (Text replacement - "{{Breadcrumb |Sonic the Hedgehog (8-bit)" to "{{Breadcrumb|noitalics=yes |Sonic the Hedgehog (8-bit)|l1=''Sonic the Hedgehog'' (8-bit)") |
||
| (One intermediate revision by the same user not shown) | |||
| Line 1: | Line 1: | ||
| − | {{Breadcrumb | + | {{Breadcrumb|noitalics=yes |
| − | |Sonic the Hedgehog (8-bit)|:Category:Sonic the Hedgehog (8-bit) bosses|l2=Bosses|{{PAGENAME}}}} | + | |Sonic the Hedgehog (8-bit)|l1=''Sonic the Hedgehog'' (8-bit)|:Category:Sonic the Hedgehog (8-bit) bosses|l2=Bosses|{{PAGENAME}}|l3=Labyrinth Zone boss}} |
{{BossInfo | {{BossInfo | ||
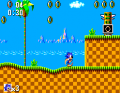
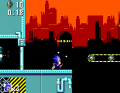
| image=8bitS1LabyrBoss.png | | image=8bitS1LabyrBoss.png | ||
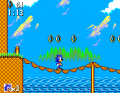
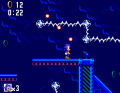
| − | | | + | | image2=Sonic1 GG LZ Boss.png |
| − | | name=Labyrinth Zone boss | + | | imagetitle1=Master System |
| + | | imagetitle2=Game Gear | ||
| + | | name=Labyrinth Zone boss | ||
| game=Sonic the Hedgehog (8-bit) | | game=Sonic the Hedgehog (8-bit) | ||
| − | | level=Labyrinth Zone (8-bit) | + | | level=Labyrinth Zone (8-bit){{!}}Labyrinth Zone |
| hits=8 | | hits=8 | ||
}} | }} | ||
| − | ''' | + | The '''Labyrinth Zone''' is the fourth boss of the 8-bit versions of ''[[Sonic the Hedgehog (8-bit)|Sonic the Hedgehog]]'', fought at the end of [[Labyrinth Zone (8-bit)|Labyrinth Zone]]. |
| − | [[Sonic]] begins underwater in | + | ==Strategy== |
| + | [[Labyrinth Zone (8-bit)|Labyrinth Zone]]'s fight with [[Dr. Eggman]] sees the return of [[Bridge Zone boss|his submarine]] from [[Bridge Zone]]. [[Sonic the Hedgehog|Sonic]] begins underwater in the third Act, however he has an unlimited supply of air. When the player reaches Eggman, they will notice two banks on either side of the screen. there are three spaces in which Eggman can emerge: one on the bottom, and two on the top at left and right sides of the screen. Eggman appears from one of the gaps, and the player should jump on or under his pod to deal damage, but they must watch out; if Eggman emerges from the bottom space, he will shoot energy projectiles in both directions, but if he appears from either of the top spaces, he will send a vaguely-homing torpedo towards Sonic. These attacks are easily dodged, though good timing is necessary due to reduced mobility underwater. | ||
| + | |||
| + | After eight hits, his craft explodes, and Sonic can escape the watery depths to [[Scrap Brain Zone (8-bit)|Scrap Brain Zone]]. | ||
==References== | ==References== | ||
| − | <references /> | + | <references/> |
| − | {{S1GGOmni| | + | {{S1GGOmni|3}} |
Latest revision as of 08:45, 31 July 2023
| |
Sonic the Hedgehog (8-bit) |
| Bosses |
| Labyrinth Zone boss |
| show;hide
|
| Labyrinth Zone boss |
|---|
| Game: Sonic the Hedgehog (8-bit) |
| Level: Labyrinth Zone |
| Hits to defeat: 8 |


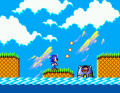
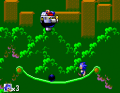
The Labyrinth Zone is the fourth boss of the 8-bit versions of Sonic the Hedgehog, fought at the end of Labyrinth Zone.
Strategy
Labyrinth Zone's fight with Dr. Eggman sees the return of his submarine from Bridge Zone. Sonic begins underwater in the third Act, however he has an unlimited supply of air. When the player reaches Eggman, they will notice two banks on either side of the screen. there are three spaces in which Eggman can emerge: one on the bottom, and two on the top at left and right sides of the screen. Eggman appears from one of the gaps, and the player should jump on or under his pod to deal damage, but they must watch out; if Eggman emerges from the bottom space, he will shoot energy projectiles in both directions, but if he appears from either of the top spaces, he will send a vaguely-homing torpedo towards Sonic. These attacks are easily dodged, though good timing is necessary due to reduced mobility underwater.
After eight hits, his craft explodes, and Sonic can escape the watery depths to Scrap Brain Zone.
References
| Sonic the Hedgehog (8-bit) | |
|---|---|
|
Manuals |
show;hide
|