
Difference between revisions of "SPG:Slope Collision"
From Sonic Retro
(Added animation for floor sensors) |
(→360 Degree Collision: A more complete explanation) |
||
| (22 intermediate revisions by the same user not shown) | |||
| Line 2: | Line 2: | ||
'''Notes:''' | '''Notes:''' | ||
*''The research applies to all four of the [[Sega Mega Drive]] games and [[Sonic CD]]''. | *''The research applies to all four of the [[Sega Mega Drive]] games and [[Sonic CD]]''. | ||
| − | *''This guide relies on information about tiles and | + | *''This guide relies on information about tiles and Sensors discussed in [[SPG:Solid_Tiles|Solid Tiles]]''. |
| − | *''This page is essentially part 1 of 2. This details | + | *''This page is essentially part 1 of 2. This details the Player's terrain collision and 360 collision with walls and ceilings. For part 2, detailing Player physics and speeds when on slopes, go to [[SPG:Slope_Physics|Slope Physics]]''. |
==Introduction== | ==Introduction== | ||
| Line 10: | Line 10: | ||
==The Player's Sensors== | ==The Player's Sensors== | ||
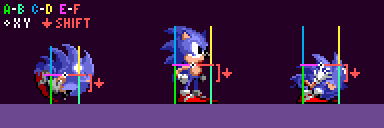
| − | Like any object which wants to collide with tiles, | + | Like any object which wants to collide with tiles, Sensors are needed at the edges to detect the Solid Tiles. In the case of the Player object, many of these Sensors surround them in all 4 directions. |
| − | [[Image:SPGSensors.png|link=Special:FilePath/SPGSensors.png]] | + | {| class="prettytable" style="width: auto;" |
| − | [[Image:SPGSensorAnchors.png]] ' | + | |style="text-align: center;"|[[Image:SPGSensors.png|link=Special:FilePath/SPGSensors.png]] |
| + | |style="text-align: center;"|[[Image:SPGSensorAnchors.png]] | ||
| + | |- | ||
| + | !style="text-align: center;"|Coloured lines represent the Player's Sensors. | ||
| + | !style="text-align: center;"|White points represent the anchor positions of the Player's Sensors. | ||
| + | |} | ||
| + | {| class="prettytable" style="width: auto;" | ||
| + | !Sensor | ||
| + | !Purpose | ||
| + | |- | ||
| + | | | ||
| + | <span style="color:#00f000; font-weight: bold;">A</span> and <span style="color:#38ffa2; font-weight: bold;">B</span> | ||
| + | | | ||
| + | Ground collision | ||
| + | |- | ||
| + | | | ||
| + | <span style="color:#00aeef; font-weight: bold;">C</span> and <span style="color:#fff238; font-weight: bold;">D</span> | ||
| + | | | ||
| + | Ceiling collision | ||
| + | |- | ||
| + | | | ||
| + | <span style="color:#ff38ff; font-weight: bold;">E</span> and <span style="color:#ff5454; font-weight: bold;">F</span> | ||
| + | | | ||
| + | Push collision | ||
| + | |- | ||
| + | |} | ||
| − | + | Since the Player's collision setup is symmetrical, it makes sense for the game to set up widths and heights using radius values. The Player has separate radius values for their <span style="color:#ff38ff; font-weight: bold;">E</span> and <span style="color:#ff5454; font-weight: bold;">F</span> Sensor pair (their '''Push Radius''') which always remains the same, and for their <span style="color:#00f000; font-weight: bold;">A</span>, <span style="color:#38ffa2; font-weight: bold;">B</span>, <span style="color:#00aeef; font-weight: bold;">C</span> and <span style="color:#fff238; font-weight: bold;">D</span> Sensors there is a Width Radius and Height Radius both of which will change depending on the Player's state. For these sizes see [[SPG:Characters|Characters]]. | |
| − | |||
| − | |||
| − | |||
| + | Note on sprite alignment: | ||
| + | * The Player's sprite is 1 pixel offset to the left when they face left, which can result in them appearing to be 1px inside a tile when pushing leftwards. Amusingly, this offset will appear corrected when pushing most objects thanks to their hitboxes sticking out ''1'' pixel further on their right and bottom (due to their origins being off-centre by ''1'' in X and Y). So while tiles are collided with accuracy, it will appear the opposite in-game. More about object collision in [[SPG:Solid_Objects|Solid Objects]]. | ||
| + | |||
| + | |||
| + | ==While Grounded== | ||
| + | When on the ground, the Player will persistently check for the ground by their feet in order to update their '''''Ground Angle''''' and '''''Ground Speed'''''. With that, they can update their position. They will also check to push against walls that meet the ground if they are moving. | ||
| + | |||
| + | ===Grounded Sensor Activation=== | ||
| + | |||
| + | Before jumping into exactly how these Sensors make Sonic react to the terrain, it's best to know when they are actually being used. | ||
| + | |||
| + | Ground Sensors <span style="color:#00f000; font-weight: bold;">A</span> and <span style="color:#38ffa2; font-weight: bold;">B</span> are always active while grounded, and will actively search for new terrain at the Player's feet at any angle. | ||
| + | |||
| + | When grounded, Push Sensors <span style="color:#ff38ff; font-weight: bold;">E</span> and <span style="color:#ff5454; font-weight: bold;">F</span> only activate when the Player is walking in that direction. For example, while standing still the Player isn't checking with their Push Sensors at all, but while '''''Ground Speed''''' is positive, the Player's <span style="color:#ff38ff; font-weight: bold;">E</span> Sensor is inactive, and while '''''Ground Speed''''' is negative, the Player's <span style="color:#ff5454; font-weight: bold;">F</span> Sensor is inactive. | ||
| + | |||
| + | However this is not always the case, both Push Sensors simply aren't active when the Player's '''''Ground Angle''''' is outside of a ''0'' to ''90'' and ''270'' to ''360'' (or simply ''-90'' to ''90'') degree range, meaning when you running around a loop, the Push Sensors will vanish for the top half of the loop. In S3K however, Push Sensors will also appear when the Player's '''''Ground Angle''''' is a multiple of ''90° (64)'' in addition to the normal angle ranges. | ||
| + | |||
| + | While grounded, Ceiling Sensors <span style="color:#00aeef; font-weight: bold;">C</span> and <span style="color:#fff238; font-weight: bold;">D</span> are never active, and the Player won't check for collision with Solid Tiles above them while grounded. | ||
| + | |||
| + | ===360 Degree Collision=== | ||
| + | One of the main features of classic Sonic gameplay is the ability to traverse terrain of any angle. | ||
| + | With Ground Sensors that point downwards as shown above, the Player could run over basic hills and ramps and ledges, and all that works great. But it is not enough, as they cannot make their way from the flat ground, up a steeper and steeper slope, to walls and ceilings without more work. | ||
| − | + | Why not? Well to better understand, imagine what we will call a "simple platformer". A character can walk left and right, and up/down some simple slopes. No full loops, just a few shallow hills and very flat ramps. To stay aligned with the floor after moving horizontally, all the character would need to do is move up or down until they met the level of the ground. The angle of the floor would then be measured. The angle would be used to attenuate '''''Ground Speed''''', but nothing more is needed. The character can just move along horizontally and then be moved straight up and down to adhere to floor level. | |
| − | + | {| class="prettytable" style="width: auto;" | |
| − | + | |style="text-align:center; width: 256px;"|[[Image:SPGNoModeChange.gif]] | |
| + | | | ||
| + | In this example, the game has been modified to function more like this simple platformer, to demonstrate the issue explained above. When Sonic reaches the upper end of the curve, the game is still aligning him to the floor vertically, and his steep '''''Ground Angle''''' means each frame he is moving in the opposite direction that the Sensors are pointing, rather than perpendicular. There's also no accounting for Sonic's adjusted "width" when he's rotated so much. There is just no way the game can handle the transition to walls when everything is built for moving snapping the Player up and down on the Y-axis. | ||
| + | |} | ||
| + | |||
| + | What does the game actually do to solve this? It uses four different modes of collision. | ||
| + | |||
| + | ====The Four Modes==== | ||
| + | Each mode is essentially an entire separate copy of a simple platformer collision, each with a unique functionality. There are 2 modes that align the Player vertically on the Y Axis (Floor mode and Ceiling mode), and 2 modes that align the Player horizontally on the X Axis (Left Wall mode and Right Wall mode). | ||
| + | |||
| + | [[Image:SPGModes.gif]] | ||
| + | |||
| + | In the example of the "simple platformer", the character is essentially always in Floor mode, aligning the player vertically with the ground below them. However in Sonic games, when '''''Ground Angle''''' gets too steep, the Player switches mode, moving from Floor mode to Right Wall mode (to Ceiling mode, to Left Wall mode, and back around to Floor mode, etc). At any one time, in any one mode, the Player behaves like a simpler platformer on different axis. The magic happens by combining all four modes, and seamlessly switching between them. | ||
| + | |||
| + | =====Determining The Mode===== | ||
| + | The Player's current mode is derived entirely from the current '''''Ground Angle'''''. For example, when walking to the right up a quarter pipe, if '''''Ground Angle''''' is shallower than ''46° (223)'', the player will be in Floor mode. Floor mode behaves more or less like any other kind of platformer, with the ground below the Player, and the Player aligns to the ground vertically. | ||
| + | |||
| + | Then, when '''''Ground Angle''''' reaches a point steeper than ''45° (224)'', the Player will be in Right Wall mode. Here everything is basically the same, only rotated 90 degrees. The ground is to the right of the Player, and the Player aligns to the ground horizontally instead of vertically. | ||
| + | |||
| + | And of course, if '''''Ground Angle''''' then became shallower than ''46° (223)'', the Player would be back in Floor mode. | ||
| + | |||
| + | The other transitions work in exactly the same way. When the mode is being calculated, it simply checks which quadrant the Player's '''''Ground Angle''''' is currently in, which will place the Player's Ground Sensors in the correct mode (ranges are inclusive): | ||
| + | |||
| + | {| class="prettytable" style="width: auto;" | ||
| + | !Ground Sensor Mode | ||
| + | !Angle Range | ||
| + | |- | ||
| + | |Floor Mode | ||
| + | |''0° (255)'' to ''45° (224)'' | ||
| + | |||
| + | and mirrored: ''315° (32)'' to ''360° (0)'' | ||
| + | |- | ||
| + | |Right Wall Mode | ||
| + | |''46° (223)'' to ''134° (161)'' | ||
| + | |- | ||
| + | |Ceiling Mode | ||
| + | |''135° (160)'' to ''225° (96)'' | ||
| + | |- | ||
| + | |Left Wall Mode | ||
| + | |''226° (95)'' to ''314° (33)'' | ||
| + | |} | ||
| + | |||
| + | [[Image:SPGModeRanges.png]]<br> | ||
| + | Note: ''Unlike most other angle ranges used, extra effort was applied to ensure these are symmetrical, as not doing so would noticeably affect gameplay. The Floor and Ceiling mode ranges are slightly bigger than the wall ranges.'' | ||
| + | Now, the Push sensors will change mode at slightly different ranges. | ||
| − | ==Sensor | + | {| class="prettytable" style="width: auto;" |
| + | !Push Sensor Mode | ||
| + | !Angle Range | ||
| + | |- | ||
| + | |Floor Mode | ||
| + | |''0° (255)'' to ''44° (225)'' | ||
| − | + | and mirrored: ''316° (31)'' to ''360° (0)'' | |
| + | |- | ||
| + | |Right Wall Mode | ||
| + | |''45° (224)'' to ''135° (160)'' | ||
| + | |- | ||
| + | |Ceiling Mode | ||
| + | |''136° (159)'' to ''224° (97)'' | ||
| + | |- | ||
| + | |Left Wall Mode | ||
| + | |''225° (96)'' to ''315° (32)'' | ||
| + | |} | ||
| − | + | [[Image:SPGModePushRanges.png]]<br> | |
| + | Note: ''Again, these are symmetrical. But this time, the Floor mode range is slightly smaller than the wall ranges.'' | ||
| − | + | It's important to note (as explained above in [[SPG:Slope_Collision#Grounded_Sensor_Activation|sensor activation]]) that the Push sensors don't appear on walls or angles steeper than walls. However, in S3K the game activates the Push Sensors while on walls and ceilings that are multiples of 90 degrees. | |
| − | + | Overall, these small changes in the ranges results in the Push Sensors rotating a few frames sooner when walking up a slope than the Ground Sensors. | |
| − | + | =====Mode Collision Changes===== | |
| + | Where are the sensors when in modes other then Floor mode? Simply put, they change axis to point in the new direction of the ground. | ||
| − | + | For example, in Right Wall mode they're in exactly the same place, only rotated 90 degrees. Sensor <span style="color:#00f000; font-weight: bold;">A</span> is now at <code>'''''Y Position''''' + '''''Width Radius'''''</code> instead of <code>'''''X Position''''' - '''''Width Radius'''''</code>. Sensor <span style="color:#38ffa2; font-weight: bold;">B</span> is now at <code>'''''Y Position''''' - '''''Width Radius'''''</code>, instead of <code>'''''X Position''''' + '''''Width Radius'''''</code>. Instead of downward vertical sensor, they are now horizontal facing left, at his foot level (which is now "below" them, at <code>'''''X Position''''' + '''''Width Radius'''''</code>). They move and rotate in the same way for the other modes. | |
| − | + | Because the sensors move so far, it is possible for the Player to be "popped" out to a new position in the step in which he switches mode. However, this is hardly ever more than a few pixels and really isn't noticeable during normal play. | |
| − | + | The Push Sensors work in much the same way, simply rotating based on their current mode. | |
| − | + | With these four modes, the Player can go over all sorts of shapes. Inner curves, outer curves, you name them. Here are some approximate example images with their angle values to help give you some idea of what this results in: | |
| − | |||
| − | |||
| − | |||
| − | |||
| − | |||
| − | |||
| − | |||
| − | |||
| − | |||
| − | |||
| − | |||
| − | + | [[Image:SPGInnerCurve.PNG|link=Special:FilePath/SPGInnerCurve.PNG]] [[Image:SPGInnerCurveChart.PNG|link=Special:FilePath/SPGInnerCurveChart.PNG]] | |
| − | + | You can observe Sonic's mode changing after his '''''Ground Angle''''' exceeds ''45°''. Sonic's position shifts a bit when the mode change occurs, due to the totally new collision angle and position. You can also notice his Push Sensor changing mode first due to it's slightly different angle range. | |
| − | + | [[Image:SPGOuterCurve.PNG|link=Special:FilePath/SPGOuterCurve.PNG]] [[Image:SPGOuterCurveChart.PNG|link=Special:FilePath/SPGOuterCurveChart.PNG]] | |
| − | + | You may notice the Sonic's mode switches erratically on the convex curve, this is because his '''''Ground Angle''''' will suddenly decrease when switching to wall mode, causing it to switch back and forth until he is far enough down the curve to stabilise. This isn't usually noticeable, and happens less the faster you are moving. | |
| − | When | + | =====When to Change Mode===== |
| + | If you've checked the guide regarding the [[SPG:Main_Game_Loop|Main Game Loop]] you may notice the mode switching isn't mentioned at all, that's because the game doesn't actually ever "switch" or "update" the Player's mode. The Player's current "mode" is decided right before a collision occurs. It will measure their '''''Ground Angle''''' as described above, and decide which mode of collision to use right there and then. There is no "mode" state stored in memory. So effectively, the Player's mode updates whenever their angle ('''''Ground Angle''''') does. | ||
| + | Since a new '''''Ground Angle''''' is only calculated as a '''result''' of [[SPG:Slope_Collision#Ground_Sensors_.28Grounded.29|ground collision]], the Player's mode for the current frame's ground collision has to use the ''previous'' frames angle, even though the Player has moved to a new part of the slope since then. This results in the Player's mode effectively changing 1 frame ''after'' the Player reaches one of the diagonal angle thresholds, as seen above. | ||
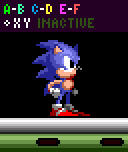
| − | == | + | ===Ground Sensors (Grounded)=== |
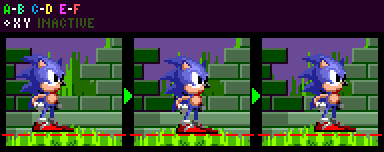
[[Image:SPGStandingAnimated.gif|link=Special:FilePath/SPGStandingAnimated.gif]] | [[Image:SPGStandingAnimated.gif|link=Special:FilePath/SPGStandingAnimated.gif]] | ||
| − | <span style="color:#00f000; font-weight: bold;">A</span> and <span style="color:#38ffa2; font-weight: bold;">B</span> sit at | + | Ground sensors <span style="color:#00f000; font-weight: bold;">A</span> and <span style="color:#38ffa2; font-weight: bold;">B</span> sit at either side of the Player's feet. |
[[Image:SPGSensorsOnTiles.gif]] | [[Image:SPGSensorsOnTiles.gif]] | ||
| − | === | + | ====Movement==== |
| − | + | Sensor <span style="color:#00f000; font-weight: bold;">A</span> is on the Player's left side, at <code>'''''X Position''''' - '''''Width Radius'''''</code>, <code>'''''Y Position''''' + '''''Height Radius'''''</code>. While <span style="color:#38ffa2; font-weight: bold;">B</span> is on their right, at <code>'''''X Position''''' + '''''Width Radius'''''</code>, <code>'''''Y Position''''' + '''''Height Radius'''''</code>. That is of course when in [[SPG:Slope Collision#The Four Modes|floor mode]]. In other modes, [[SPG:Slope Collision#The Four Modes|the Sensor arrangement rotates]]. | |
These radius values change depending on the character and action (see [[SPG:Characters|Characters]]). | These radius values change depending on the character and action (see [[SPG:Characters|Characters]]). | ||
| − | === | + | ====Process==== |
| + | The Ground Sensors are 2 Sensors and they effectively compete to find the nearest floor to the Player. Both Sensors behave the same and search for a Solid Tile and the smaller distance is the Sensor that wins. For example, ''-10'' is a "smaller" distance than ''5''. If both distances are the same, Sensor <span style="color:#00f000; font-weight: bold;">A</span> will win. The Sensor that wins is is then the distance and tile angle used (and it's found tile is the one referenced). | ||
| − | + | Once the winning distance is found, it can be tested and used to reposition the player. | |
| − | + | As we know, Sensors return a distance to the nearest surface, up to an extreme maximum of ''32'' pixels. If the Player's Ground Sensors are within ''32''ish pixels of the floor, the game may know the floor is there but we might not just want them to snap down right away. The game will test the winning distance found and react appropriately. | |
| + | |||
| + | In Sonic 1, if the winning distance value is less than ''-14'' or greater than ''14'', the Player won't collide. | ||
| + | In Sonic 2 onward however the positive limit depends on the Player's current speed. In this case, (for when the Player is on the floor) if the distance is greater than <code>minimum(absolute('''''X Speed''''') + ''4'', ''14'')</code> then they won't collide. So the faster the Player moves, the greater the distance the Player can be from the floor while still being pulled back down to it. | ||
| + | The ''-14'' limit remains the same. | ||
| + | |||
| + | If the Player was in a [[SPG:Slope Collision#The Four Modes|sideways mode]], such as on a wall, it would use '''''Y Speed''''' instead. | ||
| − | + | If the player does collide with the floor, the distance will be added to (or subtracted from, when in [[SPG:Slope Collision#The Four Modes|ceiling mode or left wall mode]]) the Players '''''X or Y Position''''', and the '''''Ground Angle''''' will be set to the tile angle found by the winning Sensor. | |
| − | ==== | + | ====Angles Of Flagged Tiles==== |
| + | Typically, the tile angle found by a Sensor will be the specific angle value that tile has set. | ||
| − | + | However, certain tiles are [[SPG:Solid_Tiles#Flagged_Tiles|flagged]], which changes how the Player reacts to the angle. If the tile is flagged, (usually a normal full block, or certain other special tiles) rather than using the tile's angle directly, the (grounded) Ground Sensors will take the current '''''Ground Angle''''' and simply snap it to the nearest right angle. For example, if Ground Angle was ''95° (188)'', it would become ''90° (192)''. Essentially, the calculation used for degrees would be: | |
| − | + | <syntaxhighlight>snapped_angle = (round(Ground Angle / 90) mod 4) * 90;</syntaxhighlight> | |
| − | + | In Sonic 2 onwards, this angle snapping also occurs with normal tiles if the absolute difference between your current '''''Ground Angle''''' and the tile's angle is greater than ''45° (32)''. | |
| − | + | ====Ledges==== | |
| − | + | The Player has to be able to run off of ledges. If both Sensor <span style="color:#00f000; font-weight: bold;">A</span> and <span style="color:#38ffa2; font-weight: bold;">B</span> detect no solid tiles, the Player will become [[SPG:Air_State|airborne]]. | |
| − | + | =====Balancing On Edges===== | |
| + | One nice touch is that the Player goes into a balancing animation when near to the edge of a ledge. This only happens when they are stopped (their '''''Ground Speed''''' is ''0''). | ||
| − | + | How does the game know? It is simple - any time only one of the Ground Sensors finds the floor, the Player must be near a ledge. If <span style="color:#00f000; font-weight: bold;">A</span> is active and <span style="color:#38ffa2; font-weight: bold;">B</span> is not the ledge is to their right and vice versa. | |
| − | + | But if the Player began balancing the instant one of the Sensors found nothing, they would do it too "early", and it would look silly. So it only happens when only one Sensor is active, and '''''X Position''''' is greater than the edge of the solid tile. This is checked with an extra downward Sensor at the Player's '''''X Position''''' and <code>'''''Y Position''''' + '''''Height Radius'''''</code> when '''''Ground Speed''''' is ''0''. All this extra Sensor does is check if there is floor at their '''''X Position''''', is it not related to collision or physics. | |
| − | + | [[Image:SPGBalancingAnimated.gif|link=Special:FilePath/SPGBalancingAnimated.gif]] | |
| − | + | Assuming the right edge of the ledge to be an X position of ''2655'', the Player will only start to balance at an '''''X Position''''' of ''2656'' (edge pixel + ''1''). they'll fall off at an '''''X Position''''' of ''2665'' (edge pixel + ''10'') when both Sensors find nothing. | |
| − | + | In ''[[Sonic 2]]'' and ''[[Sonic CD]]'', if the ledge is the opposite direction than they are facing, they has a second balancing animation. | |
| − | + | In ''[[Sonic 2]]'', ''[[Sonic 3]]'', and ''[[Sonic & Knuckles]]'', the Player has yet a ''third'' balancing animation, for when they are even further out on the ledge. Assuming the same values as above, this would start when they are at an '''''X Position''''' of ''2662''. | |
| + | |||
| + | '''Note:''' While balancing, certain abilities are not allowed (ducking, looking up, spindash, etc). In Sonic 3 & Knuckles, the Player is still allowed to duck and spindash (not to look up, though) when balancing on the ground but not when balancing on an object. | ||
| + | |||
| + | ===Push Sensors (Grounded)=== | ||
| + | [[Image:SPGPushingAnimated.gif|link=Special:FilePath/SPGPushingAnimated.gif]] | ||
| − | + | <span style="color:#ff38ff; font-weight: bold;">E</span> sits at the Player's left at <code>'''''X Position''''' - '''''Push Radius'''''</code>, while <span style="color:#ff5454; font-weight: bold;">F</span> sits at their right at <code>'''''X Position''''' + '''''Push Radius'''''</code>. That is, when in floor mode. In other modes, [[SPG:Slope Collision#The Four Modes|the Sensor arrangement rotates]]. | |
| − | + | ====Movement==== | |
| + | '''''Push Radius''''' is always ''10'', placing <span style="color:#ff38ff; font-weight: bold;">E</span> to the Player's left side, at <code>'''''X Position''''' - ''10''</code>. While <span style="color:#ff5454; font-weight: bold;">F</span> is to their right, at <code>'''''X Position''''' + ''10''</code>, giving the Player a total width of ''21'' pixels when pushing. | ||
| − | + | Sensors <span style="color:#ff38ff; font-weight: bold;">E</span> and <span style="color:#ff5454; font-weight: bold;">F</span> spend most of their time at the Player's '''''Y Position''''' however while the Player's '''''Ground Angle''''' is ''0'' (on totally flat ground) both Push Sensors will move to their <code>'''''Y Position''''' + ''8''</code> so that they can push against low steps and not just snap up ontop of them. | |
| − | + | As noted above, this arrangement is rotated when in any mode other than [[SPG:Slope Collision#The Four Modes|floor mode]]. | |
| − | + | You may remember that Sensors <span style="color:#00f000; font-weight: bold;">A</span> and <span style="color:#38ffa2; font-weight: bold;">B</span> are only ''19'' pixels apart but the Player is ''21'' pixels wide when pushing into walls. This means that the Player is skinnier by ''2'' pixels when running off of ledges than when bumping into walls. | |
| − | + | So, these Sensors remain rather steady, especially considering that '''''Push Radius''''' never changes. That's not to say these Sensors don't move relative to this starting position though. They do, and a lot. | |
| + | As noted in [[SPG:Main Game Loop|Main Game Loop]] wall collision (while grounded) actually takes place before the Player's position physically moves anywhere that frame, so they wont actually be in/touching a wall when they need to collide with it. The game accounts for this by actually adding their '''''X Speed''''' and '''''Y Speed''''' to the Sensor's default position each frame, this is where the Sensor ''would'' be if the Player had moved yet. | ||
| − | + | ====Process==== | |
| + | Assuming the wall's left side to be at an X position of ''704'', the Player cannot get closer than an '''''X Position''''' of ''693''. Assuming the wall's right side to be at an X position of ''831'', the Player cannot get closer than an '''''X Position''''' of ''842''. Thus the distance between both Sensors inclusive should be ''21'' pixels, stretching from the Player's <code>'''''X Position''''' - ''10''</code> to <code>'''''X Position''''' + ''10''</code>. | ||
| − | + | When the Player collides with a wall, this will set their '''''Ground Speed''''' to ''0'' if they are moving in the direction of the wall, not while moving away from it. | |
| − | The Player | + | The distance value found by the Sensor in it's given direction is used to stop the Player at a wall in the following ways. |
| − | + | The distances found by the Push Sensors are used slightly differently while grounded. | |
| − | + | Naturally, the game will ignore a positive distance because they will not collide. If the Sensor's distance is negative, this means that when the Player's position actually does change, they will be inside the wall. | |
| − | + | In this case, because the Sensor is actually out in front of the Player (where they ''will'' be after they move that frame), instead of using the distance to reposition the Player by directly changing their position the game smartly uses the fact that the Player has still yet to move within the current frame. All it has to do is add the distance to the Player's '''''X Speed''''' (if moving right, or ''subtract'' the distance from the Player's '''''X Speed''''' if moving left. This would be done to '''''Y Speed''''' if in [[SPG:Slope Collision#The Four Modes|wall mode]]). This results in the Player moving when their position changes, right up to the wall, but no further. In the next frame, because '''''Ground Speed''''' has been set to ''0'' the Player will have stopped just like in any other situation. | |
| − | + | Thanks to this process and the Sensor's movement, this effectively results in no difference between this and if the Sensor was simply checked '''after''' movement had occurred like all other Sensors. | |
| − | + | ===Jump Check=== | |
| + | The Player cannot jump when there is a low ceiling above them. The frame that the Player tries jumping, <span style="color:#00aeef; font-weight: bold;">C</span> and <span style="color:#fff238; font-weight: bold;">D</span> Ceiling Sensors are activated for one frame to check if their is ceiling too close. If there is a collision detected with upwards <span style="color:#00aeef; font-weight: bold;">C</span> and <span style="color:#fff238; font-weight: bold;">D</span> Sensors at the Player's <code>'''''X Position''''' - '''''Width Radius'''''</code> and <code>'''''X Position''''' + '''''Width Radius'''''</code>, and if the closest distance found is less than ''6'' (meaning for a character the same size as Sonic the ceiling would be ''25'' pixels above the Player's '''''Y Position''''' or closer while standing), the Player won't bother jumping at all. | ||
| − | + | ==While Airborne== | |
| + | When in the air, the Player will use their Sensors in all directions to detect the surrounding terrain to bump walls, or to land on floors and ceilings. | ||
| − | + | Note: ''Unlike on the ground, the Player's angle does not affect or rotate collision while in the air.'' | |
| − | + | ===Airborne Sensor Activation=== | |
| + | While in the air, all Sensors play a part to find ground to reattach the Player to, or bump against. But rather than have all active at once and risk lag, only 4-5 will be active at any given time. | ||
| − | + | As you move through the air, the game will check the angle of your motion ('''''X Speed''''' and '''''Y Speed''''') through the air. It will then pick a quadrant by checking the angle found. | |
| − | ''' | + | {| class="prettytable" style="width: auto;" |
| + | !Range | ||
| + | !Values (inclusive) | ||
| + | |- | ||
| + | !Mostly Right | ||
| + | |''0° (255)'' to ''45° (224)'' | ||
| + | And mirrored: ''316° (31)'' to ''360° (0)'' | ||
| + | |- | ||
| + | !Mostly Up | ||
| + | |''46° (223)'' to ''135° (160)'' | ||
| + | |- | ||
| + | !Mostly Left | ||
| + | |''136° (159)'' to ''225° (96)'' | ||
| + | |- | ||
| + | !Mostly Down | ||
| + | |''226° (95)'' to ''315° (32)'' | ||
| + | |- | ||
| + | |} | ||
| + | Note: You can get a similar result by more simply comparing '''''X Speed''''' and '''''Y Speed''''' and choosing the dominant axis/direction being moved along. | ||
| + | Depending on the quadrant, different Sensors will be active. | ||
| − | == | + | When going ''mostly right'', the Player's <span style="color:#ff5454; font-weight: bold;">F</span> Push Sensor will be active, along with both <span style="color:#00f000; font-weight: bold;">A</span> and <span style="color:#38ffa2; font-weight: bold;">B</span> Ground Sensors and the <span style="color:#00aeef; font-weight: bold;">C</span> and <span style="color:#fff238; font-weight: bold;">D</span> Ceiling Sensors. |
| − | + | When going ''mostly left'', it is the exact same as going right, but the <span style="color:#ff38ff; font-weight: bold;">E</span> Push Sensor instead. | |
| − | the | + | When going ''mostly up'', both the <span style="color:#00aeef; font-weight: bold;">C</span> and <span style="color:#fff238; font-weight: bold;">D</span> Ceiling Sensors and the <span style="color:#ff38ff; font-weight: bold;">E</span> and <span style="color:#ff5454; font-weight: bold;">F</span> Push Sensors are active. |
| − | + | When going ''mostly down'', it is the same as going up, but the <span style="color:#00f000; font-weight: bold;">A</span> and <span style="color:#38ffa2; font-weight: bold;">B</span> Ground Sensors are active instead of the Ceiling Sensors. | |
| − | === | + | ===Ground Sensors (Airborne)=== |
| + | While airborne, the Ground Sensors work a lot like they do when grounded, competing to find a "winning" distance. Though the process after this is a little different. | ||
| − | + | ====Movement==== | |
| − | + | Sensor <span style="color:#00f000; font-weight: bold;">A</span> is on the Player's left side, at <code>'''''X Position''''' - '''''Width Radius'''''</code>, <code>'''''Y Position''''' + '''''Height Radius'''''</code>. While <span style="color:#38ffa2; font-weight: bold;">B</span> is on their right, at <code>'''''X Position''''' + '''''Width Radius'''''</code>, <code>'''''Y Position''''' + '''''Height Radius'''''</code>. | |
| − | + | ====Process==== | |
| + | While airborne, if the winning distance value is greater than or equal ''0'' (meaning the Sensor isn't overlapping the terrain yet) the Player won't collide and the game will exit the collision code. | ||
| + | If still colliding after that check, the game will then check the following: | ||
| − | + | When moving '''mostly down''', it will check if both Sensor's distances are larger than or equal to <code>-('''''Y Speed''''' + ''8'')</code>. If either of them are, the player will collide, if neither of them are, the Player will not collide. | |
| − | + | However when moving '''mostly left''' or '''mostly right''', the Player will collide if the Player's '''''Y Speed''''' is greater than or equal to ''0''. | |
| − | + | Note: The winning angle found by all sensors take [[SPG:Slope_Collision#Angles Of Flagged Tiles|flagged tiles into account]]. | |
| − | === | + | ====Landing On A Floor==== |
| + | Finally, upon successfully colliding, the Player will land. | ||
| − | ''' | + | The winning distance will be added to the Player's '''''Y Position'''''. |
| − | + | Then the the Player's grounded flag is set, [[SPG:Slope_Physics#Landing_On_The_Ground|'''''Ground Speed''''' is set according to the winning angle and the Player's speed]], and '''''Ground Angle''''' is set to that winning angle. | |
| − | + | Ground collision in the next frame will be done via the [[SPG:Slope_Collision#Ground_Sensors_.28Grounded.29|grounded Ground Sensors]]. Based on the new '''''Ground Angle''''', in the next frame the Player is likely to be in [[SPG:Slope_Collision#The_Four_Modes|floor mode]] but could be in a [[SPG:Slope_Collision#The_Four_Modes|wall mode]] if the angle is steeper. | |
| − | + | ====Jumping "Through" Floors==== | |
| + | The above airborne behaviours are most noticeable with jump through (top solid) tiles when jumping from underneath. The solid tiles that make up these ledges are flagged as being a certain type that should only be detected by the Player's <span style="color:#00f000; font-weight: bold;">A</span> and <span style="color:#38ffa2; font-weight: bold;">B</span> Ground Sensors, so solid from the top only. | ||
| − | + | These are often in the hilly, green zones such as [[Green Hill Zone (Sonic the Hedgehog 16-bit)|Green Hill Zone]], [[Emerald Hill Zone]], [[Palmtree Panic Zone]], and so on. They are ignored entirely by <span style="color:#00aeef; font-weight: bold;">C</span> and <span style="color:#fff238; font-weight: bold;">D</span> as well as the Push Sensors <span style="color:#ff38ff; font-weight: bold;">E</span> and <span style="color:#ff5454; font-weight: bold;">F</span>. Finally, sensor <span style="color:#00f000; font-weight: bold;">A</span> and <span style="color:#38ffa2; font-weight: bold;">B</span> (mostly) are only active in the air when the player is '''not''' moving mostly upwards. So with a slightly shorter jump, you will see the Player 'pop' upwards onto a jump through surface once they begin to fall. | |
| − | |||
| − | + | As discussed above there are conditions to be met aside from just the Sensors being active and finding the floor related to both the distances found and the current '''''Y Speed''''' of the Player. So you may also see the Player pop upwards onto a Jump through ledge if you start moving to the side at the peak of a straight jump thanks to those more relaxed rules for landing when moving mostly left or mostly right. | |
| − | + | ===Ceiling Sensors=== | |
| + | [[Image:SPGHitCeiling.gif|link=Special:FilePath/SPGHitCeiling.gif]] | ||
| − | + | ====Movement==== | |
| + | The Player's <span style="color:#00aeef; font-weight: bold;">C</span> and <span style="color:#fff238; font-weight: bold;">D</span> Ceiling Sensors are always an exact mirror image of the Player's Ground Sensors, they have the same X positions but are flipped upside down and face upwards. | ||
| − | The distance | + | ====Process==== |
| + | They perform in the exact same way as the Ground Sensors, competing against each other, simply up instead of down. When these Sensors find a ceiling, the Sensor which finds the smallest distance will win. The Sensor that wins is the distance and angle used (and it's found tile is the one referenced). | ||
| − | + | The distances are processed here in the same way as the Ground Sensors do while airborne, mainly being that a winning distance of greater than ''0'' is not reacted to. If the winning distance is less than ''0'', the Player will collide. | |
| − | The | + | Note: The winning angle found by all sensors take [[SPG:Slope_Collision#Angles Of Flagged Tiles|flagged tiles into account]]. |
| − | + | ====Landing On A Ceiling==== | |
| + | Upon successfully colliding with a ceiling, the winning distance will be subtracted from the Player's Y Position. | ||
| − | + | The game will then [[SPG:Slope_Physics#Landing_On_The_Ground|test if the Player should land on the ceiling]] or just bump their head (for these checks see [[SPG:Slope_Physics#Landing_On_The_Ground|Slope Physics]]). | |
| − | + | [[Image:SPGCeilingLand.gif]] | |
| − | + | If they landed, they will become grounded and their '''''Ground Speed''''' will be calculated and '''''Ground Angle''''' will be set to that found by the Ceiling Sensors. | |
| − | + | Because they are now grounded, on the next frame the Player will continue to collide with the ceiling with their [[SPG:Slope_Collision#Ground_Sensors_.28Grounded.29|Ground Sensors]]. The Player is likely to be in [[SPG:Slope_Collision#The_Four_Modes|wall mode]] because their '''''Ground Angle''''' has been set to that of the ceiling, but the Player [[SPG:Slope_Physics#When_Going_Upward|won't become grounded if the ceiling angle is too "flat"]]. However, obviously if their angle was somehow "flat" enough they'd be in [[SPG:Slope_Collision#The_Four_Modes|ceiling mode]]. | |
| + | Otherwise, if they just bumped their head, '''''Y Speed''''' is set to ''0''. | ||
| − | == | + | ===Push Sensors (Airborne)=== |
| − | + | While airborne, the Push Sensors work a lot like they do when grounded, though the process is slightly different. | |
| + | ====Movement==== | ||
| + | <span style="color:#ff38ff; font-weight: bold;">E</span> is to the Player's left side, at <code>'''''X Position''''' - ''10''</code>. While <span style="color:#ff5454; font-weight: bold;">F</span> is to their right, at <code>'''''X Position''''' + ''10''</code>. They are both at '''''Y Position'''''. | ||
| − | == | + | ====Process==== |
| + | Like normal, if the distance is negative and the Sensor is inside the wall, they will collide. The game will ignore a positive distance. | ||
| − | + | Airborne Push collision happens ''after'' the Player moves like all other Sensors, so it will just add the distance to the Player's '''''X Position''''' and set '''''X Speed''''' to ''0''. | |
| − | [[ | + | ==Summary== |
| + | Here's a visualisation of how Sensors interact with [[SPG:Solid_Tiles|solid tiles]] during some typical gameplay. Here, you can notice how the Ground Sensors align the Player to the "highest" ground tile they find. The <span style="color:#ff38ff; font-weight: bold;">E</span> and <span style="color:#ff5454; font-weight: bold;">F</span> Sensors lower when on flat ground. You can also notice the Sensors snap to the 4 cardinal directions based on the Ground Angle, resulting in the four [[SPG:Slope_Collision#360_Degree_Collision|collision modes]]. | ||
| + | [[Image:SPGCollisionDemo.gif|link=Special:FilePath/SPGCollisionDemo.gif]] | ||
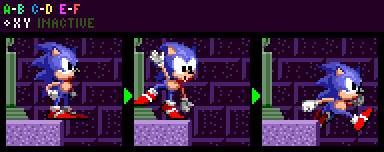
===Bugs Using This Method=== | ===Bugs Using This Method=== | ||
| + | Unfortunately, there are a couple of quirks in the original games because of the 2 sensor Ground collision method. | ||
| − | + | If the Player stands on a slanted ledge, one Sensor will find no tile and return a height of foot level. This causes the Player to be set to the wrong position. | |
| − | |||
| − | If the Player stands on a slanted ledge, one | ||
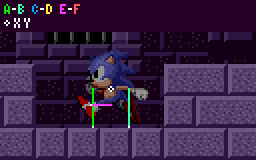
[[Image:SPGSlopeBug1Animated.gif|link=Special:FilePath/SPGSlopeBug1Animated.gif]] | [[Image:SPGSlopeBug1Animated.gif|link=Special:FilePath/SPGSlopeBug1Animated.gif]] | ||
| − | The Player raises up with | + | The Player raises up with Sensor <span style="color:#38ffa2; font-weight: bold;">B</span> as they move right. When <span style="color:#38ffa2; font-weight: bold;">B</span> drops off the ledge, the Player defaults to the level of Sensor <span style="color:#00f000; font-weight: bold;">A</span>. Then they raise up with Sensor <span style="color:#00f000; font-weight: bold;">A</span> as they move further right. So they will move up, drop down, and move up again as they run off the ledge. |
| − | There are only a few areas where this is noticeable, but it applies to all Mega Drive titles | + | There are only a few areas where this is noticeable, but it applies to all Mega Drive titles. |
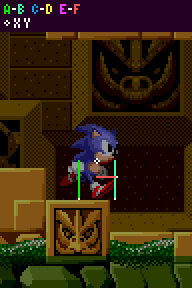
The second form of it occurs when two opposing ramp tiles abut each other, as in some of the low hills in [[Green Hill Zone (Sonic the Hedgehog 16-bit)|Green Hill Zone]] and [[Marble Zone]]. | The second form of it occurs when two opposing ramp tiles abut each other, as in some of the low hills in [[Green Hill Zone (Sonic the Hedgehog 16-bit)|Green Hill Zone]] and [[Marble Zone]]. | ||
| Line 239: | Line 387: | ||
[[Image:SPGSlopeBug2Animated.gif|link=Special:FilePath/SPGSlopeBug2Animated.gif]] | [[Image:SPGSlopeBug2Animated.gif|link=Special:FilePath/SPGSlopeBug2Animated.gif]] | ||
| − | Sensor <span style="color:#38ffa2; font-weight: bold;">B</span> starts climbing down the ramp on the right, but the Player still defaults to the level of the previous ramp found by | + | Sensor <span style="color:#38ffa2; font-weight: bold;">B</span> starts climbing down the ramp on the right, but the Player still defaults to the level of the previous ramp found by Sensor <span style="color:#00f000; font-weight: bold;">A</span>. Because these ramps are usually shallow, this only causes them to dip down in the middle by about ''1'' pixel. |
| − | But that is not all. Because the highest | + | But that is not all. Because the highest Sensor is the one the Player gets the angle from, even though it looks like they should be considered to be at the angle of the ramp on the right (because they are closer to it), they will still have the angle of the ramp on the left. When you jump, they will jump at that angle, moving backward, not forward like you would expect. |
==Notes== | ==Notes== | ||
| − | *''This page is essentially part 1 of 2. This details | + | *''This page is essentially part 1 of 2. This details the Player's terrain collision and 360 collision with walls and ceilings. For part 2, detailing Player physics and speeds when on slopes, go to [[SPG:Slope_Physics|Slope Physics]]''. |
[[Category:Sonic Physics Guide]] | [[Category:Sonic Physics Guide]] | ||
Latest revision as of 04:22, 1 August 2023
| Sonic Physics Guide |
|---|
|
| Collision |
|
| Physics |
|
| Gameplay |
| Presentation |
| Special |
Notes:
- The research applies to all four of the Sega Mega Drive games and Sonic CD.
- This guide relies on information about tiles and Sensors discussed in Solid Tiles.
- This page is essentially part 1 of 2. This details the Player's terrain collision and 360 collision with walls and ceilings. For part 2, detailing Player physics and speeds when on slopes, go to Slope Physics.
Contents
Introduction
Now that you know how Solid Tiles and Sensors work, the Player object can use these to detect where nearby surfaces are, and react to collisions to essentially allow terrain around them to act "solid".
The Player's Sensors
Like any object which wants to collide with tiles, Sensors are needed at the edges to detect the Solid Tiles. In the case of the Player object, many of these Sensors surround them in all 4 directions.
|

|
| Coloured lines represent the Player's Sensors. | White points represent the anchor positions of the Player's Sensors. |
|---|
| Sensor | Purpose |
|---|---|
|
A and B |
Ground collision |
|
C and D |
Ceiling collision |
|
E and F |
Push collision |
Since the Player's collision setup is symmetrical, it makes sense for the game to set up widths and heights using radius values. The Player has separate radius values for their E and F Sensor pair (their Push Radius) which always remains the same, and for their A, B, C and D Sensors there is a Width Radius and Height Radius both of which will change depending on the Player's state. For these sizes see Characters.
Note on sprite alignment:
- The Player's sprite is 1 pixel offset to the left when they face left, which can result in them appearing to be 1px inside a tile when pushing leftwards. Amusingly, this offset will appear corrected when pushing most objects thanks to their hitboxes sticking out 1 pixel further on their right and bottom (due to their origins being off-centre by 1 in X and Y). So while tiles are collided with accuracy, it will appear the opposite in-game. More about object collision in Solid Objects.
While Grounded
When on the ground, the Player will persistently check for the ground by their feet in order to update their Ground Angle and Ground Speed. With that, they can update their position. They will also check to push against walls that meet the ground if they are moving.
Grounded Sensor Activation
Before jumping into exactly how these Sensors make Sonic react to the terrain, it's best to know when they are actually being used.
Ground Sensors A and B are always active while grounded, and will actively search for new terrain at the Player's feet at any angle.
When grounded, Push Sensors E and F only activate when the Player is walking in that direction. For example, while standing still the Player isn't checking with their Push Sensors at all, but while Ground Speed is positive, the Player's E Sensor is inactive, and while Ground Speed is negative, the Player's F Sensor is inactive.
However this is not always the case, both Push Sensors simply aren't active when the Player's Ground Angle is outside of a 0 to 90 and 270 to 360 (or simply -90 to 90) degree range, meaning when you running around a loop, the Push Sensors will vanish for the top half of the loop. In S3K however, Push Sensors will also appear when the Player's Ground Angle is a multiple of 90° (64) in addition to the normal angle ranges.
While grounded, Ceiling Sensors C and D are never active, and the Player won't check for collision with Solid Tiles above them while grounded.
360 Degree Collision
One of the main features of classic Sonic gameplay is the ability to traverse terrain of any angle. With Ground Sensors that point downwards as shown above, the Player could run over basic hills and ramps and ledges, and all that works great. But it is not enough, as they cannot make their way from the flat ground, up a steeper and steeper slope, to walls and ceilings without more work.
Why not? Well to better understand, imagine what we will call a "simple platformer". A character can walk left and right, and up/down some simple slopes. No full loops, just a few shallow hills and very flat ramps. To stay aligned with the floor after moving horizontally, all the character would need to do is move up or down until they met the level of the ground. The angle of the floor would then be measured. The angle would be used to attenuate Ground Speed, but nothing more is needed. The character can just move along horizontally and then be moved straight up and down to adhere to floor level.

|
In this example, the game has been modified to function more like this simple platformer, to demonstrate the issue explained above. When Sonic reaches the upper end of the curve, the game is still aligning him to the floor vertically, and his steep Ground Angle means each frame he is moving in the opposite direction that the Sensors are pointing, rather than perpendicular. There's also no accounting for Sonic's adjusted "width" when he's rotated so much. There is just no way the game can handle the transition to walls when everything is built for moving snapping the Player up and down on the Y-axis. |
What does the game actually do to solve this? It uses four different modes of collision.
The Four Modes
Each mode is essentially an entire separate copy of a simple platformer collision, each with a unique functionality. There are 2 modes that align the Player vertically on the Y Axis (Floor mode and Ceiling mode), and 2 modes that align the Player horizontally on the X Axis (Left Wall mode and Right Wall mode).

In the example of the "simple platformer", the character is essentially always in Floor mode, aligning the player vertically with the ground below them. However in Sonic games, when Ground Angle gets too steep, the Player switches mode, moving from Floor mode to Right Wall mode (to Ceiling mode, to Left Wall mode, and back around to Floor mode, etc). At any one time, in any one mode, the Player behaves like a simpler platformer on different axis. The magic happens by combining all four modes, and seamlessly switching between them.
Determining The Mode
The Player's current mode is derived entirely from the current Ground Angle. For example, when walking to the right up a quarter pipe, if Ground Angle is shallower than 46° (223), the player will be in Floor mode. Floor mode behaves more or less like any other kind of platformer, with the ground below the Player, and the Player aligns to the ground vertically.
Then, when Ground Angle reaches a point steeper than 45° (224), the Player will be in Right Wall mode. Here everything is basically the same, only rotated 90 degrees. The ground is to the right of the Player, and the Player aligns to the ground horizontally instead of vertically.
And of course, if Ground Angle then became shallower than 46° (223), the Player would be back in Floor mode.
The other transitions work in exactly the same way. When the mode is being calculated, it simply checks which quadrant the Player's Ground Angle is currently in, which will place the Player's Ground Sensors in the correct mode (ranges are inclusive):
| Ground Sensor Mode | Angle Range |
|---|---|
| Floor Mode | 0° (255) to 45° (224)
and mirrored: 315° (32) to 360° (0) |
| Right Wall Mode | 46° (223) to 134° (161) |
| Ceiling Mode | 135° (160) to 225° (96) |
| Left Wall Mode | 226° (95) to 314° (33) |

Note: Unlike most other angle ranges used, extra effort was applied to ensure these are symmetrical, as not doing so would noticeably affect gameplay. The Floor and Ceiling mode ranges are slightly bigger than the wall ranges.
Now, the Push sensors will change mode at slightly different ranges.
| Push Sensor Mode | Angle Range |
|---|---|
| Floor Mode | 0° (255) to 44° (225)
and mirrored: 316° (31) to 360° (0) |
| Right Wall Mode | 45° (224) to 135° (160) |
| Ceiling Mode | 136° (159) to 224° (97) |
| Left Wall Mode | 225° (96) to 315° (32) |

Note: Again, these are symmetrical. But this time, the Floor mode range is slightly smaller than the wall ranges.
It's important to note (as explained above in sensor activation) that the Push sensors don't appear on walls or angles steeper than walls. However, in S3K the game activates the Push Sensors while on walls and ceilings that are multiples of 90 degrees.
Overall, these small changes in the ranges results in the Push Sensors rotating a few frames sooner when walking up a slope than the Ground Sensors.
Mode Collision Changes
Where are the sensors when in modes other then Floor mode? Simply put, they change axis to point in the new direction of the ground.
For example, in Right Wall mode they're in exactly the same place, only rotated 90 degrees. Sensor A is now at Y Position + Width Radius instead of X Position - Width Radius. Sensor B is now at Y Position - Width Radius, instead of X Position + Width Radius. Instead of downward vertical sensor, they are now horizontal facing left, at his foot level (which is now "below" them, at X Position + Width Radius). They move and rotate in the same way for the other modes.
Because the sensors move so far, it is possible for the Player to be "popped" out to a new position in the step in which he switches mode. However, this is hardly ever more than a few pixels and really isn't noticeable during normal play.
The Push Sensors work in much the same way, simply rotating based on their current mode.
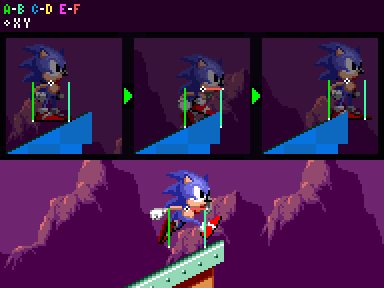
With these four modes, the Player can go over all sorts of shapes. Inner curves, outer curves, you name them. Here are some approximate example images with their angle values to help give you some idea of what this results in:

You can observe Sonic's mode changing after his Ground Angle exceeds 45°. Sonic's position shifts a bit when the mode change occurs, due to the totally new collision angle and position. You can also notice his Push Sensor changing mode first due to it's slightly different angle range.


You may notice the Sonic's mode switches erratically on the convex curve, this is because his Ground Angle will suddenly decrease when switching to wall mode, causing it to switch back and forth until he is far enough down the curve to stabilise. This isn't usually noticeable, and happens less the faster you are moving.
When to Change Mode
If you've checked the guide regarding the Main Game Loop you may notice the mode switching isn't mentioned at all, that's because the game doesn't actually ever "switch" or "update" the Player's mode. The Player's current "mode" is decided right before a collision occurs. It will measure their Ground Angle as described above, and decide which mode of collision to use right there and then. There is no "mode" state stored in memory. So effectively, the Player's mode updates whenever their angle (Ground Angle) does.
Since a new Ground Angle is only calculated as a result of ground collision, the Player's mode for the current frame's ground collision has to use the previous frames angle, even though the Player has moved to a new part of the slope since then. This results in the Player's mode effectively changing 1 frame after the Player reaches one of the diagonal angle thresholds, as seen above.
Ground Sensors (Grounded)
Ground sensors A and B sit at either side of the Player's feet.

Movement
Sensor A is on the Player's left side, at X Position - Width Radius, Y Position + Height Radius. While B is on their right, at X Position + Width Radius, Y Position + Height Radius. That is of course when in floor mode. In other modes, the Sensor arrangement rotates.
These radius values change depending on the character and action (see Characters).
Process
The Ground Sensors are 2 Sensors and they effectively compete to find the nearest floor to the Player. Both Sensors behave the same and search for a Solid Tile and the smaller distance is the Sensor that wins. For example, -10 is a "smaller" distance than 5. If both distances are the same, Sensor A will win. The Sensor that wins is is then the distance and tile angle used (and it's found tile is the one referenced).
Once the winning distance is found, it can be tested and used to reposition the player.
As we know, Sensors return a distance to the nearest surface, up to an extreme maximum of 32 pixels. If the Player's Ground Sensors are within 32ish pixels of the floor, the game may know the floor is there but we might not just want them to snap down right away. The game will test the winning distance found and react appropriately.
In Sonic 1, if the winning distance value is less than -14 or greater than 14, the Player won't collide.
In Sonic 2 onward however the positive limit depends on the Player's current speed. In this case, (for when the Player is on the floor) if the distance is greater than minimum(absolute(X Speed) + 4, 14) then they won't collide. So the faster the Player moves, the greater the distance the Player can be from the floor while still being pulled back down to it.
The -14 limit remains the same.
If the Player was in a sideways mode, such as on a wall, it would use Y Speed instead.
If the player does collide with the floor, the distance will be added to (or subtracted from, when in ceiling mode or left wall mode) the Players X or Y Position, and the Ground Angle will be set to the tile angle found by the winning Sensor.
Angles Of Flagged Tiles
Typically, the tile angle found by a Sensor will be the specific angle value that tile has set.
However, certain tiles are flagged, which changes how the Player reacts to the angle. If the tile is flagged, (usually a normal full block, or certain other special tiles) rather than using the tile's angle directly, the (grounded) Ground Sensors will take the current Ground Angle and simply snap it to the nearest right angle. For example, if Ground Angle was 95° (188), it would become 90° (192). Essentially, the calculation used for degrees would be:
snapped_angle = (round(Ground Angle / 90) mod 4) * 90;In Sonic 2 onwards, this angle snapping also occurs with normal tiles if the absolute difference between your current Ground Angle and the tile's angle is greater than 45° (32).
Ledges
The Player has to be able to run off of ledges. If both Sensor A and B detect no solid tiles, the Player will become airborne.
Balancing On Edges
One nice touch is that the Player goes into a balancing animation when near to the edge of a ledge. This only happens when they are stopped (their Ground Speed is 0).
How does the game know? It is simple - any time only one of the Ground Sensors finds the floor, the Player must be near a ledge. If A is active and B is not the ledge is to their right and vice versa.
But if the Player began balancing the instant one of the Sensors found nothing, they would do it too "early", and it would look silly. So it only happens when only one Sensor is active, and X Position is greater than the edge of the solid tile. This is checked with an extra downward Sensor at the Player's X Position and Y Position + Height Radius when Ground Speed is 0. All this extra Sensor does is check if there is floor at their X Position, is it not related to collision or physics.
Assuming the right edge of the ledge to be an X position of 2655, the Player will only start to balance at an X Position of 2656 (edge pixel + 1). they'll fall off at an X Position of 2665 (edge pixel + 10) when both Sensors find nothing.
In Sonic 2 and Sonic CD, if the ledge is the opposite direction than they are facing, they has a second balancing animation.
In Sonic 2, Sonic 3, and Sonic & Knuckles, the Player has yet a third balancing animation, for when they are even further out on the ledge. Assuming the same values as above, this would start when they are at an X Position of 2662.
Note: While balancing, certain abilities are not allowed (ducking, looking up, spindash, etc). In Sonic 3 & Knuckles, the Player is still allowed to duck and spindash (not to look up, though) when balancing on the ground but not when balancing on an object.
Push Sensors (Grounded)
E sits at the Player's left at X Position - Push Radius, while F sits at their right at X Position + Push Radius. That is, when in floor mode. In other modes, the Sensor arrangement rotates.
Movement
Push Radius is always 10, placing E to the Player's left side, at X Position - 10. While F is to their right, at X Position + 10, giving the Player a total width of 21 pixels when pushing.
Sensors E and F spend most of their time at the Player's Y Position however while the Player's Ground Angle is 0 (on totally flat ground) both Push Sensors will move to their Y Position + 8 so that they can push against low steps and not just snap up ontop of them.
As noted above, this arrangement is rotated when in any mode other than floor mode.
You may remember that Sensors A and B are only 19 pixels apart but the Player is 21 pixels wide when pushing into walls. This means that the Player is skinnier by 2 pixels when running off of ledges than when bumping into walls.
So, these Sensors remain rather steady, especially considering that Push Radius never changes. That's not to say these Sensors don't move relative to this starting position though. They do, and a lot. As noted in Main Game Loop wall collision (while grounded) actually takes place before the Player's position physically moves anywhere that frame, so they wont actually be in/touching a wall when they need to collide with it. The game accounts for this by actually adding their X Speed and Y Speed to the Sensor's default position each frame, this is where the Sensor would be if the Player had moved yet.
Process
Assuming the wall's left side to be at an X position of 704, the Player cannot get closer than an X Position of 693. Assuming the wall's right side to be at an X position of 831, the Player cannot get closer than an X Position of 842. Thus the distance between both Sensors inclusive should be 21 pixels, stretching from the Player's X Position - 10 to X Position + 10.
When the Player collides with a wall, this will set their Ground Speed to 0 if they are moving in the direction of the wall, not while moving away from it.
The distance value found by the Sensor in it's given direction is used to stop the Player at a wall in the following ways.
The distances found by the Push Sensors are used slightly differently while grounded.
Naturally, the game will ignore a positive distance because they will not collide. If the Sensor's distance is negative, this means that when the Player's position actually does change, they will be inside the wall.
In this case, because the Sensor is actually out in front of the Player (where they will be after they move that frame), instead of using the distance to reposition the Player by directly changing their position the game smartly uses the fact that the Player has still yet to move within the current frame. All it has to do is add the distance to the Player's X Speed (if moving right, or subtract the distance from the Player's X Speed if moving left. This would be done to Y Speed if in wall mode). This results in the Player moving when their position changes, right up to the wall, but no further. In the next frame, because Ground Speed has been set to 0 the Player will have stopped just like in any other situation.
Thanks to this process and the Sensor's movement, this effectively results in no difference between this and if the Sensor was simply checked after movement had occurred like all other Sensors.
Jump Check
The Player cannot jump when there is a low ceiling above them. The frame that the Player tries jumping, C and D Ceiling Sensors are activated for one frame to check if their is ceiling too close. If there is a collision detected with upwards C and D Sensors at the Player's X Position - Width Radius and X Position + Width Radius, and if the closest distance found is less than 6 (meaning for a character the same size as Sonic the ceiling would be 25 pixels above the Player's Y Position or closer while standing), the Player won't bother jumping at all.
While Airborne
When in the air, the Player will use their Sensors in all directions to detect the surrounding terrain to bump walls, or to land on floors and ceilings.
Note: Unlike on the ground, the Player's angle does not affect or rotate collision while in the air.
Airborne Sensor Activation
While in the air, all Sensors play a part to find ground to reattach the Player to, or bump against. But rather than have all active at once and risk lag, only 4-5 will be active at any given time.
As you move through the air, the game will check the angle of your motion (X Speed and Y Speed) through the air. It will then pick a quadrant by checking the angle found.
| Range | Values (inclusive) |
|---|---|
| Mostly Right | 0° (255) to 45° (224)
And mirrored: 316° (31) to 360° (0) |
| Mostly Up | 46° (223) to 135° (160) |
| Mostly Left | 136° (159) to 225° (96) |
| Mostly Down | 226° (95) to 315° (32) |
Note: You can get a similar result by more simply comparing X Speed and Y Speed and choosing the dominant axis/direction being moved along.
Depending on the quadrant, different Sensors will be active.
When going mostly right, the Player's F Push Sensor will be active, along with both A and B Ground Sensors and the C and D Ceiling Sensors.
When going mostly left, it is the exact same as going right, but the E Push Sensor instead.
When going mostly up, both the C and D Ceiling Sensors and the E and F Push Sensors are active.
When going mostly down, it is the same as going up, but the A and B Ground Sensors are active instead of the Ceiling Sensors.
Ground Sensors (Airborne)
While airborne, the Ground Sensors work a lot like they do when grounded, competing to find a "winning" distance. Though the process after this is a little different.
Movement
Sensor A is on the Player's left side, at X Position - Width Radius, Y Position + Height Radius. While B is on their right, at X Position + Width Radius, Y Position + Height Radius.
Process
While airborne, if the winning distance value is greater than or equal 0 (meaning the Sensor isn't overlapping the terrain yet) the Player won't collide and the game will exit the collision code.
If still colliding after that check, the game will then check the following:
When moving mostly down, it will check if both Sensor's distances are larger than or equal to -(Y Speed + 8). If either of them are, the player will collide, if neither of them are, the Player will not collide.
However when moving mostly left or mostly right, the Player will collide if the Player's Y Speed is greater than or equal to 0.
Note: The winning angle found by all sensors take flagged tiles into account.
Landing On A Floor
Finally, upon successfully colliding, the Player will land.
The winning distance will be added to the Player's Y Position.
Then the the Player's grounded flag is set, Ground Speed is set according to the winning angle and the Player's speed, and Ground Angle is set to that winning angle.
Ground collision in the next frame will be done via the grounded Ground Sensors. Based on the new Ground Angle, in the next frame the Player is likely to be in floor mode but could be in a wall mode if the angle is steeper.
Jumping "Through" Floors
The above airborne behaviours are most noticeable with jump through (top solid) tiles when jumping from underneath. The solid tiles that make up these ledges are flagged as being a certain type that should only be detected by the Player's A and B Ground Sensors, so solid from the top only.
These are often in the hilly, green zones such as Green Hill Zone, Emerald Hill Zone, Palmtree Panic Zone, and so on. They are ignored entirely by C and D as well as the Push Sensors E and F. Finally, sensor A and B (mostly) are only active in the air when the player is not moving mostly upwards. So with a slightly shorter jump, you will see the Player 'pop' upwards onto a jump through surface once they begin to fall.
As discussed above there are conditions to be met aside from just the Sensors being active and finding the floor related to both the distances found and the current Y Speed of the Player. So you may also see the Player pop upwards onto a Jump through ledge if you start moving to the side at the peak of a straight jump thanks to those more relaxed rules for landing when moving mostly left or mostly right.
Ceiling Sensors
Movement
The Player's C and D Ceiling Sensors are always an exact mirror image of the Player's Ground Sensors, they have the same X positions but are flipped upside down and face upwards.
Process
They perform in the exact same way as the Ground Sensors, competing against each other, simply up instead of down. When these Sensors find a ceiling, the Sensor which finds the smallest distance will win. The Sensor that wins is the distance and angle used (and it's found tile is the one referenced).
The distances are processed here in the same way as the Ground Sensors do while airborne, mainly being that a winning distance of greater than 0 is not reacted to. If the winning distance is less than 0, the Player will collide.
Note: The winning angle found by all sensors take flagged tiles into account.
Landing On A Ceiling
Upon successfully colliding with a ceiling, the winning distance will be subtracted from the Player's Y Position.
The game will then test if the Player should land on the ceiling or just bump their head (for these checks see Slope Physics).

If they landed, they will become grounded and their Ground Speed will be calculated and Ground Angle will be set to that found by the Ceiling Sensors.
Because they are now grounded, on the next frame the Player will continue to collide with the ceiling with their Ground Sensors. The Player is likely to be in wall mode because their Ground Angle has been set to that of the ceiling, but the Player won't become grounded if the ceiling angle is too "flat". However, obviously if their angle was somehow "flat" enough they'd be in ceiling mode.
Otherwise, if they just bumped their head, Y Speed is set to 0.
Push Sensors (Airborne)
While airborne, the Push Sensors work a lot like they do when grounded, though the process is slightly different.
Movement
E is to the Player's left side, at X Position - 10. While F is to their right, at X Position + 10. They are both at Y Position.
Process
Like normal, if the distance is negative and the Sensor is inside the wall, they will collide. The game will ignore a positive distance.
Airborne Push collision happens after the Player moves like all other Sensors, so it will just add the distance to the Player's X Position and set X Speed to 0.
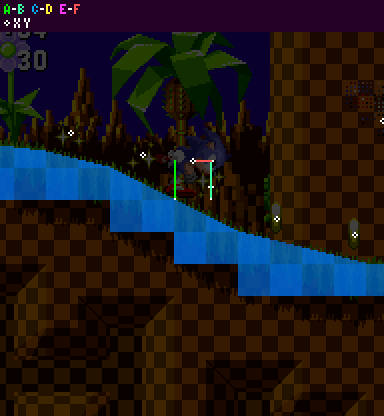
Summary
Here's a visualisation of how Sensors interact with solid tiles during some typical gameplay. Here, you can notice how the Ground Sensors align the Player to the "highest" ground tile they find. The E and F Sensors lower when on flat ground. You can also notice the Sensors snap to the 4 cardinal directions based on the Ground Angle, resulting in the four collision modes.
Bugs Using This Method
Unfortunately, there are a couple of quirks in the original games because of the 2 sensor Ground collision method.
If the Player stands on a slanted ledge, one Sensor will find no tile and return a height of foot level. This causes the Player to be set to the wrong position.
The Player raises up with Sensor B as they move right. When B drops off the ledge, the Player defaults to the level of Sensor A. Then they raise up with Sensor A as they move further right. So they will move up, drop down, and move up again as they run off the ledge.
There are only a few areas where this is noticeable, but it applies to all Mega Drive titles.
The second form of it occurs when two opposing ramp tiles abut each other, as in some of the low hills in Green Hill Zone and Marble Zone.
Sensor B starts climbing down the ramp on the right, but the Player still defaults to the level of the previous ramp found by Sensor A. Because these ramps are usually shallow, this only causes them to dip down in the middle by about 1 pixel.
But that is not all. Because the highest Sensor is the one the Player gets the angle from, even though it looks like they should be considered to be at the angle of the ramp on the right (because they are closer to it), they will still have the angle of the ramp on the left. When you jump, they will jump at that angle, moving backward, not forward like you would expect.
Notes
- This page is essentially part 1 of 2. This details the Player's terrain collision and 360 collision with walls and ceilings. For part 2, detailing Player physics and speeds when on slopes, go to Slope Physics.