Difference between revisions of "SPG:Game Objects"
From Sonic Retro
(Added points number motion info) |
m (Consistent trigger area language) |
||
| (67 intermediate revisions by 3 users not shown) | |||
| Line 1: | Line 1: | ||
| − | Notes: | + | {{SPGPages}} |
| + | '''Notes:''' | ||
| + | *''The research applies to all four of the [[Sega Mega Drive]] games and [[Sonic CD]].'' | ||
| + | *''Variables and constants for Sonic and other characters such as '''''X Position''''' and ''acc'' will be referenced frequently, they can be found in [[SPG:Basics|Basics]]''. | ||
| + | *''An object's actual '''''Width Radius''''' and '''''Height Radius''''' variables are separate to an object's '''hitbox''' width radius and height radius.'' | ||
| + | *''How slope data is used for solid objects is detailed in [[SPG:Solid_Objects#Sloped_Objects|Sloped Objects]].'' | ||
| + | *''More detailed information about how hitboxes and "trigger areas" work, as well as the Player's hitbox, can be found at [[SPG:Hitboxes|Hitboxes]].'' | ||
| − | == | + | ==Introduction== |
| + | |||
| + | Objects move in various ways, some simple and some rather complex. It may be enough to simply observe an object to know how it acts, but this isn't the case most of the time where greater depth is required. | ||
| + | |||
| + | ==Rings== | ||
| + | |||
| + | [[Image:SPGRingHitbox.png]] | ||
| + | |||
| + | Rings have a hitbox with a width radius of ''6'' and a height radius of ''6'', resulting in a ''13'' x ''13'' rectangle. (while their sprite is larger, at ''16'' x ''16''), so the Player can get quite close to a ring before a collision occurs and they collect it. | ||
| + | |||
| + | ===Scattered Rings=== | ||
| + | When a ring is bouncing around, it has a '''''Width Radius''''' of 8 and a '''''Height Radius''''' of 8 resulting in a ''17'' x ''17'' rectangle. | ||
| − | + | ====Ring Gravity==== | |
| − | + | Rings do not have same gravity force as the Player does. Instead, their gravity is a force of ''0.09375 (24 subpixels)''. So, this value is added to the rings' '''''Y Speed''''' every frame. | |
| − | + | ||
| − | + | ====Ring Bounce==== | |
| − | + | ||
| − | + | When the scattered rings hit the ground, their vertical speed is multiplied by ''-0.75''. This has the effect of reversing their vertical motion, as well as slowing it somewhat. This calculation is performed after the addition of the gravity. Their horizontal speed is unaffected by bouncing. | |
| − | + | ||
| − | + | Rings only check for the floor once every 4 frames, using a sensor at their '''''X Position''''' and <code>'''''Y Position''''' + '''''Height Radius'''''</code>. | |
| − | + | ||
| − | + | Clearly, when the rings bounce off the floor, they do so so imprecisely as on 75% of frames they are not even checking for it. So they sometimes pass well into the ground before deciding to bounce away. This is really not noticed during normal play, and was necessary to avoid too much slowdown. | |
| − | / | + | |
| − | + | But there are further limitations on bouncing rings, probably also in place to avoid processor load. They are totally unaffected by walls (they do not cast any wall sensors), and are only concerned with vertical surfaces. These checks also only happen when the ring is moving downwards ('''''Y Speed''''' > 0) thus they can also fly up through ceilings. This can actually become a bother to the Player if they are struck in a small corridor, as most of their rings are lost in the ceiling and don't fall back down to be regathered. To make things worse, to disperse the processor load, the floor check only happens every 4 frames, offset for each ring, meaning rings will tend to fall through floors entirely. | |
| − | + | ||
| − | + | ====Ring Lifespan==== | |
| − | + | ||
| − | + | All scattered rings are destroyed after 256 steps if they have not been regathered. Also, if they leave the horizontal view boundaries, they are destroyed. Again, on a more powerful system, you may choose not to include this feature. | |
| − | + | ||
| − | + | ===Ring Animations=== | |
| − | + | ||
| − | + | Fixed rings have 4 frames of animation, and spend 8 steps showing each frame before moving to the next. Scattered rings are more complicated, in that they have a much faster animation speed when they are created (1 frame per 2 steps), but this slows down over their lifespan. | |
| − | + | ||
| + | frameDuration = floor(ringLifespan * 2 / lifespanTimer) | ||
| + | |||
| + | ==Spikes== | ||
| + | [[Image:SPGSpikeSolidity.gif]] | ||
| + | |||
| + | Spikes in Sonic 1 vary in size. A single object can either contain ''1'' or ''4'' or more spikes. The solid width radius (or height radius if the spikes are horizontal) of the object is also extended to match. | ||
| + | |||
| + | Spikes in Sonic 2 onwards (both vertical and horizontal) spikes are more consistent, and have a '''''Width Radius''''' of ''16'' and a '''''Height Radius''''' of ''16'', resulting in a ''33'' x ''33'' rectangle, this is their solid size. | ||
| + | |||
| + | ===Moving Spikes=== | ||
| + | Moving spikes retract into and extend out of walls. The game achieves this by simply moving the object ''32'' pixels each time they move. | ||
| + | The spikes will move once every ''64'' frames. While moving they will retract or extend by ''8'' pixels per frame until the new position has been reached. | ||
| + | |||
| + | ===Spike Damage=== | ||
| + | Spikes will hurt the Player if the Player makes contact with the correct side (like landing on upwards facing spikes, or pushing/running into sideways facing spikes). Contact with any other side of the spikes will not hurt the Player. | ||
| − | == | + | ==Springs== |
| − | + | Red [[Springs|springs]] propel the Player at a speed of 16, and yellow Springs at a speed of 10. If the Spring faces up or down, the value is either negative or positive, respectively, and '''''Y Speed''''' is set to it. If the Spring faces left or right, the value is either negative or positive, respectively, and '''''Ground Speed''''' (or '''''X Speed''''' while airborne) is set to it. Vertical Springs don't affect '''''X Speed''''' and likewise horizontal Springs don't affect '''''Y Speed'''''. | |
| − | == | + | ===Vertical Springs=== |
| − | + | [[Image:SPGVerticalSpringHitbox.png]] | |
| − | + | Vertical Springs (both up and down) have a '''''Width Radius''''' of 16 and a '''''Height Radius''''' of ''8'', resulting in a ''33'' x ''17'' rectangle, this is their solid size. | |
| − | + | ====Activation==== | |
| + | Vertical Springs simply activate if the Player touches the correct side. | ||
| − | + | On the frame of collision, the game will add or subtract '''8''' from the Player's '''''Y Position''''' to pull the player ''8'' pixels inside of the Spring. | |
| − | |||
| − | [[Image: | + | ===Horizontal Springs=== |
| + | [[Image:SPGHorizontalSpringHitbox.png]] | ||
| − | + | Horizontal Springs (both left and right) have a '''''Width Radius''''' of ''8'' and a '''''Height Radius''''' of ''14'', resulting in a ''17'' x ''31'' rectangle, this is their solid size. | |
| − | + | Note: ''This Height is correct in Sonic 1 as it has smaller Springs, but was not altered to fit the larger springs in subsequent games. '' | |
| − | === | + | ====Activation==== |
| − | + | Much like vertical Springs, horizontal Springs will activate when you touch the correct side. | |
| − | + | Note: In Sonic 1 and 2, horizontal springs only work when the Player is grounded, affecting '''''Ground Speed''''' only. Sonic 3 onwards they work in the air too, affecting '''''X Speed'''''. | |
| − | + | On the frame of collision, the game will add or subtract ''8'' from the Player's '''''X Position''''' to pull the player ''8'' pixels inside of the Spring. | |
| − | + | When the Player bounces away from a horizontal Spring (red or yellow) the [[SPG:Running#Control_Lock|control lock timer]] is set to ''16''. This means they cannot brake or otherwise affect their '''''Ground Speed''''' for 16 steps. Why lock the horizontal controls? You are likely to be pressing in the direction of the Spring as you run into it, and this would cause the Player to bounce away in their braking animation. Temporarily ignoring input is a quick and elegant solution. | |
| − | |||
| − | + | =====Sonic 2 Onwards===== | |
| + | However in [[Sonic 2 (16-bit)]] onwards, touching the horizontal Spring object isn't the only way to activate them. If the Player is standing on a Spring facing right and you slowly step off it and land on the floor nearby (moving right without turning) the Spring will activate, even though it is impossible to have pushed into the Spring . So something extra is occurring. | ||
| + | This happens because if the Player is not moving towards the Spring (so either standing still or moving away), the game checks if their '''''X/Y Position'''''s are within a box which surrounds the Spring. This box is much larger than the Spring itself, spanning vertically from <code>Spring's '''''Y Position''''' - ''24''</code> to <code>Spring's '''''Y Position''''' + ''24''</code> | ||
| + | and horizontally from the Spring's '''''X Position''''' to <code>Spring's '''''X Position''''' + (''40'' in the Spring's direction)</code>. | ||
| − | + | The result of this is you can walk up to a Spring, stop, and if you are within ''40'' pixels of it you will be propelled away. Keeping in mind the normal '''''Width Radius''''' for the solid area of these Springs is ''8'', this can happen incredibly and noticeably early. This is all in addition to the normal Spring activation by touching the actual side of it. | |
| − | === | + | ===Diagonal Springs=== |
| − | + | There are no diagonal Springs in [[Sonic the Hedgehog (16-bit)]]. But there are in [[Sonic 2 (16-bit)]], [[Sonic 3 & Knuckles|3, K]], and [[Sonic CD|CD]]. | |
| − | + | [[Image:SPGDiagonalSpringHitbox.png]] | |
| − | + | Diagonal Springs are sloped solid objects. They have a '''''Width Radius''''' of ''16'' and a '''''Height Radius''''' of ''16'', resulting in a ''33'' x ''33'' rectangle, this is their solid size. | |
| − | + | Their height array is as follows: | |
| + | [16, 16, 16, 16, 16, 16, | ||
| + | 16, 16, 16, 16, 16, 16, 14, 12, 10, 8, 6, 4, 2, 0, -2, -4, | ||
| + | -4, -4, -4, -4, -4, -4] | ||
| − | + | Diagonal Springs facing down will be the same just with everything flipped vertically, just like those facing left are the same with everything flipped horizontally. | |
| − | === | + | ====Activation==== |
| + | If the Diagonal Spring is facing upwards at all, the Player needs to land on top of the Spring to activate it. If it's facing down at all, the Player needs to touch the underneath. | ||
| − | + | However, there is an additional check. Diagonal Springs facing right at all will only bounce the Player if <code>Player's '''''X Position''''' > (Spring's '''''X Position''''' - ''4'')</code>. For those facing left at all, the Spring will bounce if <code>Player's '''''X Position''''' < (Spring's '''''X Position''''' + ''4'')</code>. | |
| − | + | On the frame of collision, the game will add or subtract 8 from the Player's '''''X/Y Position'''''s (in the diagonal direction into the spring) to pull the Player ''8'' pixels inside of the Spring. | |
| − | + | ====Strength==== | |
| − | + | Sonic 2, 3, and K work the same way, but Sonic CD is different. | |
| − | This is the | + | In Sonic 2, 3, and K, a diagonal Spring sets both '''''X Speed''''' and '''''Y Speed''''' to the Spring's value, with the appropriate sign. So a red Spring facing up and to the right sets '''''Y Speed''''' to '''-16''' and '''''X Speed''''' to '''16'''. The trouble with this method is that the Player is technically bounced faster diagonally than horizontally or vertically. This is because they didn't bother to calculate the sine functions. |
| − | + | In Sonic CD, they do however. Conveniently, the absolute sine and cosine of a 45 degree angle are the same, so you only need one value. It comes out to ''11.3125 (11 pixels 80 subpixels)'' for Red Springs and ''7.0703125 (7 pixels 18 subpixels)'' for Yellow ones. | |
| − | == | + | ===Spring Animation=== |
| − | + | Springs have ''3'' subimages, which are '''relaxed''', '''compressed''', and '''extended'''. | |
| + | When activated, the '''compressed''' subimage plays for ''1'' frame (the frame of collision), the '''relaxed''' subimage plays for ''2'' frames, the '''extended''' subimage plays for ''6'' frames, then the Spring returns to being relaxed. | ||
| − | + | The Spring stops acting solid to the while it animates, and becomes solid again when it relaxes. | |
| − | [[Image: | + | ==Item Monitors== |
| + | [[Image:SPGItemMonitorHitbox.png]] | ||
| − | + | Item Monitors have a '''''Width Radius''''' of ''15'' and a '''''Height Radius''''' of ''15'', resulting in a ''31'' x ''31'' rectangle. However in Sonic 3 onwards, they have a '''''Width Radius''''' of ''14'' and a '''''Height Radius''''' of ''16'', resulting in a ''30'' x ''33'' rectangle. This is their solid size you can push against. Item Monitors use [[SPG:Solid_Objects#Monitor_Solidity|unique solidity]] which differs a little from normal solid objects, most notably having no underside collision. | |
| − | + | The Hitbox larger than the solid box, with a width radius of ''16'' and a height radius of ''16'', resulting in a ''33'' x ''33'' rectangle. This applies to all games. | |
| − | + | They have a gravity of ''0.21875 (56 subpixels)'' while falling. | |
| − | + | ===Breaking The Monitor=== | |
| + | Item Monitors [[SPG:Solid_Objects#Monitor_Solidity_Conditions|do not always act solid to the Player]]. When they don't, this allows the Player to get close enough within the Monitor to make contact with the hitbox. | ||
| − | ==== | + | ====Monitor Hitbox Reaction==== |
| + | An Item Monitor breaks when the Player touches it's hitbox, however there are a few other checks performed after contact with the hitbox is made. | ||
| − | + | {| class="prettytable" style="width: auto;" | |
| + | !If the Player's '''''Y Speed''''' is greater than or equal to ''0'' | ||
| + | |- | ||
| + | | | ||
| + | If they are in their roll animation, the Item Monitor will break. Otherwise if the Player isn't rolling, nothing will happen. | ||
| + | |- | ||
| + | !If the Player's '''''Y Speed''''' is less than ''0'' | ||
| + | |- | ||
| + | | | ||
| + | Here, the Item Monitor won't break at all, but it can be bounced upwards. | ||
| − | + | If the Player's '''''Y Position''''' is greater than or equal to than the Item Monitor's '''''Y Position''''' + ''16'', the Item Monitor will bounce up with a '''''Y Speed''''' of ''-1.5 (-1 pixel 128 subpixels)'' knocking the Item Monitor upwards and the Player's '''''Y Speed''''' is reversed. Otherwise if the Player is too high, nothing will happen. | |
| − | + | However, in [[Sonic & Knuckles]] (and therefore [[Sonic 3 & Knuckles]]), the ability to bounce an Item Monitor was removed, and a Monitor will instead break when being hit while the Player is moving upwards, with the Player's '''''Y Speed''''' reversing in the same way. | |
| − | + | This is why you can break an Item Monitor by pushing against it and jumping. In [[Sonic 3]] alone and all the games before that, this doesn't happen. | |
| + | |} | ||
| − | + | If the Item Monitor breaks it will no longer act solid, its hitbox will be inactive, and it will show the broken sprite. | |
| − | + | ==Bumpers== | |
| − | Bumpers such as those in [[Spring Yard Zone]] set | + | Bumpers such as those in [[Spring Yard Zone]] set the Player's '''''X Speed''''' to <code>''7'' * cosine('''p''')</code>, and '''''Y Speed''''' to <code>7 * -sine('''p''')</code>, where '''p''' is the angle measured from the Bumper's centre to the Player's. This is regardless of the Player's velocity when they hit the bumper. |
[[Image:SPGBumperHitbox.png]] | [[Image:SPGBumperHitbox.png]] | ||
| − | Bumpers have a hitbox with a width radius of 8 and a height radius of 8, resulting in a 17 x 17 rectangle. Other than the hitbox | + | Bumpers have a hitbox with a width radius of ''8'' and a height radius of ''8'', resulting in a ''17'' x ''17'' rectangle. Other than the hitbox '''''X Speed''''' repulsion, there is no solidity to Bumpers. |
| + | |||
| + | ==Breakable Blocks and Rocks== | ||
| + | When the Player jumps on top of breakable objects, such as the rocks in [[Hill Top Zone]], blocks in [[Marble Zone]], or the tube caps in [[Chemical Plant Zone]], they bounce away with a '''''Y Speed''''' of ''-3''. '''''X Speed''''' is unaffected. | ||
| + | |||
| + | The block produces 4 segments. These segments have a gravity of ''0.21875 (56 subpixels)''. Their initial '''''X/Y Speed'''''s are (X: ''-2'', Y: ''-2'') & (X: ''2'', Y: ''-2'') for the top two, and (X: ''-1'', Y: ''-1'') & (X: ''1'', Y: ''-1'') for the bottom two. | ||
| + | |||
| + | ==Breaking Walls== | ||
| + | |||
| + | In Sonic 1, 2, 3, & K, the character's absolute '''''X Speed''''' must exceed ''4.5'' in order to break through destructible walls when rolling (except for [[Knuckles]], who busts walls on contact, and doesn't need to be rolled up). '''''X Speed''''' is unaffected by the collision, as well. | ||
| + | |||
| + | However, when Knuckles breaks walls in Sonic 3 & Knuckles, though their '''''X Speed''''' is unaffected, they don't move during the frame in which they hit the wall. The same thing is true when the Player [[Spindash|spindashes]] through a wall in Sonic 3 & Knuckles. | ||
| + | |||
| + | In Sonic CD, the '''''X Speed''''' threshold is removed. The Player can break through destructible walls by simply jumping near them, or rolling into them at any speed. | ||
| + | |||
| + | ==Buttons== | ||
| + | [[Image:SPGButtonHitbox.png]] | ||
| + | |||
| + | Buttons simply act solid and have a '''''Width Radius''''' and '''''Height Radius''''' which is smaller than the button when not pressed. When the Player is standing on it, the subimage changes to pressed and the switch is activated. | ||
| + | |||
| + | ==Checkpoints== | ||
| + | [[Image:SPGCheckpointTrigger.png]] | ||
| + | |||
| + | Checkpoints use a [[SPG:Hitboxes#Trigger_Areas|Trigger Area]] instead of hitboxes. | ||
| − | + | The trigger top left is Checkpoint's '''''X Position''''' - ''18'' and '''''Y Position''''' - ''64'', the trigger size is ''16'' x ''104''. | |
| − | The | ||
| − | |||
| − | + | Of course, the '''''Y Position''''' of a Checkpoint is not centred on the entire thing, it's more closely centred on the pole, excluding the part at the top. This is why the trigger is larger above the '''''Y Position''''' than below it. | |
| − | |||
| − | |||
| − | The | + | ==Bridges== |
| + | The bridges in Sonic 1, 2 and 3 are known for their dynamic movement as the Player moves over them. | ||
| + | Bridges are set up with a controller object and an array of log objects which the controller object creates, though this can just be an array of values to represent the segments in most engines now. The controller object contains a few variables: There's the length (in segments) of the bridge, which is usually 12, but it can be longer; there's the index of the segment the Player is standing on, which starts at ''0'' for the leftmost segment and ends at <code>length - 1</code>. | ||
| − | + | ===Bridge Collision=== | |
| + | Collision with a bridge while you aren't already on it is rather simple. The controller object is actually one of the logs, the middle log (or the log just to the right of the middle on even bridges, which is usual). This log acts as a platform as wide as the entire bridge using the length variable (and accounts for any uncentred-ness). Essentially the bridge is one large normal [[SPG:Solid_Objects#Jump_Through_Platforms|jump through platform]] at that log's '''''Y Position''''', though the game will also check that your <code>'''''Y Speed''''' >= ''0''</code> before doing any of the normal platform collision. The horizontal range check is also different, where the Player's '''''X Position''''' must be over the top of a log (meaning, within the bridge's entire horizontal area) to collide with the bridge at all. The other logs of the bridge have no collision at all. | ||
| − | ====Calculating Each Log | + | However, once you are on the bridge, the game simply sets your '''''Y Position''''' so that you are standing on top of the log index your '''''X Position''''' is currently over. Normal method for [[SPG:Solid_Objects#Walking_Off_Edges|walking off platforms]] is used to exit the bridge at either end. |
| − | The '' | + | |
| + | ===Dip Amount=== | ||
| + | The "dip" amount is the lowest the bridge can go at any given time. This changes depending on the log the Player is standing on. | ||
| + | To get the current maximum dip amount in pixels the bridge controller uses predetermined values for each log. | ||
| + | |||
| + | The values go up in 2's, starting at 2 and continuing to the middle, with the other side being a mirror of the first half. For example, a bridge with length 5 will have the values | ||
| + | |||
| + | 2, 4, 6, 4, 2 | ||
| + | |||
| + | and a bridge with length 6, the values would be | ||
| + | |||
| + | 2, 4, 6, 6, 4, 2 | ||
| + | |||
| + | The bridges commonly found in Sonic games (12 segments in length) would have the values | ||
| + | |||
| + | 2, 4, 6, 8, 10, 12, 12, 10, 8, 6, 4, 2 | ||
| + | |||
| + | To get the current maximum dip for the bridge, the game uses the value from the log currently being stood on. We'll call the current value '''maximum_dip'''. | ||
| + | |||
| + | ===Calculating Each Log Dip=== | ||
| + | The '''''Y Position''''' of the segments in the bridge depend on the log that the Player is currently standing on, as so: | ||
[[Image:SPGBridge.png]] | [[Image:SPGBridge.png]] | ||
| − | + | The Player is on the 5th segment, we'll call this the '''current_log''' and it's value is 5. | |
| + | |||
| + | In this example, the dip would look as follows: | ||
| + | |||
| + | 2, 4, 6, 8, 10, 12, 12, 10, 8, 6, 4, 2 | ||
| − | + | So the current '''maximum_dip''' for the bridge will be the 5th log's value, which is 10. | |
| − | So the current | ||
| − | To calculate the position of each log, we calculate how far it is from | + | To calculate the position of each log, we calculate how far it is from '''current_log''' relative to the edge it's near. We will call this value '''log_distance'''. |
| − | Segment 0 is 1/5 of the way to | + | Segment 0 is 1/5 of the way to '''current_log''', so it's '''log_distance''' is 1/5 or 0.2. |
| − | Segment 1 is 2/5 of the way to | + | Segment 1 is 2/5 of the way to '''current_log''', so it's '''log_distance''' is 2/5 or 0.4. |
| − | Segment 4 is 5/5 of the way to | + | Segment 4 is 5/5 of the way to '''current_log''', so it's '''log_distance''' is 5/5 or 1. |
| − | Working from the other side, we use the distance from the end to | + | Working from the other side, we use the distance from the end to '''current_log''', rather than from the start. |
| − | Segment 11 is 1/8 of the way to | + | Segment 11 is 1/8 of the way to '''current_log''', so it's '''log_distance''' is 1/8 or 0.125. |
| − | Segment 6 is 6/8 of the way to | + | Segment 6 is 6/8 of the way to '''current_log''', so it's '''log_distance''' is 6/8 or 0.75. |
(Since we've already calculated segment 4 from one direction, there's no need to do it from the other). | (Since we've already calculated segment 4 from one direction, there's no need to do it from the other). | ||
| − | We then use | + | We then use '''log_distance''' to calculate it's position: |
| + | |||
| + | Log's Y Position = Bridge's Y Position + '''maximum_dip''' * sine(90 * log_distance) | ||
| + | |||
| + | |||
| + | Some custom code to calculate these automatically may go as follows: | ||
| + | |||
| + | Notes: | ||
| + | * This assumes first segment index starts at 0 in the loop, but '''current_log''' (the log currently stood on) would start at 1. | ||
| + | * If the Player is not on any of the logs (from walking off), the max dip is just 0 so the bridge won't need to run this code. In addition, the logs don't need to update when the Player jumps off apart from slowly relaxing the bridge. | ||
| + | * It does not account for any smoothing of the bridge movement, like in Sonic Mania | ||
| + | * Sine here uses degrees not radians. Because the original game uses 256 angles rather than 360, there may be slight differences with the sine function causing some logs to be a pixel off (never the logs being stood on, mainly the logs towards the sides). It's tiny and unnoticeable, but can be corrected with extra work to recreate the functions in the original game. | ||
| + | |||
| + | <syntaxhighlight>// Get the current log stood on | ||
| + | current_log = floor((the Player's X Position - Bridge's leftmost X) / 16) + 1; | ||
| + | |||
| + | // Get the current maximum dip for the bridge via current_log | ||
| + | // Note: It would be better to get the max dip for all segments and placing them in an array for later use rather than calculating each frame | ||
| + | if (current_log <= SegmentAmount / 2) | ||
| + | // Log is to the left of the player | ||
| + | maximum_dip = current_log * 2; // Working from the left side in | ||
| + | else | ||
| + | // Log is to the right of the player (or the log being stood on) | ||
| + | maximum_dip = ((SegmentAmount - '''current_log''') + 1) * 2; // Working from the right side in | ||
| + | |||
| + | |||
| + | // Loop through all logs, and set their Y Positions | ||
| + | for (i = 0; i < SegmentAmount; i ++) | ||
| + | { | ||
| + | // Get difference in position of this log to current log stood on | ||
| + | var difference = abs((i + 1) - current_log); | ||
| + | |||
| + | // Get distance from current log to the closest side, depending if before or after current_log | ||
| + | if (i < current_log) | ||
| + | // Log is to the left of the player | ||
| + | log_distance = 1 - (difference / current_log); //working from the left side in | ||
| + | else | ||
| + | // Log is to the right of the player (or the log being stood on) | ||
| + | log_distance = 1 - (difference / ((SegmentAmount - current_log) + 1)); // working from the right side in | ||
| − | + | // Get y of current log using max dip and log distance. This is the final Y Position for the log | |
| + | Log[i]'s Y Position = Bridge's Y Position + floor(maximum_dip * sine(90 * log_distance)) | ||
| + | } | ||
| + | </syntaxhighlight> | ||
| − | + | Meanwhile, all these dip values are multiplied by the sine of the angle in the controller object that counts to 90 when the Player is standing on top, and down to 0 when the Player gets off, so the dip will smoothly increase with time when the Player jumps on to the bridge, and then smoothly decrease when they leave it. It takes 16 frames for bridge to return itself to its original position from full tension, resulting in a step of 5.625. | |
| + | As noted above, original uses 256 angles, so the actual angle range in the controller object is 0~64, with step of 4. | ||
| − | + | ==Air Bubble Maker== | |
| − | + | Air bubble makers work on a repeating cycle. They will wait, then after waiting they will create small, medium, and large air bubbles, and then wait again. This happens on a repeated cycle. | |
| − | |||
| − | |||
| − | |||
| − | |||
| − | |||
| − | |||
| − | |||
| − | |||
| − | |||
| + | ===Types=== | ||
| + | Air bubble makers don't ''always'' create a large air bubble each cycle. The bubble makers have an "air_bubble_frequency", which determines how many cycles it takes to create a large air bubble. | ||
| − | + | Common examples: | |
| − | === | + | air_bubble_frequency = 0: A large air bubble will be produced on every cycle. |
| + | air_bubble_frequency = 1: A large air bubble will only be produced every other cycle. | ||
| + | air_bubble_frequency = 2: A large air bubble will only be produced on every third cycle. | ||
| − | + | And so on. '''air_bubble_frequency''' can be thought of as how many cycles that do not produce a large air bubble occur between the cycles that do. | |
| − | + | This frequency is chosen by the level designers as these makers are placed onto the map, typically between 0 and 2. | |
| − | + | If the current cycle is set to create a [[SPG:Game Objects#Large Air Bubble|large air bubble]], we will call this a '''Large Air Bubble Cycle'''. | |
| − | === | + | ===Cycle=== |
| + | As mentioned, air bubble makers run on a repeating cycle, like the following: | ||
| − | + | [IDLE----],[PRODUCING-------------], | |
| + | [IDLE---],[PRODUCING--], | ||
| + | [IDLE-----],[PRODUCING------], | ||
| + | ... | ||
| − | + | You may notice the irregular idle and producing duration. This one of the main factors that gives the bubble maker it's very random feel. | |
| − | === | + | ===Idle=== |
| + | The idle state duration is a random number in the range 128-255 (inclusive), chosen each time the bubble maker's state becomes idle. | ||
| + | Once the duration is up, the object will enter the producing state. | ||
| − | [[Image: | + | ===Producing=== |
| + | The producing state duration depends on the number of bubbles being made in that cycle. This amount is a random number in the range ''1''-''6'' (inclusive), chosen each time the maker's state becomes producing. | ||
| + | |||
| + | The maker does not produce all of its bubbles in one go. A delay between each bubble is chosen at random from the range ''0''-''31'' (inclusive). Only once each bubble has been created, will the maker change state back to idle. | ||
| + | |||
| + | ====Bubbles==== | ||
| + | The bubbles produced are positioned at the bubble maker's '''''X/Y Position''''' plus some variation along the X axis. The variation is in a range of 16 pixels, centered on the bubble maker's '''''X Position'''''. So, a random number in the range X-8 to X+7 inclusive. | ||
| + | |||
| + | =====Sizes===== | ||
| + | The type of each bubbles produced can be either small or medium (if a large air bubble is to be produced this cycle, it will replace one of these). | ||
| + | |||
| + | The order of these is not random however, a set of predefined sizes is chosen at random. There are four set sequences it can choose from. | ||
| + | |||
| + | Set 1: [Small, Small, Small, Small, Medium, Small] | ||
| + | Set 2: [Small, Small, Small, Medium, Small, Small] | ||
| + | Set 3: [Medium, Small, Medium, Small, Small, Small] | ||
| + | Set 4: [Small, Medium, Small, Small, Medium, Small] | ||
| + | |||
| + | So, for example if the maker object has decided to spawn ''3'' bubbles, and chooses set ''3'' for their sizes, they will be <code>[Medium, Small, Medium]</code>. | ||
| + | |||
| + | ====Large Air Bubble Cycle==== | ||
| + | If the current cycle is a '''Large Air Bubble Cycle''', then one of the bubbles produced (whether it is medium or small) will be chosen to instead become a [[SPG:Game Objects#Large Air Bubble|large air bubble]]. As each of the bubbles for the cycle are about to be produced, the maker does the following to choose whether it should be large: | ||
| + | |||
| + | * If a large air bubble has already been made this cycle, the bubble will not become large. | ||
| + | * If there has been no large air bubble this cycle, and this is the last bubble to be made, the bubble will become large. | ||
| + | * Otherwise, the bubble has a 1 in 4 chance of becoming a large air bubble. | ||
| + | |||
| + | The result is that one large air bubble is created per '''Large Air Bubble Cycle'''. | ||
| + | |||
| + | ==Water Bubble== | ||
| + | Water bubble objects of all sizes move upwards with a '''''Y Speed''''' of ''-0.5 (-128 subpixels)''. They sway back and forth (via a sine wave) once every 128 frames, moving 8 pixels horizontally in total. | ||
| + | A bubble will pop if it's '''''Y Position''''' reaches the water's surface Y. | ||
| + | |||
| + | ===Large Air Bubble=== | ||
| + | Large air bubbles objects move and pop in the same fashion as small or medium bubbles. | ||
| + | |||
| + | [[Image:SPGLargeAirBubbleTrigger.png]] | ||
| + | |||
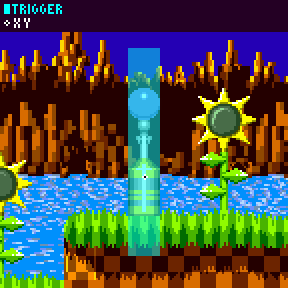
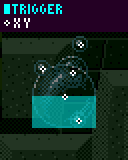
| + | Large Air Bubbles use a [[SPG:Hitboxes#Trigger_Areas|Trigger Area]] instead of hitboxes. | ||
| + | |||
| + | The trigger top left is Bubble <code>'''''X Position''''' - ''16''</code> and Bubble '''''Y Position''''', the trigger size is ''32'' x ''16''. This covers the bottom half of the bubble only, resulting in the Player's mouth overlapping the bubble upon any collisions. | ||
| + | This area is only active when the bubble is at full size. | ||
| − | + | Note: | |
| + | * ''For the effects of breathing a bubble, see [[SPG:Underwater#Large_Air_Bubbles|Underwater]].'' | ||
| − | + | ==End of Level Capsules== | |
| − | + | ===Sonic 1 Capsule=== | |
| + | [[Image:SPGS1CapsuleSolidity.png]] | ||
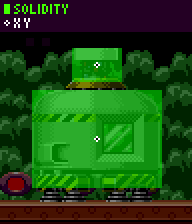
| − | + | First, For ''60'' steps, every ''8'' frames, spawn explosion at capsule position plus random x/y offset (Max horizontal offset of ''31'' pixels, and according to calculations, vertical is the same). The capsule will switch to the exploded frame. At end of those ''60'' steps, start with the animals. | |
| − | For 60 steps, every 8 | ||
| − | + | ====Animals==== | |
| − | + | Then it spawns ''8'' animals at capsule's <code>'''''X Position''''' - ''28''</code>, and <code>'''''Y Position''''' + ''32''</code>, horizontally separated by ''7'', with timers starting from ''154'' and decreasing by ''8'' with each subsequent animal (animals don't jump out until their timer reaches zero). This results in a row of animals which will each jump seperately. | |
| − | + | Then, for ''150'' frames, every ''8'' frames, it will spawn an animal at a random '''''X Position''''' amongst the existing animal group, with their timer set to ''12''. | |
| − | When all animal objects have disappeared, run Got Through message. | + | When all the animal objects have disappeared, it will finally run the "Got Through" message. |
| − | + | ===Sonic 2 Capsule=== | |
| − | + | [[Image:SPGS2CapsuleSolidity.png]] | |
| − | + | ||
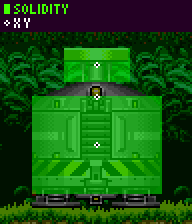
| + | Firstly, an explosion spawns at lock's position. The lock then moves with an '''''X Speed''''' of ''8'', and a '''''Y Speed''''' of ''-4''. It will then wait ''29'' frames. | ||
| − | + | ====Animals==== | |
| − | 8 animals | + | Much like Sonic 1, it then spawns ''8'' animals at capsule's <code>'''''X Position''''' - ''28''</code>, and <code>'''''Y Position''''' + ''32''</code>, horizontally separated by ''7'', with timers starting from ''154'' and decreasing by ''8'' with each subsequent animal. This again results in a row of animals which will each jump seperately. |
| − | + | Then similarly, for ''180'' frames, every ''8'' frames, an animal will spawn at a random '''''X Position''''' amongst the existing animal group, with their alarm set to ''12''. | |
| − | When all animal objects have disappeared, the game will run the | + | When all the animal objects have disappeared, the game will run the "Got Through" message. |
| − | == | + | ==S Tunnels== |
| + | The S Tunnels in [[Green Hill Zone (Sonic the Hedgehog 16-bit)|Green Hill Zone]] simply keep the Player rolling at all times. If their '''''Ground Speed''''' reaches ''0'' and they stand up, the game acts as if you have pressed down and they roll again instantly. Since the S tunnels have no flat ground, the Player will always roll down it and should never just crouch. However, as part of the function making the Player roll, if their '''''Ground Speed''''' does happen to be ''0'', it will set their '''''Ground Speed''''' to ''2''. | ||
| − | === | + | ==Pushable Blocks== |
| + | Pushable blocks move 1 pixel at a time contact is made when pushing (the mechanics of which can be found in the [[SPG:Solid_Objects#Pushable_Blocks|Solid Objects]] page). | ||
| − | === | + | ===Falling Down=== |
| − | + | Pushable blocks are checking below themselves with a single sensor (only on the frames the block actually moves) to ensure there is floor beneath them. It will ignore the floor if the distance found is greater than 0. If they find no floor when they get pushed, they will switch to their falling state. While in this state, to prepare, and to avoid falling too soon and clipping the corner, they will begin to move horizontally at a speed of 4 in the direction of the push until they have moved 16 pixels. At this point they are completely over the ledge that they originally detected. They will then proceed to fall and land as normal. | |
| − | + | ==Seesaws== | |
| + | [[Image:SPGSeesawHitbox.gif]] | ||
| − | + | The Seesaws in [[Sonic the Hedgehog (16-bit)]] are sloped platform (jump through) objects. They have a '''''Width Radius''''' of ''48'' and a '''''Height Radius''''' of ''8'', resulting in a ''97'' x ''17'' rectangle, this is their solid size. | |
| − | |||
| − | + | The height arrays are as follows: | |
| + | Note: Because it's a platform, it has no extra slope information on either side. | ||
| − | + | When sloped down toward the right: | |
| − | + | [36, 36, 38, 40, 42, 44, 42, 40, 38, 36, 35, 34, 33, 32, 31, 30, 29, 28, 27, 26, 25, 24, 23, 22, 21, 20, 19, 18, 17, 16, 15, 14, 13, 12, 11, 10, 9, 8, 7, 6, 5, 4, 3, 2, 2, 2, 2, 2] | |
| − | + | Sloped down toward the left is the same as the above, but in the opposite order (the game just reverses the above list dynamically): | |
| − | [ | + | [2, 2, 2, 2, 2, 3, 4, 5, 6, 7, 8, 9, 10, 11, 12, 13, 14, 15, 16, 17, 18, 19, 20, 21, 22, 23, 24, 25, 26, 27, 28, 29, 30, 31, 32, 33, 34, 35, 36, 38, 40, 42, 44, 42, 40, 38, 36, 36] |
| − | + | When straight: | |
| − | + | [21, 21, 21, 21, 21, 21, 21, 21, 21, 21, 21, 21, 21, 21, 21, 21, 21, 21, 21, 21, 21, 21, 21, 21, 21, 21, 21, 21, 21, 21, 21, 21, 21, 21, 21, 21, 21, 21, 21, 21, 21, 21, 21, 21, 21, 21, 21, 21] | |
| − | + | Which isn't a slope at all, of course, but it does result in raising the platform collision area up well above the Seesaw's Y Positon. | |
| − | + | Lastly, the spike ball simply has a hurt hitbox with a width radius of ''8'' and a height radius of ''8'', resulting in a ''17'' x ''17'' rectangle. | |
| − | + | ===Rotation=== | |
| + | The Seesaw can be in 3 states, sloped toward the left, sloped toward the right, and straight. | ||
| − | + | When the Player is standing/lands on on a Seesaw, the Seesaw's state changes based on the Player's '''''X Position'''''. | |
| + | The seesaw will be straight if the Player's '''''X Position''''' is within a radius of 8 pixels of the Seesaw's '''''X Position''''', otherwise it will slope to whatever side they are on. | ||
| − | + | ===Launching the Spike Ball=== | |
| + | When the Player lands on the Seesaw, and the seesaw's rotation is changed, it will launch a spike ball upwards. | ||
| + | The speed of which is based on both where you landed and your landing speed. | ||
| − | + | If the Player landed in the middle (meaning, within the range that the board remains straight) the spike ball will launch with an '''''X Speed''''' of ''1.078125 (1 pixel 20 subpixels)'' and '''''Y Speed''''' of ''-8.09375 (-8 pixels 24 subpixels)''. | |
| − | + | Otherwise, if the Player's '''''Y Speed''''' is less than ''10'' on landing, the spike ball will launch with an '''''X Speed''''' of ''0.796875 (204 subpixels)'' and '''''Y Speed''''' of ''-10.9375 (-10 pixels 240 subpixels)''. | |
| − | + | Otherwise, the spike ball will launch with an '''''X Speed''''' of ''0.625 (160 subpixels)'' and '''''Y Speed''''' of ''-14''. | |
| − | |||
| − | + | Of course, all these '''''X Speed'''''s would be negative if the spike ball started on the right side. | |
| − | + | The spike ball has a gravity of ''0.21875 (56 subpixels)''. | |
| − | The | ||
| − | === | + | ===Launching The Player=== |
| + | When the spike ball lands, the Player simply launches with whatever '''''Y Speed''''' the spike ball launched at. | ||
| − | == | + | ==Flippers== |
| − | + | [[Image:FlipperHitbox.gif]] | |
| − | [[Image: | + | The flippers in [[Casino Night Zone]] are sloped solid objects. They have a '''''Width Radius''''' of ''24'' and a '''''Height Radius''''' of ''6'', resulting in a ''49'' x ''13'' rectangle, this is their solid size. |
| + | |||
| + | The height arrays are as follows: | ||
| + | |||
| + | When down: | ||
| + | |||
| + | [7, 7, 7, 7, 7, 7, | ||
| + | 7, 8, 9, 10, 11, 10, 9, 8, 7, 6, 5, 4, 3, 2, 1, 0, -1, -2,-3, -4, -5, -6, -7, -8, | ||
| + | -9, -10, -11, -12, -13, -14] | ||
| + | |||
| + | When straight: | ||
| + | |||
| + | [6, 6, 6, 6, 6, 6, | ||
| + | 7, 8, 9, 9, 9, 9, 9, 9, 8, 8, 8, 8, 8, 8, 7, 7, 7, 7, 6, 6, 6, 6, 5, 5, | ||
| + | 4, 4, 4, 4, 4, 4] | ||
| + | |||
| + | When up: | ||
| + | |||
| + | [5, 5, 5, 5, 5, 6, | ||
| + | 7, 8, 9, 10, 11, 11, 12, 12, 13, 13, 14, 14, 15, 15, 16, 16, 17, 17, 18, 18, 17, 17, 16, 16, | ||
| + | 16, 16, 16, 16, 16, 16] | ||
| + | |||
| + | When the Player lands on them, they are forced into a roll. While on them, '''''Ground Speed''''' is set to 1 (or -1 if the flipper is facing left), and horizontal input is ignored. | ||
| + | |||
| + | ===Flipping The Player=== | ||
| + | When the player presses jump, the flipper activates, and the Player is launched at new X and '''''Y Speed'''''s based on their '''''X Position''''' relative to the flipper. | ||
| + | |||
| + | Here's some code which emulates what the game does to calculate the Player's new '''''X/Y Speed'''''s when flipping. | ||
| + | |||
| + | <syntaxhighlight>// Get the difference between the Player's X Position and the Flipper's X Position, offset by 35 | ||
| + | var xdiff; | ||
| + | if flipper_direction == 1 //(1 facing right, -1 facing left) | ||
| + | x_diff = (player's X Position - flipper's X Position) + 35; | ||
| + | else | ||
| + | x_diff = (flipper's X Position - player's X Position) + 35; | ||
| + | |||
| + | // Difference modified to be used as speed multiplier | ||
| + | var multiplier = min(x_diff, 64); | ||
| + | multiplier = multiplier * 32; | ||
| + | multiplier += 2048; | ||
| + | multiplier = -multiplier / 256; | ||
| + | |||
| + | // Difference modified to be used as angle for sine and cosine | ||
| + | var angle = (x_diff / 4) + 64; | ||
| + | |||
| + | // Convert hex angle to degree angle to use for sine and cosine in modern game engines (not necessary if you are using hex angles) | ||
| + | var degree_angle = (256 - angle) * 1.40625; | ||
| + | |||
| + | // Calculate sine and cosine | ||
| + | var sine = sin(degree_angle) * multiplier; | ||
| + | var cosine = cos(degree_angle) * multiplier; | ||
| + | |||
| + | // Launch player | ||
| + | player's X Speed = cosine * flipper_direction; | ||
| + | player's Y Speed = -sine;</syntaxhighlight> | ||
| + | |||
| + | ''Note:'' | ||
| + | *''The jumping flag is not set when launched, because if it were, your velocity would be cut short if you let go of the jump button.'' | ||
| + | |||
| + | ===Animation=== | ||
| + | When the flipper is activated, it animates through each subimage (straight, up, straight), which each last for ''4'' frames. Then it resets to being down. | ||
| + | |||
| + | ''Note:'' | ||
| + | *''Each subimage also uses it's accompanying height array for the slopes.'' | ||
| + | |||
| + | ==Fans (Horizontal)== | ||
| + | The horizontal fans in [[Star Light Zone]] push the Player back, but don't actually affect their speed at all. What is actually happening is just an '''''X Position''''' shift each frame, based on how far away from the fan the Player is. | ||
| + | |||
| + | Because it doesn't affect the Player's speeds, the Player can accelerate and run or jump full speed while in the fan's influence. | ||
| + | |||
| + | [[Image:SPGHorizontalFanTrigger.png]] | ||
| + | |||
| + | Horizontal Fans use a [[SPG:Hitboxes#Trigger_Areas|Trigger Area]] instead of hitboxes. | ||
| + | |||
| + | If the Fan is facing right, the [[SPG:Hitboxes#Trigger_Areas|trigger]] top left is <code>Fan's X Position - 80</code> and <code>Fan's Y Position - 96</code>, otherwise the trigger top left is<code>Fan's X Position - 160</code> and <code>Fan's Y Position - 96</code>. The trigger size is ''240'' x ''112''. This results in an area of ''80'' pixels behind the Fan, and ''160'' pixels in front of the Fan. | ||
| + | |||
| + | ===Fan Force=== | ||
| + | Here's some code which emulates how the game calculates how far to push the Player back: | ||
| + | |||
| + | <syntaxhighlight>// Distance | ||
| + | var x_diff = Player's X Position - Fan's X Position; | ||
| + | if fan's direction == -1 //(1 facing right, -1 facing left) | ||
| + | x_diff = -x_diff; | ||
| + | |||
| + | // Calculate force | ||
| + | var fan_force = floor(x_diff); | ||
| + | if x_diff < 0 | ||
| + | { | ||
| + | // The Player is behind the fan (will invert and "double" the distance, because it is half the size of the area infront) | ||
| + | fan_force = -(fan_force - 1) | ||
| + | fan_force = fan_force * 2; | ||
| + | } | ||
| + | |||
| + | // Calculate final force based on distance | ||
| + | fan_force = fan_force + 96; | ||
| + | fan_force = (256 - fan_force) >> 4; // ">> 4" here is equivalent to dividing by 16, floored. You can substitute it for normal division to get a smoother motion. | ||
| + | if (Fan's direction == -1) | ||
| + | fan_force = -fan_force; | ||
| + | |||
| + | // Move the player | ||
| + | Player's X Position += fan_force;</syntaxhighlight> | ||
| + | |||
| + | ==Fans (Vertical)== | ||
| + | Vertical fans from [[Oil Ocean Zone]] work almost exactly the same way as horizontal fans, but on the Y axis. | ||
| + | |||
| + | [[Image:SPGVerticalFanTrigger.gif]] | ||
| + | |||
| + | Vertical Fans also use a [[SPG:Hitboxes#Trigger_Areas|Trigger Area]] instead of hitboxes. | ||
| + | |||
| + | The [[SPG:Hitboxes#Trigger_Areas|trigger]] top left is <code>Fan's X Position - 64</code> and <code>(Fan's Y Position - 96) - Oscillation</code>, the trigger size is ''128'' x ''144''. This results in an area of ''48'' pixels below the Fan, and ''96'' pixels above the Fan, offset by the oscillation. | ||
| + | |||
| + | Note: ''"Oscillation" is a value which oscillates from 0 to 15 and back on a sine wave once every 88 frames'' | ||
| + | |||
| + | ===Fan Force=== | ||
| + | Here's some code which emulates how the game calculates how far to push the Player upwards: | ||
| + | |||
| + | <syntaxhighlight>// Distances | ||
| + | var x_diff = Player's X Position - Fan's X Position; | ||
| + | var y_diff = (Player's Y Position + oscillation) - Fan's Y Position; // oscillation is a value which oscillates from 0 to 15 and back on a sine wave once every 88 frames | ||
| + | |||
| + | // Calculate force | ||
| + | var fan_force = floor(y_diff); | ||
| + | if y_diff > 0 | ||
| + | { | ||
| + | fan_force = -(fan_force + 1) | ||
| + | fan_force = fan_force * 2; | ||
| + | } | ||
| + | fan_force = fan_force + 96; | ||
| + | fan_force = (-fan_force) >> 4; // ">> 4" here is equivalent to dividing by 16, floored. You can substitute it for normal division to get a smoother motion. | ||
| − | + | // Move the player | |
| + | player's Y Position += fan_force; | ||
| + | player's Y Speed = 0;</syntaxhighlight> | ||
| − | ==== | + | ==Spike Traps== |
| + | When [[Marble Zone]] Spike traps fall, their '''''Y Speed''''' increases by 0.4375 each frame. When they reach full length, they spend about 60 frames there. After this they begin to rise by 0.5px per frame, or 1 pixel every 2 frames. The length they can fall varies. | ||
| − | + | [[Image:SPGSpikeTrapHitbox.png]] | |
| − | |||
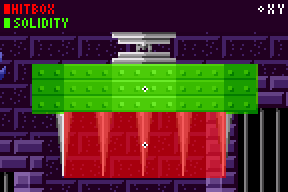
| − | + | They have a solid box at the top (which the Player can walk on & push against) however the spike area is a damage hit box which will simply hurt the Player upon contact but doesn't have solidity. | |
| − | ==== | + | ==Conveyor Belts== |
| + | A [[Scrap Brain Zone]] conveyor belt will simply add the belt speed to the Player's '''''X Position''''', their speeds are unaffected. | ||
| − | + | ==Spring Ramps== | |
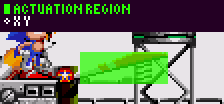
| − | Spring ramps aren't quite as simple as normal | + | Spring ramps aren't quite as simple as normal Springs. Firstly, they have a specific region where they actuate. |
[[Image:SPGSpringRampActuationRegion.png]] | [[Image:SPGSpringRampActuationRegion.png]] | ||
| − | The ramp will activate if | + | The ramp will activate if their '''''X Position''''' is within the green region as they stand on it. |
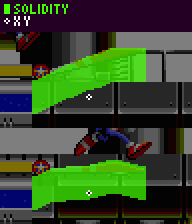
| − | When a Spring ramp activates they don't bounce | + | When a Spring ramp activates they don't bounce the Player instantly, instead, the Player moves down a bit as the animation plays. There are two subimages, normal and down, and these both have different collision height arrays as shown below. |
[[Image:SPGSpringRampSolidty.png]] | [[Image:SPGSpringRampSolidty.png]] | ||
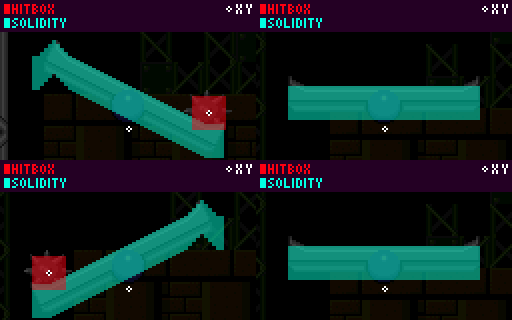
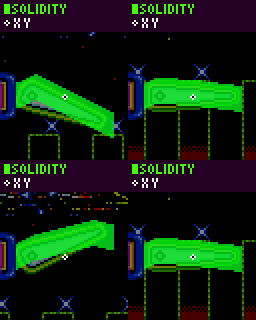
| − | + | Spring ramps are sloped solid objects. They have a '''''Width Radius''''' of ''28'' and a '''''Height Radius''''' of ''8'', resulting in a ''57'' x ''17'' rectangle, this is their solid size. | |
| + | |||
| + | The height arrays are as follows: | ||
| + | |||
| + | When relaxed: | ||
| + | |||
| + | [8, 8, 8, 8, 8, 8, | ||
| + | 8, 9, 10, 11, 12, 13, 14, 15, 16, 16, 17, 18, 19, 20, 20, 21, 21, 22, 23, 24, 24, 24, 24, 24, 24, 24, 24, 24, | ||
| + | 24, 24, 24, 24, 24, 24] | ||
| − | + | When pressed: | |
| − | So how fast do they bounce | + | [8, 8, 8, 8, 8, 8, |
| + | 8, 9, 10, 11, 12, 12, 12, 12, 13, 13, 13, 13, 13, 13, 14, 14, 15, 15, 16, 16, 16, 16, 15, 15, 14, 14, 13, 13, | ||
| + | 13, 13, 13, 13, 13, 13] | ||
| + | |||
| + | Once activated it plays the down subimage for 4 frames, and the Player will lower with it but is otherwise unaffected and will keep walking. On the next frame it's back up and the Player is raised again but still unaffected, on the frame after this they will actually be in the air. | ||
| + | |||
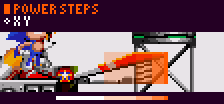
| + | So how fast do they bounce the Player? Well, that's not perfectly simple either. It will bounce the Player up with a '''''Y Speed''''' of -4, and depending on their '''''X Position''''' relative to the ramp it will subtract a second modifier from their '''''Y Speed'''''. This is all dependant on the positions where the Player's '''''X Position''''' is right now as they are bounced, not where they were when activated it. | ||
[[Image:SPGSpringRampPowerSteps.png]] | [[Image:SPGSpringRampPowerSteps.png]] | ||
| Line 312: | Line 647: | ||
From left to right this modifier can be 0, 1, 2, 3 or 4. | From left to right this modifier can be 0, 1, 2, 3 or 4. | ||
| − | So if | + | So if the Player happened to be in section 3, their '''''Y Speed''''' would become ''-4'', minus the modifier of ''2'', resulting in ''-6''. |
| − | |||
| − | |||
| − | |||
| − | |||
| − | |||
| − | + | '''''X Speed''''' is also affected, if absolute '''''X Speed''''' happens to be larger than or equal to ''4'', the modifier will be added to (or subtracted from) '''''X Speed'''''. If the Player is in the third section (which has a modifier of ''2''), and they have an '''''X Speed''''' of ''5'', their '''''X Speed''''' would become <code>5 + 2</code>. | |
| − | |||
| − | + | ''Note:'' | |
| + | *This all gets capped at ''6'' in Sonic 2 due to the speed cap still being present in the air. | ||
| − | ==== | + | ==Spring Caps== |
| + | The red spring caps that cover the tubes in [[Chemical Plant Zone]] work like springboards, but are slightly stronger than a Yellow springboard. They set the Player's '''''Y Speed''''' to ''-10.5 (-10 pixels 128 subpixels)'' upon collision. | ||
| − | The | + | ==Spinners== |
| + | The black spinners that propel you forward in [[Chemical Plant Zone]] set the Player's '''''X Speed''''' to 16, unless if they're already moving faster than that. | ||
| − | == | + | ==Ski Lifts== |
| − | + | The ski lifts in [[Hill Top Zone]] move with an '''''X Speed''''' of ''2'', and a '''''Y Speed''''' of ''1''. | |
| − | + | ==Balloons== | |
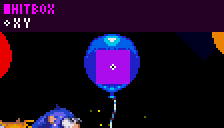
| − | The balloons in [[Carnival Night Zone]] set '' | + | The balloons in [[Carnival Night Zone]] set '''''Y Speed''''' to ''-7'' when the Player collides with them, no matter what their angle of collision. '''''X Speed''''' is not affected. |
[[Image:SPGBalloonHitbox.png]] | [[Image:SPGBalloonHitbox.png]] | ||
| − | Balloons have a hitbox with a width radius of 8 and a height radius of 8, resulting in a 17 x 17 rectangle. | + | Balloons have a hitbox with a width radius of ''8'' and a height radius of ''8'', resulting in a ''17'' x ''17'' rectangle. |
| − | + | ==Cannons== | |
| − | The cannons in [[Carnival Night Zone]] set | + | The cannons in [[Carnival Night Zone]] set the Player's '''''X Speed''''' to <code>''16'' * cosine('''p''')</code>, and '''''Y Speed''''' to <code>''16'' * -sine('''p''')</code>, where '''p''' is the angle of the cannon. |
| − | == | + | ==Bouncy Mushrooms== |
| − | + | The mushrooms in [[Mushroom Hill Zone]] work like springs only each successive bounce is higher than the last, up to three bounces. The first bounce sets '''''Y Speed''''' to ''-6.5 (-6 pixels 128 subpixels)'', the second, ''-7.5 (-7 pixels 128 subpixels)'', and the third, ''-8.5 (-8 pixels 128 subpixels)''. | |
| − | |||
| − | The mushrooms in [[Mushroom Hill Zone]] work | ||
==Points== | ==Points== | ||
| − | When you hit a Badnik or other point-bearing item (such as Bumpers), a small score notification will fly up out of it. After it spawns at the object's X and Y | + | When you hit a Badnik or other point-bearing item (such as Bumpers), a small score notification will fly up out of it. After it spawns at the object's X and '''''Y Position''''', it begins with a '''''Y Speed''''' of ''-3'', and will slow down by ''0.09375 (24 subpixels)'' each frame. Once it is no longer moving, it will vanish. This will take around ''32'' frames. |
[[Category:Sonic Physics Guide|Game Objects]] | [[Category:Sonic Physics Guide|Game Objects]] | ||
Latest revision as of 08:50, 1 August 2023
| Sonic Physics Guide |
|---|
|
| Collision |
|
| Physics |
|
| Gameplay |
| Presentation |
| Special |
Notes:
- The research applies to all four of the Sega Mega Drive games and Sonic CD.
- Variables and constants for Sonic and other characters such as X Position and acc will be referenced frequently, they can be found in Basics.
- An object's actual Width Radius and Height Radius variables are separate to an object's hitbox width radius and height radius.
- How slope data is used for solid objects is detailed in Sloped Objects.
- More detailed information about how hitboxes and "trigger areas" work, as well as the Player's hitbox, can be found at Hitboxes.
Contents
- 1 Introduction
- 2 Rings
- 3 Spikes
- 4 Springs
- 5 Item Monitors
- 6 Bumpers
- 7 Breakable Blocks and Rocks
- 8 Breaking Walls
- 9 Buttons
- 10 Checkpoints
- 11 Bridges
- 12 Air Bubble Maker
- 13 Water Bubble
- 14 End of Level Capsules
- 15 S Tunnels
- 16 Pushable Blocks
- 17 Seesaws
- 18 Flippers
- 19 Fans (Horizontal)
- 20 Fans (Vertical)
- 21 Spike Traps
- 22 Conveyor Belts
- 23 Spring Ramps
- 24 Spring Caps
- 25 Spinners
- 26 Ski Lifts
- 27 Balloons
- 28 Cannons
- 29 Bouncy Mushrooms
- 30 Points
Introduction
Objects move in various ways, some simple and some rather complex. It may be enough to simply observe an object to know how it acts, but this isn't the case most of the time where greater depth is required.
Rings
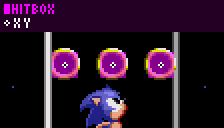
Rings have a hitbox with a width radius of 6 and a height radius of 6, resulting in a 13 x 13 rectangle. (while their sprite is larger, at 16 x 16), so the Player can get quite close to a ring before a collision occurs and they collect it.
Scattered Rings
When a ring is bouncing around, it has a Width Radius of 8 and a Height Radius of 8 resulting in a 17 x 17 rectangle.
Ring Gravity
Rings do not have same gravity force as the Player does. Instead, their gravity is a force of 0.09375 (24 subpixels). So, this value is added to the rings' Y Speed every frame.
Ring Bounce
When the scattered rings hit the ground, their vertical speed is multiplied by -0.75. This has the effect of reversing their vertical motion, as well as slowing it somewhat. This calculation is performed after the addition of the gravity. Their horizontal speed is unaffected by bouncing.
Rings only check for the floor once every 4 frames, using a sensor at their X Position and Y Position + Height Radius.
Clearly, when the rings bounce off the floor, they do so so imprecisely as on 75% of frames they are not even checking for it. So they sometimes pass well into the ground before deciding to bounce away. This is really not noticed during normal play, and was necessary to avoid too much slowdown.
But there are further limitations on bouncing rings, probably also in place to avoid processor load. They are totally unaffected by walls (they do not cast any wall sensors), and are only concerned with vertical surfaces. These checks also only happen when the ring is moving downwards (Y Speed > 0) thus they can also fly up through ceilings. This can actually become a bother to the Player if they are struck in a small corridor, as most of their rings are lost in the ceiling and don't fall back down to be regathered. To make things worse, to disperse the processor load, the floor check only happens every 4 frames, offset for each ring, meaning rings will tend to fall through floors entirely.
Ring Lifespan
All scattered rings are destroyed after 256 steps if they have not been regathered. Also, if they leave the horizontal view boundaries, they are destroyed. Again, on a more powerful system, you may choose not to include this feature.
Ring Animations
Fixed rings have 4 frames of animation, and spend 8 steps showing each frame before moving to the next. Scattered rings are more complicated, in that they have a much faster animation speed when they are created (1 frame per 2 steps), but this slows down over their lifespan.
frameDuration = floor(ringLifespan * 2 / lifespanTimer)
Spikes
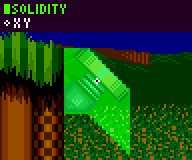
Spikes in Sonic 1 vary in size. A single object can either contain 1 or 4 or more spikes. The solid width radius (or height radius if the spikes are horizontal) of the object is also extended to match.
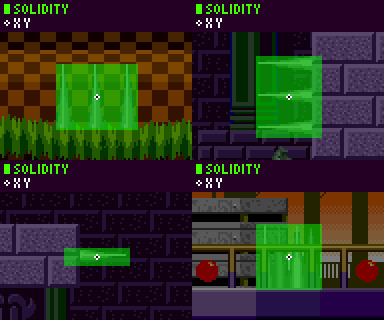
Spikes in Sonic 2 onwards (both vertical and horizontal) spikes are more consistent, and have a Width Radius of 16 and a Height Radius of 16, resulting in a 33 x 33 rectangle, this is their solid size.
Moving Spikes
Moving spikes retract into and extend out of walls. The game achieves this by simply moving the object 32 pixels each time they move. The spikes will move once every 64 frames. While moving they will retract or extend by 8 pixels per frame until the new position has been reached.
Spike Damage
Spikes will hurt the Player if the Player makes contact with the correct side (like landing on upwards facing spikes, or pushing/running into sideways facing spikes). Contact with any other side of the spikes will not hurt the Player.
Springs
Red springs propel the Player at a speed of 16, and yellow Springs at a speed of 10. If the Spring faces up or down, the value is either negative or positive, respectively, and Y Speed is set to it. If the Spring faces left or right, the value is either negative or positive, respectively, and Ground Speed (or X Speed while airborne) is set to it. Vertical Springs don't affect X Speed and likewise horizontal Springs don't affect Y Speed.
Vertical Springs
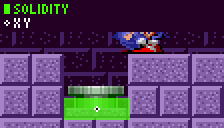
Vertical Springs (both up and down) have a Width Radius of 16 and a Height Radius of 8, resulting in a 33 x 17 rectangle, this is their solid size.
Activation
Vertical Springs simply activate if the Player touches the correct side.
On the frame of collision, the game will add or subtract 8 from the Player's Y Position to pull the player 8 pixels inside of the Spring.
Horizontal Springs
Horizontal Springs (both left and right) have a Width Radius of 8 and a Height Radius of 14, resulting in a 17 x 31 rectangle, this is their solid size.
Note: This Height is correct in Sonic 1 as it has smaller Springs, but was not altered to fit the larger springs in subsequent games.
Activation
Much like vertical Springs, horizontal Springs will activate when you touch the correct side.
Note: In Sonic 1 and 2, horizontal springs only work when the Player is grounded, affecting Ground Speed only. Sonic 3 onwards they work in the air too, affecting X Speed.
On the frame of collision, the game will add or subtract 8 from the Player's X Position to pull the player 8 pixels inside of the Spring.
When the Player bounces away from a horizontal Spring (red or yellow) the control lock timer is set to 16. This means they cannot brake or otherwise affect their Ground Speed for 16 steps. Why lock the horizontal controls? You are likely to be pressing in the direction of the Spring as you run into it, and this would cause the Player to bounce away in their braking animation. Temporarily ignoring input is a quick and elegant solution.
Sonic 2 Onwards
However in Sonic 2 (16-bit) onwards, touching the horizontal Spring object isn't the only way to activate them. If the Player is standing on a Spring facing right and you slowly step off it and land on the floor nearby (moving right without turning) the Spring will activate, even though it is impossible to have pushed into the Spring . So something extra is occurring.
This happens because if the Player is not moving towards the Spring (so either standing still or moving away), the game checks if their X/Y Positions are within a box which surrounds the Spring. This box is much larger than the Spring itself, spanning vertically from Spring's Y Position - 24 to Spring's Y Position + 24
and horizontally from the Spring's X Position to Spring's X Position + (40 in the Spring's direction).
The result of this is you can walk up to a Spring, stop, and if you are within 40 pixels of it you will be propelled away. Keeping in mind the normal Width Radius for the solid area of these Springs is 8, this can happen incredibly and noticeably early. This is all in addition to the normal Spring activation by touching the actual side of it.
Diagonal Springs
There are no diagonal Springs in Sonic the Hedgehog (16-bit). But there are in Sonic 2 (16-bit), 3, K, and CD.
Diagonal Springs are sloped solid objects. They have a Width Radius of 16 and a Height Radius of 16, resulting in a 33 x 33 rectangle, this is their solid size.
Their height array is as follows:
[16, 16, 16, 16, 16, 16,
16, 16, 16, 16, 16, 16, 14, 12, 10, 8, 6, 4, 2, 0, -2, -4,
-4, -4, -4, -4, -4, -4]
Diagonal Springs facing down will be the same just with everything flipped vertically, just like those facing left are the same with everything flipped horizontally.
Activation
If the Diagonal Spring is facing upwards at all, the Player needs to land on top of the Spring to activate it. If it's facing down at all, the Player needs to touch the underneath.
However, there is an additional check. Diagonal Springs facing right at all will only bounce the Player if Player's X Position > (Spring's X Position - 4). For those facing left at all, the Spring will bounce if Player's X Position < (Spring's X Position + 4).
On the frame of collision, the game will add or subtract 8 from the Player's X/Y Positions (in the diagonal direction into the spring) to pull the Player 8 pixels inside of the Spring.
Strength
Sonic 2, 3, and K work the same way, but Sonic CD is different.
In Sonic 2, 3, and K, a diagonal Spring sets both X Speed and Y Speed to the Spring's value, with the appropriate sign. So a red Spring facing up and to the right sets Y Speed to -16 and X Speed to 16. The trouble with this method is that the Player is technically bounced faster diagonally than horizontally or vertically. This is because they didn't bother to calculate the sine functions.
In Sonic CD, they do however. Conveniently, the absolute sine and cosine of a 45 degree angle are the same, so you only need one value. It comes out to 11.3125 (11 pixels 80 subpixels) for Red Springs and 7.0703125 (7 pixels 18 subpixels) for Yellow ones.
Spring Animation
Springs have 3 subimages, which are relaxed, compressed, and extended. When activated, the compressed subimage plays for 1 frame (the frame of collision), the relaxed subimage plays for 2 frames, the extended subimage plays for 6 frames, then the Spring returns to being relaxed.
The Spring stops acting solid to the while it animates, and becomes solid again when it relaxes.
Item Monitors
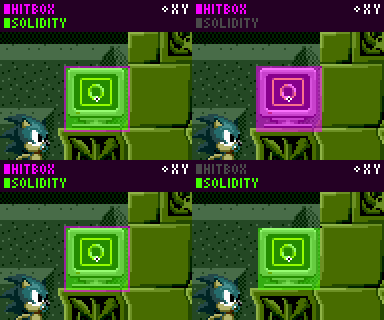
Item Monitors have a Width Radius of 15 and a Height Radius of 15, resulting in a 31 x 31 rectangle. However in Sonic 3 onwards, they have a Width Radius of 14 and a Height Radius of 16, resulting in a 30 x 33 rectangle. This is their solid size you can push against. Item Monitors use unique solidity which differs a little from normal solid objects, most notably having no underside collision.
The Hitbox larger than the solid box, with a width radius of 16 and a height radius of 16, resulting in a 33 x 33 rectangle. This applies to all games.
They have a gravity of 0.21875 (56 subpixels) while falling.
Breaking The Monitor
Item Monitors do not always act solid to the Player. When they don't, this allows the Player to get close enough within the Monitor to make contact with the hitbox.
Monitor Hitbox Reaction
An Item Monitor breaks when the Player touches it's hitbox, however there are a few other checks performed after contact with the hitbox is made.
| If the Player's Y Speed is greater than or equal to 0 |
|---|
|
If they are in their roll animation, the Item Monitor will break. Otherwise if the Player isn't rolling, nothing will happen. |
| If the Player's Y Speed is less than 0 |
|
Here, the Item Monitor won't break at all, but it can be bounced upwards. If the Player's Y Position is greater than or equal to than the Item Monitor's Y Position + 16, the Item Monitor will bounce up with a Y Speed of -1.5 (-1 pixel 128 subpixels) knocking the Item Monitor upwards and the Player's Y Speed is reversed. Otherwise if the Player is too high, nothing will happen. However, in Sonic & Knuckles (and therefore Sonic 3 & Knuckles), the ability to bounce an Item Monitor was removed, and a Monitor will instead break when being hit while the Player is moving upwards, with the Player's Y Speed reversing in the same way. This is why you can break an Item Monitor by pushing against it and jumping. In Sonic 3 alone and all the games before that, this doesn't happen. |
If the Item Monitor breaks it will no longer act solid, its hitbox will be inactive, and it will show the broken sprite.
Bumpers
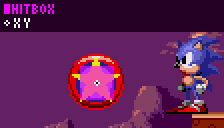
Bumpers such as those in Spring Yard Zone set the Player's X Speed to 7 * cosine(p), and Y Speed to 7 * -sine(p), where p is the angle measured from the Bumper's centre to the Player's. This is regardless of the Player's velocity when they hit the bumper.
Bumpers have a hitbox with a width radius of 8 and a height radius of 8, resulting in a 17 x 17 rectangle. Other than the hitbox X Speed repulsion, there is no solidity to Bumpers.
Breakable Blocks and Rocks
When the Player jumps on top of breakable objects, such as the rocks in Hill Top Zone, blocks in Marble Zone, or the tube caps in Chemical Plant Zone, they bounce away with a Y Speed of -3. X Speed is unaffected.
The block produces 4 segments. These segments have a gravity of 0.21875 (56 subpixels). Their initial X/Y Speeds are (X: -2, Y: -2) & (X: 2, Y: -2) for the top two, and (X: -1, Y: -1) & (X: 1, Y: -1) for the bottom two.
Breaking Walls
In Sonic 1, 2, 3, & K, the character's absolute X Speed must exceed 4.5 in order to break through destructible walls when rolling (except for Knuckles, who busts walls on contact, and doesn't need to be rolled up). X Speed is unaffected by the collision, as well.
However, when Knuckles breaks walls in Sonic 3 & Knuckles, though their X Speed is unaffected, they don't move during the frame in which they hit the wall. The same thing is true when the Player spindashes through a wall in Sonic 3 & Knuckles.
In Sonic CD, the X Speed threshold is removed. The Player can break through destructible walls by simply jumping near them, or rolling into them at any speed.
Buttons
Buttons simply act solid and have a Width Radius and Height Radius which is smaller than the button when not pressed. When the Player is standing on it, the subimage changes to pressed and the switch is activated.
Checkpoints
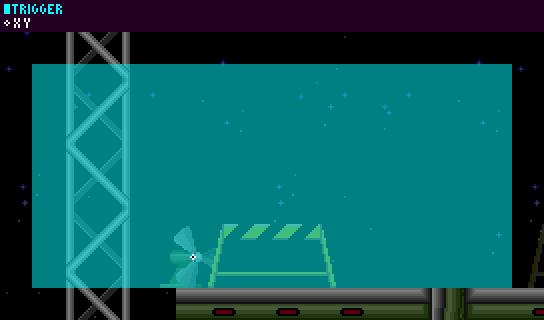
Checkpoints use a Trigger Area instead of hitboxes.
The trigger top left is Checkpoint's X Position - 18 and Y Position - 64, the trigger size is 16 x 104.
Of course, the Y Position of a Checkpoint is not centred on the entire thing, it's more closely centred on the pole, excluding the part at the top. This is why the trigger is larger above the Y Position than below it.
Bridges
The bridges in Sonic 1, 2 and 3 are known for their dynamic movement as the Player moves over them.
Bridges are set up with a controller object and an array of log objects which the controller object creates, though this can just be an array of values to represent the segments in most engines now. The controller object contains a few variables: There's the length (in segments) of the bridge, which is usually 12, but it can be longer; there's the index of the segment the Player is standing on, which starts at 0 for the leftmost segment and ends at length - 1.
Bridge Collision
Collision with a bridge while you aren't already on it is rather simple. The controller object is actually one of the logs, the middle log (or the log just to the right of the middle on even bridges, which is usual). This log acts as a platform as wide as the entire bridge using the length variable (and accounts for any uncentred-ness). Essentially the bridge is one large normal jump through platform at that log's Y Position, though the game will also check that your Y Speed >= 0 before doing any of the normal platform collision. The horizontal range check is also different, where the Player's X Position must be over the top of a log (meaning, within the bridge's entire horizontal area) to collide with the bridge at all. The other logs of the bridge have no collision at all.
However, once you are on the bridge, the game simply sets your Y Position so that you are standing on top of the log index your X Position is currently over. Normal method for walking off platforms is used to exit the bridge at either end.
Dip Amount
The "dip" amount is the lowest the bridge can go at any given time. This changes depending on the log the Player is standing on. To get the current maximum dip amount in pixels the bridge controller uses predetermined values for each log.
The values go up in 2's, starting at 2 and continuing to the middle, with the other side being a mirror of the first half. For example, a bridge with length 5 will have the values
2, 4, 6, 4, 2
and a bridge with length 6, the values would be
2, 4, 6, 6, 4, 2
The bridges commonly found in Sonic games (12 segments in length) would have the values
2, 4, 6, 8, 10, 12, 12, 10, 8, 6, 4, 2
To get the current maximum dip for the bridge, the game uses the value from the log currently being stood on. We'll call the current value maximum_dip.
Calculating Each Log Dip
The Y Position of the segments in the bridge depend on the log that the Player is currently standing on, as so:
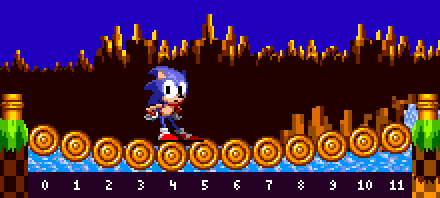 The Player is on the 5th segment, we'll call this the current_log and it's value is 5.
In this example, the dip would look as follows:
2, 4, 6, 8, 10, 12, 12, 10, 8, 6, 4, 2
So the current maximum_dip for the bridge will be the 5th log's value, which is 10.
To calculate the position of each log, we calculate how far it is from current_log relative to the edge it's near. We will call this value log_distance.
Segment 0 is 1/5 of the way to current_log, so it's log_distance is 1/5 or 0.2.
Segment 1 is 2/5 of the way to current_log, so it's log_distance is 2/5 or 0.4.
Segment 4 is 5/5 of the way to current_log, so it's log_distance is 5/5 or 1.
Working from the other side, we use the distance from the end to current_log, rather than from the start.
Segment 11 is 1/8 of the way to current_log, so it's log_distance is 1/8 or 0.125.
Segment 6 is 6/8 of the way to current_log, so it's log_distance is 6/8 or 0.75.
(Since we've already calculated segment 4 from one direction, there's no need to do it from the other).
We then use log_distance to calculate it's position:
Log's Y Position = Bridge's Y Position + maximum_dip * sine(90 * log_distance)
Some custom code to calculate these automatically may go as follows:
Notes:
- This assumes first segment index starts at 0 in the loop, but current_log (the log currently stood on) would start at 1.
- If the Player is not on any of the logs (from walking off), the max dip is just 0 so the bridge won't need to run this code. In addition, the logs don't need to update when the Player jumps off apart from slowly relaxing the bridge.
- It does not account for any smoothing of the bridge movement, like in Sonic Mania
- Sine here uses degrees not radians. Because the original game uses 256 angles rather than 360, there may be slight differences with the sine function causing some logs to be a pixel off (never the logs being stood on, mainly the logs towards the sides). It's tiny and unnoticeable, but can be corrected with extra work to recreate the functions in the original game.
// Get the current log stood on
current_log = floor((the Player's X Position - Bridge's leftmost X) / 16) + 1;

// Get the current maximum dip for the bridge via current_log
// Note: It would be better to get the max dip for all segments and placing them in an array for later use rather than calculating each frame
if (current_log <= SegmentAmount / 2)
   // Log is to the left of the player
   maximum_dip = current_log * 2; // Working from the left side in
else
   // Log is to the right of the player (or the log being stood on)
   maximum_dip = ((SegmentAmount - '''current_log''') + 1) * 2; // Working from the right side in


// Loop through all logs, and set their Y Positions
for (i = 0; i < SegmentAmount; i ++)
{
   // Get difference in position of this log to current log stood on
   var difference = abs((i + 1) - current_log);

   // Get distance from current log to the closest side, depending if before or after current_log
   if (i < current_log)
      // Log is to the left of the player
      log_distance = 1 - (difference / current_log); //working from the left side in
   else
      // Log is to the right of the player (or the log being stood on)
      log_distance = 1 - (difference / ((SegmentAmount - current_log) + 1));  // working from the right side in

   // Get y of current log using max dip and log distance. This is the final Y Position for the log
   Log[i]'s Y Position = Bridge's Y Position + floor(maximum_dip * sine(90 * log_distance))
}
Meanwhile, all these dip values are multiplied by the sine of the angle in the controller object that counts to 90 when the Player is standing on top, and down to 0 when the Player gets off, so the dip will smoothly increase with time when the Player jumps on to the bridge, and then smoothly decrease when they leave it. It takes 16 frames for bridge to return itself to its original position from full tension, resulting in a step of 5.625.
As noted above, original uses 256 angles, so the actual angle range in the controller object is 0~64, with step of 4.
Air Bubble Maker
Air bubble makers work on a repeating cycle. They will wait, then after waiting they will create small, medium, and large air bubbles, and then wait again. This happens on a repeated cycle.
Types
Air bubble makers don't always create a large air bubble each cycle. The bubble makers have an "air_bubble_frequency", which determines how many cycles it takes to create a large air bubble.
Common examples:
 air_bubble_frequency = 0: A large air bubble will be produced on every cycle.
 air_bubble_frequency = 1: A large air bubble will only be produced every other cycle.
 air_bubble_frequency = 2: A large air bubble will only be produced on every third cycle.
And so on. air_bubble_frequency can be thought of as how many cycles that do not produce a large air bubble occur between the cycles that do.
This frequency is chosen by the level designers as these makers are placed onto the map, typically between 0 and 2.
If the current cycle is set to create a large air bubble, we will call this a Large Air Bubble Cycle.
Cycle
As mentioned, air bubble makers run on a repeating cycle, like the following:
 [IDLE----],[PRODUCING-------------],
 [IDLE---],[PRODUCING--],
 [IDLE-----],[PRODUCING------],
 ...
You may notice the irregular idle and producing duration. This one of the main factors that gives the bubble maker it's very random feel.
Idle
The idle state duration is a random number in the range 128-255 (inclusive), chosen each time the bubble maker's state becomes idle. Once the duration is up, the object will enter the producing state.
Producing
The producing state duration depends on the number of bubbles being made in that cycle. This amount is a random number in the range 1-6 (inclusive), chosen each time the maker's state becomes producing.
The maker does not produce all of its bubbles in one go. A delay between each bubble is chosen at random from the range 0-31 (inclusive). Only once each bubble has been created, will the maker change state back to idle.
Bubbles
The bubbles produced are positioned at the bubble maker's X/Y Position plus some variation along the X axis. The variation is in a range of 16 pixels, centered on the bubble maker's X Position. So, a random number in the range X-8 to X+7 inclusive.
Sizes
The type of each bubbles produced can be either small or medium (if a large air bubble is to be produced this cycle, it will replace one of these).
The order of these is not random however, a set of predefined sizes is chosen at random. There are four set sequences it can choose from.
 Set 1: [Small, Small, Small, Small, Medium, Small]
 Set 2: [Small, Small, Small, Medium, Small, Small]
 Set 3: [Medium, Small, Medium, Small, Small, Small]
 Set 4: [Small, Medium, Small, Small, Medium, Small]
So, for example if the maker object has decided to spawn 3 bubbles, and chooses set 3 for their sizes, they will be [Medium, Small, Medium].
Large Air Bubble Cycle
If the current cycle is a Large Air Bubble Cycle, then one of the bubbles produced (whether it is medium or small) will be chosen to instead become a large air bubble. As each of the bubbles for the cycle are about to be produced, the maker does the following to choose whether it should be large:
- If a large air bubble has already been made this cycle, the bubble will not become large.
- If there has been no large air bubble this cycle, and this is the last bubble to be made, the bubble will become large.
- Otherwise, the bubble has a 1 in 4 chance of becoming a large air bubble.
The result is that one large air bubble is created per Large Air Bubble Cycle.
Water Bubble
Water bubble objects of all sizes move upwards with a Y Speed of -0.5 (-128 subpixels). They sway back and forth (via a sine wave) once every 128 frames, moving 8 pixels horizontally in total. A bubble will pop if it's Y Position reaches the water's surface Y.
Large Air Bubble
Large air bubbles objects move and pop in the same fashion as small or medium bubbles.
Large Air Bubbles use a Trigger Area instead of hitboxes.
The trigger top left is Bubble X Position - 16 and Bubble Y Position, the trigger size is 32 x 16. This covers the bottom half of the bubble only, resulting in the Player's mouth overlapping the bubble upon any collisions.
This area is only active when the bubble is at full size.
Note:
- For the effects of breathing a bubble, see Underwater.
End of Level Capsules
Sonic 1 Capsule
First, For 60 steps, every 8 frames, spawn explosion at capsule position plus random x/y offset (Max horizontal offset of 31 pixels, and according to calculations, vertical is the same). The capsule will switch to the exploded frame. At end of those 60 steps, start with the animals.
Animals
Then it spawns 8 animals at capsule's X Position - 28, and Y Position + 32, horizontally separated by 7, with timers starting from 154 and decreasing by 8 with each subsequent animal (animals don't jump out until their timer reaches zero). This results in a row of animals which will each jump seperately.
Then, for 150 frames, every 8 frames, it will spawn an animal at a random X Position amongst the existing animal group, with their timer set to 12.
When all the animal objects have disappeared, it will finally run the "Got Through" message.
Sonic 2 Capsule
Firstly, an explosion spawns at lock's position. The lock then moves with an X Speed of 8, and a Y Speed of -4. It will then wait 29 frames.
Animals
Much like Sonic 1, it then spawns 8 animals at capsule's X Position - 28, and Y Position + 32, horizontally separated by 7, with timers starting from 154 and decreasing by 8 with each subsequent animal. This again results in a row of animals which will each jump seperately.
Then similarly, for 180 frames, every 8 frames, an animal will spawn at a random X Position amongst the existing animal group, with their alarm set to 12.
When all the animal objects have disappeared, the game will run the "Got Through" message.
S Tunnels
The S Tunnels in Green Hill Zone simply keep the Player rolling at all times. If their Ground Speed reaches 0 and they stand up, the game acts as if you have pressed down and they roll again instantly. Since the S tunnels have no flat ground, the Player will always roll down it and should never just crouch. However, as part of the function making the Player roll, if their Ground Speed does happen to be 0, it will set their Ground Speed to 2.
Pushable Blocks
Pushable blocks move 1 pixel at a time contact is made when pushing (the mechanics of which can be found in the Solid Objects page).
Falling Down
Pushable blocks are checking below themselves with a single sensor (only on the frames the block actually moves) to ensure there is floor beneath them. It will ignore the floor if the distance found is greater than 0. If they find no floor when they get pushed, they will switch to their falling state. While in this state, to prepare, and to avoid falling too soon and clipping the corner, they will begin to move horizontally at a speed of 4 in the direction of the push until they have moved 16 pixels. At this point they are completely over the ledge that they originally detected. They will then proceed to fall and land as normal.
Seesaws
The Seesaws in Sonic the Hedgehog (16-bit) are sloped platform (jump through) objects. They have a Width Radius of 48 and a Height Radius of 8, resulting in a 97 x 17 rectangle, this is their solid size.
The height arrays are as follows: Note: Because it's a platform, it has no extra slope information on either side.
When sloped down toward the right:
[36, 36, 38, 40, 42, 44, 42, 40, 38, 36, 35, 34, 33, 32, 31, 30, 29, 28, 27, 26, 25, 24, 23, 22, 21, 20, 19, 18, 17, 16, 15, 14, 13, 12, 11, 10, 9, 8, 7, 6, 5, 4, 3, 2, 2, 2, 2, 2]
Sloped down toward the left is the same as the above, but in the opposite order (the game just reverses the above list dynamically):
[2, 2, 2, 2, 2, 3, 4, 5, 6, 7, 8, 9, 10, 11, 12, 13, 14, 15, 16, 17, 18, 19, 20, 21, 22, 23, 24, 25, 26, 27, 28, 29, 30, 31, 32, 33, 34, 35, 36, 38, 40, 42, 44, 42, 40, 38, 36, 36]
When straight:
[21, 21, 21, 21, 21, 21, 21, 21, 21, 21, 21, 21, 21, 21, 21, 21, 21, 21, 21, 21, 21, 21, 21, 21, 21, 21, 21, 21, 21, 21, 21, 21, 21, 21, 21, 21, 21, 21, 21, 21, 21, 21, 21, 21, 21, 21, 21, 21]
Which isn't a slope at all, of course, but it does result in raising the platform collision area up well above the Seesaw's Y Positon.
Lastly, the spike ball simply has a hurt hitbox with a width radius of 8 and a height radius of 8, resulting in a 17 x 17 rectangle.
Rotation
The Seesaw can be in 3 states, sloped toward the left, sloped toward the right, and straight.
When the Player is standing/lands on on a Seesaw, the Seesaw's state changes based on the Player's X Position. The seesaw will be straight if the Player's X Position is within a radius of 8 pixels of the Seesaw's X Position, otherwise it will slope to whatever side they are on.
Launching the Spike Ball
When the Player lands on the Seesaw, and the seesaw's rotation is changed, it will launch a spike ball upwards. The speed of which is based on both where you landed and your landing speed.
If the Player landed in the middle (meaning, within the range that the board remains straight) the spike ball will launch with an X Speed of 1.078125 (1 pixel 20 subpixels) and Y Speed of -8.09375 (-8 pixels 24 subpixels).
Otherwise, if the Player's Y Speed is less than 10 on landing, the spike ball will launch with an X Speed of 0.796875 (204 subpixels) and Y Speed of -10.9375 (-10 pixels 240 subpixels).
Otherwise, the spike ball will launch with an X Speed of 0.625 (160 subpixels) and Y Speed of -14.
Of course, all these X Speeds would be negative if the spike ball started on the right side.
The spike ball has a gravity of 0.21875 (56 subpixels).
Launching The Player
When the spike ball lands, the Player simply launches with whatever Y Speed the spike ball launched at.
Flippers
The flippers in Casino Night Zone are sloped solid objects. They have a Width Radius of 24 and a Height Radius of 6, resulting in a 49 x 13 rectangle, this is their solid size.
The height arrays are as follows:
When down:
[7,  7,  7,  7,  7,  7,
7,  8,  9, 10, 11, 10,  9,  8,  7,  6, 5,  4,  3,  2,  1,  0, -1, -2,-3, -4, -5, -6, -7, -8,
-9, -10, -11, -12, -13, -14]
When straight:
[6,  6,  6,  6,  6,  6,
7,  8,  9,  9,  9,  9,  9,  9,  8,  8, 8,  8,  8,  8,  7,  7,  7,  7,  6,  6,  6,  6,  5,  5,
4,  4, 4,  4,  4,  4]
When up:
[5,  5,  5,  5,  5,  6,
7,  8,  9, 10, 11, 11, 12, 12, 13, 13, 14, 14, 15, 15, 16, 16, 17, 17, 18, 18, 17, 17, 16, 16,
16, 16, 16, 16, 16, 16]
When the Player lands on them, they are forced into a roll. While on them, Ground Speed is set to 1 (or -1 if the flipper is facing left), and horizontal input is ignored.
Flipping The Player
When the player presses jump, the flipper activates, and the Player is launched at new X and Y Speeds based on their X Position relative to the flipper.
Here's some code which emulates what the game does to calculate the Player's new X/Y Speeds when flipping.
// Get the difference between the Player's X Position and the Flipper's X Position, offset by 35
var xdiff;
if flipper_direction == 1 //(1 facing right, -1 facing left)
   x_diff = (player's X Position - flipper's X Position) + 35;
else
   x_diff = (flipper's X Position - player's X Position) + 35;

// Difference modified to be used as speed multiplier
var multiplier = min(x_diff, 64);
multiplier = multiplier * 32;
multiplier += 2048;
multiplier = -multiplier / 256;

// Difference modified to be used as angle for sine and cosine
var angle = (x_diff / 4) + 64;

// Convert hex angle to degree angle to use for sine and cosine in modern game engines (not necessary if you are using hex angles)
var degree_angle = (256 - angle) * 1.40625;

// Calculate sine and cosine
var sine = sin(degree_angle) * multiplier;
var cosine = cos(degree_angle) * multiplier;

// Launch player
player's X Speed = cosine * flipper_direction;
player's Y Speed = -sine;
Note:
- The jumping flag is not set when launched, because if it were, your velocity would be cut short if you let go of the jump button.
Animation
When the flipper is activated, it animates through each subimage (straight, up, straight), which each last for 4 frames. Then it resets to being down.
Note:
- Each subimage also uses it's accompanying height array for the slopes.
Fans (Horizontal)
The horizontal fans in Star Light Zone push the Player back, but don't actually affect their speed at all. What is actually happening is just an X Position shift each frame, based on how far away from the fan the Player is.
Because it doesn't affect the Player's speeds, the Player can accelerate and run or jump full speed while in the fan's influence.
Horizontal Fans use a Trigger Area instead of hitboxes.
If the Fan is facing right, the trigger top left is Fan's X Position - 80 and Fan's Y Position - 96, otherwise the trigger top left isFan's X Position - 160 and Fan's Y Position - 96. The trigger size is 240 x 112. This results in an area of 80 pixels behind the Fan, and 160 pixels in front of the Fan.
Fan Force
Here's some code which emulates how the game calculates how far to push the Player back:
// Distance
var x_diff = Player's X Position - Fan's X Position;
if fan's direction == -1 //(1 facing right, -1 facing left)
   x_diff = -x_diff;

// Calculate force
var fan_force = floor(x_diff);
if x_diff < 0
{
   // The Player is behind the fan (will invert and "double" the distance, because it is half the size of the area infront)
   fan_force = -(fan_force - 1)
   fan_force = fan_force * 2;
}

// Calculate final force based on distance
fan_force = fan_force + 96;
fan_force = (256 - fan_force) >> 4; // ">> 4" here is equivalent to dividing by 16, floored. You can substitute it for normal division to get a smoother motion.
if (Fan's direction == -1)
   fan_force = -fan_force;

// Move the player
Player's X Position += fan_force;
Fans (Vertical)
Vertical fans from Oil Ocean Zone work almost exactly the same way as horizontal fans, but on the Y axis.
Vertical Fans also use a Trigger Area instead of hitboxes.
The trigger top left is Fan's X Position - 64 and (Fan's Y Position - 96) - Oscillation, the trigger size is 128 x 144. This results in an area of 48 pixels below the Fan, and 96 pixels above the Fan, offset by the oscillation.
Note: "Oscillation" is a value which oscillates from 0 to 15 and back on a sine wave once every 88 frames
Fan Force
Here's some code which emulates how the game calculates how far to push the Player upwards:
// Distances
var x_diff = Player's X Position - Fan's X Position;
var y_diff = (Player's Y Position + oscillation) - Fan's Y Position; // oscillation is a value which oscillates from 0 to 15 and back on a sine wave once every 88 frames

// Calculate force
var fan_force = floor(y_diff);
if y_diff > 0
{
   fan_force = -(fan_force + 1)
   fan_force = fan_force * 2;
}
fan_force = fan_force + 96;
fan_force = (-fan_force) >> 4; // ">> 4" here is equivalent to dividing by 16, floored. You can substitute it for normal division to get a smoother motion.

// Move the player
player's Y Position += fan_force;
player's Y Speed = 0;
Spike Traps
When Marble Zone Spike traps fall, their Y Speed increases by 0.4375 each frame. When they reach full length, they spend about 60 frames there. After this they begin to rise by 0.5px per frame, or 1 pixel every 2 frames. The length they can fall varies.
They have a solid box at the top (which the Player can walk on & push against) however the spike area is a damage hit box which will simply hurt the Player upon contact but doesn't have solidity.
Conveyor Belts
A Scrap Brain Zone conveyor belt will simply add the belt speed to the Player's X Position, their speeds are unaffected.
Spring Ramps
Spring ramps aren't quite as simple as normal Springs. Firstly, they have a specific region where they actuate.
The ramp will activate if their X Position is within the green region as they stand on it.
When a Spring ramp activates they don't bounce the Player instantly, instead, the Player moves down a bit as the animation plays. There are two subimages, normal and down, and these both have different collision height arrays as shown below.
Spring ramps are sloped solid objects. They have a Width Radius of 28 and a Height Radius of 8, resulting in a 57 x 17 rectangle, this is their solid size.
The height arrays are as follows:
When relaxed:
[8,  8,  8,  8,  8,  8,
8,  9, 10, 11, 12, 13, 14, 15, 16, 16, 17, 18, 19, 20, 20, 21, 21, 22, 23, 24, 24, 24, 24, 24, 24, 24, 24, 24,
24, 24, 24, 24, 24, 24]
When pressed:
[8,  8,  8,  8,  8,  8,
8,  9, 10, 11, 12, 12, 12, 12, 13, 13, 13, 13, 13, 13, 14, 14, 15, 15, 16, 16, 16, 16, 15, 15, 14, 14, 13, 13,
13, 13, 13, 13, 13, 13]
Once activated it plays the down subimage for 4 frames, and the Player will lower with it but is otherwise unaffected and will keep walking. On the next frame it's back up and the Player is raised again but still unaffected, on the frame after this they will actually be in the air.
So how fast do they bounce the Player? Well, that's not perfectly simple either. It will bounce the Player up with a Y Speed of -4, and depending on their X Position relative to the ramp it will subtract a second modifier from their Y Speed. This is all dependant on the positions where the Player's X Position is right now as they are bounced, not where they were when activated it.
From left to right this modifier can be 0, 1, 2, 3 or 4.
So if the Player happened to be in section 3, their Y Speed would become -4, minus the modifier of 2, resulting in -6.
X Speed is also affected, if absolute X Speed happens to be larger than or equal to 4, the modifier will be added to (or subtracted from) X Speed. If the Player is in the third section (which has a modifier of 2), and they have an X Speed of 5, their X Speed would become 5 + 2.
Note:
- This all gets capped at 6 in Sonic 2 due to the speed cap still being present in the air.
Spring Caps
The red spring caps that cover the tubes in Chemical Plant Zone work like springboards, but are slightly stronger than a Yellow springboard. They set the Player's Y Speed to -10.5 (-10 pixels 128 subpixels) upon collision.
Spinners
The black spinners that propel you forward in Chemical Plant Zone set the Player's X Speed to 16, unless if they're already moving faster than that.
Ski Lifts
The ski lifts in Hill Top Zone move with an X Speed of 2, and a Y Speed of 1.
Balloons
The balloons in Carnival Night Zone set Y Speed to -7 when the Player collides with them, no matter what their angle of collision. X Speed is not affected.
Balloons have a hitbox with a width radius of 8 and a height radius of 8, resulting in a 17 x 17 rectangle.
Cannons
The cannons in Carnival Night Zone set the Player's X Speed to 16 * cosine(p), and Y Speed to 16 * -sine(p), where p is the angle of the cannon.
Bouncy Mushrooms
The mushrooms in Mushroom Hill Zone work like springs only each successive bounce is higher than the last, up to three bounces. The first bounce sets Y Speed to -6.5 (-6 pixels 128 subpixels), the second, -7.5 (-7 pixels 128 subpixels), and the third, -8.5 (-8 pixels 128 subpixels).
Points
When you hit a Badnik or other point-bearing item (such as Bumpers), a small score notification will fly up out of it. After it spawns at the object's X and Y Position, it begins with a Y Speed of -3, and will slow down by 0.09375 (24 subpixels) each frame. Once it is no longer moving, it will vanish. This will take around 32 frames.
