Add a Custom Badnik to Sonic 2 SMS
From Sonic Retro
(Original guide by Glitch)
Contents
Requirements
- Sonic 2 SMS disassembly (download a fresh copy from the SVN repo).
- Aspect Edit (or alternative tile editor)
In addition to the software requirements, this guide assumes that you have at least a basic understanding of Z80 assembly with the WLA-DX assembler.
Introduction
In this tutorial we will cover the steps required to add a new badnik to Sonic 2 SMS. The badnik of choice is Coconuts since this will give us the opportunity to explore some of the more advanced features of the Aspect engine. We'll be using the excellent tile art provided by tokumaru as the basis for the animations. The badnik will be added to Green Hills Zone.
Adding a new object to the game is quite a long process. We'll be breaking this down into a few tasks:
- Creating the tiles
- Loading the tiles into the level
- Creating a skeleton object
- Defining animation frames
- Adding the new object to the level
- Developing the object logic
Creating the Tiles
This is probably the easiest part of the process. The main complication is figuring out how best to order the tiles in the tileset in order to achieve optimum VRAM usage. As you should know, each tile is 8x8 pixels. SMS hardware sprites consist of two tiles stacked vertically to produce one 8x16 sprite. Multiple sprites are combined to create an object. We need to take this into account when creating the tileset since the SMS will read two consecutive tiles for each hardware sprite. Fig. 1 should help to clarify the tile grouping.
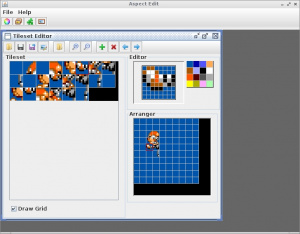
Fire up your tile editor of choice. Aspect Edit is highly recommended for this since it directly supports the compression methods used by the Aspect engine. If you choose to use another tile editor you must compress the data manually. A utility to do this is provided in the SVN disassembly (s2pack.exe). Draw the tiles and group as shown in fig. 2. To save time, an example tileset has been uploaded here. Save the tileset as art/badniks/art_badnik_coconuts.bin.
Loading the Tiles
Now that we have the tileset data we need to include it in the build and tell the engine to load it along with the rest of the level. Let's try to find room in the ROM for the new data. If you downloaded the pre-made tileset we'll need to find about 508 bytes of free space. The easiest way to determine this is to build the ROM (run build.bat) and examine the resulting "build_report.txt" file. There should be enough room in bank 10 so open src/includes/bank10.asm and include the new tileset at the end:
Art_SHZ_Level_Tiles:		;$8000
.incbin "art\level\shz\art_shz_level_tiles.bin"

Art_GHZ_Level_Tiles:		;$91DC
.incbin "art\level\ghz\art_ghz_level_tiles.bin"

Art_GMZ_Level_Tiles:		;$A2AC
.incbin "art\level\gmz\art_gmz_level_tiles.bin"

Art_Ending_Text:			;$B2E2
.incbin "art\fonts\art_ending_text.bin"

; add the tileset here.
Art_Badnik_Coconuts:
.incbin "art\badniks\art_badnik_coconuts.bin"
Note the use of the "Art_Badnik_Coconuts" label. We'll use this later on to reference the new tile data. Now that we've included tiles in the build we need to load them along with the other Green Hills zone badniks. Open src/zone_tilesets.asm in your editor. Scroll down a few lines and locate the section that looks like the following:
;Green Hills Zone
.db :Art_GHZ_Level_Tiles
	.dw $2000
	.dw Art_GHZ_Level_Tiles
	.dw Tileset_GHZ
.db :Art_GHZ_Level_Tiles
	.dw $2000
	.dw Art_GHZ_Level_Tiles
	.dw Tileset_GHZ
.db :Art_GHZ_Level_Tiles
	.dw $2000
	.dw Art_GHZ_Level_Tiles
.dw Tileset_GHZThese three structures are used by the engine to determine which tiles to load and where in VRAM they should be loaded for each act of GHZ. The structure reads as follows:
- .db :Art_GHZ_Level_Tiles - this defines the bank that contains the level tiles. The ":label" syntax is a special WLA-DX directive that means "the ROM bank containing this label".
- .dw $2000 - this is the VRAM address at which to load the level tiles.
- .dw Art_GHZ_Level_Tiles - a pointer to the level tile art within the bank specified above.
- .dw Tileset_GHZ - this is a pointer to a list of object tilesets to load for this act. We'll be modifying this list to include our new badnik.
Scroll down further until you reach the "Tileset_GHZ" list:
Tileset_GHZ:
.db :Art_Icons_Numbers
	.dw $0200
	.dw Art_Icons_Numbers
.db :Art_Monitors_Generic
	.dw $09C0
	.dw Art_Monitors_Generic

...*SNIP*...

.db :Art_Badnik_Crab
	.dw $14C0
	.dw Art_Badnik_Crab
.db $FF
This structure is nearly identical to the previous one: the bank number of the tile data, the VRAM address to load and a pointer to the tile data. The single $FF byte signals the end of the list. Now that we have included the tileset in the build, we have two out of the three pieces of data:
.db :Art_Badnik_Coconuts
	.dw xxxx
	.dw Art_Badnik_Coconuts
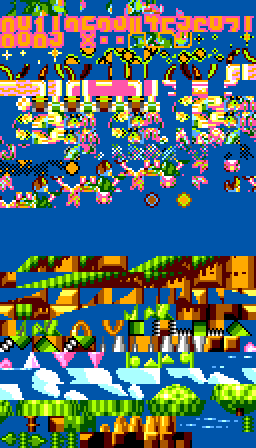
We need to find somewhere to load the tiles into VRAM. We can do this using Meka's VRAM tile viewer. Fire up the emulator and load GHZ. You should see something similar to fig.3. There's a large area of empty space between the last badnik tiles and the start of the level tiles at address $2000. For simplicity's sake let's load the coconuts tiles at address $1A00. Normally we'd want to pack this tightly against the last tile of the previous badnik. Your tileset list should now look similar to the following:
Tileset_GHZ:
.db :Art_Icons_Numbers
	.dw $0200
	.dw Art_Icons_Numbers
.db :Art_Monitors_Generic
	.dw $09C0
	.dw Art_Monitors_Generic

...*SNIP*...

.db :Art_Badnik_Crab
	.dw $14C0
	.dw Art_Badnik_Crab
.db :Art_Badnik_Coconuts
	.dw $1A00
	.dw Art_Badnik_Coconuts
.db $FF
To test, build the ROM and load it into Meka. You should see the new tiles in the VRAM tile window (see fig.4). Now that the tiles are in VRAM we can start defining animation frames.
Creating a Skeleton Object
Now we're getting to the interesting part: we need to tell the engine about our new object. Open src/object_logic_pointers.asm in your editor. This is the definitive list of all objects in the game. Each entry in this list points to a logic sequence for a particular object. As you can see from the comments, the logic routines are spread out across three banks: 28, 30 and 31. There is a rough grouping for each bank. Bank 31 contains logic for Sonic, powerups (monitors, chaos emeralds, etc), and some misc. objects. Bank 28 mostly contains badnik logic. Bank 30 consists of bosses, more badniks and some more misc objects.
Where we choose to place the logic doesn't really matter. We just need somewhere with enough free space. By checking build_report.txt, we can see that bank 30 has about 1,000 bytes of free space, so this seems like a good candidate. Open src/includes/bank30.asm and add the following:
.include "src\object_logic\logic_coconuts.asm"This file doesn't exist yet. Don't worry, we're going to create it next. Start a new file, fill it with the following and save it as logic_coconuts.asm:
Logic_Coconuts:
.dw Coconuts_State00
.dw Coconuts_State01

Coconuts_State00:
.db $01, $00
    .dw Coconuts_Init
.db $FF, $00

Coconuts_State01:
.db $06, $01
    .dw Coconuts_Main
.db $FF, $00


Coconuts_Init:
    ld      (ix + Object.StateNext), 1
    ret

Coconuts_Main:
    ret
So, what have we done here? With the first three lines we have defined a new logic sequence called "Logic_Coconuts", that consists of two states (we will be adding additional states later). By convention, the first state is treated as an initialisation state (a sort of constructor). Its job is to load any default values that are required by the object. Let's move on to the next four lines:
Coconuts_State00:
.db $01, $00
    .dw Coconuts_Init
.db $FF, $00
This sequence of bytes is the logic script for state 0. It tells the game engine what needs to be performed in this state. It reads as follows: for one iteration of the game loop, display animation frame 0 and run procedure Coconuts_Init. The $FF, $00 sequence is a command that means "end of this script". Compare this with the script for Coconuts_State01, which reads as follows: for six iterations of the game loop, show animation frame 1 and run procedure Coconuts_Main. Once the game engine encounters an $FF, $00 sequence, and providing it hasn't received any other instructions, it will simply start the current state's script again from the beginning.
For the time being, this logic sequence doesn't really do much. The initialiser procedure simply sets the object's state to 1 and the Coconuts_Main procedure does nothing. This is the bare logic skeleton that is required for a new object. Next, we need to add this logic sequence to the list of objects in the object_logic_pointers.asm file. Be careful when adding to this list: the pointer needs to go in the correct section for the bank and order is important. More specifically, the order in which the object appears in this list determines the object's ID.
Since the object was added to bank 30, add the logic sequence to the end of the bank 30 list:
;Bank 30 objects
.dw Logic_Title_SonicHand		;50 - Sonic's hand (title screen)
.dw Logic_Title_TailsEye		;51 - Tails' eye (title screen)
...*SNIP*...
.dw DATA_B30_96FC                       ;5F
.dw Logic_Coconuts                      ;60
The new object's ID is $60. While we're at it, let's define a constant so that we can refer to the new badnik by label. Open src/include/objects.asm and add the following to the bottom of the file:
.def Object_Coconuts $60So, now the engine is aware of our new badnik but we haven't actually defined any animation frames yet.
Defining Animations
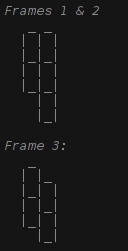
As mentioned previously, objects are represented on screen by groups of 8x16 sprites. These sprites are arranged around the object's centre point using "mapping" data. Mapping data is simply horizontal and vertical offsets, relative to the centre, for each hardware sprite. Sprite mappings are defined in the file src/sprite_arrangement_data.asm. Looking back at the tile grouping diagram (fig.1), there are 3 frames of animation for the Coconuts badnik. For these three frames, we'll need two distinct sets of mappings: one set for the first two frames, and one for the last frame.
Add the following to sprite_arrangement_data.asm:
SprArrange_Coconuts_1:
.dw -16, -8
.dw -16,  0
.dw   0, -8
.dw   0,  0
.dw  16,  0

SprArrange_Coconuts_2
.dw -16, -8
.dw  -8,  0
.dw   0, -8
.dw   8,  0
Each line consists of two words: vertical offset and horizontal offset, respectively. E.g. ".dw -16, -8" will place the first sprite 16 pixels to the left, and 8 pixels above the object's centre position.
According to build_report.txt, the bank containing the object animation data is nearly full so we'll need to make some room. Luckily there are a lot of unused mapping data that can be deleted. Search for label "DATA_B31_A14A". Scroll down a little further and you should see a line that reads:
.db $F0, $FF, $F8, $FF ; $470-$477Everything below this line until the next label ("DATA_B31_A606") can safely be removed.
Now that we've defined the mappings we need to tell the engine which tiles to use. The actual animation frames are defined in src/object_animations.asm. Open it in your editor. The file starts with a list of pointers to the actual frame data. We'll add an entry to this in a minute. First, let's examine the structure of an animation frame:
DATA_B31_8188:
.db $06, $04, $1C
	.dw SprArrange_3x2_BC	;sprite arrangement
	.dw $0000		;vertical offset
	.dw $0000		;horizontal offset
	.dw DATA_B31_85C9	;pointer to char codes
The first byte ($06 in this case) is the number of sprites in this frame. The next two ($04 and $1C) are currently unknown. These will be copied verbatim. The next word is a pointer to the sprite mapping data. The next two words are offsets that will be applied to the object's X/Y coordinates to determine its centre point. The last word is a pointer to an array of tile indices (within the badnik's tileset) that define the tiles to display for the frame.
Add the following to the file:
AnimData_Coconuts:
.dw AnimData_BlankFrame
.dw AnimData_Coconuts_Frame1
.dw AnimData_Coconuts_Frame2
.dw AnimData_Coconuts_Frame3

AnimData_Coconuts_Frame1:
.db $05, $04, $1C
    .dw SprArrange_Coconuts_1
    .dw $0000
    .dw $0000
    .dw AnimData_Coconuts_Chars1
AnimData_Coconuts_Frame2:
.db $05, $04, $1C
    .dw SprArrange_Coconuts_1
    .dw $0000
    .dw $0000
    .dw AnimData_Coconuts_Chars2
AnimData_Coconuts_Frame3:
.db $04, $04, $1C
    .dw SprArrange_Coconuts_2
    .dw $0000
    .dw $0000
    .dw AnimData_Coconuts_Chars3

AnimData_Coconuts_Chars1:
.db $00, $02, $04, $06, $08
AnimData_Coconuts_Chars2:
.db $00, $02, $0A, $0C, $0E
AnimData_Coconuts_Chars3:
.db $00, $12, $10, $14
Here, we're defining 4 frames: one blank frame (used by the initialisation state) and the three required for the coconuts animation. Now that we've defined our badnik's animation frame list we need to add it to the list of pointers at the start of the file. The ordering of the pointers must match the order defined in object_logic_pointers.asm. Add "AnimData_Coconuts" to the end of the list:
.dw DATA_B31_9C9E
.dw DATA_B31_9CFA
.dw AnimData_Coconuts
The new object is now fully integrated into the game engine and can be added to the level's object list.
Adding the Object to a Level
Each zone has an object layout list. This is, quite simply, an array of 9-byte structures each of which define an object's X/Y coordinate, the index of the first tile in its tileset within VRAM, and some additional flags. See fig.6 for an example. The 9 bytes structure highlighted in the example reads as follows: 23 C0 02 4E 01 00 00 A6 00
| Value | Description |
|---|---|
| 23 | The object's ID. |
| 02C0 | The X coordinate. |
| 014E | The Y coordinate. |
| 00 | Per-object flags. |
| 00 | Object parameters (or subtype) |
| A6 | Index of the object's first tile (for when the object is facing right). |
| 00 | Index of the object's first tile (for when the object is facing left). |
Normally, when adding or changing an object in the level's object layout list we would need to open the relevant binary file in a hex editor to make the modifications. However, for GHZ Act 1 the binary data has been converted to an assembly file to make it easier to edit. Open layout/ghz/object_layout_ghz1.asm in your editor. You should see something similar to the following:
.db Object_Crab
    .dw $02C0       ; xpos
    .dw $014E       ; ypos
    .db $00         ; flags
    .db $00         ; params
    .db $A6, $00    ; char codes
.db Object_Crab
    .dw $0500
    .dw $0110
    .db $00
    .db $00
    .db $A6, $00
.db Object_Newtron
    .dw $08D0
    .dw $0060
    .db $00
    .db $00
    .db $8A, $8A
To add our Coconuts badnik to GHZ Act 1 we will need to add an entry to this list:
.db Object_Coconuts
    .dw $0130
    .dw $00F0
    .db 0
    .db 0
    .db $D0, 00
Hopefully, this will be fairly self-explanatory. The object will be placed at coordinates 304,240 ($0130, $00F0) and its tileset starts at index 208 ($D0). Calculating the tileset's index is relatively straightforward: simply take its VRAM address and divide by 32. In our case, we loaded the tileset at VRAM address $1A00 so the tile index is $1A00 / 32 = $D0. Alternatively, if you place your mouse over the tile in Meka's VRAM display window it will tell you the index in the status bar.
You can use Aspect Edit to help determine the location for the object: the X/Y coordinate of the mouse cursor is displayed in the "Info" section, on the right hand side.
Once you have added the new entry to the list, build the ROM and you should see something similar to the screenshot in fig.7. Great, we've added the badnik to the level but it doesn't do much yet. We can't interact with it. Next, we will need to add some logic.
Developing the Logic
In progress...


