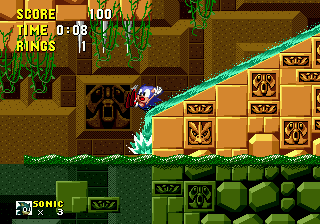
Mega Drive Graphics
From Sonic Retro
TODO: Shadow/highlight mode, interlacing mode, and H32 mode.
The purpose of this page is to give a basic overview of how the Mega Drive renders graphics, to help aid in understanding how graphics work in a Sonic game.
The Mega Drive uses a Yamaha YM7101 (referred to as "Sega 315-5313" in the hardware) to process all of the graphics and get it displayed on a television. It is commonly referred to as the "Video Display Processor", or "VDP" for short.
Contents
Color palettes
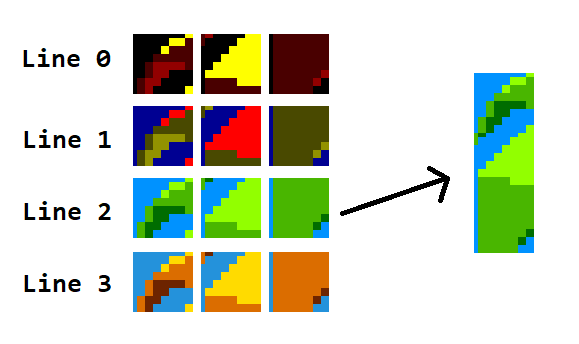
A color palette is simply just a group of colors. The Mega Drive supports up to 64 colors to be loaded at one time (into a section of memory in the VDP called "CRAM" or "Color RAM"). These 64 colors are then split up into 4 smaller sections called "palette lines".
Example of a color palette.
Tiles
Alongside the palette, the VDP uses "tiles" as the building blocks for all the graphics used in a Mega Drive game. A tile can simply be thought of as an 8x8 pixel sized image. The VDP has a section of memory called "VRAM" or "Video RAM" that can hold up to 2048 tiles. Larger and more coherent images are then pieced together using these tiles, which we'll get to how that's done a little later. A tile can only use up to 16 colors in the palette, which which colors it uses being what palette line the tile is assigned. The first color in the palette line is always transparent in a tile.
Example using 3 tiles, with how they would appear on each palette line using the palette above. Also shown grouped together, all using line 2.
Tilemaps and Planes
The VDP can display 2 "background planes" or "layers". There's a foreground plane, referred to as "Plane A", and a background plane, referred to as "Plane B". There's also a special plane called the "window plane" that can be shown in the place of plane A in a certain area of the screen.
These planes use a 2 dimensional array of tiles with a fixed size called a "tilemap" to display graphics. In a tilemap, you can set which tile to use, which palette line that a tile uses, make a tile flip horizontally and/or vertically, and also set a tile to have "priority", which we'll get to later. The size of a plane can be set to 32x32 tiles, 32x64, 64x32, 64x64, 128x32, and 32x128. The size applies to both planes at the same time, they do not have individual size settings. These planes can also be scrolled, and repeats infinitely outside the plane boundaries. There are a few scroll settings. You can scroll a plane horizontally in its entirety, scroll each individual 16 pixel rows, or scroll each every individual scanline. Vertically, you can scroll a plane in its entirety, or scroll each individual 16 pixel columns.
Horizontal scrolling information gets stored in a dedicated section of VRAM, while vertical scrolling information gets its own memory section called "VSRAM" or "Vertical Scroll RAM".
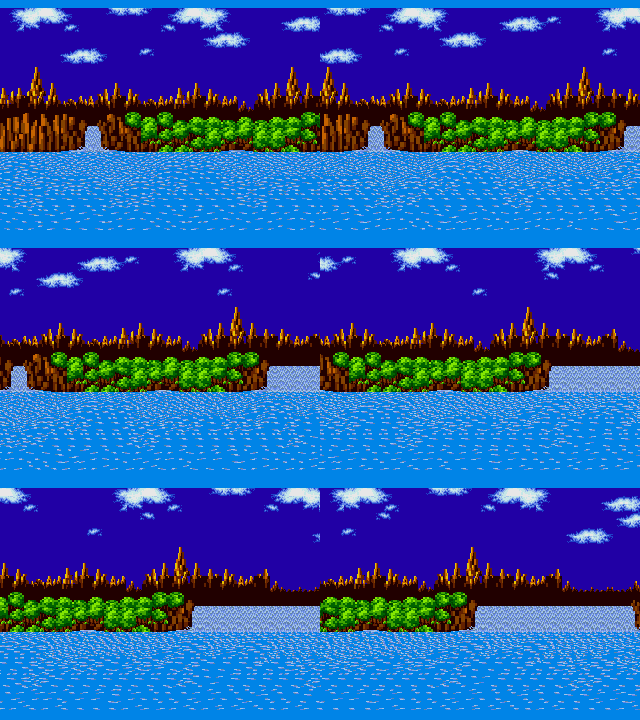
Plane B in Green Hill Zone, scrolling horizontally by scanline to give it its parallax effect.
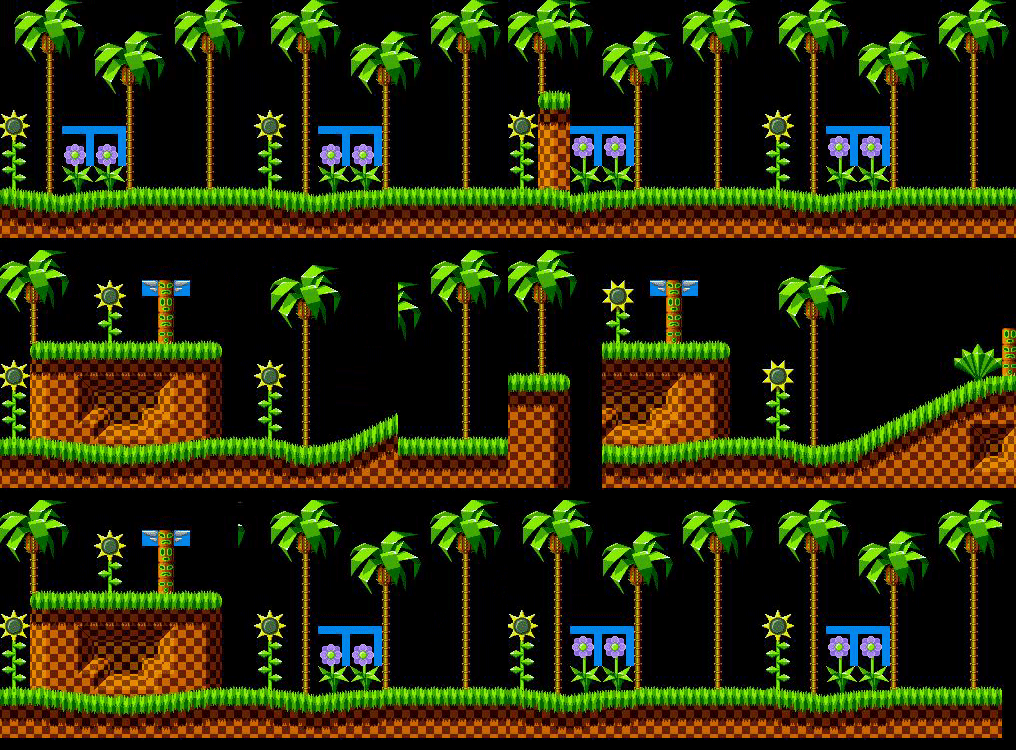
Now, you may be wondering how tilemaps larger than the size of a plane gets displayed if there's so little space. Well, since you can set the size of a plane to be larger than the screen, you can have it so that as you scroll, you load in new tiles outside of the screen, which gives the illusion of a larger tilemap being displayed.
Plane A in Green Hill Zone, reloading tiles as the game's camera scrolls through the level.
Sprites
A sprite is a group of tiles that can be individually moved anywhere on the screen. The width and height of a sprite can go up to 4 tiles. Like a tile in a tilemap, a sprite can be given a palette line, be assigned which tile to use, be flipped, and also have a "priority" bit. It also has X and Y position properties. The setting applies to all the tiles in a sprite, and not for each individual tile in it. When a sprite is drawn, it first draws the tile that it gets assigned, and then for the other tiles, it just goes to the next tile in VRAM, and draws them column by column. All of sprites needed to draw gets stored in a dedicated section of VRAM.
A sprite's X and Y position can range from 0 to 511. However, the top of the screen starts at (128, 128) for sprites, allowing you some wiggle room for going offscreen to the left.
How Sonic's ball sprite, a singular 4x4 tile sprite, is arranged.
Sprites can also be grouped together to form a larger image, or to build a sprite using smaller pieces to prevent padding tiles from having to be used to fill larger sprite pieces.
How Sonic's standing sprite is arranged. Uses 3 3x1 sprites and 1 4x2 sprite.
There is a limit with the amount of sprites you can draw on screen at once. The simplest limit is that only up to 80 sprites can be displayed in one frame. Another limit is that only up to 20 sprites can be on one scanline. The final limit is that there can only be up to 320 pixels from sprites drawn on a single scanline. These limits make it undesirable to form large images out of sprites, and thus is why you see something like Sonic 1 and 2's title screen emblem and logo on plane A instead of it being made out of sprites.
When one of the scanline limits is reached, it stops drawing sprite pixels any further until the next scanline.
Sonic 1 actually abuses the scanline limits to make Sonic appear behind the logo in the title screen. Offscreen to the left are a collection of sprites made specifically to hit the scanline limits so that Sonic's body doesn't appear over the logo.
Sonic 1's title screen with and without the sprite scanline limits imposed.
Sonic 2 does something slightly different. The VDP also has a feature in which if it finds a sprite whose X position is set to 0, it will stop drawing sprites for the rest of the scanline in which the sprite lies at. So, it's basically the same effect as if you were to set up a bunch of sprites, but without actually having to waste a bunch of sprites.
Display Order
The order in which the planes and sprites should appear is as so:
- Background color (selected from any of the colors in the entire palette)
- Plane B tiles with priority bit not set
- Plane A tiles with priority bit not set
- Sprite tiles with priority bit not set
- Window plane tiles with priority bit set
- Plane B tiles with priority bit set
- Plane A tiles with priority bit set
- Sprite tiles with priority bit set
- Window plane tiles with priority bit set
This is where the priority bit mentioned before comes in. Basically, it allows the tiles that have priority to be displayed over tiles that don't.
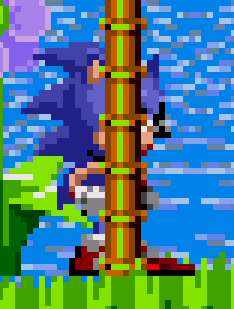
Palmtree tiles in Plane A have their priority bit set, so it appears over Sonic's sprites, which don't have their priority bit set.
Sprites also have an order in which they are drawn. Sprites stored earlier in the sprite list get rendered over sprites that are stored later in the list.
In Sonic 2, the ring sprites are one of the first things sent to the sprite list, so the title card text sprites get sent later. Since both don't have their priority bits set, the ring sprites appear over the text.
Rendering Process + Blanking and Interrupting
A CRT television would render a frame line by line, pixel by pixel using a electron beam that would move across the screen. For each pixel, the VDP would determine which pixel to have sent to the TV to be drawn. After a line of pixels is drawn, the CRT would temporarily stop drawing so that it can put the beam back at the left side of the screen to draw the next line. The period in which the beam resets its position is called a "horizontal blanking period". The VDP has a feature in which the Mega Drive's CPU process can be interrupted at the start of a horizontal blanking period (a "horizontal (blank) interrupt"), typically to quickly have something in the VDP changed.
The palette gets changes to a more green palette once the TV has rendered up to the scanline in which water should be rendered at, using a horizontal interrupt to tell the CPU to change the palette.
Once the entire frame is drawn, the CRT stops drawing again so that it can put the beam back at the top left side of the screen to draw the next frame. The period in which this happens is called a "vertical blanking period". The VDP also can interrupt the CPU at the start of this period (called a "vertical (blank) interrupt"), typically to update the VDP with the data needed to draw the next frame.
Direct Memory Access
Direct memory access (commonly referred to as "DMA") is a common feature in computers that allow for very fast data transferring making the CPU do it manually. In the case of the Mega Drive, the VDP has this feature for filling VRAM with a certain value (VRAM fill), copying from a section of VRAM to another (VRAM copy), and also the ability to quickly transfer data from cartridge ROM or the main system RAM into VRAM, CRAM, or VSRAM (68000 to VDP). Whenever a 68000 to VDP DMA is used, the 68000 CPU is halted until the data is transferred. However, the overall time taken to do the transfer is still faster than if the 68000 CPU manually transferred data over into VDP memory. The other 2 modes do not halt the CPU since it doesn't need to access it.
Sonic games usually use DMA to quickly transfer sprite data, scroll data, palette data, and Sonic's sprite tiles into VDP memory via 68000 to VDP DMA, and VRAM fill to clear out sections of VRAM.
| Mega Drive Sonic Community Hacking Guide | |
|---|---|
| Introduction | |
| Beginner Mistakes | Mega Drive Graphics | Mega Drive Audio | Mega Drive Processing |

