Difference between revisions of "SPG:Game Objects"
From Sonic Retro
(Added visual hitbox/solid box examples) |
(Added spring ramp) |
||
| Line 161: | Line 161: | ||
===Chemical Plant=== | ===Chemical Plant=== | ||
| + | |||
| + | ====Spring Ramps==== | ||
| + | Spring ramps aren't quite as simple as normal springs. Firstly, they have a specific region where they actuate. | ||
| + | |||
| + | [[Image:SPGSpringRampActuationRegion.png]] | ||
| + | |||
| + | The ramp will activate if his X position is within the green region as he stands on it. | ||
| + | |||
| + | When a Spring ramp activates they don't bounce Sonic instantly, instead, Sonic moves down a bit as the animation plays. There are 2 subimages, normal and down, and these both have different collision height arrays as shown below. | ||
| + | |||
| + | [[Image:SPGSpringRampSolidty.png]] | ||
| + | |||
| + | On the left is how the solidity appears in-game, on the right is the height array as it is stored, it simply gets scaled by 2 horizontally. The ramps only use this collision data and no hitboxes, and it would be confined to the sprite size (even though it appears to go past it here). | ||
| + | |||
| + | Once activated it plays the down subimage for 4 frames, and Sonic will lower with it but is otherwise unaffected and will keep walking. On the next frame it's back up and Sonic is raised again but still unaffected, on the frame after this Sonic will actually be in the air. | ||
| + | |||
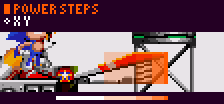
| + | So how fast do they bounce Sonic? Well, that's not perfectly simple either. It will bounce Sonic up with a ''ysp'' of -4, and depending on Sonic's ''xpos'' position along the ramp it will subtract a second modifier from his ''ysp''. This is all dependant on the positions where Sonic's ''xps'' is right now as he is bounced, not where he was when activated it. | ||
| + | |||
| + | [[Image:SPGSpringRampPowerSteps.png]] | ||
| + | |||
| + | From left to right this modifier can be 0, 1, 2, 3 or 4. | ||
| + | |||
| + | So if Sonic happened to be in section 3, his ''ysp'' would become -4, minus the modifier of 2, resulting in -6. | ||
====Spring Caps==== | ====Spring Caps==== | ||
Revision as of 22:55, 29 December 2019
Notes: Research applies to all four of the Mega Drive games, and Sonic CD. If there are any varying differences between the games, this will be covered below.
Contents
Sonic's Hitbox
Some objects are solid, but many objects use a different rectangular hitbox in order to interact with Sonic. Hitboxes in the classic Sonic games are non-solid object only areas of collision. They can pass over eachother without pushing eachother away but will trigger a reaction specific to that object. While Sonic already has collision information for colliding with terrain tiles and solid parts of objects, hitboxes of items and objects will only care about Sonic's own hitbox, so whenever hitboxes are mentioned, it is not a solid box that Sonic can push against - unless otherwise stated.
His hitbox changes size depending on what he's doing, the sizes are roughly 17px by 33px while upright, 17p by 21px while crouched, and 17px by 23px while rolling. These would all be centred around on Sonic's position.
General Objects
General objects appear in many zones and games and the code should be the same between them.
Rings
Rings have a hitbox sized 12px x 12px (while their sprite is larger, at 16px), so Sonic can get very close to a ring before a collision occurs and he collects it.
Springboards
Red springboards propel Sonic at a speed of 16, and yellow springboards at a speed of 10. If the springboard faces up or down, the value is either negative or positive, respectively, and Y speed is set to it. If the springboard faces left or right, the value is either negative or positive, respectively, and X speed is set to it. Vertical springboards don't affect X speed and likewise horizontal springboards don't affect Y speed.
Diagonal Springboards
There are no diagonal springboards in Sonic the Hedgehog (16-bit). But there are in Sonic 2 (16-bit), 3, K, and CD. Sonic 2, 3, and K work the same way, but Sonic CD is different.
In Sonic 2, 3, and K, a diagonal spring sets both X speed and Y speed to the springboard's value, with the appropriate sign. So a red springboard facing up and to the right sets Y speed to -16 and X speed to 16. The trouble with this method is that Sonic is technically bounced faster diagonally than horizontally or vertically. This is because they didn't bother to calculate the sine functions.
In Sonic CD, they do however. Conveniently, the absolute sine and cosine of a 45 degree angle are the same, so you only need one value. It comes out to 11.3125 for Red springs and 7.0703125 for Yellow ones.
Horizontal Control Lock
When Sonic bounces away from a horizontal springboard (red or yellow), he cannot brake or otherwise affect his X speed for 16 steps. The engine achieves this by setting the same horizontal control lock as when sliding back down steep inclines (in S3&K, bytes $32-33 in the player object's status table). Why lock the horizontal controls? The player is likely to be pressing in the direction of the springboard as they run into it, and this would cause Sonic to bounce away in his braking animation. Temporarily ignoring input is a quick and elegant solution.
Bumpers
Bumpers such as those in Spring Yard Zone set Sonic's X speed to 7*cosine(p), and Y speed to 7*-sine(p), where p is the angle measured from the bumper's centre to Sonic's. This is regardless of Sonic's velocity when he hits the bumper. They have a hitbox sized 16px x 16px, which is smaller than their sprite. Other than the hitbox repulsion, there is no solidity to bumpers.
Bridges
The bridges in Sonic 1, 2 and 3 are known for their dynamic movement as Sonic moves over them. Bridges are set up with a controller object and an array of log objects which the controller object creates, though this can just be an array of values to represent the segments in most engines now. The controller object contains a few variables: There's the length (in segments) of the bridge, which is usually 12, but it can be longer; there's the index of the segment Sonic is standing on, which starts at 0 for the leftmost segment and ends at length-1.
Depression Amount
The depression amount is the lowest the bridge can go at any given time. This changes depending on the log Sonic is standing on. To get the current maximum depression amount in pixels the bridge controller uses predetermined values for each log.
The values go up in 2's, starting at 2 and continuing to the middle, with the other side being a mirror of the first half. For example, a bridge with length 5 will have the values 2,4,6,4,2 and a bridge with length 6, the values would be 2,4,6,6,4,2. The bridges commonly found in Sonic (12 segments in length) would have the values 2,4,6,8,10,12,12,10,8,6,4,2.
To get the current maximum depression for the bridge, the game uses the value from the log currently being stood on. We'll call the current value MaxDepression.
Calculating Each Log Depression
The Y position of the segments in the bridge depend on the log that Sonic is currently standing on, as so:
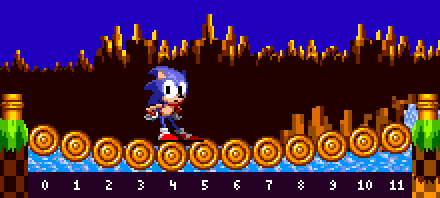 Sonic is on the 5th segment, we'll call this the CurrentSegment and it's value is 5.
In this example, the depressions would look as follows: 2,4,6,8,10,12,12,10,8,6,4,2 So the current MaxDepression for the bridge will be the 5th log's value, which is 10.
To calculate the position of each log, we calculate how far it is from CurrentSegment relative to the edge it's near. We will call this value LogDistance.
Segment 0 is 1/5 of the way to CurrentSegment, so it's LogDistance is 1/5 or 0.2.
Segment 1 is 2/5 of the way to CurrentSegment, so it's LogDistance is 2/5 or 0.4.
Segment 4 is 5/5 of the way to CurrentSegment, so it's LogDistance is 5/5 or 1.
Working from the other side, we use the distance from the end to CurrentSegment, rather than from the start.
Segment 11 is 1/8 of the way to CurrentSegment, so it's LogDistance is 1/8 or 0.125.
Segment 6 is 6/8 of the way to CurrentSegment, so it's LogDistance is 6/8 or 0.75.
(Since we've already calculated segment 4 from one direction, there's no need to do it from the other).
We then use LogDistance to calculate it's position:
LogY = BridgeY + MaxDepression * sine(90 * LogDistance).
Some code to calculate these automatically may go as follows (assumes first segment index starts at 0 in loop for other purposes, but CurrentSegment would start at 1).
 for (i = 0; i < SegmentAmount; i++)
 {
   //get difference of log
   var log_difference = abs((i+1)-CurrentSegment);

   //get opposite distance from current log to a side, depending if before or after CurrentSegment
   if (i < CurrentSegment) LogDistance = log_difference / CurrentSegment; else LogDistance = log_difference / ((SegmentAmount - CurrentSegment) + 1);

   //get y of log using max depression and log distance (reversed)
   LogY = BridgeY+((MaxDepression) * sine(90 * (1 - LogDistance)));
 }
Meanwhile, all these depression values are multiplied by the sine of the angle in the controller object that counts to 90 when Sonic is standing on top, and down to 0 when Sonic gets off, so the depression will smoothly increase with time when Sonic jumps on to the bridge, and then smoothly decrease when he leaves it.
Breaking Walls
In Sonic 1, 2, 3, & K, the character's absolute X speed must exceed 4.5 in order to break through destructible walls when rolling (except for Knuckles, who busts walls on contact, and doesn't need to be rolled up). X speed is unaffected by the collision, as well.
However, when Knuckles breaks walls in Sonic 3 & Knuckles, though his X speed is unaffected, he doesn't move during the frame in which he hits the wall. The same thing is true when Sonic spindashes through a wall in Sonic 3 & Knuckles.
In Sonic CD, the X speed threshold is removed. Sonic can break through destructible walls by simply jumping near them, or rolling into them at any speed.
Breakable Blocks and Rocks
When Sonic jumps on top of breakable objects, such as the rocks in Hill Top Zone, blocks in Marble Zone, or the tube caps in Chemical Plant Zone, he bounces away with a Y speed of -3. X speed is unaffected.
Buttons
Buttons simply have a solid box (which Sonic can walk on & push against) which is lower than the top of the button when not depressed. When Sonic is standing on it, the subimage changes to depressed and the switch is activated.
End of Level Capsules
Sonic 1 Method
Explosion
For 60 steps, every 8 steps, spawn explosion at capsule position plus random x,y offset (Max horizontal offset of 31 pixels, and according to calculations, vertical is the same). At end of those 60 steps, start with the animals
Animals
Switch to exploded frame. Spawn 8 animals at capsule position -28x, +32y, horizontally separated by 7, with alarms starting from 154 and decreasing by 8 per animal (animals don't jump out until their alarm reaches zero).
For 150 steps, every 8 steps, spawn animal at random x position amongst the existing animal group (but tighter in, not near edges), with their alarm set to 12.
When all animal objects have disappeared, run Got Through message.
Sonic 2 Method
Explosion
An explosion spawns at lock's position, move lock at +8x, -4y. Wait 29 steps.
Animals
8 animals spawn at capsule position -28x, +32y, horizontally separated by 7, with alarms starting from 154 and decreasing by 8 per animal (the animals don't jump out until their alarm reaches zero).
For 180 steps, every 8 steps, an animal will spawn at random x position amongst the existing animal group (but tighter in, not near edges), with their alarm set to 12.
When all animal objects have disappeared, the game will run the 'Got Through' message.
Zone Specific Gimmicks
Green Hill
S Tunnels
The S Tunnels in Green Hill Zone simply keep Sonic rolling at all times. If his speed reaches 0 and he stands up, the game acts as if you have pressed down and he rolls again instantly. Since the S tunnels have no flat ground, Sonic will always roll down it and should never just crouch.
Marble
Spike Traps
When Marble Zone Spike traps fall, their Y Speed increases by 0.4375 each frame. When they reach full length, they spend about 60 frames there. After this they begin to rise by 0.5px per frame, or 1 pixel every 2 frames. The length they can fall varies.
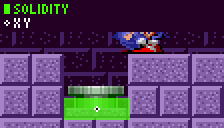
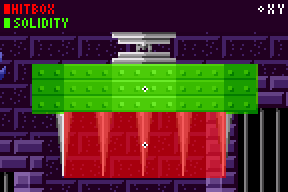
They have a solid box at the top (which Sonic can walk on & push against) however the spike area is a damage hit box which will simply hurt Sonic upon contact but doesn't have solidity.
Scrap Brain
Conveyor Belts
A Scrap Brain Zone conveyor belt will simply add the belt speed to Sonics X position, Sonic's speeds are unaffected.
Chemical Plant
Spring Ramps
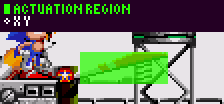
Spring ramps aren't quite as simple as normal springs. Firstly, they have a specific region where they actuate.
The ramp will activate if his X position is within the green region as he stands on it.
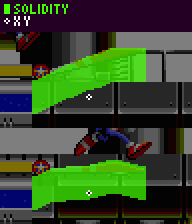
When a Spring ramp activates they don't bounce Sonic instantly, instead, Sonic moves down a bit as the animation plays. There are 2 subimages, normal and down, and these both have different collision height arrays as shown below.
On the left is how the solidity appears in-game, on the right is the height array as it is stored, it simply gets scaled by 2 horizontally. The ramps only use this collision data and no hitboxes, and it would be confined to the sprite size (even though it appears to go past it here).
Once activated it plays the down subimage for 4 frames, and Sonic will lower with it but is otherwise unaffected and will keep walking. On the next frame it's back up and Sonic is raised again but still unaffected, on the frame after this Sonic will actually be in the air.
So how fast do they bounce Sonic? Well, that's not perfectly simple either. It will bounce Sonic up with a ysp of -4, and depending on Sonic's xpos position along the ramp it will subtract a second modifier from his ysp. This is all dependant on the positions where Sonic's xps is right now as he is bounced, not where he was when activated it.
From left to right this modifier can be 0, 1, 2, 3 or 4.
So if Sonic happened to be in section 3, his ysp would become -4, minus the modifier of 2, resulting in -6.
Spring Caps
The red spring caps that cover the tubes in Chemical Plant Zone work like springboards, but are slightly stronger than a Yellow springboard. They set Sonic's Y speed to -10.5 upon collision.
Spinners
The black spinners that impel you forward in Chemical Plant Zone set X speed to 16. They don't seem to slow you down if you're already moving faster than that, though.
Hill Top
Ski Lifts
The ski lifts in Hill Top Zone move with an X speed of 2, and a Y speed of 1
Carnival Night
Balloons
The balloons in Carnival Night Zone set Y speed to -7 when Sonic collides with them, no matter what his angle of collision. X speed is not affected. They have a hitbox sized 16px x 16px, which is a bit smaller than their sprite.
Cannons
The cannons in Carnival Night Zone set Sonic's X speed to 16*cosine(p), and Y speed to 16*-sine(p), where p is the angle of the cannon.
Mushroom Hill
Mushrooms
The mushrooms in Mushroom Hill Zone work just like springboards, only each successive bounce is higher than the last, up to three bounces. The first bounce sets Y speed to -6.5, the second, -7.5, and the third, -8.5.
