
Difference between revisions of "S4Omni"
From Sonic Retro
m (bosses now in same order as levels) |
(zone order changed due to the song from the website saying "zone3" for LL1's song) |
||
| Line 27: | Line 27: | ||
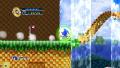
|[[File:Sonic4shz.PNG|120px|link=Splash Hill Zone]] | |[[File:Sonic4shz.PNG|120px|link=Splash Hill Zone]] | ||
[[Splash Hill Zone|Splash Hill]] | [[Splash Hill Zone|Splash Hill]] | ||
| + | |[[Image:Notavailable.svg|100px|link=Casino Street Zone]] | ||
| + | [[Casino Street Zone|Casino Street]] | ||
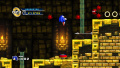
|[[File:Sonic4llz.png|120px|link=Lost Labyrinth Zone]] | |[[File:Sonic4llz.png|120px|link=Lost Labyrinth Zone]] | ||
[[Lost Labyrinth Zone|Lost Labyrinth]] | [[Lost Labyrinth Zone|Lost Labyrinth]] | ||
| − | |||
| − | |||
|- | |- | ||
|[[Image:Notavailable.svg|100px|link=Mad Gear Zone]] | |[[Image:Notavailable.svg|100px|link=Mad Gear Zone]] | ||
| Line 82: | Line 82: | ||
|[[File:Sonic-4 boss.jpg|120px|link=Splash Hill Zone Boss]] | |[[File:Sonic-4 boss.jpg|120px|link=Splash Hill Zone Boss]] | ||
[[Splash Hill Zone Boss|Splash Hill]] | [[Splash Hill Zone Boss|Splash Hill]] | ||
| − | |[[File:Notavailable.svg|100px|link= | + | |[[File:Notavailable.svg|100px|link=Casino Street Zone Boss]] |
| − | [[ | + | [[Casino Street Zone Boss|Casino Street]] |
|} | |} | ||
{| style="text-align:center" | {| style="text-align:center" | ||
|- | |- | ||
| − | |[[File:Notavailable.svg|100px|link= | + | |[[File:Notavailable.svg|100px|link=Lost Labyrinth Zone Boss]] |
| − | [[ | + | [[Lost Labyrinth Zone Boss|Lost Labyrinth]] |
|[[File:Notavailable.svg|100px|link=Mad Gear Zone Boss]] | |[[File:Notavailable.svg|100px|link=Mad Gear Zone Boss]] | ||
[[Mad Gear Zone Boss|Mad Gear]] | [[Mad Gear Zone Boss|Mad Gear]] | ||
Revision as of 21:40, 21 August 2010
1
| Sonic the Hedgehog 4 | |
|---|---|
 Main Article |
|
Usage
{{S4Omni|#}}
Substitute # with one of the following numbers depending on which type of article you want to use the template:
- Levels (this is used by default and can be left blank)
- Advertisements
- Enemies
- Bosses
- Cheats and codes