
Difference between revisions of "SPG:Solid Tiles"
From Sonic Retro
(→Distance: Extra clarity) |
(→Height Array: Added context example of all the different Solid Tiles) |
||
| (41 intermediate revisions by 2 users not shown) | |||
| Line 1: | Line 1: | ||
| + | {{SPGPages}} | ||
'''Notes:''' | '''Notes:''' | ||
| − | *The research applies to all four of the [[Sega Mega Drive]] games and | + | *''The research applies to all four of the [[Sega Mega Drive]] games and [[Sonic CD]]''. |
| − | + | *''The following only describes how the Player object collides and interacts with stage terrain. Solid objects, such as [[Monitor|Monitors]], Jump Through Platforms, and Pushable Blocks each have their own collision routines with the Player and don't necessarily behave exactly the same as the tiles do. For this, refer to [[SPG:Solid_Objects|Solid Objects]]''. | |
| − | * | + | *''This page describes what Solid Tiles and Sensors are and how they work. For their use in player collision and movement, see [[SPG:Slope Collision|Slope Collision]] (part 1) and [[SPG:Slope Physics|Slope Physics]] (part 2)''. |
| − | + | *''This page is essentially part 1 of 2. This details what Solid Tiles are and how they are used directly. For part 2, detailing how Solid Tiles and collision layers are used to create anything from simple slopes all the way to bigger Sonic set-pieces like loops, go to [[SPG:Solid Terrain|Solid Terrain]].'' | |
| − | * | ||
| − | |||
| − | |||
| − | |||
| − | * | ||
==Introduction== | ==Introduction== | ||
| − | What are | + | What are Solid Tiles? While there are often solid objects in Sonic zones, the zone itself would require far too much object memory if the environment were constructed entirely of solid objects, each with their own 64 bytes of RAM. A clever short-cut is used - the zone is constructed out of tiles anyway, so all that needs be done is have each tile know whether or not it is solid. |
You may know that zones are broken down into 128x128 pixel chunks (or 256x256 pixel chunks in ''[[Sonic 1]]'' and ''[[Sonic CD]]''), which are in turn broken into 16x16 pixel blocks, which are again in turn broken into even smaller 8x8 pixel tiles. All of the solidity magic happens with the 16x16 blocks, so those are the only ones we will be interested in throughout this guide. | You may know that zones are broken down into 128x128 pixel chunks (or 256x256 pixel chunks in ''[[Sonic 1]]'' and ''[[Sonic CD]]''), which are in turn broken into 16x16 pixel blocks, which are again in turn broken into even smaller 8x8 pixel tiles. All of the solidity magic happens with the 16x16 blocks, so those are the only ones we will be interested in throughout this guide. | ||
| − | + | The Player object's collisions and interactions with these Solid Tiles are what make up their basic engine. They dictate how the Player handles floors, walls, ceilings, slopes, and loops. | |
| − | First we will look at how the environment is constructed from tiles, and then | + | First we will look at how the environment is constructed from tiles, and then the Player's method for detecting their environment. |
==Solid Tiles== | ==Solid Tiles== | ||
| + | Solid Tiles are what define the terrain solidity in a stage. The shape of slopes, and the angles of them. | ||
| − | Solid | + | [[Image:SPGSolidTiles.png]] ''Solid Tiles covering the surfaces of Terrain, giving them solidity.'' |
| − | === | + | ===Block Grid=== |
| + | For the purposes of this guide, the "Solid Tiles" are the actual solidity data used to define the ground shape. But the structure they belong to are "Blocks". Each Sonic stage essentially contains a grid of 16 by 16 px Blocks (grid cells) that fill a stage (or more specifically, fill each predefined terrain "Chunk"). Each of these Blocks references a solid tile (or empty solid tile) from a list of predefined Solid Tiles which contain height array data that contains the filled (solid) area/shape for that Block. Each Block can also define other properties for it's Solid Tile such as flipping or flagging. | ||
| − | + | ===Height Array=== | |
| + | Now for the Solid Tiles themselves. How is a solid tile set up? How is the shape of the terrain formatted? | ||
| − | Each | + | Each Solid Tile is simply an array of 16 height values that can range from 0px ($00) to 16px ($10) inclusive. |
| − | [[Image: | + | [[Image:SPGSolidTileHeightMasks.png]] ''Example of how many different height arrays are needed in order to account for every possible slope.'' |
| − | + | Let's take a closer look at an example Solid Tile. | |
| − | + | [[Image:SPGHeightMask.PNG|link=Special:FilePath/SPGHeightMask.PNG]] | |
| − | + | This tile's height array has the values | |
| + | 0, 0, 1, 2, 2, 3, 4, 5, 5, 6, 6, 7, 8, 9, 9, 9 | ||
| + | and has the angle 33.75° ($E8). | ||
| − | + | Solid Tiles also have another height array (or, well, a ''width'' array) for horizontal collisions. | |
| − | + | For example, the tile above would be, from top to bottom | |
| + | 0, 0, 0, 0, 0, 0, 0, 3, 4, 5, 7, 9, 10, 11, 13, 14 | ||
| + | This width array represents the same slope, angle, and creates the exact same shape within the tile. | ||
| − | + | ===Angles=== | |
| − | + | Solid Tiles contain a specific angle value which represents the angle of the slope of the surface that the Height Array creates. | |
| − | [[Image: | + | [[Image:SPGSolidTileAngles.png]] ''Tile angles (degrees)'' |
| − | + | This angle is used when the Player collides with the Solid Tile and needs to react with slope physics and to allow the Player to rotate along the terrain. | |
| − | + | ====Flagged Tiles==== | |
| + | [[Image:SPGFlaggedSolidTiles.png]] | ||
| − | + | Nearly all tiles have a specific angle value which is used to allow the Player to rotate with sloped ground. However, some tiles angle is used as a flag. In the original games, if the angle of the tile is 255 ($FF), it is a flagged tile. How this angle is reacted to is determined by the object's code. In the case of the Player, they will not set their Ground Angle to the tile's angle as normal, but will instead find a new Ground Angle which is the Player's current Ground Angle snapped to the nearest 90° (0, 90, 180, or 270). | |
| − | |||
| − | + | This flag applies commonly to full block Solid Tiles (filled squares), as it is a quick and easy way to allow the Player to walk on all sides of a full block without needing to flip it around or provide multiple angle values for each side. | |
| − | + | This is also used as a trick to effectively "flatten" the end of ramps. The ramps found in [[Emerald Hill Zone]] end with a diagonal slope - yet Spindashing up it sends you flying directly upwards into the air. How? The trick is that the last tile on that ramp has an angle of 255 ($FF), so is flagged despite not being a flat tile. This snaps the Player to 90° (aka, moving directly upwards) just as they leave the ramp. | |
| − | ' | + | ===Flipping Tiles=== |
| + | You may wonder how sloped ceilings are possible if the height array creates slopes along the tops of Solid Tiles. The answer to this is that Blocks can be flipped horizontally and/or vertically. The collision systems take this into account when reading the height data from that Block's tile. | ||
| − | + | The angles of flipped tiles are also adjusted to align correctly after being read. | |
| − | + | ===Tile Solidity=== | |
| + | Not all tiles behave the same. Some tiles are only solid from the top, some only from the sides, and some of course are solid from all sides. This solidity aspect affects which directions of Sensors can detect them. For example, a "top only" tile will be ignored by sideways and upwards facing Sensors, but downward facing Sensors will detect them. | ||
| − | ' | + | What are Sensors? Well, that's up next. |
| − | + | ==Sensors== | |
| − | + | "Sensors" are simply checks performed by objects which look for Solid Tiles around them. | |
| − | + | An x/y position ('''anchor point''') is checked, and if it finds a solid tile, they will gather information about the tile. | |
| + | Sensors can point down, right, up, or left, and all behave the same in their respective directions/axis. | ||
| − | The | + | [[Image:SPGSensorAnchors.png]] ''The white points represent the '''anchor''' positions of the Player's Sensors.'' |
| − | + | In this example, the Sensor to the Player's mid right points right, and those at the Player's feet point down. Their direction dictates in which direction they are looking for a surface. A Sensor pointing right is looking for the leftmost edge of solid terrain nearby, a Sensor pointing down is looking for the topmost edge of solid terrain nearby. | |
| − | + | The Sensor will read the height or width array of the Solid Tile it is checking. | |
| − | + | Which value of the array is used? For a vertical Sensor, subtract the tile's X position from the Sensor's X position. For a horizontal Sensor (using the width array), subtract the tile's Y position from the Sensor's Y position. The result is the index of the array to use. | |
| − | + | So, now we know Sensors are points which look for Solid Tiles they touch, and that they can check the height or width array value of tiles at specific positions to get the floor surface position. | |
| − | |||
| − | |||
| − | |||
| − | + | However, this is not the whole picture. If a Sensor finds an empty tile or the array value of the tile found by the Sensor is 16 (a full block amount), then it's likely that the surface of the solid terrain is actually found within an adjacent tile instead. | |
| − | |||
| − | + | ====Sensor Regression & Extension==== | |
| + | So when a Sensor check is performed at a Sensor's '''anchor point''' it has either found a solid tile, or it hasn't. If it has, what if the height value found is 16 and isn't actually the surface of the terrain? Or if it hasn't, what if there's a solid tile nearby? | ||
| − | + | Well, this is easily solved by checking neighbouring tiles if certain conditions are met. | |
| − | * | + | Note: |
| + | *The following is an example in the case of a Sensor which is pointing down looking for solids below (like a floor Sensor while standing upright). | ||
| + | *The current height or width array value of a tile at the Sensor's X/Y position will be referred to as the ''tile height''. | ||
| − | + | =====Normal===== | |
| − | + | When the '''anchor point''' finds a Solid Tile and the ''tile height'' of the first tile is between 1 and 15 (inclusive), the game can be sure the surface of the terrain has been found without needing to check extra tiles at all. | |
| − | + | Otherwise, one of the following 2 things will happen. | |
| − | |||
| − | + | =====Regression===== | |
| + | When the '''anchor point''' finds a Solid Tile and the ''tile height'' of the first tile is 16 (meaning the tile is completely filled in that position), it will check up by 1 extra Solid Tile. We'll call this the "regression" since it goes back against the Sensor direction. | ||
| + | |||
| + | If a regression occurs and ''tile height'' of the second tile is 0 (or the tile is empty), it will just default to processing the first tile, as the first tile ''must'' be the terrain surface. | ||
| − | == | + | =====Extension===== |
| − | + | When the '''anchor point''' just finds an empty tile (or the ''tile height'' of the first tile is 0), it will check down by 1 extra Solid Tile. We'll call this the "extension" because it goes outwards, in the direction of the Sensor. | |
| − | + | If an extension occurs and just finds an empty second tile (or the ''tile height'' of the second tile is 0), the game knows that no terrain or terrain surface has been found, and will return the distance to the end of the second tile checked. | |
| − | '' | ||
| − | |||
| − | |||
| − | |||
| − | |||
| + | If a solid tile was found to be processed, it will calculate the distance between that ''tile height'' and the Sensor. | ||
| − | + | [[Image:SPGSensorDistance.gif]] | |
| − | + | In the above example, a downward facing Sensor moves down through 3 Solid Tiles. We can see the tiles it checks, and the distance it returns at each position. We can also see if it is performing extension or regression. You can see this means the Sensor can effectively act as a line, it can regress or extend up to 32 pixels to find the nearest surface. | |
| − | |||
| − | + | The regression & extension will occur in the direction of the Sensor, be it horizontal or vertical. So a right facing Sensor's regression would check an extra tile to the left, and extension would check an extra tile to the right. While an upward facing Sensor's regression would check an extra tile below, and extension would check an extra tile above. | |
| − | + | With all this, a Sensor can always locate the nearest open surface (and the tile containing that surface) of the terrain within a range of 2 tiles (the tile the Sensor '''anchor point''' is touching plus another). | |
| − | + | ====Reaction==== | |
| + | Once a final suitable tile has been found, information about the tile is returned. | ||
| − | + | The information a Sensor finds is as follows: | |
| − | + | *The distance from the Sensor pixel to the surface of the solid tile found (in the Sensor's direction) | |
| − | + | *The angle of the tile found | |
| + | *The tile ID | ||
| − | + | =====Distance===== | |
| − | + | The distance to the Solid Tile surface (found by the Sensor) is the most important piece of information dictating how an object will react to Solid Tiles. It's not the distance to the tile, it's the distance to the ''edge of the solid area within the tile'', precisely. | |
| − | |||
| − | |||
| − | |||
| − | |||
| − | |||
| − | |||
| − | ==== | ||
| − | |||
| − | |||
| − | |||
| − | |||
| − | |||
| − | |||
| − | |||
| − | |||
| − | |||
| − | |||
| − | |||
| − | |||
| − | |||
| − | |||
| − | |||
| − | |||
| − | |||
| − | |||
| − | |||
| − | |||
| − | |||
| − | |||
| − | |||
| − | |||
| − | |||
| − | |||
| − | |||
| − | |||
| − | |||
| − | |||
| − | |||
| − | |||
| − | |||
| − | |||
| − | |||
| − | |||
| − | |||
| − | |||
| − | |||
| − | |||
| − | |||
| − | |||
| − | |||
| − | |||
| − | |||
| − | |||
| − | |||
| − | |||
| − | |||
| − | |||
| − | |||
| − | |||
| − | |||
| − | |||
| − | |||
| − | |||
| − | |||
| − | |||
| − | |||
| − | |||
| − | |||
| − | |||
| − | |||
| − | |||
| − | |||
| − | |||
| − | |||
| − | |||
| − | |||
| − | |||
| − | |||
| − | |||
| − | |||
| − | |||
| − | |||
| − | |||
| − | |||
| − | |||
| − | |||
| − | |||
| − | |||
| − | |||
| − | |||
| − | |||
| − | |||
| − | |||
| − | |||
| − | |||
| − | |||
| − | |||
| − | |||
| − | |||
| − | |||
| − | |||
| − | |||
| − | |||
| − | |||
| − | |||
| − | |||
| − | |||
| − | |||
| − | |||
| − | |||
| − | |||
| − | |||
| − | |||
| − | |||
| − | |||
| − | |||
| − | |||
| − | |||
| − | |||
| − | |||
| − | |||
| − | |||
| − | |||
| − | |||
| − | |||
| − | |||
| − | |||
| − | + | The distance can either be 0, negative, or positive. | |
| − | When | + | When no Solid Tile is found by a Sensor, the Sensor will return a distance between 16 and 32 (inclusive), which is the distance to the end of the second tile checked. This is the potentially "no-tile-found" distance range. |
| − | + | *''Note: It doesn't necessarily mean no tile has been found if the distance is in this range, but if no tile was found the distance will definitely be within this range so the game typically chooses to treat it as such just incase.'' | |
| − | + | In future, if the guide references a tile not being found, this means either the distance is out of the range the object wants, or the distance is between 16 and 31. | |
| − | + | *A distance of 0 means the Sensor is just touching the solid tile surface and the object will not need to move (but may still choose to collide). | |
| − | + | *A negative distance means the surface found is closer to the object than the Sensor position. Negative distances are almost always reacted to when colliding, because it indicates that the object is inside the solid and can be pushed out. | |
| − | + | *Positive distances mean the surface found is further away from the object than the Sensor position. Since this means the object isn't actually touching the tile, it's rarely used - but not never. A notable example of it's use is by floor Sensors of various objects, including the Player, to keep them attached to the ground even if the ground has sloped away from them a bit as they move. Objects usually employ a limit to how far an object can be "pulled" down to a solid they aren't actually touching. This will be detailed further down for the Player. | |
| − | + | If the object decides to snap itself to the terrain, it simply has to add the distance value to it's position. Or subtract, depending on the Sensor's direction. A Sensor pointing left may return a negative distance if it is inside a solid, but the object would have to subtract the distance in order to move to the right, out of it. | |
| − | + | Of course, as stated, this distance can be representative of any 4 directions, depending on the Sensor's own angle. | |
| − | + | ====Typical Sensor Usage==== | |
| + | Sensors are utilised by many different objects, including the Player, to align themselves or "collide" with Solid Tiles. A Sensor will typically be cast with an anchor positioned at the edge of the object, pointing outwards. For example, positioned at the right of an object at X Position + Width Radius pointing right, or positioned at the bottom of an object at Y Position + Y Radius pointing down. | ||
| − | + | Most objects will only use 1 or 2 Sensors, usually pointing down looking for the floor, though some will also use additional Sensors to check for walls. The Player object is more complex and can sometimes use up to 5 Sensors at once depending on their state. How the Player uses Sensors is described in [[SPG:Slope_Collision#The_Player.27s_Sensors|Slope Collision]]. | |
| − | + | In the example of a Sensor at the bottom, if terrain is found nearby the distance found from this Sensor can be used to reposition the object to align perfectly with the floor. For example if the Sensor returned a distance of -10, the Sensor is 16 pixels inside of the Terrain, and the object would simply have to add -10 to their Y Position to align perfectly with the surface. | |
| + | Objects typically won't react to positive distances where the Sensor is outside of the terrain (but not always, typically positive Sensor distances are used for alignment while an object is already on the ground to ensure they remain "stuck"). | ||
| − | + | =====Distance Rejection===== | |
| + | Objects will reject distances too "large" in either direction (positive or negative). | ||
| − | + | When casting Sensors, objects check the returned distances it accepts for collision. For example, checking if a distance is >= 16 or <= -16 and if it is, not colliding. This will filter out potentially "no-tile-found" distances. This avoids a need for the game to remember if a tile was found after the Sensor was cast, it can just remember the distance value. Though typically the game opts for a distance of 14 as the limit (< -14 or > 14) as this usually means either the surface of the Solid Tile is too far away to matter anyway. | |
| − | Sensor | + | ====Visual Depiction==== |
| + | Sensors will be drawn from the Sensor anchor, extending towards the centre of the object. This demonstrates the direction of the Sensor, and also, given the typical use of Sensors, the approximate "solid" areas of the object using the Sensor. | ||
| − | + | You can imagine it vaguely like so - if the very edge pixels of the surface of the ground is within these lines, the object would collide and be pushed out of the Solid Tile. It is of course not quite this simple in reality. As shown in the previous visualisation of a Sensor, the "line" portion can extend up to 32 pixels in either direction, all depending on where the Sensor anchor currently sits within it's tile... and sometimes objects will align themselves even when the Sensor returns positive distances and aren't even touching the Solid Tile... and objects will reject all sorts of different varying distances Sensors return depending on what the Sensor is being used for... This would be impossible to accurately draw over the Player while keeping things understandable and clear. This visualisation is a simplified and rough estimation. | |
| − | + | Just be aware that the line based depictions are for simple illustration purposes only and the endpoints of the lines are the active Sensor anchor positions (which always behave as described). | |
| − | |||
| − | |||
[[Category:Sonic Physics Guide]] | [[Category:Sonic Physics Guide]] | ||
Revision as of 10:25, 24 November 2022
| Sonic Physics Guide |
|---|
|
| Collision |
|
| Physics |
|
| Gameplay |
| Presentation |
| Special |
Notes:
- The research applies to all four of the Sega Mega Drive games and Sonic CD.
- The following only describes how the Player object collides and interacts with stage terrain. Solid objects, such as Monitors, Jump Through Platforms, and Pushable Blocks each have their own collision routines with the Player and don't necessarily behave exactly the same as the tiles do. For this, refer to Solid Objects.
- This page describes what Solid Tiles and Sensors are and how they work. For their use in player collision and movement, see Slope Collision (part 1) and Slope Physics (part 2).
- This page is essentially part 1 of 2. This details what Solid Tiles are and how they are used directly. For part 2, detailing how Solid Tiles and collision layers are used to create anything from simple slopes all the way to bigger Sonic set-pieces like loops, go to Solid Terrain.
Contents
Introduction
What are Solid Tiles? While there are often solid objects in Sonic zones, the zone itself would require far too much object memory if the environment were constructed entirely of solid objects, each with their own 64 bytes of RAM. A clever short-cut is used - the zone is constructed out of tiles anyway, so all that needs be done is have each tile know whether or not it is solid.
You may know that zones are broken down into 128x128 pixel chunks (or 256x256 pixel chunks in Sonic 1 and Sonic CD), which are in turn broken into 16x16 pixel blocks, which are again in turn broken into even smaller 8x8 pixel tiles. All of the solidity magic happens with the 16x16 blocks, so those are the only ones we will be interested in throughout this guide.
The Player object's collisions and interactions with these Solid Tiles are what make up their basic engine. They dictate how the Player handles floors, walls, ceilings, slopes, and loops.
First we will look at how the environment is constructed from tiles, and then the Player's method for detecting their environment.
Solid Tiles
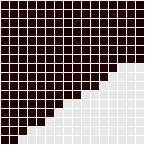
Solid Tiles are what define the terrain solidity in a stage. The shape of slopes, and the angles of them.
 Solid Tiles covering the surfaces of Terrain, giving them solidity.
Block Grid
For the purposes of this guide, the "Solid Tiles" are the actual solidity data used to define the ground shape. But the structure they belong to are "Blocks". Each Sonic stage essentially contains a grid of 16 by 16 px Blocks (grid cells) that fill a stage (or more specifically, fill each predefined terrain "Chunk"). Each of these Blocks references a solid tile (or empty solid tile) from a list of predefined Solid Tiles which contain height array data that contains the filled (solid) area/shape for that Block. Each Block can also define other properties for it's Solid Tile such as flipping or flagging.
Height Array
Now for the Solid Tiles themselves. How is a solid tile set up? How is the shape of the terrain formatted?
Each Solid Tile is simply an array of 16 height values that can range from 0px ($00) to 16px ($10) inclusive.
 Example of how many different height arrays are needed in order to account for every possible slope.
Let's take a closer look at an example Solid Tile.
This tile's height array has the values
0, 0, 1, 2, 2, 3, 4, 5, 5, 6, 6, 7, 8, 9, 9, 9
and has the angle 33.75° ($E8).
Solid Tiles also have another height array (or, well, a width array) for horizontal collisions.
For example, the tile above would be, from top to bottom
0, 0, 0, 0, 0, 0, 0, 3, 4, 5, 7, 9, 10, 11, 13, 14
This width array represents the same slope, angle, and creates the exact same shape within the tile.
Angles
Solid Tiles contain a specific angle value which represents the angle of the slope of the surface that the Height Array creates.
 Tile angles (degrees)
This angle is used when the Player collides with the Solid Tile and needs to react with slope physics and to allow the Player to rotate along the terrain.
Flagged Tiles

Nearly all tiles have a specific angle value which is used to allow the Player to rotate with sloped ground. However, some tiles angle is used as a flag. In the original games, if the angle of the tile is 255 ($FF), it is a flagged tile. How this angle is reacted to is determined by the object's code. In the case of the Player, they will not set their Ground Angle to the tile's angle as normal, but will instead find a new Ground Angle which is the Player's current Ground Angle snapped to the nearest 90° (0, 90, 180, or 270).
This flag applies commonly to full block Solid Tiles (filled squares), as it is a quick and easy way to allow the Player to walk on all sides of a full block without needing to flip it around or provide multiple angle values for each side.
This is also used as a trick to effectively "flatten" the end of ramps. The ramps found in Emerald Hill Zone end with a diagonal slope - yet Spindashing up it sends you flying directly upwards into the air. How? The trick is that the last tile on that ramp has an angle of 255 ($FF), so is flagged despite not being a flat tile. This snaps the Player to 90° (aka, moving directly upwards) just as they leave the ramp.
Flipping Tiles
You may wonder how sloped ceilings are possible if the height array creates slopes along the tops of Solid Tiles. The answer to this is that Blocks can be flipped horizontally and/or vertically. The collision systems take this into account when reading the height data from that Block's tile.
The angles of flipped tiles are also adjusted to align correctly after being read.
Tile Solidity
Not all tiles behave the same. Some tiles are only solid from the top, some only from the sides, and some of course are solid from all sides. This solidity aspect affects which directions of Sensors can detect them. For example, a "top only" tile will be ignored by sideways and upwards facing Sensors, but downward facing Sensors will detect them.
What are Sensors? Well, that's up next.
Sensors
"Sensors" are simply checks performed by objects which look for Solid Tiles around them.
An x/y position (anchor point) is checked, and if it finds a solid tile, they will gather information about the tile. Sensors can point down, right, up, or left, and all behave the same in their respective directions/axis.
 The white points represent the anchor positions of the Player's Sensors.
In this example, the Sensor to the Player's mid right points right, and those at the Player's feet point down. Their direction dictates in which direction they are looking for a surface. A Sensor pointing right is looking for the leftmost edge of solid terrain nearby, a Sensor pointing down is looking for the topmost edge of solid terrain nearby.
The Sensor will read the height or width array of the Solid Tile it is checking. Which value of the array is used? For a vertical Sensor, subtract the tile's X position from the Sensor's X position. For a horizontal Sensor (using the width array), subtract the tile's Y position from the Sensor's Y position. The result is the index of the array to use.
So, now we know Sensors are points which look for Solid Tiles they touch, and that they can check the height or width array value of tiles at specific positions to get the floor surface position.
However, this is not the whole picture. If a Sensor finds an empty tile or the array value of the tile found by the Sensor is 16 (a full block amount), then it's likely that the surface of the solid terrain is actually found within an adjacent tile instead.
Sensor Regression & Extension
So when a Sensor check is performed at a Sensor's anchor point it has either found a solid tile, or it hasn't. If it has, what if the height value found is 16 and isn't actually the surface of the terrain? Or if it hasn't, what if there's a solid tile nearby?
Well, this is easily solved by checking neighbouring tiles if certain conditions are met.
Note:
- The following is an example in the case of a Sensor which is pointing down looking for solids below (like a floor Sensor while standing upright).
- The current height or width array value of a tile at the Sensor's X/Y position will be referred to as the tile height.
Normal
When the anchor point finds a Solid Tile and the tile height of the first tile is between 1 and 15 (inclusive), the game can be sure the surface of the terrain has been found without needing to check extra tiles at all.
Otherwise, one of the following 2 things will happen.
Regression
When the anchor point finds a Solid Tile and the tile height of the first tile is 16 (meaning the tile is completely filled in that position), it will check up by 1 extra Solid Tile. We'll call this the "regression" since it goes back against the Sensor direction.
If a regression occurs and tile height of the second tile is 0 (or the tile is empty), it will just default to processing the first tile, as the first tile must be the terrain surface.
Extension
When the anchor point just finds an empty tile (or the tile height of the first tile is 0), it will check down by 1 extra Solid Tile. We'll call this the "extension" because it goes outwards, in the direction of the Sensor.
If an extension occurs and just finds an empty second tile (or the tile height of the second tile is 0), the game knows that no terrain or terrain surface has been found, and will return the distance to the end of the second tile checked.
If a solid tile was found to be processed, it will calculate the distance between that tile height and the Sensor.

In the above example, a downward facing Sensor moves down through 3 Solid Tiles. We can see the tiles it checks, and the distance it returns at each position. We can also see if it is performing extension or regression. You can see this means the Sensor can effectively act as a line, it can regress or extend up to 32 pixels to find the nearest surface.
The regression & extension will occur in the direction of the Sensor, be it horizontal or vertical. So a right facing Sensor's regression would check an extra tile to the left, and extension would check an extra tile to the right. While an upward facing Sensor's regression would check an extra tile below, and extension would check an extra tile above.
With all this, a Sensor can always locate the nearest open surface (and the tile containing that surface) of the terrain within a range of 2 tiles (the tile the Sensor anchor point is touching plus another).
Reaction
Once a final suitable tile has been found, information about the tile is returned.
The information a Sensor finds is as follows:
- The distance from the Sensor pixel to the surface of the solid tile found (in the Sensor's direction)
- The angle of the tile found
- The tile ID
Distance
The distance to the Solid Tile surface (found by the Sensor) is the most important piece of information dictating how an object will react to Solid Tiles. It's not the distance to the tile, it's the distance to the edge of the solid area within the tile, precisely.
The distance can either be 0, negative, or positive.
When no Solid Tile is found by a Sensor, the Sensor will return a distance between 16 and 32 (inclusive), which is the distance to the end of the second tile checked. This is the potentially "no-tile-found" distance range.
- Note: It doesn't necessarily mean no tile has been found if the distance is in this range, but if no tile was found the distance will definitely be within this range so the game typically chooses to treat it as such just incase.
In future, if the guide references a tile not being found, this means either the distance is out of the range the object wants, or the distance is between 16 and 31.
- A distance of 0 means the Sensor is just touching the solid tile surface and the object will not need to move (but may still choose to collide).
- A negative distance means the surface found is closer to the object than the Sensor position. Negative distances are almost always reacted to when colliding, because it indicates that the object is inside the solid and can be pushed out.
- Positive distances mean the surface found is further away from the object than the Sensor position. Since this means the object isn't actually touching the tile, it's rarely used - but not never. A notable example of it's use is by floor Sensors of various objects, including the Player, to keep them attached to the ground even if the ground has sloped away from them a bit as they move. Objects usually employ a limit to how far an object can be "pulled" down to a solid they aren't actually touching. This will be detailed further down for the Player.
If the object decides to snap itself to the terrain, it simply has to add the distance value to it's position. Or subtract, depending on the Sensor's direction. A Sensor pointing left may return a negative distance if it is inside a solid, but the object would have to subtract the distance in order to move to the right, out of it.
Of course, as stated, this distance can be representative of any 4 directions, depending on the Sensor's own angle.
Typical Sensor Usage
Sensors are utilised by many different objects, including the Player, to align themselves or "collide" with Solid Tiles. A Sensor will typically be cast with an anchor positioned at the edge of the object, pointing outwards. For example, positioned at the right of an object at X Position + Width Radius pointing right, or positioned at the bottom of an object at Y Position + Y Radius pointing down.
Most objects will only use 1 or 2 Sensors, usually pointing down looking for the floor, though some will also use additional Sensors to check for walls. The Player object is more complex and can sometimes use up to 5 Sensors at once depending on their state. How the Player uses Sensors is described in Slope Collision.
In the example of a Sensor at the bottom, if terrain is found nearby the distance found from this Sensor can be used to reposition the object to align perfectly with the floor. For example if the Sensor returned a distance of -10, the Sensor is 16 pixels inside of the Terrain, and the object would simply have to add -10 to their Y Position to align perfectly with the surface. Objects typically won't react to positive distances where the Sensor is outside of the terrain (but not always, typically positive Sensor distances are used for alignment while an object is already on the ground to ensure they remain "stuck").
Distance Rejection
Objects will reject distances too "large" in either direction (positive or negative).
When casting Sensors, objects check the returned distances it accepts for collision. For example, checking if a distance is >= 16 or <= -16 and if it is, not colliding. This will filter out potentially "no-tile-found" distances. This avoids a need for the game to remember if a tile was found after the Sensor was cast, it can just remember the distance value. Though typically the game opts for a distance of 14 as the limit (< -14 or > 14) as this usually means either the surface of the Solid Tile is too far away to matter anyway.
Visual Depiction
Sensors will be drawn from the Sensor anchor, extending towards the centre of the object. This demonstrates the direction of the Sensor, and also, given the typical use of Sensors, the approximate "solid" areas of the object using the Sensor.
You can imagine it vaguely like so - if the very edge pixels of the surface of the ground is within these lines, the object would collide and be pushed out of the Solid Tile. It is of course not quite this simple in reality. As shown in the previous visualisation of a Sensor, the "line" portion can extend up to 32 pixels in either direction, all depending on where the Sensor anchor currently sits within it's tile... and sometimes objects will align themselves even when the Sensor returns positive distances and aren't even touching the Solid Tile... and objects will reject all sorts of different varying distances Sensors return depending on what the Sensor is being used for... This would be impossible to accurately draw over the Player while keeping things understandable and clear. This visualisation is a simplified and rough estimation.
Just be aware that the line based depictions are for simple illustration purposes only and the endpoints of the lines are the active Sensor anchor positions (which always behave as described).