|
|
| (43 intermediate revisions by 2 users not shown) |
| Line 1: |
Line 1: |
| | + | {{SPGPages}} |
| | '''Notes:''' | | '''Notes:''' |
| − | The research applies to all four of the [[Sega Mega Drive]] games and ''[[Sonic CD]]''. | + | *''The research applies to all four of the [[Sega Mega Drive]] games and [[Sonic CD]]''. |
| − | | + | *''The following only describes how the Player object collides and interacts with stage terrain. Solid objects, such as [[Monitor|Monitors]], Jump Through Platforms, and Pushable Blocks each have their own collision routines with the Player and don't necessarily behave exactly the same as the tiles do. For this, refer to [[SPG:Solid_Objects|Solid Objects]]''. |
| − | Following only describes how [[Sonic the Hedgehog|Sonic]] collides and interacts with solid tiles. Solid objects, such as [[Monitor|Monitors]], Moving Platforms, and Blocks each have their own collision routines with Sonic and don't necessarily behave exactly the same as the tiles do. For this, refer to [[SPG:Solid_Objects|Solid Objects]].
| + | *''This page describes what Solid Tiles and Sensors are and how they work. For their use in player collision and movement, see [[SPG:Slope Collision|Slope Collision]] (part 1) and [[SPG:Slope Physics|Slope Physics]] (part 2)''. |
| − | | + | *''This page is essentially part 1 of 2. This details what Solid Tiles are and how they are used directly. For part 2, detailing how Solid Tiles and collision layers are used to create anything from simple slopes all the way to bigger Sonic set-pieces like loops, go to [[SPG:Solid Terrain|Solid Terrain]].'' |
| − | ==Variables==
| |
| − | | |
| − | The following variables/constants will be referenced frequently in this section.
| |
| − | | |
| − | <nowiki>//Variables
| |
| − | xpos: The X-coordinate of Sonic's center.
| |
| − | ypos: The Y-coordinate of Sonic's center.
| |
| − | xsp: The speed at which Sonic is moving horizontally.
| |
| − | ysp: The speed at which Sonic is moving vertically.
| |
| − | gsp: The speed at which Sonic is moving on the ground.
| |
| − | slope: The current slope factor (slp) value being used.
| |
| − | ang: Sonic's angle on the ground.
| |
| − |
| |
| − | //Constants
| |
| − | acc: 0.046875
| |
| − | dec: 0.5
| |
| − | frc: 0.046875 (same as acc)
| |
| − | top: 6
| |
| − | jmp: 6.5 (6 for Knuckles)
| |
| − | slp: 0.125
| |
| − | slprollup: 0.078125
| |
| − | slprolldown: 0.3125
| |
| − | fall: 2.5
| |
| − | </nowiki>
| |
| | | | |
| | ==Introduction== | | ==Introduction== |
| | | | |
| − | What are solid tiles? While there are often solid objects in Sonic zones, the zone itself would require far too much object memory if the environment were constructed entirely of solid objects, each with their own 64 bytes of RAM. A clever short-cut is used - the zone is constructed out of tiles anyway, so all that needs be done is have each tile know whether or not it is solid. | + | What are Solid Tiles? While there are often solid objects in Sonic zones, the zone itself would require far too much object memory if the environment were constructed entirely of solid objects, each with their own 64 bytes of RAM. A clever short-cut is used - the zone is constructed out of tiles anyway, so all that needs be done is have each tile know whether or not it is solid. |
| | | | |
| | You may know that zones are broken down into 128x128 pixel chunks (or 256x256 pixel chunks in ''[[Sonic 1]]'' and ''[[Sonic CD]]''), which are in turn broken into 16x16 pixel blocks, which are again in turn broken into even smaller 8x8 pixel tiles. All of the solidity magic happens with the 16x16 blocks, so those are the only ones we will be interested in throughout this guide. | | You may know that zones are broken down into 128x128 pixel chunks (or 256x256 pixel chunks in ''[[Sonic 1]]'' and ''[[Sonic CD]]''), which are in turn broken into 16x16 pixel blocks, which are again in turn broken into even smaller 8x8 pixel tiles. All of the solidity magic happens with the 16x16 blocks, so those are the only ones we will be interested in throughout this guide. |
| | | | |
| − | Note: ''While 16x16 tiles are "officially" named blocks, they are being referred to as solid tiles here since it gets the main point across, a simple grid pattern of sets of data which can be read simply, as opposed to objects or any other method. "Solid Tiles" and "Blocks" can be used interchangeably in this guide.''
| + | The Player object's collisions and interactions with these Solid Tiles are what make up their basic engine. They dictate how the Player handles floors, walls, ceilings, slopes, and loops. |
| − | | |
| − | Sonic's collisions and interactions with these solid tiles are what make up his basic engine. They dictate how he handles floors, walls, ceilings, slopes, and loops. Because this is such a large subject, and so complex, this guide is more proximate than other Sonic Physics Guides, but I have kept speculation to a minimum.
| |
| − | | |
| − | First we will look at Sonic's method for detecting his environment, then how this environment is constructed and how Sonic handles it's complexity with such a simple system.
| |
| | | | |
| − | Note: ''While solidity tiles are used in the original games, these basic collision methods and sensor layouts will still work (with adjustments) with sprite masks, or line intersections, etc, in your own engine.''
| + | First we will look at how the environment is constructed from tiles, and then the Player's method for detecting their environment. |
| | | | |
| − | ==Sensors== | + | ==Solid Tiles== |
| − | The collision with solid tiles is handled using 'sensors' that surround Sonic. You can imagine these as lines which Sonic will not allow solid tiles to overlap, along the different axis. | + | Solid Tiles are what define the terrain solidity in a stage. The shape of slopes, and the angles of them. |
| | | | |
| − | [[Image:SPGSensors.png|link=Special:FilePath/SPGSensors.png]] | + | [[Image:SPGSolidTiles.png]] ''Solid Tiles covering the surfaces of Terrain, giving them solidity.'' |
| − | ''An accurate approximation of the sensors'' | |
| | | | |
| − | <span style="color:#00f000; font-weight: bold;">A</span> and <span style="color:#38ffa2; font-weight: bold;">B</span> - Floor collision
| + | ===Block Grid=== |
| − | <span style="color:#00aeef; font-weight: bold;">C</span> and <span style="color:#fff238; font-weight: bold;">D</span> - Ceiling collision (only used mid-air)
| + | For the purposes of this guide, the "Solid Tiles" are the actual solidity data used to define the ground shape. But the structure they belong to are "Blocks". Each Sonic stage essentially contains a grid of 16 by 16 px Blocks (grid cells) that fill a stage (or more specifically, fill each predefined terrain "Chunk"). Each of these Blocks references a solid tile (or empty solid tile) from a list of predefined Solid Tiles which contain height array data that contains the filled (solid) area/shape for that Block. Each Block can also define other properties for it's Solid Tile such as flipping or flagging. |
| − | <span style="color:#ff38ff; font-weight: bold;">E</span> and <span style="color:#ff5454; font-weight: bold;">F</span> - Wall collision (shifting by 8px depending on certain factors, which will be explained)
| |
| − | XY - Sonic's xpos and ypos
| |
| | | | |
| | + | ===Height Array=== |
| | + | Now for the Solid Tiles themselves. How is a solid tile set up? How is the shape of the terrain formatted? |
| | | | |
| − | Since Sonic's collision setup is symmetrical, it makes sense for the game to set up widths and heights using radius values. Sonic has separate radius values for his <span style="color:#ff38ff; font-weight: bold;">E</span> and <span style="color:#ff5454; font-weight: bold;">F</span> sensor pair (his '''Push Radius''') which always remains the same, and for his <span style="color:#00f000; font-weight: bold;">A</span>, <span style="color:#38ffa2; font-weight: bold;">B</span>, <span style="color:#00aeef; font-weight: bold;">C</span> and <span style="color:#fff238; font-weight: bold;">D</span> sensors there is a width radius (his '''Body Width Radius''') and height radius (his '''Body Height Radius''') both of which will change depending on Sonic's state.
| + | Each Solid Tile is simply an array of 16 height values that can range from 0px ($00) to 16px ($10) inclusive. |
| | | | |
| − | ===Sprite alignment===
| + | [[Image:SPGSolidTileHeightMasks.png]] ''Example of how many different height arrays are needed in order to account for every possible slope.'' |
| − | Sonic's sprite is 1 pixel offset to the left when he faces left, which can result in him appearing to be 1px inside a tile when pushing leftwards. However to an average person playing, this won't appear to happen with most objects thanks to their hitboxes sticking out 1px further on their right and bottom (due to their origins being off-centre by 1 in X and Y). So while tiles are collided with more accurately than objects, bizarrely it will appear the opposite in-game, thanks to Sonic's sprite alignment when flipped. More about object collision in [[SPG:Solid_Objects|Solid Objects]].
| |
| | | | |
| − | ==How Sensors Detect Solid Tiles==
| + | Let's take a closer look at an example Solid Tile. |
| − | | |
| − | It's all well and good knowing that Sonic collides with solids using lines, but what's the process? First, we have to understand what Solid Tiles actually are.
| |
| − | | |
| − | ===Height Masks===
| |
| − | | |
| − | When a sensor finds a tile, they return the "height" of the tile.
| |
| − | | |
| − | How is the height of the tile found?
| |
| − | | |
| − | Each tile has a value associated with it that references a mask stored in memory. Each mask is simply an array of 16 height values that range from 0px ($00) to 16px ($10) and an angle value.
| |
| | | | |
| | [[Image:SPGHeightMask.PNG|link=Special:FilePath/SPGHeightMask.PNG]] | | [[Image:SPGHeightMask.PNG|link=Special:FilePath/SPGHeightMask.PNG]] |
| | | | |
| − | This height mask, for example, has the height array 0 0 1 2 2 3 4 5 5 6 6 7 8 9 9 9, and the angle 33.75° ($E8). | + | This tile's height array has the values |
| | + | 0, 0, 1, 2, 2, 3, 4, 5, 5, 6, 6, 7, 8, 9, 9, 9 |
| | + | and has the angle 33.75° ($E8). |
| | | | |
| − | Which value of the height array is used? Subtract the tile's X position from the sensor's X position. The result is the index of the height array to use.
| + | Solid Tiles also have another height array (or, well, a ''width'' array) for horizontal collisions. |
| | | | |
| − | If the height value found is 16px ($10), that's the entire tile filled at that X position, so then the sensor has to check for another tile above the first one found, and search for that one's height value.
| + | For example, the tile above would be, from top to bottom |
| | + | 0, 0, 0, 0, 0, 0, 0, 3, 4, 5, 7, 9, 10, 11, 13, 14 |
| | + | This width array represents the same slope, angle, and creates the exact same shape within the tile. |
| | | | |
| − | ===Sensor Process=== | + | ===Angles=== |
| | + | Solid Tiles contain a specific angle value which represents the angle of the slope of the surface that the Height Array creates. |
| | | | |
| − | While the sensors here are described as lines, there's actually one initial '''anchor point''' pixel when a sensor is detecting the ground around Sonic.
| + | [[Image:SPGSolidTileAngles.png]] ''Tile angles (degrees)'' |
| − | For example, imagine a single point at the bottom of Sonic's <span style="color:#00f000; font-weight: bold;">A</span> sensor, this position is the '''anchor point''' and will check for a tile.
| |
| | | | |
| − | [[Image:SPGSensorAnchors.png]] ''The white points represent the active '''anchors''' of the sensor lines.''
| + | This angle is used when the Player collides with the Solid Tile and needs to react with slope physics and to allow the Player to rotate along the terrain. |
| | | | |
| − | ====Sensor Regression & Extension==== | + | ====Flagged Tiles==== |
| − | So when checked, a sensor's '''anchor point''' has found a solid tile, or it hasn't. If it has, what if the tile found isn't actually the surface of the terrain? Or if it hasn't, what if there's a tile nearby?
| + | [[Image:SPGFlaggedSolidTiles.png]] |
| | | | |
| − | Well, this is easily solved by checking nearby tiles also, until certain conditions are met. Though of course, these conditions could be met on the first tile.
| + | Nearly all tiles have a specific angle value which is used to allow the Player to rotate with sloped ground. However, some tiles angle is used as a flag. In the original games, if the angle of the tile is 255 ($FF), it is a flagged tile. How this angle is reacted to is determined by the object's code. In the case of the Player, they will not set their Ground Angle to the tile's angle as normal, but will instead find a new Ground Angle which is the Player's current Ground Angle snapped to the nearest 90° (0, 90, 180, or 270). |
| | | | |
| − | In the case of the <span style="color:#00f000; font-weight: bold;">A</span> sensor:
| + | This flag applies commonly to full block Solid Tiles (filled squares), as it is a quick and easy way to allow the Player to walk on all sides of a full block without needing to flip it around or provide multiple angle values for each side. |
| | | | |
| − | If this '''anchor point''' finds a Solid Tile, it will check up by 1 extra Solid Tile (effectively 16px up). We'll call this the "regression" since it goes back inwards towards Sonic.
| + | This is also used as a trick to effectively "flatten" the end of ramps. The ramps found in [[Emerald Hill Zone]] end with a diagonal slope - yet Spindashing up it sends you flying directly upwards into the air. How? The trick is that the last tile on that ramp has an angle of 255 ($FF), so is flagged despite not being a flat tile. This snaps the Player to 90° (aka, moving directly upwards) just as they leave the ramp. |
| | | | |
| − | However, if the '''anchor point''' just finds an empty tile, it will check down by 1 extra Solid Tile (effectively a 16px extension down) just in case. We'll call this the "extension" because it goes outwards, away from Sonic.
| + | ===Flipping Tiles=== |
| | + | You may wonder how sloped ceilings are possible if the height array creates slopes along the tops of Solid Tiles. The answer to this is that Blocks can be flipped horizontally and/or vertically. The collision systems take this into account when reading the height data from that Block's tile. |
| | | | |
| − | The regression & extension will occur in the direction of the sensor, be it horizontal or vertical. So sensor <span style="color:#ff5454; font-weight: bold;">F</span>'s regression would check an extra tile to the left, and extension would check an extra tile to the right. While sensor <span style="color:#fff238; font-weight: bold;">D</span> 's regression would check an extra tile below, and extension would check an extra tile above. | + | The angles of flipped tiles are also adjusted to align correctly after being read. |
| | | | |
| − | So, for all intents and purposes the lines shown are Sonic's solid areas, but it's slightly more complex internally. This method of visualising the sensors as lines is also the most accurate way to translate the solidity to other engines/frameworks which don't need to use the same specific tile methods & calculations.
| + | ===Tile Solidity=== |
| | + | Not all tiles behave the same. Some tiles are only solid from the top, some only from the sides, and some of course are solid from all sides. This solidity aspect affects which directions of Sensors can detect them. For example, a "top only" tile will be ignored by sideways and upwards facing Sensors, but downward facing Sensors will detect them. |
| | | | |
| − | =====Uses=====
| + | What are Sensors? Well, that's up next. |
| − | Regression is what makes the sensor anchor positions actually act as lines, and will let Sonic collide with the outside of a floor or wall even if his anchor points have already gone over 1 tile into it. Without this, collisions would effectively only happen for only a single pixel per sensor.
| |
| | | | |
| − | With extension however, most sensors will effectively '''ignore''' the extension and will only re-position Sonic when he's already close enough (when the Sensor's '''anchor point''' is actually touching a tile). The exception is Sonic's <span style="color:#00f000; font-weight: bold;">A</span> and <span style="color:#38ffa2; font-weight: bold;">B</span> sensors, while grounded, will use this extension to lock Sonic to the floor even if he happened to be 16px above it.
| + | ==Sensors== |
| | | | |
| − | ====Reaction====
| + | "Sensors" are simply checks performed by objects which look for Solid Tiles around them. |
| − | Once a tile has been found, it's 'height' (or position horizontally for horizontal sensors) will be returned for Sonic to use to re-position himself.
| |
| | | | |
| − | ====Summary====
| + | An x/y position ('''anchor point''') is checked, and if it finds a solid tile, they will gather information about the tile. |
| − | Here's a demonstrative animation showing a very simplified process of how the floor sensors detect a tile and be moved upwards. In this case, Sonic will have a ''gsp'' of 6.
| + | Sensors can point down, right, up, or left, and all behave the same in their respective directions/axis. |
| | | | |
| − | [[Image:SPGSensorProcess.gif]] ''Again, of note is that while the floor sensors will not ignore the 1 tile extension when grounded, other sensors will only be "listened to" if the sensor line is already touching the tile.'' | + | [[Image:SPGSensorAnchors.png]] ''The white points represent the '''anchor''' positions of the Player's Sensors.'' |
| | | | |
| | + | In this example, the Sensor to the Player's mid right points right, and those at the Player's feet point down. Their direction dictates in which direction they are looking for a surface. A Sensor pointing right is looking for the leftmost edge of solid terrain nearby, a Sensor pointing down is looking for the topmost edge of solid terrain nearby. |
| | | | |
| − | === Floor Sensors (<span style="color:#00f000; font-weight: bold;">A</span> and <span style="color:#38ffa2; font-weight: bold;">B</span>) ===
| + | The Sensor will read the height or width array of the Solid Tile it is checking. |
| | + | Which value of the array is used? For a vertical Sensor, subtract the tile's X position from the Sensor's X position. For a horizontal Sensor (using the width array), subtract the tile's Y position from the Sensor's Y position. The result is the index of the array to use. |
| | | | |
| − | [[Image:SPGStandingAnimated.gif|link=Special:FilePath/SPGStandingAnimated.gif]]
| + | So, now we know Sensors are points which look for Solid Tiles they touch, and that they can check the height or width array value of tiles at specific positions to get the floor surface position. |
| | | | |
| − | <span style="color:#00f000; font-weight: bold;">A</span> and <span style="color:#38ffa2; font-weight: bold;">B</span> stretch down from Sonic's ''ypos'' to his feet at ''ypos''+'''Body Height Radius'''.
| + | However, this is not the whole picture. If a Sensor finds an empty tile or the array value of the tile found by the Sensor is 16 (a full block amount), then it's likely that the surface of the solid terrain is actually found within an adjacent tile instead. |
| | | | |
| − | ====Movement==== | + | ====Sensor Regression & Extension==== |
| − | Typically, Sonic's '''Body Width Radius''' is 9, placing <span style="color:#00f000; font-weight: bold;">A</span> on Sonic's left side, at ''xpos''-9. While <span style="color:#38ffa2; font-weight: bold;">B</span> should be on his right, at ''xpos''+9, 19 pixels wide.
| + | So when a Sensor check is performed at a Sensor's '''anchor point''' it has either found a solid tile, or it hasn't. If it has, what if the height value found is 16 and isn't actually the surface of the terrain? Or if it hasn't, what if there's a solid tile nearby? |
| − | His '''Body Height Radius''' is usually 19, making him 39 pixels tall in total.
| |
| | | | |
| − | However while rolling or jumping, his '''Body Width Radius''' becomes 7, placing <span style="color:#00f000; font-weight: bold;">A</span> at ''xpos''-7. With <span style="color:#38ffa2; font-weight: bold;">B</span> at ''xpos''+7, 15 pixels wide. This is to ensure Sonic doesn't appear too far away from the floor at steep angles while in curled up. Crouching does not affect his '''Body Width Radius'''.
| + | Well, this is easily solved by checking neighbouring tiles if certain conditions are met. |
| | | | |
| − | Here's an example of that in action:
| + | Note: |
| | + | *The following is an example in the case of a Sensor which is pointing down looking for solids below (like a floor Sensor while standing upright). |
| | + | *The current height or width array value of a tile at the Sensor's X/Y position will be referred to as the ''tile height''. |
| | | | |
| − | [[Image:SPGWidthRadiusChange.gif|link=Special:FilePath/SPGWidthRadiusChange.gif]]
| + | =====Normal===== |
| | | | |
| − | While rolling or jumping (and otherwise generally curled up), Sonic's '''Body Height Radius''' becomes smaller at a value of 14, making him 29 pixels tall. Because of this, in the step in which Sonic rolls or jumps or otherwise becomes shorter, the engine adds 5 to his ''ypos'' so that his bottom point will remain unchanged despite him getting shorter and his center changing position. 5 also has to be subtracted from ''ypos'' when he unrolls or lands from a jump. The camera system also has to keep this offset in mind, otherwise, the view will jump when Sonic changes height.
| + | When the '''anchor point''' finds a Solid Tile and the ''tile height'' of the first tile is between 1 and 15 (inclusive), the game can be sure the surface of the terrain has been found without needing to check extra tiles at all. |
| | | | |
| − | As described initially, all sensors will check 16px further if they don't initially find a tile. Most sensors don't use this. The difference here, is the floor sensors will use this extension to check 16px below Sonic's feet and stick to a tile while Sonic is already grounded. So if Sonic ends up slightly above the ground because of a downward slope (and he's already on the ground) this extra space checked is to keep him attached to the ground at all times, until a cliff higher than or equal to 16px turns up, or he jumps.
| + | Otherwise, one of the following 2 things will happen. |
| | | | |
| − | ====Method==== | + | =====Regression===== |
| | | | |
| − | Assuming the ground level to be at a Y position of 736 ($02E0), while standing Sonic is atop it at a ''ypos'' of 716 ($02CC), which is 20 pixels above ground level.
| + | When the '''anchor point''' finds a Solid Tile and the ''tile height'' of the first tile is 16 (meaning the tile is completely filled in that position), it will check up by 1 extra Solid Tile. We'll call this the "regression" since it goes back against the Sensor direction. |
| | + | |
| | + | If a regression occurs and ''tile height'' of the second tile is 0 (or the tile is empty), it will just default to processing the first tile, as the first tile ''must'' be the terrain surface. |
| | | | |
| − | Floor sensors are a special case, there are 2 sensors and they need to detect slopes - so greater depth will be explored after establishing where these sensors are. The following simplified description applies when not on walls or ceilings.
| + | =====Extension===== |
| | | | |
| − | Both sensors behave the same and search for a Solid Tile. Whichever sensor finds the highest height, Sonic's ''ypos'' is set to the pixel above that height minus his '''Body Height Radius'''. His ''ang'' is also set to the angle of the Solid Tile that returned the highest height.
| + | When the '''anchor point''' just finds an empty tile (or the ''tile height'' of the first tile is 0), it will check down by 1 extra Solid Tile. We'll call this the "extension" because it goes outwards, in the direction of the Sensor. |
| − | When no Solid Tile is found by a sensor, foot level (''ypos''+'''Body Height Radius''') is returned by default.
| |
| | | | |
| − | =====Ledges=====
| + | If an extension occurs and just finds an empty second tile (or the ''tile height'' of the second tile is 0), the game knows that no terrain or terrain surface has been found, and will return the distance to the end of the second tile checked. |
| | | | |
| − | Sonic has to be able to run off of ledges. It would not do to just keep walking like Wile E. Coyote, not noticing that there is nothing beneath him.
| |
| | | | |
| − | If both sensor <span style="color:#00f000; font-weight: bold;">A</span> and <span style="color:#38ffa2; font-weight: bold;">B</span> detect no solid tiles, Sonic will "fall" - a flag will be set telling the engine he is now in the air. | + | If a solid tile was found to be processed, it will calculate the distance between that ''tile height'' and the Sensor. |
| | | | |
| − | =====Balancing On Edges=====
| + | [[Image:SPGSensorDistance.gif]] |
| | | | |
| − | One nice touch is that Sonic goes into a balancing animation when near to the edge of a ledge. This only happens when he is stopped (his ground speed is 0).
| + | In the above example, a downward facing Sensor moves down through 3 Solid Tiles. We can see the tiles it checks, and the distance it returns at each position. We can also see if it is performing extension or regression. You can see this means the Sensor can effectively act as a line, it can regress or extend up to 32 pixels to find the nearest surface. |
| | | | |
| − | How does the engine know? It is simple - any time only one of the ground sensors is activated, Sonic must be near a ledge. If <span style="color:#00f000; font-weight: bold;">A</span> is active and <span style="color:#38ffa2; font-weight: bold;">B</span> is not the ledge is to his right and vice versa.
| + | The regression & extension will occur in the direction of the Sensor, be it horizontal or vertical. So a right facing Sensor's regression would check an extra tile to the left, and extension would check an extra tile to the right. While an upward facing Sensor's regression would check an extra tile below, and extension would check an extra tile above. |
| | | | |
| − | But if Sonic began balancing the instant one of the sensors found nothing, he would do it too "early", and it would look silly. So it only happens when only one sensor is active, and ''xpos'' is greater than the edge of the solid tile found by the active sensor.
| + | With all this, a Sensor can always locate the nearest open surface (and the tile containing that surface) of the terrain within a range of 2 tiles (the tile the Sensor '''anchor point''' is touching plus another). |
| | | | |
| − | [[Image:SPGBalancingAnimated.gif|link=Special:FilePath/SPGBalancingAnimated.gif]]
| + | ====Reaction==== |
| − | | + | Once a final suitable tile has been found, information about the tile is returned. |
| − | Assuming the right edge of the ledge to be an X position of 2655 ($0A5F), Sonic will only start to balance at an ''xpos'' of 2656 ($0A60) (edge pixel+1). He'll fall off at an ''xpos'' of 2665 ($0A69) (edge pixel+10) when both sensors find nothing.
| |
| − | | |
| − | In ''[[Sonic 2]]'' and ''[[Sonic CD]]'', if the ledge is the opposite direction than he is facing, he has a second balancing animation.
| |
| − | | |
| − | In ''[[Sonic 2]]'', ''[[Sonic 3]]'', and ''[[Sonic & Knuckles]]'', Sonic has yet a ''third'' balancing animation, for when he's even further out on the ledge. Assuming the same values as above, this would start when he is at an ''xpos'' of 2662 ($0A66).
| |
| − | | |
| − | '''Note:''' While balancing, certain abilities are not allowed (ducking, looking up, spindashing, etc). In Sonic 3 & Knuckles, the player is still allowed to duck and spindash (not to look up, though) when balancing on the ground but not when balancing on an object.
| |
| − | | |
| − | === Ceiling Sensors (<span style="color:#00aeef; font-weight: bold;">C</span> and <span style="color:#fff238; font-weight: bold;">D</span>) ===
| |
| − | | |
| − | [[Image:SPGHitCeiling.gif|link=Special:FilePath/SPGHitCeiling.gif]]
| |
| − | | |
| − | Sonic's <span style="color:#00aeef; font-weight: bold;">C</span> and <span style="color:#fff238; font-weight: bold;">D</span> sensors are always an exact mirror image of Sonic's floor sensors, they have the same X positions and length but are flipped upside down.
| |
| − | | |
| − | They perform in the exact same way simply up instead of down.
| |
| − | | |
| − | However, they aren't active at the same times.
| |
| − | | |
| − | ====Method==== | |
| − | | |
| − | Sonic will detect ceilings and be pushed out of them whether he is moving up or down, unlike floors which are only detected when moving down. It ''is'' possible to hit a "ceiling" (which is just the bottom side of a block) while moving down - by pressing toward a wall with a gap in it, or jumping toward the side of an upper curve both with a high absolute ''xsp''.
| |
| − | | |
| − | | |
| − | === Wall Sensors (<span style="color:#ff38ff; font-weight: bold;">E</span> and <span style="color:#ff5454; font-weight: bold;">F</span>) ===
| |
| − | | |
| − | [[Image:SPGPushingAnimated.gif|link=Special:FilePath/SPGPushingAnimated.gif]]
| |
| − | | |
| − | <span style="color:#ff38ff; font-weight: bold;">E</span> spans from Sonic's ''xpos'' to his left at ''xpos''-'''Push Radius''', while <span style="color:#ff5454; font-weight: bold;">F</span> spans from Sonic's ''xpos'' to his right at ''xpos''+'''Push Radius'''.
| |
| − | | |
| − | ====Movement====
| |
| − | | |
| − | '''Push Radius''' is always 10, stretching <span style="color:#00f000; font-weight: bold;">E</span> to Sonic's left side, at ''xpos''-10. While <span style="color:#38ffa2; font-weight: bold;">F</span> stretches to his right, at ''xpos''+10, giving Sonic a total width of 21 pixels when pushing.
| |
| − | | |
| − | Sensors <span style="color:#ff38ff; font-weight: bold;">E</span> and <span style="color:#ff5454; font-weight: bold;">F</span> Spend most of their time at Sonic's ''ypos'' however while Sonic's ''ang'' is 0 (on totally flat ground) both wall sensors will move to his ''ypos''+8 so that he can push against low steps and not just snap up ontop of them.
| |
| − | | |
| − | The horizontal sensor lines are always positioned at ''ypos'' while airborne.
| |
| − | | |
| − | ====Method====
| |
| − | | |
| − | Assuming the wall's left side to be at an X position of 704 ($02C0), Sonic cannot get closer than an ''xpos'' of 693 ($02B5). Assuming the wall's right side to be at an X position of 831 ($033F), Sonic cannot get closer than an ''xpos'' of 842 ($034A). Thus both sensor lines combined should be 21 pixels wide, stretching from Sonic's ''xpos''-10 to ''xpos''+10.
| |
| − | | |
| − | Any time it detects a solid tile, Sonic should be "popped out", set to the edge of the tile minus (or plus) 11, and his ground speed set to 0. (He cannot be popped out by only 10, because then a point at ''xpos''+10 would still lie within the edge pixel of the tile. This would register a continuous collision, and he would stick to the wall.) This will also set his '''gsp''' to 0 if he is moving in the direction of the wall, not away from it. If it were otherwise, he would stick to walls if he tried to move away.
| |
| − | | |
| − | Though the tile's edge minus Sonic's ''xpos'' might be 11, there are 10 free pixels between Sonic's ''xpos'' and the tile's edge. The eleventh pixel away is the tile's edge itself. This would be the same for a tile on the left. So Sonic is effectively 21 pixels wide when including ''xpos''.
| |
| − | | |
| − | You may remember that sensors <span style="color:#00f000; font-weight: bold;">A</span> and <span style="color:#38ffa2; font-weight: bold;">B</span> are only 19 pixels apart but Sonic is 21 pixels wide when pushing into walls. This means that Sonic is skinnier by 2 pixels when running off of ledges than when bumping into walls.
| |
| − | | |
| − | ===Sensor Activation===
| |
| − | | |
| − | Knowing where the sensors are and what they do is only half the job since they are only sometimes active. This depends while you are grounded or airborne.
| |
| − | | |
| − | ====While Grounded====
| |
| − | | |
| − | Floor Sensors <span style="color:#00f000; font-weight: bold;">A</span> and <span style="color:#38ffa2; font-weight: bold;">B</span> are always active while grounded, and will use their 1 tile extension to actively search for new floor below Sonic's feet.
| |
| − | | |
| − | When grounded, Wall Sensors <span style="color:#ff38ff; font-weight: bold;">E</span> and <span style="color:#ff5454; font-weight: bold;">F</span> only activate when Sonic is walking in that direction. For example, while standing still Sonic isn't checking with his wall sensors at all, but while ''gsp'' is positive, Sonic's <span style="color:#ff38ff; font-weight: bold;">E</span> sensor is inactive, and while ''gsp'' is negative, Sonic's <span style="color:#ff5454; font-weight: bold;">F</span> sensor is inactive.
| |
| − | | |
| − | However this is not always the case, both wall sensors simply don't appear when Sonic's ''ang'' is outside of a 0 to 90 and 270 to 360 (or simply -90 to 90) degree range, meaning when you running around a loop, the wall sensors will vanish for the top half of the loop. In S3K however these sensors will also appear when Sonic's 'ang' is a multiple of 90 in addition to the angle range.
| |
| − | | |
| − | While grounded Ceiling Sensors <span style="color:#00aeef; font-weight: bold;">C</span> and <span style="color:#fff238; font-weight: bold;">D</span> are never active, and Sonic won't check for collision with solid tiles above himself while on the floor.
| |
| − | | |
| − | ====While Airborne====
| |
| − | | |
| − | While in the air, all sensors play a part to find ground to reattach Sonic to. But rather than have all active at once and risk lag, only 2-3 will be active at any given time.
| |
| − | | |
| − | As you move, the game will check the angle of your motion (xsp and ysp) through the air. It will then pick a quadrant by rounding to the nearest 90 degrees. (this is different to the Mode, this is simply a measurement of if you are going mostly left, right up or down). The quadrant can be more easily found by simply comparing the xsp and ysp and finding which is larger or smaller.
| |
| − |
| |
| − | if absolute xsp is larger then or equal to absolute ysp then
| |
| − | if xsp is larger than 0 then
| |
| − | Sonic is going mostly right
| |
| − | else
| |
| − | Sonic is going mostly left
| |
| − | else
| |
| − | if ysp is larger than 0 then
| |
| − | Sonic is going mostly down
| |
| − | else
| |
| − | Sonic is going mostly up
| |
| − | | |
| − | Depending on the quadrant, different sensors will be active.
| |
| − | | |
| − | When going '''mostly right''', Sonic's <span style="color:#ff5454; font-weight: bold;">F</span> sensor will be active, along with both <span style="color:#00f000; font-weight: bold;">A</span> and <span style="color:#38ffa2; font-weight: bold;">B</span> floor sensors and the <span style="color:#00aeef; font-weight: bold;">C</span> and <span style="color:#fff238; font-weight: bold;">D</span> ceiling sensors.
| |
| − | | |
| − | When going '''mostly left''', it is the exact same as going right, but the <span style="color:#ff38ff; font-weight: bold;">E</span> wall sensor instead.
| |
| − | | |
| − | When going '''mostly up''', both the <span style="color:#00aeef; font-weight: bold;">C</span> and <span style="color:#fff238; font-weight: bold;">D</span> ceiling sensors and the <span style="color:#ff38ff; font-weight: bold;">E</span> and <span style="color:#ff5454; font-weight: bold;">F</span> wall sensors are active.
| |
| − | | |
| − | When going '''mostly down''', it is the same as going up, but the <span style="color:#00f000; font-weight: bold;">A</span> and <span style="color:#38ffa2; font-weight: bold;">B</span> floor sensors are active instead of the ceiling sensors.
| |
| − | | |
| − | ===Summary===
| |
| − | | |
| − | Here's a handmade visualisation of how sensors interact with solid tiles (here highlighted in bright blue, green, and cyan). You can notice how the sensor lines are pushing Sonic from the ground tiles, and is overall rather simple. The <span style="color:#ff38ff; font-weight: bold;">E</span> and <span style="color:#ff5454; font-weight: bold;">F</span> sensors lower when on flat ground. You can also notice the sensor lines snap in 90 degree rotations resulting in four modes, this will be covered further down the guide.
| |
| − | | |
| − | [[Image:SPGCollisionDemo.gif|link=Special:FilePath/SPGCollisionDemo.gif]] ''Keep in mind, while on the ground the upper <span style="color:#00aeef; font-weight: bold;">C</span> and <span style="color:#fff238; font-weight: bold;">D</span> sensors would not exist, and while gsp is positive the left wall sensor would also not appear. These sensors are only included for illustration purposes.''
| |
| − | | |
| − | ====Bugs Using This Method====
| |
| − | | |
| − | Unfortunately, there are a couple of annoying bugs in the original engine because of this method.
| |
| − | | |
| − | If Sonic stands on a slanted ledge, one sensor will find no tile and return a height of foot level. This causes Sonic to be set to the wrong position.
| |
| − | | |
| − | [[Image:SPGSlopeBug1Animated.gif|link=Special:FilePath/SPGSlopeBug1Animated.gif]]
| |
| − | | |
| − | Sonic raises up with sensor <span style="color:#38ffa2; font-weight: bold;">B</span> sensor as he moves right. When <span style="color:#38ffa2; font-weight: bold;">B</span> drops off the ledge, Sonic defaults to the level of sensor <span style="color:#00f000; font-weight: bold;">A</span>. Then he raises up with sensor <span style="color:#00f000; font-weight: bold;">A</span> as he moves further right. So he will move up, drop down, and move up again as he runs off the ledge.
| |
| − | | |
| − | There are only a few areas where this is noticeable, but it applies to all Mega Drive titles and is pretty tacky.
| |
| − | | |
| − | The second form of it occurs when two opposing ramp tiles abut each other, as in some of the low hills in [[Green Hill Zone (Sonic the Hedgehog 16-bit)|Green Hill Zone]] and [[Marble Zone]].
| |
| − | | |
| − | [[Image:SPGSlopeBug2Animated.gif|link=Special:FilePath/SPGSlopeBug2Animated.gif]]
| |
| − | | |
| − | Sensor <span style="color:#38ffa2; font-weight: bold;">B</span> starts climbing down the ramp on the right, but Sonic still defaults to the level of the previous ramp found by sensor <span style="color:#00f000; font-weight: bold;">A</span>. Because these ramps are usually shallow, this only causes him to dip down in the middle by about 1 pixel.
| |
| − | | |
| − | But that is not all. Because the highest sensor is the one Sonic gets the angle from, even though it looks like he should be considered to be at the angle of the ramp on the right (because he is closer to it), he will still have the angle of the ramp on the left. When you jump, he will jump at that angle, moving backward, not forward like you would expect.
| |
| − | | |
| − | ===Moving At Angles===
| |
| − | | |
| − | Well, that is all very well and good for having Sonic move smoothly over terrain with different heights, but that is not all there is to the engine. Sonic's speed has to be attenuated by angled ground in order to be realistic.
| |
| − | | |
| − | There are two ways in which Sonic's speed is affected on angles. The first will make sure that he does not traverse a hill in the same amount of time as walking over flat ground of an equal width. The second will slow him down when going uphill and speed him up when going downhill. Let's look at each of these in turn.
| |
| − | | |
| − | ====The Three Speed Variables====
| |
| − | | |
| − | If Sonic were a simple platformer that required nothing but blocks, you would only need two speed variables: X speed (''xsp'') and Y speed (''ysp''), the horizontal and vertical components of Sonic's velocity. Acceleration (''acc''), deceleration (''dec''), and friction (''frc'') are added to ''xsp''; jump/bounce velocity and gravity (''grv'') are added to ''ysp'' (when Sonic is in the air).
| |
| − | | |
| − | But when slopes are involved, while Sonic moves along a slope, he's moving both horizontally and vertically. This means that both ''xsp'' and ''ysp'' have a non-zero value. Simply adding ''acc'', ''dec'', or ''frc'' to ''xsp'' no longer works; imagine Sonic was trying to run up a wall - adding to his horizontal speed would be useless because he needs to move upward.
| |
| − | | |
| − | The trick is to employ a third speed variable (as the original engine does), so let's call it Ground speed (''gsp''). This is the speed of Sonic along the ground, disregarding ''ang'' altogether. ''acc'', ''dec'', and ''frc'' are applied to ''gsp'', not ''xsp'' or ''ysp''.
| |
| − | | |
| − | While on the ground, ''xsp'' and ''xsp'' are derived from ''gsp'' every step before Sonic is moved. Perhaps a pseudo-code example is in order:
| |
| − | | |
| − | xsp = gsp*cos(angle);
| |
| − | ysp = gsp*-sin(angle);
| |
| − |
| |
| − | xpos += xsp;
| |
| − | ypos += ysp;
| |
| − | | |
| − | No matter what happens to the ''ang'', ''gsp'' is preserved, so the engine always knows what speed Sonic is "really" moving at.
| |
| − | | |
| − | ====Slope Factor====
| |
| − | | |
| − | By this point, Sonic should be able to handle any hills with an accurate velocity but he still needs to slow down when going uphill and speed up when going downhill.
| |
| − | | |
| − | Fortunately, this is simple to achieve - with something called the Slope Factor (''slope''). Just subtract ''slope''*sin(''ang'') from ''gsp'' at the beginning of every step.
| |
| − | | |
| − | gsp -= slope*sin(ang);
| |
| − | | |
| − | The value of ''slope'' is always ''slp'' when running, but not so when rolling. When Sonic is rolling uphill (the sign of ''gsp'' is equal to the sign of sin(''ang'')), ''slope'' is ''slprollup'' ($001E). When Sonic is rolling downhill (the sign of ''gsp'' is '''not''' equal to the sign of sin(''ang'')), ''slope'' is ''slprolldown'' ($0050).
| |
| − | | |
| − | '''Note:''' In Sonic 1, it appears that ''slope'' doesn't get added if Sonic is stopped and in his standing/waiting cycle. But in Sonic 3 & Knuckles, ''slope'' seems to be added even then, so that Sonic can't stand on steep slopes - they will force him to walk them down.
| |
| − | | |
| − | ===Jumping At Angles===
| |
| − | | |
| − | Jumping is also affected by the angle Sonic is at when he does it. He can't simply set ''ysp'' to negative ''jmp'' - he needs to jump away from the angle he's standing on. Instead, both ''xsp'' and ''ysp'' must have ''jmp'' subtracted from them, using cos() and sin() to get the right values.
| |
| − | | |
| − | More pseudo-code:
| |
| − | | |
| − | xsp -= jmp*sin(angle);
| |
| − | ysp -= jmp*cos(angle);
| |
| − | | |
| − | Notice how the jump values are subtracted from the ''xsp'' and ''ysp''. This means his speeds on the ground are preserved, meaning running up fast on a steep hill and jumping gives you the jump speeds and the speeds you had on the hill, resulting in a very high jump.
| |
| − | | |
| − | ==Switching Mode==
| |
| − | | |
| − | So Sonic can run over hills and ramps and ledges, and all that is great. But it is ''still'' not enough. He cannot make his way from the ground to walls and ceilings without more work.
| |
| − | | |
| − | Why not? Well, because sensor <span style="color:#00f000; font-weight: bold;">A</span> and <span style="color:#38ffa2; font-weight: bold;">B</span> check straight downward, finding the height of the ground. There is just no way they can handle the transition to walls when everything is built for moving straight up and down on the Y-axis.
| |
| − | | |
| − | How can we solve this? By using four different modes of movement. This will take a little explaining.
| |
| − | | |
| − | ===The Four Modes===
| |
| − | | |
| − | It seems pretty reasonable to assume that, because Sonic can traverse ground in 360 degrees, the engine handles all 360 degrees in much the same way. But, in fact, the engine splits the angles into four quadrants, greatly simplifying things.
| |
| − | | |
| − | To better understand what I am talking about, imagine a simpler platformer without full loops, just a few low hills and ramps. All the character would need to do is, after moving horizontally, move up or down until they met the level of the floor. The angle of the floor would then be measured. The angle would be used to attenuate ''gsp'', but nothing more. The character would still always move horizontally and move straight up and down to adhere to floor level.
| |
| − | | |
| − | This is much like how Sonic does things. Only, when ''ang'' gets too steep, Sonic switches "quadrant", moving from Floor mode to Right Wall mode (to Ceiling mode, to Left Wall mode, and back around to Floor mode, etc). At any one time, in any one mode, Sonic behaves like a simpler platformer. The magic happens by combining all four modes, and cleverly switching between them smoothly.
| |
| − | | |
| − | So how and when does Sonic switch mode?
| |
| − | | |
| − | When in Floor mode, and ''ang'' is steeper than 45° ($E0), the engine switches into Right Wall mode. Everything is basically the same, only the sensors check to the right instead of downward, and Sonic is moved to "floor" level horizontally instead of vertically.
| |
| − | | |
| − | Now that he's in Right Wall mode, if ''ang'' is shallower than 45° ($E0), the engine switches back into Floor mode.
| |
| − | | |
| − | The other transitions work in exactly the same way, with the switch angles relative to the current mode.
| |
| − | | |
| − | When the mode is being calculated, it simply checks which quadrant Sonic's ''ang'' is currently in, which will place Sonic in the correct mode (ranges are inclusive):
| |
| − | | |
| − | Floor Mode (start of rotation)
| |
| − | 0° to 45° (1~32) ($FF~$E0)
| |
| − | | |
| − | Right Wall Mode
| |
| − | 46° to 134° (33~95) ($DF~$A1)
| |
| − | | |
| − | Ceiling Mode
| |
| − | 135° to 225° (96~160) ($A0~$60)
| |
| − | | |
| − | Left Wall Mode
| |
| − | 226° to 314° (161~223) ($5F~$21)
| |
| − | | |
| − | Floor Mode (end of rotation)
| |
| − | 315° to 360° (224~256) ($20~$00)
| |
| − | | |
| − | ''Note: Since the classic games don't use degrees, and rather have angles ranging from 0 to 256, both approximate degree values and a more accurate decimal representation of the Hex values are included.''
| |
| − | | |
| − | These ranges are symmetrical for left and right, but does favour the floor and ceiling modes, with their ranges being a degree or two wider.
| |
| − | | |
| − | You might rightly ask where the ground sensors are when in Right Wall mode. They're in exactly the same place, only rotated 90 degrees. Sensor <span style="color:#00f000; font-weight: bold;">A</span> is now at Sonic's ''ypos''+9 instead of ''xpos''-9. Sensor <span style="color:#38ffa2; font-weight: bold;">B</span> is now at Sonic's ''ypos''-9, instead of ''xpos''+9. Instead of vertical sensor lines, they are now horizontal, stretching 16 pixels beyond his foot level (which is now 20 pixels "below" him, at ''xpos''+20).
| |
| − | | |
| − | Yes, because the sensors move so far, it is possible for Sonic to be "popped" out to a new position in the step in which he switches mode. However, this is hardly ever more than a few pixels and really isn't noticeable at all during normal play. To adjust for this in a new engine, an alternative method to switch mode would be to check for solid ground using a 90 degree rotated mask. For example, standing upright on flat ground, the left side would check rotated 90 degrees for steep slopes to switch to Left Wall Mode, and the right would check rotated -90 degrees for steep slopes to switch to Right Wall Mode. Only the lower ground sensor of the rotated mask would need to check for ground. This would have to exclude walls so Sonic doesn't begin walking on a wall when he gets near one, but would mean Sonic switched mode sooner on a slope which means less "popping".
| |
| − | | |
| − | One more thing: I said that solid tiles were made of height arrays. Operative word: ''height''. How do they work when in Right Wall mode? Well, rather gobsmackingly, it turns out that in the original engine, each solid tile has ''two'' complementary height arrays, one used for when moving horizontally, the other for when moving vertically.
| |
| − | | |
| − | What about Left Wall and Ceiling mode? Wouldn't there need to be ''four'' height arrays? No, because tiles of those shapes simply use normal height arrays, just inverted. When in Ceiling mode, Sonic knows that the height value found should be used to move him down and not up.
| |
| − | | |
| − | With these four modes, Sonic can go over all sorts of shapes. Inner curves, outer curves, you name them. Here are some approximate example images with their angle values to help give you some idea of what this results in:
| |
| − | | |
| − | [[Image:SPGInnerCurve.PNG|link=Special:FilePath/SPGInnerCurve.PNG]] [[Image:SPGInnerCurveChart.PNG|link=Special:FilePath/SPGInnerCurveChart.PNG]]
| |
| − | | |
| − | You can observe Sonic's mode changing on the frame after his floor angle (''ang'') exceeds 45°. Sonic's position shifts a bit when the change occurs, due to the totally new collision angle and position.
| |
| − | | |
| − | The reason the gif shows the switch being the frame after the angle threshold is reached is simply because the collision being shown is the one used for ''that'' frame, ''before'' Sonic's ''ang'' updates, which is how you see Sonic in-game to begin with.
| |
| − | | |
| − | [[Image:SPGOuterCurve.PNG|link=Special:FilePath/SPGOuterCurve.PNG]] [[Image:SPGOuterCurveChart.PNG|link=Special:FilePath/SPGOuterCurveChart.PNG]]
| |
| − | | |
| − | You may notice Sonic's mode switches erratically on the convex curve, this is because his floor angle (''ang'') will suddenly decrease when switching to wall mode, causing it to switch back and forth until he is far enough down the curve to stabilise. This isn't usually noticeable, and happens less the faster you are moving.
| |
| − | | |
| − | ===When to Change Mode===
| |
| − | | |
| − | Sonic's current "Mode" is decided precisely when collision occurs. It will measure his angle, and decide which Mode of collision to use right there. There is no "Mode" state stored in memory. So effectively, Sonic's mode changes whenever his angle (''ang'') does.
| |
| − | | |
| − | Since the floor angle (''ang'') is decided after floor collision (as a result of floor collision) the floor collision that frame has to use the previous frames angle, even though Sonic has moved to a new part of the slope since then. This results in Sonic's mode effectively changing 1 frame ''after'' Sonic reaches one of the 45 degree angle thresholds.
| |
| − | | |
| − | ===Falling and Sliding Off Of Walls And Ceilings===
| |
| − | | |
| − | When in Right Wall, Left Wall, or Ceiling mode and Sonic's ''ang'' is between 90 and 270, Sonic will fall any time absolute ''gsp'' falls below ''fall'' ($0280) (''gsp'' is set to 0 at this time, but ''xsp'' and ''ysp'' are unaffected, so Sonic will continue his trajectory through the air). This happens even if there is ground beneath him. If Sonic is in Right Wall, Left Wall, or Ceiling Mode but Sonic's ''ang'' is not between 90 and 270 then the horizontal control lock timer described below will still be set to 30 but Sonic will not enter a falling state remaining in his current state.
| |
| − | | |
| − | ====Horizontal Control Lock====
| |
| − | | |
| − | When Sonic falls or slides off in the manner described above, the [[SPG:Springs and Things#Horizontal Control Lock|horizontal control lock]] timer is set to 30 ($1E) (it won't begin to count down until Sonic lands back on the ground). While this timer is non-zero and Sonic is on the ground, it prevents the player from adjusting Sonic's speed with the left or right buttons. The timer counts down by one every step, so the lock lasts about half a second. During this time only ''slp'' and the speed Sonic fell back on the ground with is in effect, so Sonic will slip back down the slope.
| |
| − | | |
| − | if (abs(gsp) < 2.5 && (angle >= 45 && angle <= 315))
| |
| − | {
| |
| − | if (angle >= 90 && angle <= 270)
| |
| − | {
| |
| − | floor_mode = 0;
| |
| − | gsp = 0;
| |
| − | }
| |
| − | horizontal_lock_timer = 30;
| |
| − | }
| |
| − | | |
| − | ==The Air State==
| |
| − | | |
| − | Any time Sonic is in the air, he doesn't have to worry about angles, ''gsp'', ''slp'', or any of that jazz. All he has to do is move using ''xsp'' and ''ysp'' until he detects the ground, at which point he re-enters the ground state.
| |
| − | | |
| − | ===Jumping "Through" Floors===
| |
| − | | |
| − | There are some ledges that Sonic can jump up "through". These are often in the hilly, green zones such as [[Green Hill Zone (Sonic the Hedgehog 16-bit)|Green Hill Zone]], [[Emerald Hill Zone]], [[Palmtree Panic Zone]], and so on. The solid tiles that make up these ledges are flagged by the engine as being a certain type that should only be detected by Sonic's <span style="color:#00f000; font-weight: bold;">A</span> and <span style="color:#38ffa2; font-weight: bold;">B</span> sensors. They are ignored entirely by C and D as well as the horizontal sensor line. Finally, sensor <span style="color:#00f000; font-weight: bold;">A</span> and <span style="color:#38ffa2; font-weight: bold;">B</span> (mostly) only detect the floor when Sonic is moving downwards (but always while on the ground). So with a slightly shorter jump, you will see Sonic 'pop' upwards onto a jump through surface once he begins to fall.
| |
| − | | |
| − | ===Reacquisition Of The Ground===
| |
| − | Both ''xsp'' and ''ysp'' are derived from ''gsp'' while Sonic is on the ground. When he falls or otherwise leaves the ground, ''xsp'' and ''ysp'' are already the proper values for him to continue his trajectory through the air. But when Sonic lands back on the ground, ''gsp'' must be calculated from the ''xsp'' and ''ysp'' that he has when it happens.
| |
| − | You might think that they would use cos() and sin() to get an accurate value, but that is not the case. In fact, something much more basic happens, and it is different when hitting into a curved ceiling as opposed to landing on a curved floor, so I will cover them separately.
| |
| − | | |
| − | As you land the angle of the ground you touch is read (''ang'').
| |
| − | The following covers the angle (''ang'') of the ground (floor or ceiling) that Sonic touches as he lands, and only happens the frame when he lands when changing from in air to on ground.
| |
| − | | |
| − | ''Note: Since the classic games don't use degrees, and rather have angles ranging from 0 to 256, both approximate degree values and a more accurate (and inverted) decimal representation of the Hex values are included.''
| |
| − | | |
| − | ====When Falling Downward====
| |
| − | [[Image:SPGLandFloor.png|link=Special:FilePath/SPGLandFloor.png]]
| |
| − | | |
| − | The following ranges are inclusive.
| |
| − | | |
| − | '''Shallow:'''
| |
| − | When ''ang'' is in the range of
| |
| − | | |
| − | 0° to 23° (1~16) ($FF~$F0)
| |
| − | and mirrored:
| |
| − | 339° to 360° (241~256) ($0F~$00)
| |
| − | | |
| − | ''gsp'' is set to the value of ''xsp''.
| |
| − | | |
| − | '''Half Steep:'''
| |
| − | When ''ang'' is in the range of
| |
| − | | |
| − | 24° to 45° (17~32) ($EF~$E0)
| |
| − | and mirrored:
| |
| − | 316° to 338° (225~240) ($1F~$10)
| |
| − | | |
| − | ''gsp'' is set to ''xsp'' but only if the absolute of ''xsp'' is greater than ''ysp''. Otherwise, ''gsp'' is set to ''ysp''*0.5*-sign(sin(''ang'')).
| |
| − | | |
| − | '''Full Steep:'''
| |
| − | When ''ang'' is in the range of
| |
| − | | |
| − | 46° to 90° (33~64) ($DF~$C0)
| |
| − | and mirrored:
| |
| − | 271° to 315° (193~224) ($3F~$20)
| |
| − | | |
| − | ''gsp'' is set to ''xsp'' but only if the absolute of ''xsp'' is greater than ''ysp''. Otherwise, ''gsp'' is set to ''ysp''*-sign(sin(''ang'')).
| |
| − | | |
| − | ====When Going Upward====
| |
| − | [[Image:SPGLandCeiling.png|link=Special:FilePath/SPGLandCeiling.png]]
| |
| − | | |
| − | The following ranges are inclusive.
| |
| − | | |
| − | '''Slope:'''
| |
| − | When the ceiling ''ang'' detected is in the range of
| |
| | | | |
| − | 91° to 135° (65~96) ($BF~$A0)
| + | The information a Sensor finds is as follows: |
| − | and mirrored
| + | *The distance from the Sensor pixel to the surface of the solid tile found (in the Sensor's direction) |
| − | 226° to 270° (161~192) ($5F~$40)
| + | *The angle of the tile found |
| | + | *The tile ID |
| | | | |
| − | Sonic reattaches to the ceiling and ''gsp'' is set to ''ysp''*-sign(sin(''ang'')).
| + | =====Distance===== |
| | + | The distance to the Solid Tile surface (found by the Sensor) is the most important piece of information dictating how an object will react to Solid Tiles. It's not the distance to the tile, it's the distance to the ''edge of the solid area within the tile'', precisely. |
| | | | |
| − | '''Ceiling:'''
| + | The distance can either be 0, negative, or positive. |
| − | When the ceiling ''ang'' is in the range of
| |
| | | | |
| − | 136° to 225° (97~160) ($9F~$60)
| + | When no Solid Tile is found by a Sensor, the Sensor will return a distance between 16 and 32 (inclusive), which is the distance to the end of the second tile checked. This is the potentially "no-tile-found" distance range. |
| | | | |
| − | Sonic hits his head like with any ceiling, and doesn't reattach to it. ''ysp'' is set to 0, and ''xsp'' is unaffected.
| + | *''Note: It doesn't necessarily mean no tile has been found if the distance is in this range, but if no tile was found the distance will definitely be within this range so the game typically chooses to treat it as such just incase.'' |
| | | | |
| − | ===Air Rotation===
| + | In future, if the guide references a tile not being found, this means either the distance is out of the range the object wants, or the distance is between 16 and 31. |
| − | When Sonic leaves a slope, such as running up and off a quarter pipe, Sonic's angle smoothly returns to 0.
| |
| | | | |
| − | Sonic's angle (''ang'') changes by
| + | *A distance of 0 means the Sensor is just touching the solid tile surface and the object will not need to move (but may still choose to collide). |
| − | 2.8125° (2) ($2)
| |
| − | each frame, in the direction towards 0.
| |
| − | *''Note: Degree angle is approximate, as the original game has angles ranging up to 256. Degree, decimal, and hex have been provided.''
| |
| − | *''Note: Regardless of Sonic's angle, Sonic's air sensors do not rotate. Air collision essentially ignores Sonic's mode.''
| |
| | | | |
| − | ==Order of events==
| + | *A negative distance means the surface found is closer to the object than the Sensor position. Negative distances are almost always reacted to when colliding, because it indicates that the object is inside the solid and can be pushed out. |
| | | | |
| − | So, we know what happens, but in what order? It depends based on Sonic's current state.
| + | *Positive distances mean the surface found is further away from the object than the Sensor position. Since this means the object isn't actually touching the tile, it's rarely used - but not never. A notable example of it's use is by floor Sensors of various objects, including the Player, to keep them attached to the ground even if the ground has sloped away from them a bit as they move. Objects usually employ a limit to how far an object can be "pulled" down to a solid they aren't actually touching. This will be detailed further down for the Player. |
| | | | |
| − | ===While Normal===
| + | If the object decides to snap itself to the terrain, it simply has to add the distance value to it's position. Or subtract, depending on the Sensor's direction. A Sensor pointing left may return a negative distance if it is inside a solid, but the object would have to subtract the distance in order to move to the right, out of it. |
| | | | |
| − | "Normal" means when Sonic is not airborne or rolling.
| + | Of course, as stated, this distance can be representative of any 4 directions, depending on the Sensor's own angle. |
| | | | |
| − | * '''Check for special animations that prevent control (such as balancing).'''
| + | ====Typical Sensor Usage==== |
| − | * '''Check for starting a spindash.'''
| + | Sensors are utilised by many different objects, including the Player, to align themselves or "collide" with Solid Tiles. A Sensor will typically be cast with an anchor positioned at the edge of the object, pointing outwards. For example, positioned at the right of an object at X Position + Width Radius pointing right, or positioned at the bottom of an object at Y Position + Y Radius pointing down. |
| − | * '''Adjust gsp based on current ang. (slope factor)'''
| |
| − | * '''Check for starting a jump.'''
| |
| − | * '''Update gsp based on directional input and apply friction/deceleration.'''
| |
| − | * '''Check for starting ducking, balancing on ledges, etc.'''
| |
| − | * '''Wall sensor collision occurs, the contents of which depend on the sensor activation.'''
| |
| − | ** Notice it begins before Sonic physically moves, meaning it will check if the distance to a wall is closer than Sonic's xspeed in a given direction using the wall sensor's extension
| |
| − | * '''Check for starting a roll.'''
| |
| − | * '''Handle camera boundaries (keep Sonic inside the view and kill Sonic if he touches the kill plane).'''
| |
| − | * '''Move Sonic. (actually updates xpos and ypos based on xsp and ysp)'''
| |
| − | * '''Floor sensor collision occurs here.'''
| |
| − | ** Update Sonic's angle and therefore collision mode;
| |
| − | ** Lose ground if none found/too low;
| |
| − | ** Adhere to level of terrain.
| |
| − | * '''Check for falling when gsp is too low on walls/ceilings.'''
| |
| | | | |
| − | ===While Rolling===
| + | Most objects will only use 1 or 2 Sensors, usually pointing down looking for the floor, though some will also use additional Sensors to check for walls. The Player object is more complex and can sometimes use up to 5 Sensors at once depending on their state. How the Player uses Sensors is described in [[SPG:Slope_Collision#The_Player.27s_Sensors|Slope Collision]]. |
| | | | |
| − | * '''Adjust gsp based on current ang. (rolling slope factors)'''
| + | In the example of a Sensor at the bottom, if terrain is found nearby the distance found from this Sensor can be used to reposition the object to align perfectly with the floor. For example if the Sensor returned a distance of -10, the Sensor is 16 pixels inside of the Terrain, and the object would simply have to add -10 to their Y Position to align perfectly with the surface. |
| − | * '''Check for starting a jump.'''
| + | Objects typically won't react to positive distances where the Sensor is outside of the terrain (but not always, typically positive Sensor distances are used for alignment while an object is already on the ground to ensure they remain "stuck"). |
| − | * '''Update gsp based on directional input and apply friction.'''
| |
| − | * '''Wall sensor collision occurs.'''
| |
| − | * '''Handle camera boundaries (keep Sonic inside the view and kill Sonic if he touches the kill plane).'''
| |
| − | * '''Move Sonic. (actually updates xpos and ypos based on xsp and ysp)'''
| |
| − | * '''Floor sensor collision occurs here.'''
| |
| − | ** Update Sonic's angle and therefore collision mode;
| |
| − | ** Lose ground if none found/too low;
| |
| − | ** Adhere to level of terrain.
| |
| − | * '''Check for falling when gsp is too low on walls/ceilings.'''
| |
| | | | |
| − | ===While Airborne=== | + | =====Distance Rejection===== |
| | + | Objects will reject distances too "large" in either direction (positive or negative). |
| | | | |
| − | "Airborne" means when Sonic is falling or jumping or otherwise not grounded. | + | When casting Sensors, objects check the returned distances it accepts for collision. For example, checking if a distance is >= 16 or <= -16 and if it is, not colliding. This will filter out potentially "no-tile-found" distances. This avoids a need for the game to remember if a tile was found after the Sensor was cast, it can just remember the distance value. Though typically the game opts for a distance of 14 as the limit (< -14 or > 14) as this usually means either the surface of the Solid Tile is too far away to matter anyway. |
| | | | |
| − | * '''Check for jump button release i.e. jump resist.'''
| + | ====Visual Depiction==== |
| − | * '''Check for turning Super.'''
| + | Sensors will be drawn from the Sensor anchor, extending towards the centre of the object. This demonstrates the direction of the Sensor, and also, given the typical use of Sensors, the approximate "solid" areas of the object using the Sensor. |
| − | * '''Update xsp based on directional input and apply air drag.'''
| |
| − | * '''Move Sonic. (actually updates xpos and ypos based on xsp and ysp)'''
| |
| − | * '''Update ysp by adding gravity to it.'''
| |
| − | ** Notice it happens after Sonic's position was updated.
| |
| − | * '''Check underwater for reduced gravity.'''
| |
| − | * '''Rotate angle back to 0.'''
| |
| − | * '''Set collision mode to 0.'''
| |
| − | * '''Collision checks occurs here the contents of which depend on the sensor activation'''
| |
| − | ** Wall collision occurs first.
| |
| | | | |
| − | ==Notes==
| + | You can imagine it vaguely like so - if the very edge pixels of the surface of the ground is within these lines, the object would collide and be pushed out of the Solid Tile. It is of course not quite this simple in reality. As shown in the previous visualisation of a Sensor, the "line" portion can extend up to 32 pixels in either direction, all depending on where the Sensor anchor currently sits within it's tile... and sometimes objects will align themselves even when the Sensor returns positive distances and aren't even touching the Solid Tile... and objects will reject all sorts of different varying distances Sensors return depending on what the Sensor is being used for... This would be impossible to accurately draw over the Player while keeping things understandable and clear. This visualisation is a simplified and rough estimation. |
| − | * Sonic can only brake ("screech to a halt") in Floor mode.
| |
| − | * Sonic cannot jump when there is a low ceiling above him. If there is a collision detected with a sensor line stretching from Sonic's ''xpos''-9 to ''xpos''+9, at ''ypos''-25, Sonic won't bother jumping at all.
| |
| | | | |
| | + | Just be aware that the line based depictions are for simple illustration purposes only and the endpoints of the lines are the active Sensor anchor positions (which always behave as described). |
| | | | |
| | [[Category:Sonic Physics Guide]] | | [[Category:Sonic Physics Guide]] |
Notes:
- The research applies to all four of the Sega Mega Drive games and Sonic CD.
- The following only describes how the Player object collides and interacts with stage terrain. Solid objects, such as Monitors, Jump Through Platforms, and Pushable Blocks each have their own collision routines with the Player and don't necessarily behave exactly the same as the tiles do. For this, refer to Solid Objects.
- This page describes what Solid Tiles and Sensors are and how they work. For their use in player collision and movement, see Slope Collision (part 1) and Slope Physics (part 2).
- This page is essentially part 1 of 2. This details what Solid Tiles are and how they are used directly. For part 2, detailing how Solid Tiles and collision layers are used to create anything from simple slopes all the way to bigger Sonic set-pieces like loops, go to Solid Terrain.
Introduction
What are Solid Tiles? While there are often solid objects in Sonic zones, the zone itself would require far too much object memory if the environment were constructed entirely of solid objects, each with their own 64 bytes of RAM. A clever short-cut is used - the zone is constructed out of tiles anyway, so all that needs be done is have each tile know whether or not it is solid.
You may know that zones are broken down into 128x128 pixel chunks (or 256x256 pixel chunks in Sonic 1 and Sonic CD), which are in turn broken into 16x16 pixel blocks, which are again in turn broken into even smaller 8x8 pixel tiles. All of the solidity magic happens with the 16x16 blocks, so those are the only ones we will be interested in throughout this guide.
The Player object's collisions and interactions with these Solid Tiles are what make up their basic engine. They dictate how the Player handles floors, walls, ceilings, slopes, and loops.
First we will look at how the environment is constructed from tiles, and then the Player's method for detecting their environment.
Solid Tiles
Solid Tiles are what define the terrain solidity in a stage. The shape of slopes, and the angles of them.
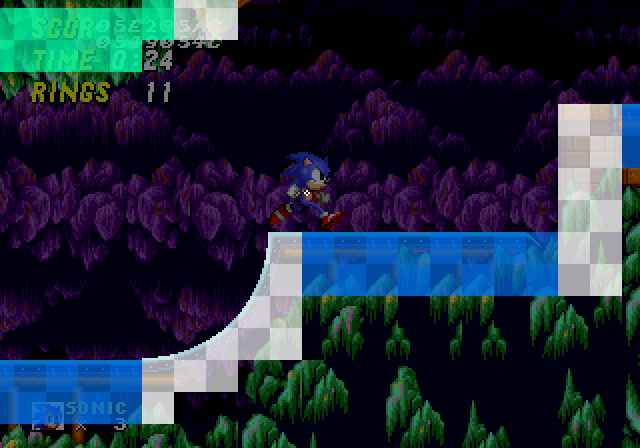 Solid Tiles covering the surfaces of Terrain, giving them solidity.
Block Grid
For the purposes of this guide, the "Solid Tiles" are the actual solidity data used to define the ground shape. But the structure they belong to are "Blocks". Each Sonic stage essentially contains a grid of 16 by 16 px Blocks (grid cells) that fill a stage (or more specifically, fill each predefined terrain "Chunk"). Each of these Blocks references a solid tile (or empty solid tile) from a list of predefined Solid Tiles which contain height array data that contains the filled (solid) area/shape for that Block. Each Block can also define other properties for it's Solid Tile such as flipping or flagging.
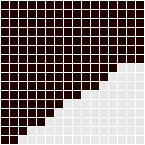
Height Array
Now for the Solid Tiles themselves. How is a solid tile set up? How is the shape of the terrain formatted?
Each Solid Tile is simply an array of 16 height values that can range from 0px ($00) to 16px ($10) inclusive.
 Example of how many different height arrays are needed in order to account for every possible slope.
Let's take a closer look at an example Solid Tile.
This tile's height array has the values
0, 0, 1, 2, 2, 3, 4, 5, 5, 6, 6, 7, 8, 9, 9, 9
and has the angle 33.75° ($E8).
Solid Tiles also have another height array (or, well, a width array) for horizontal collisions.
For example, the tile above would be, from top to bottom
0, 0, 0, 0, 0, 0, 0, 3, 4, 5, 7, 9, 10, 11, 13, 14
This width array represents the same slope, angle, and creates the exact same shape within the tile.
Angles
Solid Tiles contain a specific angle value which represents the angle of the slope of the surface that the Height Array creates.
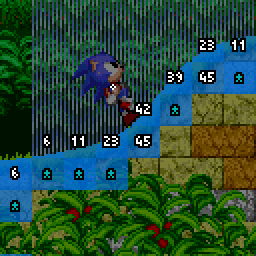 Tile angles (degrees)
This angle is used when the Player collides with the Solid Tile and needs to react with slope physics and to allow the Player to rotate along the terrain.
Flagged Tiles
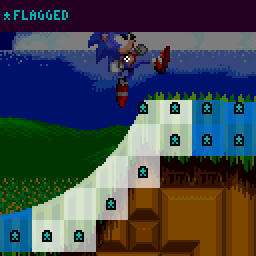
Nearly all tiles have a specific angle value which is used to allow the Player to rotate with sloped ground. However, some tiles angle is used as a flag. In the original games, if the angle of the tile is 255 ($FF), it is a flagged tile. How this angle is reacted to is determined by the object's code. In the case of the Player, they will not set their Ground Angle to the tile's angle as normal, but will instead find a new Ground Angle which is the Player's current Ground Angle snapped to the nearest 90° (0, 90, 180, or 270).
This flag applies commonly to full block Solid Tiles (filled squares), as it is a quick and easy way to allow the Player to walk on all sides of a full block without needing to flip it around or provide multiple angle values for each side.
This is also used as a trick to effectively "flatten" the end of ramps. The ramps found in Emerald Hill Zone end with a diagonal slope - yet Spindashing up it sends you flying directly upwards into the air. How? The trick is that the last tile on that ramp has an angle of 255 ($FF), so is flagged despite not being a flat tile. This snaps the Player to 90° (aka, moving directly upwards) just as they leave the ramp.
Flipping Tiles
You may wonder how sloped ceilings are possible if the height array creates slopes along the tops of Solid Tiles. The answer to this is that Blocks can be flipped horizontally and/or vertically. The collision systems take this into account when reading the height data from that Block's tile.
The angles of flipped tiles are also adjusted to align correctly after being read.
Tile Solidity
Not all tiles behave the same. Some tiles are only solid from the top, some only from the sides, and some of course are solid from all sides. This solidity aspect affects which directions of Sensors can detect them. For example, a "top only" tile will be ignored by sideways and upwards facing Sensors, but downward facing Sensors will detect them.
What are Sensors? Well, that's up next.
Sensors
"Sensors" are simply checks performed by objects which look for Solid Tiles around them.
An x/y position (anchor point) is checked, and if it finds a solid tile, they will gather information about the tile.
Sensors can point down, right, up, or left, and all behave the same in their respective directions/axis.
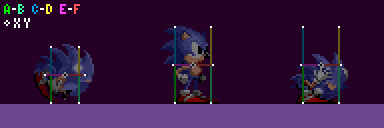 The white points represent the anchor positions of the Player's Sensors.
In this example, the Sensor to the Player's mid right points right, and those at the Player's feet point down. Their direction dictates in which direction they are looking for a surface. A Sensor pointing right is looking for the leftmost edge of solid terrain nearby, a Sensor pointing down is looking for the topmost edge of solid terrain nearby.
The Sensor will read the height or width array of the Solid Tile it is checking.
Which value of the array is used? For a vertical Sensor, subtract the tile's X position from the Sensor's X position. For a horizontal Sensor (using the width array), subtract the tile's Y position from the Sensor's Y position. The result is the index of the array to use.
So, now we know Sensors are points which look for Solid Tiles they touch, and that they can check the height or width array value of tiles at specific positions to get the floor surface position.
However, this is not the whole picture. If a Sensor finds an empty tile or the array value of the tile found by the Sensor is 16 (a full block amount), then it's likely that the surface of the solid terrain is actually found within an adjacent tile instead.
Sensor Regression & Extension
So when a Sensor check is performed at a Sensor's anchor point it has either found a solid tile, or it hasn't. If it has, what if the height value found is 16 and isn't actually the surface of the terrain? Or if it hasn't, what if there's a solid tile nearby?
Well, this is easily solved by checking neighbouring tiles if certain conditions are met.
Note:
- The following is an example in the case of a Sensor which is pointing down looking for solids below (like a floor Sensor while standing upright).
- The current height or width array value of a tile at the Sensor's X/Y position will be referred to as the tile height.
Normal
When the anchor point finds a Solid Tile and the tile height of the first tile is between 1 and 15 (inclusive), the game can be sure the surface of the terrain has been found without needing to check extra tiles at all.
Otherwise, one of the following 2 things will happen.
Regression
When the anchor point finds a Solid Tile and the tile height of the first tile is 16 (meaning the tile is completely filled in that position), it will check up by 1 extra Solid Tile. We'll call this the "regression" since it goes back against the Sensor direction.
If a regression occurs and tile height of the second tile is 0 (or the tile is empty), it will just default to processing the first tile, as the first tile must be the terrain surface.
Extension
When the anchor point just finds an empty tile (or the tile height of the first tile is 0), it will check down by 1 extra Solid Tile. We'll call this the "extension" because it goes outwards, in the direction of the Sensor.
If an extension occurs and just finds an empty second tile (or the tile height of the second tile is 0), the game knows that no terrain or terrain surface has been found, and will return the distance to the end of the second tile checked.
If a solid tile was found to be processed, it will calculate the distance between that tile height and the Sensor.
In the above example, a downward facing Sensor moves down through 3 Solid Tiles. We can see the tiles it checks, and the distance it returns at each position. We can also see if it is performing extension or regression. You can see this means the Sensor can effectively act as a line, it can regress or extend up to 32 pixels to find the nearest surface.
The regression & extension will occur in the direction of the Sensor, be it horizontal or vertical. So a right facing Sensor's regression would check an extra tile to the left, and extension would check an extra tile to the right. While an upward facing Sensor's regression would check an extra tile below, and extension would check an extra tile above.
With all this, a Sensor can always locate the nearest open surface (and the tile containing that surface) of the terrain within a range of 2 tiles (the tile the Sensor anchor point is touching plus another).
Reaction
Once a final suitable tile has been found, information about the tile is returned.
The information a Sensor finds is as follows:
- The distance from the Sensor pixel to the surface of the solid tile found (in the Sensor's direction)
- The angle of the tile found
- The tile ID
Distance
The distance to the Solid Tile surface (found by the Sensor) is the most important piece of information dictating how an object will react to Solid Tiles. It's not the distance to the tile, it's the distance to the edge of the solid area within the tile, precisely.
The distance can either be 0, negative, or positive.
When no Solid Tile is found by a Sensor, the Sensor will return a distance between 16 and 32 (inclusive), which is the distance to the end of the second tile checked. This is the potentially "no-tile-found" distance range.
- Note: It doesn't necessarily mean no tile has been found if the distance is in this range, but if no tile was found the distance will definitely be within this range so the game typically chooses to treat it as such just incase.
In future, if the guide references a tile not being found, this means either the distance is out of the range the object wants, or the distance is between 16 and 31.
- A distance of 0 means the Sensor is just touching the solid tile surface and the object will not need to move (but may still choose to collide).
- A negative distance means the surface found is closer to the object than the Sensor position. Negative distances are almost always reacted to when colliding, because it indicates that the object is inside the solid and can be pushed out.
- Positive distances mean the surface found is further away from the object than the Sensor position. Since this means the object isn't actually touching the tile, it's rarely used - but not never. A notable example of it's use is by floor Sensors of various objects, including the Player, to keep them attached to the ground even if the ground has sloped away from them a bit as they move. Objects usually employ a limit to how far an object can be "pulled" down to a solid they aren't actually touching. This will be detailed further down for the Player.
If the object decides to snap itself to the terrain, it simply has to add the distance value to it's position. Or subtract, depending on the Sensor's direction. A Sensor pointing left may return a negative distance if it is inside a solid, but the object would have to subtract the distance in order to move to the right, out of it.
Of course, as stated, this distance can be representative of any 4 directions, depending on the Sensor's own angle.
Typical Sensor Usage
Sensors are utilised by many different objects, including the Player, to align themselves or "collide" with Solid Tiles. A Sensor will typically be cast with an anchor positioned at the edge of the object, pointing outwards. For example, positioned at the right of an object at X Position + Width Radius pointing right, or positioned at the bottom of an object at Y Position + Y Radius pointing down.
Most objects will only use 1 or 2 Sensors, usually pointing down looking for the floor, though some will also use additional Sensors to check for walls. The Player object is more complex and can sometimes use up to 5 Sensors at once depending on their state. How the Player uses Sensors is described in Slope Collision.
In the example of a Sensor at the bottom, if terrain is found nearby the distance found from this Sensor can be used to reposition the object to align perfectly with the floor. For example if the Sensor returned a distance of -10, the Sensor is 16 pixels inside of the Terrain, and the object would simply have to add -10 to their Y Position to align perfectly with the surface.
Objects typically won't react to positive distances where the Sensor is outside of the terrain (but not always, typically positive Sensor distances are used for alignment while an object is already on the ground to ensure they remain "stuck").
Distance Rejection
Objects will reject distances too "large" in either direction (positive or negative).
When casting Sensors, objects check the returned distances it accepts for collision. For example, checking if a distance is >= 16 or <= -16 and if it is, not colliding. This will filter out potentially "no-tile-found" distances. This avoids a need for the game to remember if a tile was found after the Sensor was cast, it can just remember the distance value. Though typically the game opts for a distance of 14 as the limit (< -14 or > 14) as this usually means either the surface of the Solid Tile is too far away to matter anyway.
Visual Depiction
Sensors will be drawn from the Sensor anchor, extending towards the centre of the object. This demonstrates the direction of the Sensor, and also, given the typical use of Sensors, the approximate "solid" areas of the object using the Sensor.
You can imagine it vaguely like so - if the very edge pixels of the surface of the ground is within these lines, the object would collide and be pushed out of the Solid Tile. It is of course not quite this simple in reality. As shown in the previous visualisation of a Sensor, the "line" portion can extend up to 32 pixels in either direction, all depending on where the Sensor anchor currently sits within it's tile... and sometimes objects will align themselves even when the Sensor returns positive distances and aren't even touching the Solid Tile... and objects will reject all sorts of different varying distances Sensors return depending on what the Sensor is being used for... This would be impossible to accurately draw over the Player while keeping things understandable and clear. This visualisation is a simplified and rough estimation.
Just be aware that the line based depictions are for simple illustration purposes only and the endpoints of the lines are the active Sensor anchor positions (which always behave as described).

 Solid Tiles covering the surfaces of Terrain, giving them solidity.
 Example of how many different height arrays are needed in order to account for every possible slope.

 Tile angles (degrees)

 The white points represent the anchor positions of the Player's Sensors.
