Difference between revisions of "SPG:Solid Tiles"
From Sonic Retro
(Clarifications) |
|||
| Line 2: | Line 2: | ||
*The research applies to all four of the [[Sega Mega Drive]] games and ''[[Sonic CD]]''. | *The research applies to all four of the [[Sega Mega Drive]] games and ''[[Sonic CD]]''. | ||
| − | *Following only describes how | + | *Following only describes how the Player object collides and interacts with solid tiles. Solid objects, such as [[Monitor|Monitors]], Moving Platforms, and Blocks each have their own collision routines with the Player and don't necessarily behave exactly the same as the tiles do. For this, refer to [[SPG:Solid_Objects|Solid Objects]]. |
| − | *Variables and constants for | + | *Variables and constants for the Player and other characters such as X Position and ''acc'' will be referenced frequently, they can be found in [[SPG:Basics|Basics]]. |
| − | *The original games use solid tiles, however the ideas and mechanics of | + | *The original games use solid tiles, however the ideas and mechanics of the Player's base collision setup can be adapted (with adjustments) to other engines using sprite masks, line intersections, etc. |
*While 16x16 tiles are "officially" named blocks, they are being referred to as solid tiles here since they are a simple grid pattern of sets of data which can be read simply, as opposed to objects or any other method. "Solid Tiles" and "Blocks" can be used interchangeably in this guide. | *While 16x16 tiles are "officially" named blocks, they are being referred to as solid tiles here since they are a simple grid pattern of sets of data which can be read simply, as opposed to objects or any other method. "Solid Tiles" and "Blocks" can be used interchangeably in this guide. | ||
| Line 12: | Line 12: | ||
==Introduction== | ==Introduction== | ||
| − | What are solid tiles? While there are often solid objects in | + | What are solid tiles? While there are often solid objects in the Player zones, the zone itself would require far too much object memory if the environment were constructed entirely of solid objects, each with their own 64 bytes of RAM. A clever short-cut is used - the zone is constructed out of tiles anyway, so all that needs be done is have each tile know whether or not it is solid. |
You may know that zones are broken down into 128x128 pixel chunks (or 256x256 pixel chunks in ''[[Sonic 1]]'' and ''[[Sonic CD]]''), which are in turn broken into 16x16 pixel blocks, which are again in turn broken into even smaller 8x8 pixel tiles. All of the solidity magic happens with the 16x16 blocks, so those are the only ones we will be interested in throughout this guide. | You may know that zones are broken down into 128x128 pixel chunks (or 256x256 pixel chunks in ''[[Sonic 1]]'' and ''[[Sonic CD]]''), which are in turn broken into 16x16 pixel blocks, which are again in turn broken into even smaller 8x8 pixel tiles. All of the solidity magic happens with the 16x16 blocks, so those are the only ones we will be interested in throughout this guide. | ||
| − | + | the Player's collisions and interactions with these solid tiles are what make up their basic engine. They dictate how they handles floors, walls, ceilings, slopes, and loops. | |
| − | First we will look at how the environment is constructed from tiles, and then | + | First we will look at how the environment is constructed from tiles, and then the Player's method for detecting their environment. |
==Solid Tiles== | ==Solid Tiles== | ||
| Line 51: | Line 51: | ||
Sensors can point down, right, up, and left, and all behave the same in their respective directions. | Sensors can point down, right, up, and left, and all behave the same in their respective directions. | ||
| − | [[Image:SPGSensorAnchors.png]] ''The white points represent the '''anchor''' positions of | + | [[Image:SPGSensorAnchors.png]] ''The white points represent the '''anchor''' positions of the Player's sensors.'' |
| − | In this example, the sensor to | + | In this example, the sensor to the Player's mid right points right, and those at the Player's feet point down. Their direction dictates in which direction they are looking for a surface. A sensor pointing right is looking for the leftmost edge of solid terrain nearby, a sensor pointing down is looking for the topmost edge of solid terrain nearby. |
So, we know they are points which look for solid tiles they touch. However, this is not the whole picture. If a sensor finds an empty tile or the array value of the tile found by the sensor is 16 (a full block amount), then it's likely that the surface of the solid terrain is actually found within an adjacent tile. | So, we know they are points which look for solid tiles they touch. However, this is not the whole picture. If a sensor finds an empty tile or the array value of the tile found by the sensor is 16 (a full block amount), then it's likely that the surface of the solid terrain is actually found within an adjacent tile. | ||
| Line 109: | Line 109: | ||
*A negative distance means the surface found is closer to the object than the sensor position. Negative distances are almost always reacted to when colliding, because it indicates that the object is inside the solid and can be pushed out. | *A negative distance means the surface found is closer to the object than the sensor position. Negative distances are almost always reacted to when colliding, because it indicates that the object is inside the solid and can be pushed out. | ||
| − | *Positive distances mean the surface found is further away from the object than the sensor position. Since this means the object isn't actually touching the tile, it's rarely used - but not never. A notable example of it's use is by floor sensors of various objects, including | + | *Positive distances mean the surface found is further away from the object than the sensor position. Since this means the object isn't actually touching the tile, it's rarely used - but not never. A notable example of it's use is by floor sensors of various objects, including the Player, to keep them attached to the ground even if the ground has sloped away from them a bit as they move. Objects usually employ a limit to how far an object can be "pulled" down to a solid they aren't actually touching. This will be detailed further down for the Player. |
If the object decides to snap itself to the terrain, it simply has to add the distance value to it's position. Or subtract, depending on the sensor's direction. A sensor pointing left may return a negative distance if it is inside a solid, but the object would have to subtract the distance in order to move to the right, out of it. | If the object decides to snap itself to the terrain, it simply has to add the distance value to it's position. Or subtract, depending on the sensor's direction. A sensor pointing left may return a negative distance if it is inside a solid, but the object would have to subtract the distance in order to move to the right, out of it. | ||
| Line 116: | Line 116: | ||
====Summary==== | ====Summary==== | ||
| − | Here's a demonstrative animation showing a very simplified process of how the floor sensors detect a tile and be moved upwards. In this case, | + | Here's a demonstrative animation showing a very simplified process of how the floor sensors detect a tile and be moved upwards. In this case, the Player will have a Ground Speed of 6. |
[[Image:SPGSensorProcess.gif]] | [[Image:SPGSensorProcess.gif]] | ||
| Line 123: | Line 123: | ||
Throughout this guide these sensors will be drawn as lines. But, they are not. Or well, they are, but not quite as shown ahead. | Throughout this guide these sensors will be drawn as lines. But, they are not. Or well, they are, but not quite as shown ahead. | ||
| − | Sensors will be drawn from the sensor anchor, extending towards the centre of the object. You can imagine it like so - if the exact surface pixels of the ground is within these lines, | + | Sensors will be drawn from the sensor anchor, extending towards the centre of the object. You can imagine it like so - if the exact surface pixels of the ground is within these lines, the Player will be pushed out. It is of course not quite this simple in reality. As shown in the previous visualisation of a sensor, the "line" portion can extend up to 32 pixels in either direction, all depending on where the sensor anchor currently sits within it's tile... This would be impossible to accurately draw over the Player while keeping things understandable and clear. This visualisation is the most easy to visualise way to think about the solidity on a surface level. |
Just be aware that the line based depictions are for simple illustration purposes only and the endpoints of the lines are the active sensor anchors (which always behave as described). | Just be aware that the line based depictions are for simple illustration purposes only and the endpoints of the lines are the active sensor anchors (which always behave as described). | ||
| − | == | + | ==The Player's Sensors== |
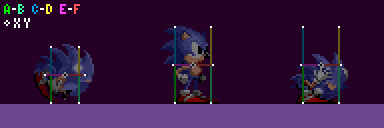
| − | Like any object which wants to collide with tiles, sensors surround | + | Like any object which wants to collide with tiles, sensors surround the Player. |
[[Image:SPGSensors.png|link=Special:FilePath/SPGSensors.png]] | [[Image:SPGSensors.png|link=Special:FilePath/SPGSensors.png]] | ||
| Line 136: | Line 136: | ||
<span style="color:#00aeef; font-weight: bold;">C</span> and <span style="color:#fff238; font-weight: bold;">D</span> - Ceiling collision (only used mid-air) | <span style="color:#00aeef; font-weight: bold;">C</span> and <span style="color:#fff238; font-weight: bold;">D</span> - Ceiling collision (only used mid-air) | ||
<span style="color:#ff38ff; font-weight: bold;">E</span> and <span style="color:#ff5454; font-weight: bold;">F</span> - Wall collision (shifting by 8px depending on certain factors, which will be explained) | <span style="color:#ff38ff; font-weight: bold;">E</span> and <span style="color:#ff5454; font-weight: bold;">F</span> - Wall collision (shifting by 8px depending on certain factors, which will be explained) | ||
| − | XY - | + | XY - the Player's X Position and Y Position |
| − | Since | + | Since the Player's collision setup is symmetrical, it makes sense for the game to set up widths and heights using radius values. The Player has separate radius values for their <span style="color:#ff38ff; font-weight: bold;">E</span> and <span style="color:#ff5454; font-weight: bold;">F</span> sensor pair (their '''Push Radius''') which always remains the same, and for their <span style="color:#00f000; font-weight: bold;">A</span>, <span style="color:#38ffa2; font-weight: bold;">B</span>, <span style="color:#00aeef; font-weight: bold;">C</span> and <span style="color:#fff238; font-weight: bold;">D</span> sensors there is a Width Radius and Height Radius both of which will change depending on the Player's state. For these sizes see [[SPG:Characters|Characters]]. |
Note on sprite alignment: | Note on sprite alignment: | ||
| − | * | + | * The Player's sprite is 1 pixel offset to the left when they faces left, which can result in him appearing to be 1px inside a tile when pushing leftwards. Amusingly, this offset will appear corrected when pushing most objects thanks to their hitboxes sticking out 1px further on their right and bottom (due to their origins being off-centre by 1 in X and Y). So while tiles are collided with accuracy, it will appear the opposite in-game. More about object collision in [[SPG:Solid_Objects|Solid Objects]]. |
| Line 149: | Line 149: | ||
[[Image:SPGStandingAnimated.gif|link=Special:FilePath/SPGStandingAnimated.gif]] | [[Image:SPGStandingAnimated.gif|link=Special:FilePath/SPGStandingAnimated.gif]] | ||
| − | <span style="color:#00f000; font-weight: bold;">A</span> and <span style="color:#38ffa2; font-weight: bold;">B</span> sit at | + | <span style="color:#00f000; font-weight: bold;">A</span> and <span style="color:#38ffa2; font-weight: bold;">B</span> sit at their feet at Y Position+Height Radius. |
====Movement==== | ====Movement==== | ||
| − | Typically, | + | Typically, the Player's Width Radius is 9, placing <span style="color:#00f000; font-weight: bold;">A</span> on the Player's left side, at X Position-9. While <span style="color:#38ffa2; font-weight: bold;">B</span> should be on their right, at X Position+9, 19 pixels wide. |
| − | + | their Height Radius is usually 19, making him 39 pixels tall in total. | |
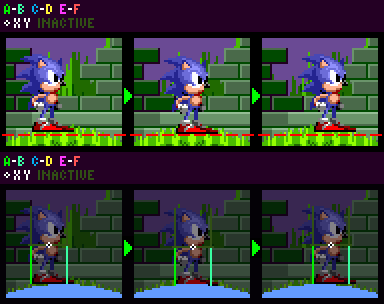
| − | However while rolling or jumping, | + | However while rolling or jumping, their Width Radius becomes 7, placing <span style="color:#00f000; font-weight: bold;">A</span> at X Position-7. With <span style="color:#38ffa2; font-weight: bold;">B</span> at X Position+7, 15 pixels wide. This is to ensure the Player doesn't appear too far away from the floor at steep angles while in curled up. Crouching does not affect their Width Radius. |
Here's an example of that in action: | Here's an example of that in action: | ||
| Line 161: | Line 161: | ||
[[Image:SPGWidthRadiusChange.gif|link=Special:FilePath/SPGWidthRadiusChange.gif]] | [[Image:SPGWidthRadiusChange.gif|link=Special:FilePath/SPGWidthRadiusChange.gif]] | ||
| − | While rolling or jumping (and otherwise generally curled up), | + | While rolling or jumping (and otherwise generally curled up), the Player's Height Radius becomes smaller at a value of 14, making him 29 pixels tall. Because of this, in the step in which the Player rolls or jumps or otherwise becomes shorter, the game adds 5 to their Y Position so that their bottom point will remain unchanged despite him getting shorter and their center changing position. 5 also has to be subtracted from Y Position when they unroll or lands from a jump. The camera system also has to keep this offset in mind, otherwise, the view will jump when the Player changes height. |
====Method==== | ====Method==== | ||
| − | Assuming the ground level to be at a Y position of 736 ($02E0), while standing | + | Assuming the ground level to be at a Y position of 736 ($02E0), while standing the Player is atop it at a Y Position of 716 ($02CC), which is 20 pixels above ground level. |
Floor sensors are a special case, there are 2 sensors and they need to detect slopes. Both sensors behave the same and search for a Solid Tile. The smaller distance is the sensor that wins. For example, -10 is a smaller distance than 5. The sensor that wins is the distance and angle used (and it's found tile is the one referenced). | Floor sensors are a special case, there are 2 sensors and they need to detect slopes. Both sensors behave the same and search for a Solid Tile. The smaller distance is the sensor that wins. For example, -10 is a smaller distance than 5. The sensor that wins is the distance and angle used (and it's found tile is the one referenced). | ||
| − | Once the winning distance is found, it can be used to reposition | + | Once the winning distance is found, it can be used to reposition the Player. |
======Distance Limits====== | ======Distance Limits====== | ||
| − | As we know, sensors return a distance to the nearest surface, up to an extreme maximum of 32 pixels. If | + | As we know, sensors return a distance to the nearest surface, up to an extreme maximum of 32 pixels. If the Player's floor sensors are within 32 pixels of the floor, the game may know the floor is there but we might not just want him to snap down right away. The game will test the distance found and react appropriately. |
<div class="large-12 columns" style="padding:0px"> | <div class="large-12 columns" style="padding:0px"> | ||
<div class="large-6 columns" style="padding:0px"> | <div class="large-6 columns" style="padding:0px"> | ||
'''While grounded:''' | '''While grounded:''' | ||
| − | In Sonic 1, if the distance value is less than -14 or greater than 14, | + | In Sonic 1, if the distance value is less than -14 or greater than 14, the Player won't collide. |
| − | In Sonic 2 onward however the positive limit depends on | + | In Sonic 2 onward however the positive limit depends on the Player's current speed - in this case, (for when the Player is on the floor) if the distance is greater than |
minimum(absolute(X Speed)+4, 14) | minimum(absolute(X Speed)+4, 14) | ||
| − | then | + | then they won't collide. So the faster the Player moves, the greater the distance the Player can be from the floor while still being pulled back down to it. |
The -14 limit remains the same. | The -14 limit remains the same. | ||
| − | If | + | If the Player was in a sideways mode, such as on a wall, it would use Y Speed instead. |
</div> | </div> | ||
<div class="large-6 columns"> | <div class="large-6 columns"> | ||
'''While airborne:''' | '''While airborne:''' | ||
| − | While airborne, if the distance value is greater than or equal 0 (meaning the sensor isn't touching the floor yet) | + | While airborne, if the distance value is greater than or equal 0 (meaning the sensor isn't touching the floor yet) the Player won't collide. |
</div> | </div> | ||
</div> | </div> | ||
=====Ledges===== | =====Ledges===== | ||
| − | + | the Player has to be able to run off of ledges. It would not do to just keep walking like Wile E. Coyote, not noticing that there is nothing beneath him. | |
| − | If both sensor <span style="color:#00f000; font-weight: bold;">A</span> and <span style="color:#38ffa2; font-weight: bold;">B</span> detect no solid tiles, | + | If both sensor <span style="color:#00f000; font-weight: bold;">A</span> and <span style="color:#38ffa2; font-weight: bold;">B</span> detect no solid tiles, the Player will "fall" - a flag will be set telling the engine they is now in the air. |
=====Balancing On Edges===== | =====Balancing On Edges===== | ||
| − | One nice touch is that | + | One nice touch is that the Player goes into a balancing animation when near to the edge of a ledge. This only happens when they is stopped (their Ground Speed is 0). |
| − | How does the engine know? It is simple - any time only one of the ground sensors is activated, | + | How does the engine know? It is simple - any time only one of the ground sensors is activated, the Player must be near a ledge. If <span style="color:#00f000; font-weight: bold;">A</span> is active and <span style="color:#38ffa2; font-weight: bold;">B</span> is not the ledge is to their right and vice versa. |
| − | But if | + | But if the Player began balancing the instant one of the sensors found nothing, they would do it too "early", and it would look silly. So it only happens when only one sensor is active, and X Position is greater than the edge of the solid tile found by the active sensor. |
[[Image:SPGBalancingAnimated.gif|link=Special:FilePath/SPGBalancingAnimated.gif]] | [[Image:SPGBalancingAnimated.gif|link=Special:FilePath/SPGBalancingAnimated.gif]] | ||
| − | Assuming the right edge of the ledge to be an X position of 2655 ($0A5F), | + | Assuming the right edge of the ledge to be an X position of 2655 ($0A5F), the Player will only start to balance at an X Position of 2656 ($0A60) (edge pixel+1). they'll fall off at an X Position of 2665 ($0A69) (edge pixel+10) when both sensors find nothing. |
| − | In ''[[Sonic 2]]'' and ''[[Sonic CD]]'', if the ledge is the opposite direction than | + | In ''[[Sonic 2]]'' and ''[[Sonic CD]]'', if the ledge is the opposite direction than they is facing, they has a second balancing animation. |
| − | In ''[[Sonic 2]]'', ''[[Sonic 3]]'', and ''[[Sonic & Knuckles]]'', | + | In ''[[Sonic 2]]'', ''[[Sonic 3]]'', and ''[[Sonic & Knuckles]]'', the Player has yet a ''third'' balancing animation, for when they's even further out on the ledge. Assuming the same values as above, this would start when they is at an X Position of 2662 ($0A66). |
| − | '''Note:''' While balancing, certain abilities are not allowed (ducking, looking up, spindash, etc). In | + | '''Note:''' While balancing, certain abilities are not allowed (ducking, looking up, spindash, etc). In the Player 3 & Knuckles, the player is still allowed to duck and spindash (not to look up, though) when balancing on the ground but not when balancing on an object. |
| Line 222: | Line 222: | ||
[[Image:SPGHitCeiling.gif|link=Special:FilePath/SPGHitCeiling.gif]] | [[Image:SPGHitCeiling.gif|link=Special:FilePath/SPGHitCeiling.gif]] | ||
| − | + | the Player's <span style="color:#00aeef; font-weight: bold;">C</span> and <span style="color:#fff238; font-weight: bold;">D</span> sensors are always an exact mirror image of the Player's floor sensors, they have the same X positions and length but are flipped upside down. | |
They perform in the exact same way simply up instead of down. | They perform in the exact same way simply up instead of down. | ||
| Line 231: | Line 231: | ||
When these sensors find a ceiling, much like the floor sensors the sensor which finds the smallest distance will win. The sensor that wins is the distance and angle used (and it's found tile is the one referenced). | When these sensors find a ceiling, much like the floor sensors the sensor which finds the smallest distance will win. The sensor that wins is the distance and angle used (and it's found tile is the one referenced). | ||
| − | This winning distance can then be subtracted from | + | This winning distance can then be subtracted from the Player's position. |
=====Distance Limits===== | =====Distance Limits===== | ||
| Line 241: | Line 241: | ||
[[Image:SPGPushingAnimated.gif|link=Special:FilePath/SPGPushingAnimated.gif]] | [[Image:SPGPushingAnimated.gif|link=Special:FilePath/SPGPushingAnimated.gif]] | ||
| − | <span style="color:#ff38ff; font-weight: bold;">E</span> sits at | + | <span style="color:#ff38ff; font-weight: bold;">E</span> sits at their left at X Position-'''Push Radius''', while <span style="color:#ff5454; font-weight: bold;">F</span> sits at their right at X Position+'''Push Radius'''. |
====Movement==== | ====Movement==== | ||
| − | '''Push Radius''' is always 10, placing <span style="color:#ff38ff; font-weight: bold;">E</span> to | + | '''Push Radius''' is always 10, placing <span style="color:#ff38ff; font-weight: bold;">E</span> to the Player's left side, at X Position-10. While <span style="color:#ff5454; font-weight: bold;">F</span> is to their right, at X Position+10, giving the Player a total width of 21 pixels when pushing. |
| − | Sensors <span style="color:#ff38ff; font-weight: bold;">E</span> and <span style="color:#ff5454; font-weight: bold;">F</span> Spend most of their time at | + | Sensors <span style="color:#ff38ff; font-weight: bold;">E</span> and <span style="color:#ff5454; font-weight: bold;">F</span> Spend most of their time at the Player's Y Position however while the Player's Ground Angle is 0 (on totally flat ground) both wall sensors will move to their Y Position+8 so that they can push against low steps and not just snap up ontop of them. |
The horizontal sensors are always positioned at Y Position while airborne. | The horizontal sensors are always positioned at Y Position while airborne. | ||
| − | You may remember that sensors <span style="color:#00f000; font-weight: bold;">A</span> and <span style="color:#38ffa2; font-weight: bold;">B</span> are only 19 pixels apart but | + | You may remember that sensors <span style="color:#00f000; font-weight: bold;">A</span> and <span style="color:#38ffa2; font-weight: bold;">B</span> are only 19 pixels apart but the Player is 21 pixels wide when pushing into walls. This means that the Player is skinnier by 2 pixels when running off of ledges than when bumping into walls. |
That's not to say these sensors don't move though. They do, and a lot. | That's not to say these sensors don't move though. They do, and a lot. | ||
| − | As noted in [[SPG:Main Game Loop|Main Game Loop]] wall collision (while grounded) actually takes place before | + | As noted in [[SPG:Main Game Loop|Main Game Loop]] wall collision (while grounded) actually takes place before the Player's position physically moves anywhere, so they wont actually be in a wall when they tries to collide with it. The game accounts for this by actually adding their X Speed and Y Speed to the sensor's position, this is where the sensor ''would'' be if the Player had moved yet. |
====Method==== | ====Method==== | ||
| − | Assuming the wall's left side to be at an X position of 704 ($02C0), | + | Assuming the wall's left side to be at an X position of 704 ($02C0), the Player cannot get closer than an X Position of 693 ($02B5). Assuming the wall's right side to be at an X position of 831 ($033F), the Player cannot get closer than an X Position of 842 ($034A). Thus the distance between both sensors inclusive should be 21 pixels, stretching from the Player's X Position-10 to X Position+10. |
| − | When | + | When the Player collides with a wall, this will set their Ground Speed to 0 if they is moving in the direction of the wall, not away from it. |
| − | The distance value found by the sensor in it's given direction is used to stop | + | The distance value found by the sensor in it's given direction is used to stop the Player at a wall. |
=====Distance Limits===== | =====Distance Limits===== | ||
| Line 270: | Line 270: | ||
The distances found by the wall sensors are used slightly differently while grounded. | The distances found by the wall sensors are used slightly differently while grounded. | ||
| − | Naturally, the game will ignore a positive distance because | + | Naturally, the game will ignore a positive distance because they will not collide. If the sensor's distance is negative, this means that when the Player's position actually does change, they will be inside the wall. |
| − | In this case, because the sensor is actually out in front of | + | In this case, because the sensor is actually out in front of the Player (where they will be after they moves) instead of using the distance to reposition the Player by directly changing their position, the game smartly uses the fact that the Player has still yet to move within the current frame. All it has to do is add the distance to the Player's X Speed (if moving right, or ''subtract'' the distance from the Player's X Speed if moving left. This would be done to Y Speed if in wall mode). This results in the Player moving when their position changes, right up to the wall, but no further. In the next frame, because Ground Speed has been set to 0 the Player will have stopped just like in any other situation. |
</div> | </div> | ||
| Line 278: | Line 278: | ||
'''While Airborne:''' | '''While Airborne:''' | ||
| − | Like normal, if the distance is negative and the sensor is inside the wall, | + | Like normal, if the distance is negative and the sensor is inside the wall, they will collide. The game will ignore a positive distance. |
</div> | </div> | ||
</div> | </div> | ||
===Extra Sensors=== | ===Extra Sensors=== | ||
| − | + | the Player cannot jump when there is a low ceiling above him. If there is a collision detected with sensors at the Player's X Position-9 and X Position+9, at Y Position-25, the Player won't bother jumping at all. | |
| Line 291: | Line 291: | ||
====While Grounded==== | ====While Grounded==== | ||
| − | Floor Sensors <span style="color:#00f000; font-weight: bold;">A</span> and <span style="color:#38ffa2; font-weight: bold;">B</span> are always active while grounded, and will use their 1 tile extension to actively search for new floor below | + | Floor Sensors <span style="color:#00f000; font-weight: bold;">A</span> and <span style="color:#38ffa2; font-weight: bold;">B</span> are always active while grounded, and will use their 1 tile extension to actively search for new floor below the Player's feet. |
| − | When grounded, Wall Sensors <span style="color:#ff38ff; font-weight: bold;">E</span> and <span style="color:#ff5454; font-weight: bold;">F</span> only activate when | + | When grounded, Wall Sensors <span style="color:#ff38ff; font-weight: bold;">E</span> and <span style="color:#ff5454; font-weight: bold;">F</span> only activate when the Player is walking in that direction. For example, while standing still the Player isn't checking with their wall sensors at all, but while Ground Speed is positive, the Player's <span style="color:#ff38ff; font-weight: bold;">E</span> sensor is inactive, and while Ground Speed is negative, the Player's <span style="color:#ff5454; font-weight: bold;">F</span> sensor is inactive. |
| − | However this is not always the case, both wall sensors simply don't appear when | + | However this is not always the case, both wall sensors simply don't appear when the Player's Ground Angle is outside of a 0 to 90 and 270 to 360 (or simply -90 to 90) degree range, meaning when you running around a loop, the wall sensors will vanish for the top half of the loop. In S3K however these sensors will also appear when the Player's Ground Angle is a multiple of 90 in addition to the angle range. |
| − | While grounded Ceiling Sensors <span style="color:#00aeef; font-weight: bold;">C</span> and <span style="color:#fff238; font-weight: bold;">D</span> are never active, and | + | While grounded Ceiling Sensors <span style="color:#00aeef; font-weight: bold;">C</span> and <span style="color:#fff238; font-weight: bold;">D</span> are never active, and the Player won't check for collision with solid tiles above himself while on the floor. |
====While Airborne==== | ====While Airborne==== | ||
| − | While in the air, all sensors play a part to find ground to reattach | + | While in the air, all sensors play a part to find ground to reattach the Player to. But rather than have all active at once and risk lag, only 4-5 will be active at any given time. |
As you move, the game will check the angle of your motion (X Speed and Y Speed) through the air. It will then pick a quadrant by rounding to the nearest 90 degrees. (this is different to the Mode, this is simply a measurement of if you are going mostly left, right up or down). The quadrant can be more easily found by simply comparing the X Speed and Y Speed and finding which is larger or smaller. | As you move, the game will check the angle of your motion (X Speed and Y Speed) through the air. It will then pick a quadrant by rounding to the nearest 90 degrees. (this is different to the Mode, this is simply a measurement of if you are going mostly left, right up or down). The quadrant can be more easily found by simply comparing the X Speed and Y Speed and finding which is larger or smaller. | ||
| Line 307: | Line 307: | ||
if absolute X Speed is larger then or equal to absolute Y Speed then | if absolute X Speed is larger then or equal to absolute Y Speed then | ||
if X Speed is larger than 0 then | if X Speed is larger than 0 then | ||
| − | + | the Player is going mostly right | |
else | else | ||
| − | + | the Player is going mostly left | |
else | else | ||
if Y Speed is larger than 0 then | if Y Speed is larger than 0 then | ||
| − | + | the Player is going mostly down | |
else | else | ||
| − | + | the Player is going mostly up | |
Depending on the quadrant, different sensors will be active. | Depending on the quadrant, different sensors will be active. | ||
| − | When going '''mostly right''', | + | When going '''mostly right''', the Player's <span style="color:#ff5454; font-weight: bold;">F</span> sensor will be active, along with both <span style="color:#00f000; font-weight: bold;">A</span> and <span style="color:#38ffa2; font-weight: bold;">B</span> floor sensors and the <span style="color:#00aeef; font-weight: bold;">C</span> and <span style="color:#fff238; font-weight: bold;">D</span> ceiling sensors. |
When going '''mostly left''', it is the exact same as going right, but the <span style="color:#ff38ff; font-weight: bold;">E</span> wall sensor instead. | When going '''mostly left''', it is the exact same as going right, but the <span style="color:#ff38ff; font-weight: bold;">E</span> wall sensor instead. | ||
| Line 328: | Line 328: | ||
===Summary=== | ===Summary=== | ||
| − | Here's a handmade visualisation of how sensors interact with solid tiles (here highlighted in bright blue, green, and cyan). You can notice how the sensors are pushing | + | Here's a handmade visualisation of how sensors interact with solid tiles (here highlighted in bright blue, green, and cyan). You can notice how the sensors are pushing the Player from the ground tiles, and is overall rather simple. The <span style="color:#ff38ff; font-weight: bold;">E</span> and <span style="color:#ff5454; font-weight: bold;">F</span> sensors lower when on flat ground. You can also notice the sensors snap in 90 degree rotations resulting in four modes, this is covered in [[SPG:Slope Physics|Slope Physics]]. |
[[Image:SPGCollisionDemo.gif|link=Special:FilePath/SPGCollisionDemo.gif]] ''Keep in mind, while on the ground the upper <span style="color:#00aeef; font-weight: bold;">C</span> and <span style="color:#fff238; font-weight: bold;">D</span> sensors would not exist, and while gsp is positive the left wall sensor would also not appear. These sensors are only included for illustration purposes.'' | [[Image:SPGCollisionDemo.gif|link=Special:FilePath/SPGCollisionDemo.gif]] ''Keep in mind, while on the ground the upper <span style="color:#00aeef; font-weight: bold;">C</span> and <span style="color:#fff238; font-weight: bold;">D</span> sensors would not exist, and while gsp is positive the left wall sensor would also not appear. These sensors are only included for illustration purposes.'' | ||
| Line 336: | Line 336: | ||
Unfortunately, there are a couple of annoying bugs in the original engine because of this method. | Unfortunately, there are a couple of annoying bugs in the original engine because of this method. | ||
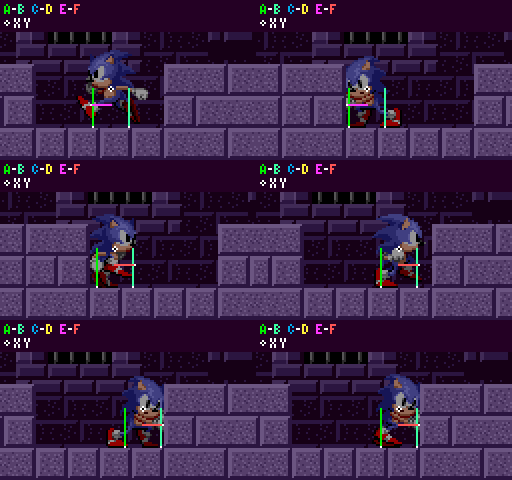
| − | If | + | If the Player stands on a slanted ledge, one sensor will find no tile and return a height of foot level. This causes the Player to be set to the wrong position. |
[[Image:SPGSlopeBug1Animated.gif|link=Special:FilePath/SPGSlopeBug1Animated.gif]] | [[Image:SPGSlopeBug1Animated.gif|link=Special:FilePath/SPGSlopeBug1Animated.gif]] | ||
| − | + | the Player raises up with sensor <span style="color:#38ffa2; font-weight: bold;">B</span> sensor as they moves right. When <span style="color:#38ffa2; font-weight: bold;">B</span> drops off the ledge, the Player defaults to the level of sensor <span style="color:#00f000; font-weight: bold;">A</span>. Then they raises up with sensor <span style="color:#00f000; font-weight: bold;">A</span> as they moves further right. So they will move up, drop down, and move up again as they runs off the ledge. | |
There are only a few areas where this is noticeable, but it applies to all Mega Drive titles and is pretty tacky. | There are only a few areas where this is noticeable, but it applies to all Mega Drive titles and is pretty tacky. | ||
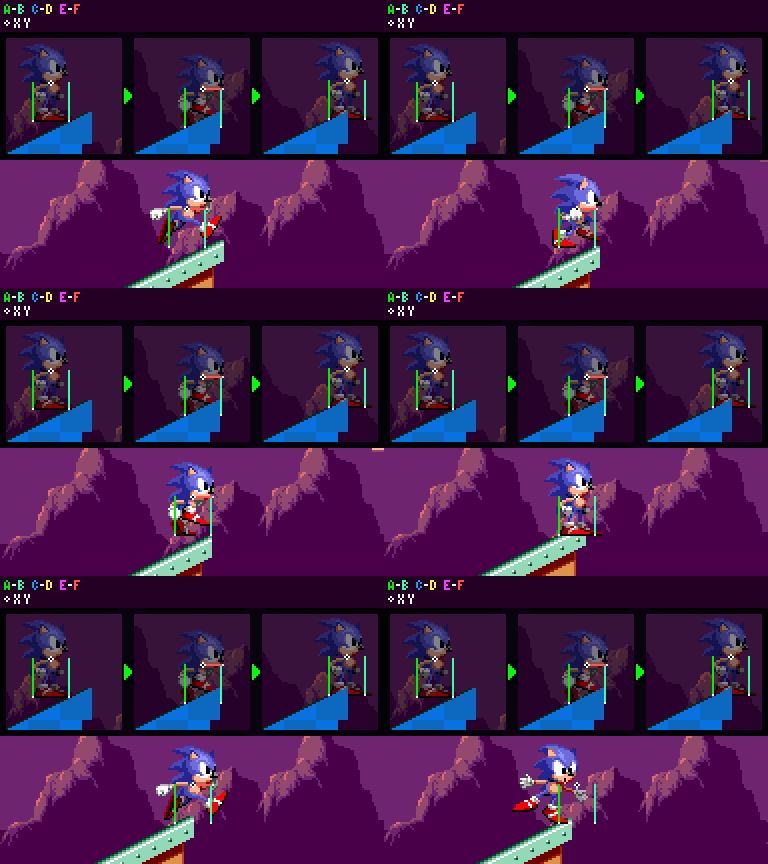
| − | The second form of it occurs when two opposing ramp tiles abut each other, as in some of the low hills in [[Green Hill Zone ( | + | The second form of it occurs when two opposing ramp tiles abut each other, as in some of the low hills in [[Green Hill Zone (the Player the Hedgehog 16-bit)|Green Hill Zone]] and [[Marble Zone]]. |
[[Image:SPGSlopeBug2Animated.gif|link=Special:FilePath/SPGSlopeBug2Animated.gif]] | [[Image:SPGSlopeBug2Animated.gif|link=Special:FilePath/SPGSlopeBug2Animated.gif]] | ||
| − | Sensor <span style="color:#38ffa2; font-weight: bold;">B</span> starts climbing down the ramp on the right, but | + | Sensor <span style="color:#38ffa2; font-weight: bold;">B</span> starts climbing down the ramp on the right, but the Player still defaults to the level of the previous ramp found by sensor <span style="color:#00f000; font-weight: bold;">A</span>. Because these ramps are usually shallow, this only causes him to dip down in the middle by about 1 pixel. |
| − | But that is not all. Because the highest sensor is the one | + | But that is not all. Because the highest sensor is the one the Player gets the angle from, even though it looks like they should be considered to be at the angle of the ramp on the right (because they is closer to it), they will still have the angle of the ramp on the left. When you jump, they will jump at that angle, moving backward, not forward like you would expect. |
==Notes== | ==Notes== | ||
| − | * Find information on how | + | * Find information on how the Player's momentum and slope handling work in the [[SPG:Slope_Physics|Slope Physics]] guide. |
[[Category:Sonic Physics Guide]] | [[Category:Sonic Physics Guide]] | ||
Revision as of 14:58, 31 March 2021
Notes:
- The research applies to all four of the Sega Mega Drive games and Sonic CD.
- Following only describes how the Player object collides and interacts with solid tiles. Solid objects, such as Monitors, Moving Platforms, and Blocks each have their own collision routines with the Player and don't necessarily behave exactly the same as the tiles do. For this, refer to Solid Objects.
- Variables and constants for the Player and other characters such as X Position and acc will be referenced frequently, they can be found in Basics.
- The original games use solid tiles, however the ideas and mechanics of the Player's base collision setup can be adapted (with adjustments) to other engines using sprite masks, line intersections, etc.
- While 16x16 tiles are "officially" named blocks, they are being referred to as solid tiles here since they are a simple grid pattern of sets of data which can be read simply, as opposed to objects or any other method. "Solid Tiles" and "Blocks" can be used interchangeably in this guide.
Contents
Introduction
What are solid tiles? While there are often solid objects in the Player zones, the zone itself would require far too much object memory if the environment were constructed entirely of solid objects, each with their own 64 bytes of RAM. A clever short-cut is used - the zone is constructed out of tiles anyway, so all that needs be done is have each tile know whether or not it is solid.
You may know that zones are broken down into 128x128 pixel chunks (or 256x256 pixel chunks in Sonic 1 and Sonic CD), which are in turn broken into 16x16 pixel blocks, which are again in turn broken into even smaller 8x8 pixel tiles. All of the solidity magic happens with the 16x16 blocks, so those are the only ones we will be interested in throughout this guide.
the Player's collisions and interactions with these solid tiles are what make up their basic engine. They dictate how they handles floors, walls, ceilings, slopes, and loops.
First we will look at how the environment is constructed from tiles, and then the Player's method for detecting their environment.
Solid Tiles
Solid tiles are a grid of data blocks, which represent solid areas within each grid cell. This area is defined using height masks.
Height Masks
When checking a solid tile, how is the height of the tile found?
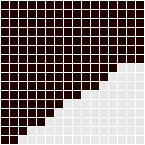
Each tile has a value associated with it that references a mask stored in memory. Each mask is simply an array of 16 height values that range from 0px ($00) to 16px ($10) and an angle value.
This height mask, for example, has the height array 0 0 1 2 2 3 4 5 5 6 6 7 8 9 9 9, and the angle 33.75° ($E8).
Which value of the height array is used? Subtract the tile's X position from the sensor's X position. The result is the index of the height array to use.
If the height value found is 16px ($10), that's the entire tile filled at that X position, so then the sensor has to check for another tile above the first one found, and search for that one's height value.
Horizontal Axis
Solid Tiles also have another height array (or, well, a width array) for horizontal collisions. This other array represents the same data and creates the exact same shape within the tile. This is only possible because the shapes represented in tiles are usually smooth continuous slopes, which don't extend in one direction then regress back. but either continue sloping in the same direction or stop.
Flipping Tiles
You may rightly wonder hows sloped ceilings are possible if the height array starts at one end only. The answer to this is that tiles can be flipped horizontally or vertically. The collision systems take this into account when reading the height data from tiles.
Sensors
"Sensors" are simply checks performed by objects which look for solid tiles around them.
An x/y position (anchor point) is checked, and if it finds a solid tile, they will gather information about the tile. Sensors can point down, right, up, and left, and all behave the same in their respective directions.
 The white points represent the anchor positions of the Player's sensors.
In this example, the sensor to the Player's mid right points right, and those at the Player's feet point down. Their direction dictates in which direction they are looking for a surface. A sensor pointing right is looking for the leftmost edge of solid terrain nearby, a sensor pointing down is looking for the topmost edge of solid terrain nearby.
So, we know they are points which look for solid tiles they touch. However, this is not the whole picture. If a sensor finds an empty tile or the array value of the tile found by the sensor is 16 (a full block amount), then it's likely that the surface of the solid terrain is actually found within an adjacent tile.
Sensor Regression & Extension
So when a sensor check is performed at a sensor's anchor point it has either found a solid tile, or it hasn't. If it has, what if the height value found is 16 and isn't actually the surface of the terrain? Or if it hasn't, what if there's a solid tile nearby?
Well, this is easily solved by checking nearby tiles also, until certain conditions are met.
In the case of a sensor which is pointing down looking for solids below:
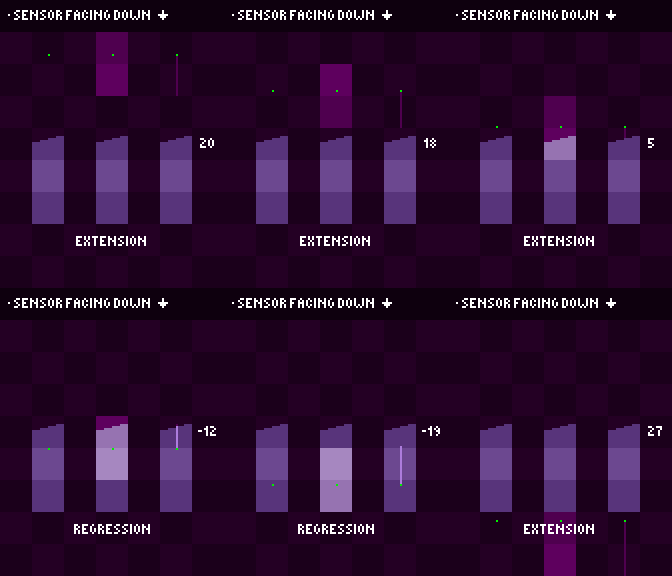
Regression:
- If the anchor point finds a Solid Tile, and if the height array value at the sensor's X of that tile is 16 (meaning the tile is completely filled in that area), it will check up by 1 extra Solid Tile. We'll call this the "regression" since it goes back against the sensor direction.
- If a regression occurs and finds no solid in the second tile, the second tile will be ignored.
Extension:
- If the anchor point just finds an empty tile (height array value of 0), it will check down by 1 extra Solid Tile. We'll call this the "extension" because it goes outwards, in the direction of the sensor.
- If an extension occurs and finds no solid in the second tile, the second tile will be ignored.
If the extension/regression does not fail, the new tile is the one which is processed, otherwise the first tile is processed instead.
In the above example, a downward facing sensor moves down through 3 Solid Tiles. We can see the tiles it checks, and the distance it returns at each position. We can also see if it is performing extension or regression. You can see this means the sensor can effectively act as a line, it can regress or extend up to 32 pixels to find the nearest surface.
To reiterate, when the sensor is within a tile which has a height array value of 0 at the sensor's x position (empty) it will check another tile in the sensor direction (extension). If the tile's height value is between 0 and 16 (not inclusive), the surface of the terrain has been found without needing to check extra tiles. If the tile's height value is 16, it will check another tile opposite to the sensor direction (regression). If the regression still fails to find a tile with a surface within, it will still return the information of the second tile. If the extension fails to find any solid tile, the sensor will return a distance of 0.
The regression & extension will occur in the direction of the sensor, be it horizontal or vertical. If the sensor is horizontal, it reads the other height array belonging to the tile, using the sensor's y position. Essentially rotating the entire setup. So a right facing sensor's regression would check an extra tile to the left, and extension would check an extra tile to the right. While an upward facing sensor's regression would check an extra tile below, and extension would check an extra tile above.
With all this, a sensor can always locate the nearest open surface (and the tile containing that surface) of the terrain within a range of 2 tiles (the tile the sensor anchor point is touching plus another).
Reaction
Once a final suitable tile has been found, information about the tile is returned.
The information a sensor finds is as follows:
- The distance from the sensor pixel to the surface of the solid tile found (in the sensor's direction)
- The angle of the tile found
- The tile ID
Distance
The distance to the solid tile surface (found by the sensor) is the most important piece of information dictating how an object will react to solid tiles. It's not the distance to the tile, it's the distance to the edge of the solid area within the tile, precisely.
The distance can either be 0, negative, or positive. When no Solid Tile is found by a sensor, a distance of 0 is returned by default.
- A distance of 0 means the sensor is just touching the solid tile surface (or has found nothing) and the object does not need to move.
- A negative distance means the surface found is closer to the object than the sensor position. Negative distances are almost always reacted to when colliding, because it indicates that the object is inside the solid and can be pushed out.
- Positive distances mean the surface found is further away from the object than the sensor position. Since this means the object isn't actually touching the tile, it's rarely used - but not never. A notable example of it's use is by floor sensors of various objects, including the Player, to keep them attached to the ground even if the ground has sloped away from them a bit as they move. Objects usually employ a limit to how far an object can be "pulled" down to a solid they aren't actually touching. This will be detailed further down for the Player.
If the object decides to snap itself to the terrain, it simply has to add the distance value to it's position. Or subtract, depending on the sensor's direction. A sensor pointing left may return a negative distance if it is inside a solid, but the object would have to subtract the distance in order to move to the right, out of it.
Of course, as stated, this distance can be representative of any 4 directions, depending on the sensor's own angle.
Summary
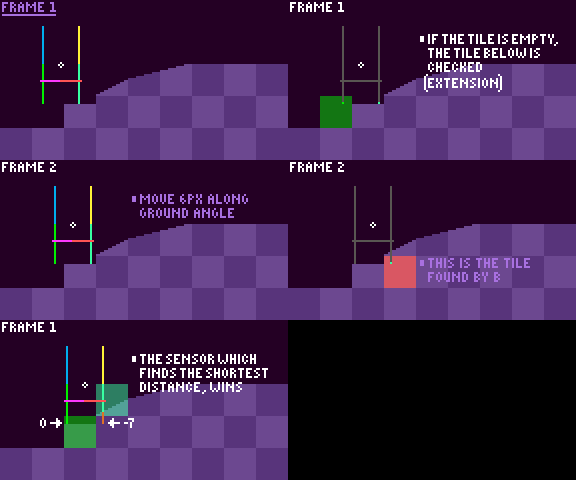
Here's a demonstrative animation showing a very simplified process of how the floor sensors detect a tile and be moved upwards. In this case, the Player will have a Ground Speed of 6.
Visual Depiction
Throughout this guide these sensors will be drawn as lines. But, they are not. Or well, they are, but not quite as shown ahead.
Sensors will be drawn from the sensor anchor, extending towards the centre of the object. You can imagine it like so - if the exact surface pixels of the ground is within these lines, the Player will be pushed out. It is of course not quite this simple in reality. As shown in the previous visualisation of a sensor, the "line" portion can extend up to 32 pixels in either direction, all depending on where the sensor anchor currently sits within it's tile... This would be impossible to accurately draw over the Player while keeping things understandable and clear. This visualisation is the most easy to visualise way to think about the solidity on a surface level.
Just be aware that the line based depictions are for simple illustration purposes only and the endpoints of the lines are the active sensor anchors (which always behave as described).
The Player's Sensors
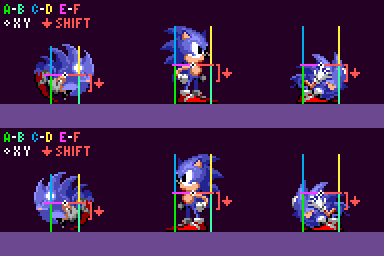
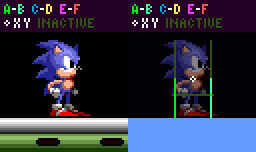
Like any object which wants to collide with tiles, sensors surround the Player.
 A and B - Floor collision
 C and D - Ceiling collision (only used mid-air)
 E and F - Wall collision (shifting by 8px depending on certain factors, which will be explained)
 XY - the Player's X Position and Y Position
Since the Player's collision setup is symmetrical, it makes sense for the game to set up widths and heights using radius values. The Player has separate radius values for their E and F sensor pair (their Push Radius) which always remains the same, and for their A, B, C and D sensors there is a Width Radius and Height Radius both of which will change depending on the Player's state. For these sizes see Characters.
Note on sprite alignment:
- The Player's sprite is 1 pixel offset to the left when they faces left, which can result in him appearing to be 1px inside a tile when pushing leftwards. Amusingly, this offset will appear corrected when pushing most objects thanks to their hitboxes sticking out 1px further on their right and bottom (due to their origins being off-centre by 1 in X and Y). So while tiles are collided with accuracy, it will appear the opposite in-game. More about object collision in Solid Objects.
Floor Sensors (A and B)
A and B sit at their feet at Y Position+Height Radius.
Movement
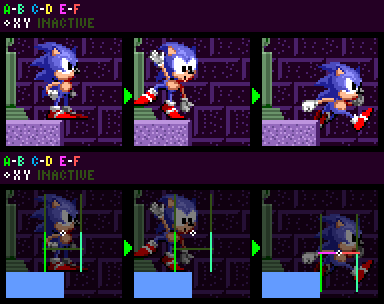
Typically, the Player's Width Radius is 9, placing A on the Player's left side, at X Position-9. While B should be on their right, at X Position+9, 19 pixels wide. their Height Radius is usually 19, making him 39 pixels tall in total.
However while rolling or jumping, their Width Radius becomes 7, placing A at X Position-7. With B at X Position+7, 15 pixels wide. This is to ensure the Player doesn't appear too far away from the floor at steep angles while in curled up. Crouching does not affect their Width Radius.
Here's an example of that in action:
While rolling or jumping (and otherwise generally curled up), the Player's Height Radius becomes smaller at a value of 14, making him 29 pixels tall. Because of this, in the step in which the Player rolls or jumps or otherwise becomes shorter, the game adds 5 to their Y Position so that their bottom point will remain unchanged despite him getting shorter and their center changing position. 5 also has to be subtracted from Y Position when they unroll or lands from a jump. The camera system also has to keep this offset in mind, otherwise, the view will jump when the Player changes height.
Method
Assuming the ground level to be at a Y position of 736 ($02E0), while standing the Player is atop it at a Y Position of 716 ($02CC), which is 20 pixels above ground level.
Floor sensors are a special case, there are 2 sensors and they need to detect slopes. Both sensors behave the same and search for a Solid Tile. The smaller distance is the sensor that wins. For example, -10 is a smaller distance than 5. The sensor that wins is the distance and angle used (and it's found tile is the one referenced).
Once the winning distance is found, it can be used to reposition the Player.
Distance Limits
As we know, sensors return a distance to the nearest surface, up to an extreme maximum of 32 pixels. If the Player's floor sensors are within 32 pixels of the floor, the game may know the floor is there but we might not just want him to snap down right away. The game will test the distance found and react appropriately.
While grounded:
In Sonic 1, if the distance value is less than -14 or greater than 14, the Player won't collide. In Sonic 2 onward however the positive limit depends on the Player's current speed - in this case, (for when the Player is on the floor) if the distance is greater than
minimum(absolute(X Speed)+4, 14)
then they won't collide. So the faster the Player moves, the greater the distance the Player can be from the floor while still being pulled back down to it. The -14 limit remains the same.
If the Player was in a sideways mode, such as on a wall, it would use Y Speed instead.
While airborne:
While airborne, if the distance value is greater than or equal 0 (meaning the sensor isn't touching the floor yet) the Player won't collide.
Ledges
the Player has to be able to run off of ledges. It would not do to just keep walking like Wile E. Coyote, not noticing that there is nothing beneath him.
If both sensor A and B detect no solid tiles, the Player will "fall" - a flag will be set telling the engine they is now in the air.
Balancing On Edges
One nice touch is that the Player goes into a balancing animation when near to the edge of a ledge. This only happens when they is stopped (their Ground Speed is 0).
How does the engine know? It is simple - any time only one of the ground sensors is activated, the Player must be near a ledge. If A is active and B is not the ledge is to their right and vice versa.
But if the Player began balancing the instant one of the sensors found nothing, they would do it too "early", and it would look silly. So it only happens when only one sensor is active, and X Position is greater than the edge of the solid tile found by the active sensor.
Assuming the right edge of the ledge to be an X position of 2655 ($0A5F), the Player will only start to balance at an X Position of 2656 ($0A60) (edge pixel+1). they'll fall off at an X Position of 2665 ($0A69) (edge pixel+10) when both sensors find nothing.
In Sonic 2 and Sonic CD, if the ledge is the opposite direction than they is facing, they has a second balancing animation.
In Sonic 2, Sonic 3, and Sonic & Knuckles, the Player has yet a third balancing animation, for when they's even further out on the ledge. Assuming the same values as above, this would start when they is at an X Position of 2662 ($0A66).
Note: While balancing, certain abilities are not allowed (ducking, looking up, spindash, etc). In the Player 3 & Knuckles, the player is still allowed to duck and spindash (not to look up, though) when balancing on the ground but not when balancing on an object.
Ceiling Sensors (C and D)
the Player's C and D sensors are always an exact mirror image of the Player's floor sensors, they have the same X positions and length but are flipped upside down.
They perform in the exact same way simply up instead of down.
However, they aren't active at the same times.
Method
When these sensors find a ceiling, much like the floor sensors the sensor which finds the smallest distance will win. The sensor that wins is the distance and angle used (and it's found tile is the one referenced). This winning distance can then be subtracted from the Player's position.
Distance Limits
Distance limits here work in the same way as the floor sensors while airborne.
Wall Sensors (E and F)
E sits at their left at X Position-Push Radius, while F sits at their right at X Position+Push Radius.
Movement
Push Radius is always 10, placing E to the Player's left side, at X Position-10. While F is to their right, at X Position+10, giving the Player a total width of 21 pixels when pushing.
Sensors E and F Spend most of their time at the Player's Y Position however while the Player's Ground Angle is 0 (on totally flat ground) both wall sensors will move to their Y Position+8 so that they can push against low steps and not just snap up ontop of them.
The horizontal sensors are always positioned at Y Position while airborne.
You may remember that sensors A and B are only 19 pixels apart but the Player is 21 pixels wide when pushing into walls. This means that the Player is skinnier by 2 pixels when running off of ledges than when bumping into walls.
That's not to say these sensors don't move though. They do, and a lot. As noted in Main Game Loop wall collision (while grounded) actually takes place before the Player's position physically moves anywhere, so they wont actually be in a wall when they tries to collide with it. The game accounts for this by actually adding their X Speed and Y Speed to the sensor's position, this is where the sensor would be if the Player had moved yet.
Method
Assuming the wall's left side to be at an X position of 704 ($02C0), the Player cannot get closer than an X Position of 693 ($02B5). Assuming the wall's right side to be at an X position of 831 ($033F), the Player cannot get closer than an X Position of 842 ($034A). Thus the distance between both sensors inclusive should be 21 pixels, stretching from the Player's X Position-10 to X Position+10.
When the Player collides with a wall, this will set their Ground Speed to 0 if they is moving in the direction of the wall, not away from it.
The distance value found by the sensor in it's given direction is used to stop the Player at a wall.
Distance Limits
While Grounded: The distances found by the wall sensors are used slightly differently while grounded.
Naturally, the game will ignore a positive distance because they will not collide. If the sensor's distance is negative, this means that when the Player's position actually does change, they will be inside the wall.
In this case, because the sensor is actually out in front of the Player (where they will be after they moves) instead of using the distance to reposition the Player by directly changing their position, the game smartly uses the fact that the Player has still yet to move within the current frame. All it has to do is add the distance to the Player's X Speed (if moving right, or subtract the distance from the Player's X Speed if moving left. This would be done to Y Speed if in wall mode). This results in the Player moving when their position changes, right up to the wall, but no further. In the next frame, because Ground Speed has been set to 0 the Player will have stopped just like in any other situation.
While Airborne:
Like normal, if the distance is negative and the sensor is inside the wall, they will collide. The game will ignore a positive distance.
Extra Sensors
the Player cannot jump when there is a low ceiling above him. If there is a collision detected with sensors at the Player's X Position-9 and X Position+9, at Y Position-25, the Player won't bother jumping at all.
Sensor Activation
Knowing where the sensors are and what they do is only half the job since they are only sometimes active. This depends while you are grounded or airborne.
While Grounded
Floor Sensors A and B are always active while grounded, and will use their 1 tile extension to actively search for new floor below the Player's feet.
When grounded, Wall Sensors E and F only activate when the Player is walking in that direction. For example, while standing still the Player isn't checking with their wall sensors at all, but while Ground Speed is positive, the Player's E sensor is inactive, and while Ground Speed is negative, the Player's F sensor is inactive.
However this is not always the case, both wall sensors simply don't appear when the Player's Ground Angle is outside of a 0 to 90 and 270 to 360 (or simply -90 to 90) degree range, meaning when you running around a loop, the wall sensors will vanish for the top half of the loop. In S3K however these sensors will also appear when the Player's Ground Angle is a multiple of 90 in addition to the angle range.
While grounded Ceiling Sensors C and D are never active, and the Player won't check for collision with solid tiles above himself while on the floor.
While Airborne
While in the air, all sensors play a part to find ground to reattach the Player to. But rather than have all active at once and risk lag, only 4-5 will be active at any given time.
As you move, the game will check the angle of your motion (X Speed and Y Speed) through the air. It will then pick a quadrant by rounding to the nearest 90 degrees. (this is different to the Mode, this is simply a measurement of if you are going mostly left, right up or down). The quadrant can be more easily found by simply comparing the X Speed and Y Speed and finding which is larger or smaller.
 if absolute X Speed is larger then or equal to absolute Y Speed then
   if X Speed is larger than 0 then
     the Player is going mostly right
   else
     the Player is going mostly left
 else
   if Y Speed is larger than 0 then
     the Player is going mostly down
   else
     the Player is going mostly up
Depending on the quadrant, different sensors will be active.
When going mostly right, the Player's F sensor will be active, along with both A and B floor sensors and the C and D ceiling sensors.
When going mostly left, it is the exact same as going right, but the E wall sensor instead.
When going mostly up, both the C and D ceiling sensors and the E and F wall sensors are active.
When going mostly down, it is the same as going up, but the A and B floor sensors are active instead of the ceiling sensors.
Summary
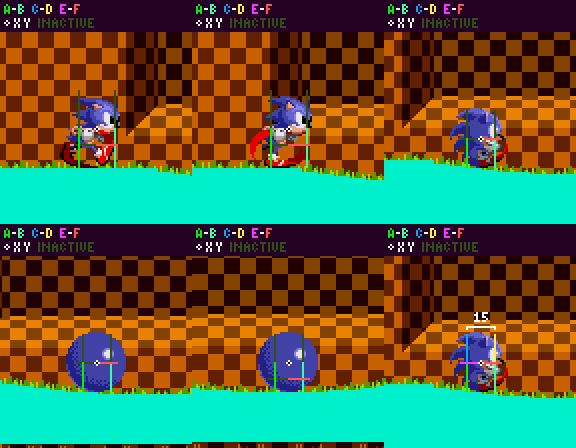
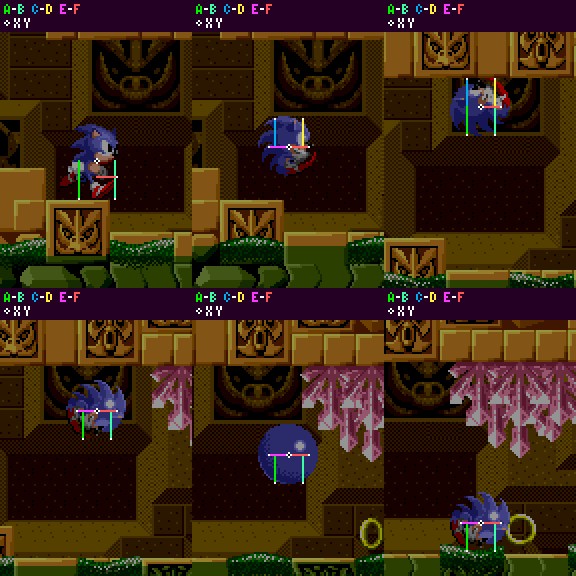
Here's a handmade visualisation of how sensors interact with solid tiles (here highlighted in bright blue, green, and cyan). You can notice how the sensors are pushing the Player from the ground tiles, and is overall rather simple. The E and F sensors lower when on flat ground. You can also notice the sensors snap in 90 degree rotations resulting in four modes, this is covered in Slope Physics.
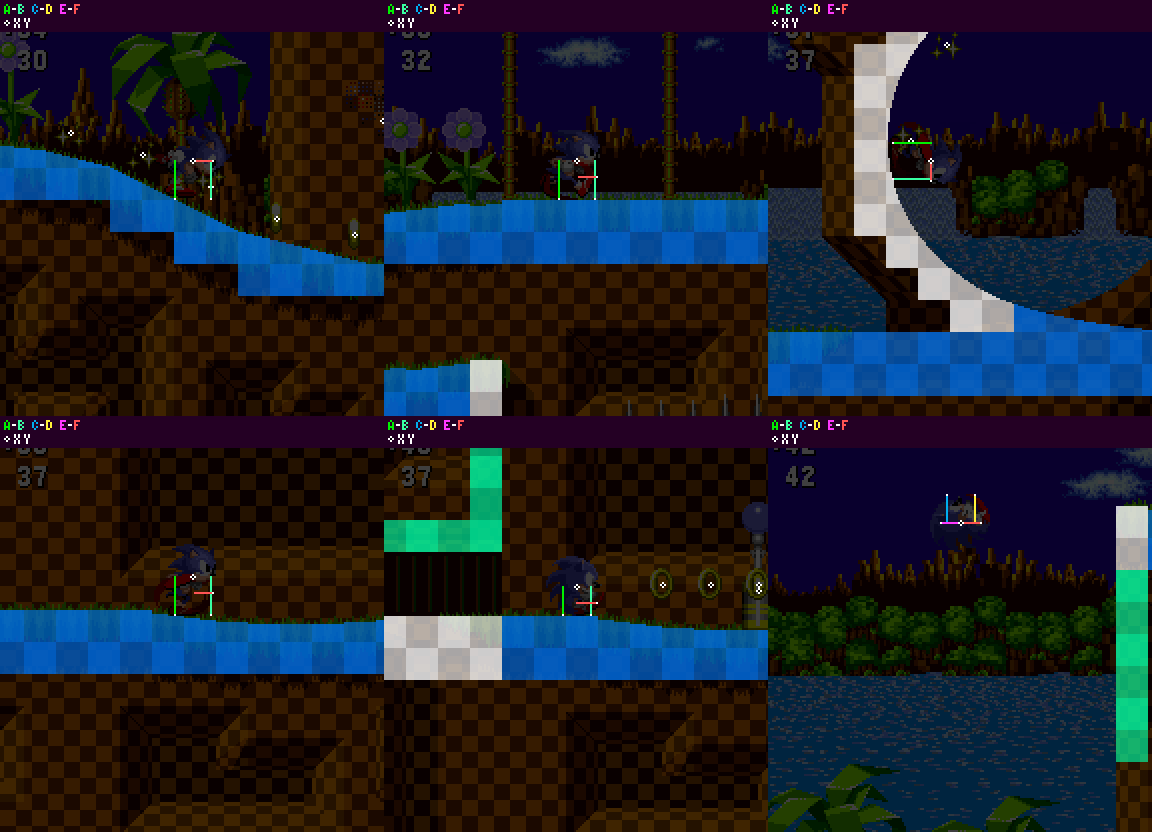 Keep in mind, while on the ground the upper C and D sensors would not exist, and while gsp is positive the left wall sensor would also not appear. These sensors are only included for illustration purposes.
Bugs Using This Method
Unfortunately, there are a couple of annoying bugs in the original engine because of this method.
If the Player stands on a slanted ledge, one sensor will find no tile and return a height of foot level. This causes the Player to be set to the wrong position.
the Player raises up with sensor B sensor as they moves right. When B drops off the ledge, the Player defaults to the level of sensor A. Then they raises up with sensor A as they moves further right. So they will move up, drop down, and move up again as they runs off the ledge.
There are only a few areas where this is noticeable, but it applies to all Mega Drive titles and is pretty tacky.
The second form of it occurs when two opposing ramp tiles abut each other, as in some of the low hills in Green Hill Zone and Marble Zone.
Sensor B starts climbing down the ramp on the right, but the Player still defaults to the level of the previous ramp found by sensor A. Because these ramps are usually shallow, this only causes him to dip down in the middle by about 1 pixel.
But that is not all. Because the highest sensor is the one the Player gets the angle from, even though it looks like they should be considered to be at the angle of the ramp on the right (because they is closer to it), they will still have the angle of the ramp on the left. When you jump, they will jump at that angle, moving backward, not forward like you would expect.
Notes
- Find information on how the Player's momentum and slope handling work in the Slope Physics guide.
