Difference between revisions of "SPG:Solid Terrain"
From Sonic Retro
(Created page "SPG:Solid Terrain" to explain how solid tiles are used to create complex terrain & how layering systems work in each game) |
(New formatting) |
||
| (3 intermediate revisions by the same user not shown) | |||
| Line 8: | Line 8: | ||
===Chunks=== | ===Chunks=== | ||
| − | Those slopes are constructed within chunks (a chunk being a 16 x 16 square of Solid | + | Those slopes are constructed within chunks (a chunk being a 16 x 16 square of Solid Tile Blocks in Sonic 1, 8 x 8 after), which in turn are also slotted together in a similar way to build terrain layouts. |
| − | == | + | ==Chunk Swapping== |
| − | Each Genesis Sonic game has some form of layer system in place. In order for the Player to pass in front of one side of a loop, then go all the way round and pass behind the other, there needs to be some sort of | + | Each Genesis Sonic game has some form of layer system in place. In order for the Player to pass in front of one side of a loop, then go all the way round and pass behind the other, there needs to be some sort of trickery involved. |
| − | + | In Sonic 1, loop chunks are simply built different. When the Player enters the loop chunk from the left, only the right side of it is solid. As the Player goes around the loop, the entire chunk will swap for another half way and sets the left side solid instead. | |
| − | In Sonic 1, loop chunks are simply built different. When the Player enters the loop from the left, only the right side of it is solid. As the Player goes around the loop, the entire chunk will swap for another half way and sets the left side solid instead. | ||
This is achieved by having 2 different chunks, and the game only allows for a couple of these special chunk types per zone. | This is achieved by having 2 different chunks, and the game only allows for a couple of these special chunk types per zone. | ||
| − | == | + | ==Layers== |
| − | In Sonic the Hedgehog 2 onwards, the system became a lot more advanced. Here each and every chunk has 2 separate Solid Tile layers. Here, we will call these "A" and "B". The Player can be on one of these layers at any given time. | + | In Sonic the Hedgehog 2 onwards, the system became a lot more advanced. Here each and every chunk has 2 separate Solid Tile collision layers. Here, we will call these "A" and "B". The Player can be on one of these layers at any given time. |
| − | |||
| − | |||
| − | These layers can have completely different (or identical) Solid Tiles on them. The Player object knows what layer they are on, and can collide with one of these layers at a time. This is a far more flexible system and can be used for all sorts of crossing paths, including loops. | + | These layers can have completely different (or identical) Solid Tiles on them. The Player object knows what collision layer they are on, and can collide with one of these layers at a time. This is a far more flexible system and can be used for all sorts of crossing paths, including loops. |
During gameplay, the Player's layer is changed via layer switchers. | During gameplay, the Player's layer is changed via layer switchers. | ||
| − | + | ===Layer Switchers=== | |
| − | A layer switcher is an object which, when a threshold is crossed by the Player, switches their collision layer to a predetermined value. | + | A layer switcher is an object which, when a threshold is crossed by the Player, switches their collision layer and/or visual priority to a predetermined value. |
| − | + | The threshold is a vertical or horizontal line that stretches to both ends of the switcher. They can use one of the following radiuses for it's size: <code>32, 64, 128, 256</code> | |
| − | + | {| class="prettytable" style="width: auto;" | |
| − | + | |style="text-align: center;"|[[Image:SPGLayerSwitcher.gif]] | |
| + | |style="text-align: center;"|[[Image:SPGLayerSwitcherHorizontal.gif]] | ||
| + | |- | ||
| + | !style="text-align: center;"|Vertical Layer Switcher | ||
| + | !style="text-align: center;"|Horizontal Layer Switcher | ||
| + | |} | ||
| − | + | =====Collision Layers===== | |
| + | Either side of the threshold line has a variable which determines the collision layer it should switch the Player to if they cross over to that side. The top or left layer we will call "'''layer_1'''", and the right or bottom layer we will call "'''layer_2'''". | ||
| − | + | =====Priority===== | |
| + | Neither collision layer A nor B represent "front" or "back". | ||
| − | Either side of the threshold line has a variable which determines the | + | Separate to collision layers, switchers are also used to change the Player's visual priority (aka their sprite depth). This is either "H" or "L" ("High" or "Low"), and will determine if the Player is displayed in front or behind certain foreground elements. Either side of the threshold line has a variable which determines the visual priority it should switch the Player to if they cross over to that side. The top or left priority we will call "'''priority_1'''", and the right or bottom priority we will call "'''priority_2'''". |
| − | + | ====Visual Depiction==== | |
| + | In the images/animations on this page, switchers are shown as an orange line (the threshold) along the switcher axis (horizontal or vertical) stretching from the position out to the radius at both ends. | ||
| + | Additionally, the area of the switcher that the Player's position has to touch in order to trigger a layer switch is shown as transparent orange. | ||
| − | + | Both sides of a switcher will display both the layer (A or B) and the visual priority (L or H) it will set the Player to on the respective side of the threshold. | |
| − | A | ||
| − | + | Also, the Player's current layer and priority will be shown above their head. | |
| − | |||
| − | + | ====Setup==== | |
| + | The following will go over the information and variables layer switchers manage in order to function. | ||
| + | {| class="prettytable" style="width: auto;" | ||
| + | !Flag(s) | ||
| + | !Usage | ||
| + | |- | ||
| + | |'''Grounded Only Flag''' | ||
| + | |A layer switcher can be flagged as being only active while the Player is on the ground, which we will label as '''grounded_only''' switchers. These are typically used in the tops of loops. | ||
| + | |- | ||
| + | |'''Current Side Flag''' | ||
| + | | | ||
| + | {| | ||
| + | |[[Image:SPGLayerSwitcherCurrentSide.gif]] | ||
| + | |Layer switchers have a variable which we will call '''current_side''' that remembers what side of it the Player is currently on (either to the left / right or above / below). | ||
| − | + | At any given time, no matter where the Player is, this variable is kept up to date. Though importantly, '''current_side''' is updated ''after'' the actual layer switching is checked/performed. | |
| + | |} | ||
| + | |- | ||
| + | |'''Visual Priority Flags''' | ||
| + | |Some switchers can also ''only'' set the priority, and completely ignore setting the collision layers. We will label these as '''priority_only''' switchers. | ||
| − | + | This is a completely separate system to the collision layers, so High or Low priorities don't need to correspond to A or B layers. | |
| − | + | |} | |
| − | |||
| − | |||
| − | |||
| − | |||
| − | |||
====Layer Switcher Functionality==== | ====Layer Switcher Functionality==== | ||
| − | A layer switcher will only switch the Player's collision layer if they are within range. The range being the radius mentioned above. | + | A layer switcher will only switch the Player's collision layer if they are within range. The range being the radius mentioned above. |
| − | + | {| class="prettytable" style="width: auto;" | |
| − | + | !Switcher Orientation | |
| − | + | !Range | |
| − | + | |- | |
| − | + | | | |
| − | + | '''Vertical''' | |
| − | + | | | |
| − | + | The Player's Y Position has to be within the range <code>switcher's '''''Y Position''''' - switcher's '''''Height Radius'''''</code> to <code>switcher's '''''Y Position''''' + switcher's '''''Height Radius'''''</code> | |
| − | + | |- | |
| − | + | | | |
| − | + | '''Horizontal''' | |
| − | + | | | |
| − | + | The Player's X Position has to be within the range <code>switcher's '''''X Position''''' - switcher's '''''Width Radius'''''</code> to <code>switcher's '''''X Position''''' + switcher's '''''Width Radius'''''</code> | |
| − | + | |} | |
| + | If that range condition is met, it will then check if the Player has crossed the threshold. | ||
| − | + | Note: ''We will use the example of a vertical switcher here, but a horizontal switcher works exactly the same in the other axis.'' | |
| − | + | {| class="prettytable" style="width: auto;" | |
| + | !If '''current_side''' is the left: | ||
| + | |- | ||
| + | | | ||
| + | If the Player's X Position is less than switcher's '''''X Position''''', the Player is still on the left, has not crossed the threshold and nothing will happen. | ||
| − | + | Otherwise, if the Player's '''''X Position''''' is greater than or equal to the switcher's '''''X Position''''', the Player has crossed the threshold, it will trigger. | |
| + | Their collision layer will be switched to '''layer_2''' (if not '''priority_only'''), and their visual priority will be set to '''priority_2'''. | ||
| + | |- | ||
| + | !If '''current_side''' is the right: | ||
| + | |- | ||
| + | | | ||
| + | If the Player's '''''X Position''''' is greater than or equal to switcher's '''''X Position''''', the Player is still on the right, has not crossed the threshold and nothing will happen. | ||
| + | Otherwise, if the Player's '''''X Position''''' is less than the switcher's '''''X Position''''', the player has crossed the threshold, it will trigger. | ||
| + | Their collision layer will be switched to '''layer_1''' (if not '''priority_only'''), and their visual priority will be set to '''priority_1'''. | ||
| + | |} | ||
After these checks (whether it triggered a switch or not), the switcher will then update '''current_side''' based on what side the Player is now on. | After these checks (whether it triggered a switch or not), the switcher will then update '''current_side''' based on what side the Player is now on. | ||
| Line 92: | Line 122: | ||
The result of this system is that the Player's layer is only switched when the switcher threshold is crossed. It works no matter how fast the Player is moving. | The result of this system is that the Player's layer is only switched when the switcher threshold is crossed. It works no matter how fast the Player is moving. | ||
| − | Additionally, because '''current_side''' is always updated even when the Player is | + | Additionally, because '''current_side''' is always updated even when the Player is outside of the switcher range, if the Player jumps over (or otherwise moves around) a switcher it won't trigger, even when they enter back into the range on the other side. |
| − | |||
==Loops== | ==Loops== | ||
In Sonic 2 onwards, loops will use 2 or more layer switchers in order to swap the Player to the correct path. | In Sonic 2 onwards, loops will use 2 or more layer switchers in order to swap the Player to the correct path. | ||
| + | {| class="prettytable" style="width: auto;" | ||
| + | |style="text-align: center;"|[[Image:SPGLayerSwitcherLoop.gif]] | ||
| + | |- | ||
| + | !style="text-align: center;"| | ||
| + | Sonic's layer changes from A to B via the mid loop switcher.<br/>The switcher after the loop sets it back to A. | ||
| + | |} | ||
| − | + | Typically this is one '''grounded_only''' layer switcher in the middle of the loop, and one layer switcher after the loop. There isn't usually one before the loop as the game assumes the Player has already been set to the correct layer sometime beforehand (though it would be safest to put one before too). | |
| − | |||
| − | Typically this is one '''grounded_only''' switcher in the middle of the loop, and one switcher after the loop. There isn't usually one before the loop as the game assumes the Player has already been set to the correct layer sometime beforehand (though it would be safest to put one before too). | ||
==Overlapping Paths== | ==Overlapping Paths== | ||
| Line 115: | Line 148: | ||
[[Image:SPGLayerSwitcherZigZag.gif]] | [[Image:SPGLayerSwitcherZigZag.gif]] | ||
| − | + | ==Notes== | |
| + | *''On this guide and in it's images, collision layer labels [A, B] and visual priority labels [L, H] represent values [0, 1] respectively in the original games.'' | ||
| + | *''This page is essentially part 2 of 2. This details how Solid Tiles and collision layers are used to create anything from simple slopes all the way to bigger Sonic set-pieces like loops. For part 1, describing what Solid Tiles are and how they are used directly, go to [[SPG:Solid_Tiles|Solid Tiles]]''. | ||
[[Category:Sonic Physics Guide]] | [[Category:Sonic Physics Guide]] | ||
Latest revision as of 08:54, 19 June 2023
| Sonic Physics Guide |
|---|
|
| Collision |
|
| Physics |
|
| Gameplay |
| Presentation |
| Special |
Notes:
- The research applies to all four of the Sega Mega Drive games and Sonic CD.
- This page is essentially part 2 of 2. This details how Solid Tiles and collision layers are used to create anything from simple slopes all the way to bigger Sonic set-pieces like loops. For part 1, describing what Solid Tiles are and how they are used directly, go to Solid Tiles.
Contents
Solid Terrain
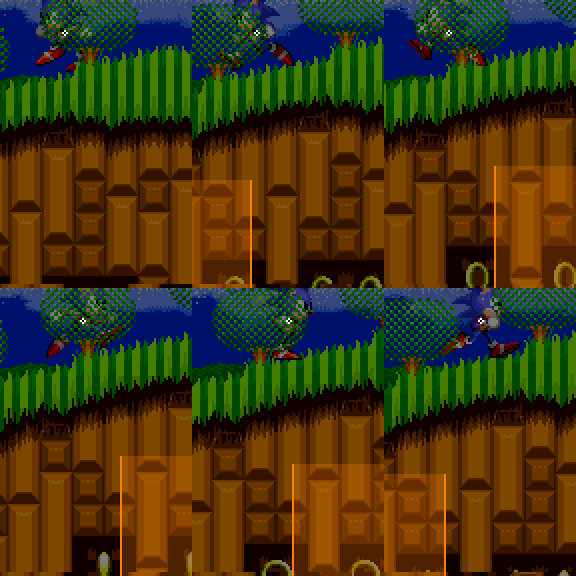
Slopes and other floors within chunks are created by slotting Solid Tiles together like a jigsaw. There are enough variations of Solid Tiles available (and even more when they are flipped around) to construct many different varied slopes, whether they are smooth like halfpipes or more randomised like grass.
Chunks
Those slopes are constructed within chunks (a chunk being a 16 x 16 square of Solid Tile Blocks in Sonic 1, 8 x 8 after), which in turn are also slotted together in a similar way to build terrain layouts.
Chunk Swapping
Each Genesis Sonic game has some form of layer system in place. In order for the Player to pass in front of one side of a loop, then go all the way round and pass behind the other, there needs to be some sort of trickery involved.
In Sonic 1, loop chunks are simply built different. When the Player enters the loop chunk from the left, only the right side of it is solid. As the Player goes around the loop, the entire chunk will swap for another half way and sets the left side solid instead.
This is achieved by having 2 different chunks, and the game only allows for a couple of these special chunk types per zone.
Layers
In Sonic the Hedgehog 2 onwards, the system became a lot more advanced. Here each and every chunk has 2 separate Solid Tile collision layers. Here, we will call these "A" and "B". The Player can be on one of these layers at any given time.
These layers can have completely different (or identical) Solid Tiles on them. The Player object knows what collision layer they are on, and can collide with one of these layers at a time. This is a far more flexible system and can be used for all sorts of crossing paths, including loops.
During gameplay, the Player's layer is changed via layer switchers.
Layer Switchers
A layer switcher is an object which, when a threshold is crossed by the Player, switches their collision layer and/or visual priority to a predetermined value.
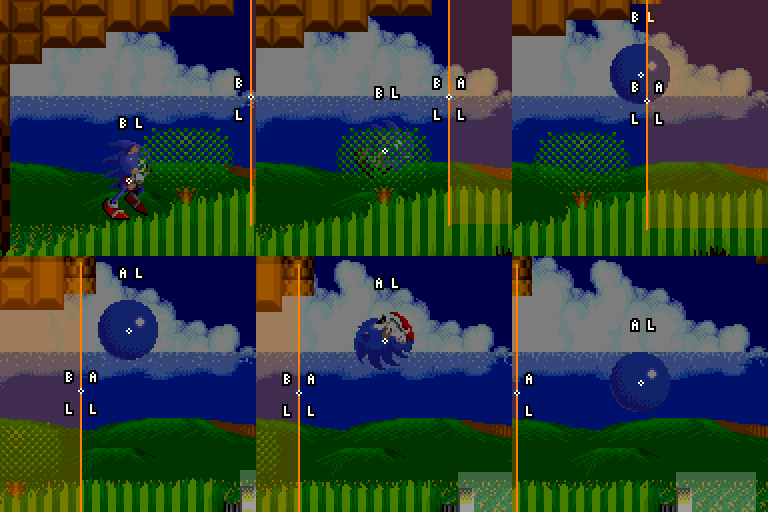
The threshold is a vertical or horizontal line that stretches to both ends of the switcher. They can use one of the following radiuses for it's size: 32, 64, 128, 256
|
|
| Vertical Layer Switcher | Horizontal Layer Switcher |
|---|
Collision Layers
Either side of the threshold line has a variable which determines the collision layer it should switch the Player to if they cross over to that side. The top or left layer we will call "layer_1", and the right or bottom layer we will call "layer_2".
Priority
Neither collision layer A nor B represent "front" or "back".
Separate to collision layers, switchers are also used to change the Player's visual priority (aka their sprite depth). This is either "H" or "L" ("High" or "Low"), and will determine if the Player is displayed in front or behind certain foreground elements. Either side of the threshold line has a variable which determines the visual priority it should switch the Player to if they cross over to that side. The top or left priority we will call "priority_1", and the right or bottom priority we will call "priority_2".
Visual Depiction
In the images/animations on this page, switchers are shown as an orange line (the threshold) along the switcher axis (horizontal or vertical) stretching from the position out to the radius at both ends. Additionally, the area of the switcher that the Player's position has to touch in order to trigger a layer switch is shown as transparent orange.
Both sides of a switcher will display both the layer (A or B) and the visual priority (L or H) it will set the Player to on the respective side of the threshold.
Also, the Player's current layer and priority will be shown above their head.
Setup
The following will go over the information and variables layer switchers manage in order to function.
Layer Switcher Functionality
A layer switcher will only switch the Player's collision layer if they are within range. The range being the radius mentioned above.
| Switcher Orientation | Range |
|---|---|
|
Vertical |
The Player's Y Position has to be within the range |
|
Horizontal |
The Player's X Position has to be within the range |
If that range condition is met, it will then check if the Player has crossed the threshold.
Note: We will use the example of a vertical switcher here, but a horizontal switcher works exactly the same in the other axis.
| If current_side is the left: |
|---|
|
If the Player's X Position is less than switcher's X Position, the Player is still on the left, has not crossed the threshold and nothing will happen. Otherwise, if the Player's X Position is greater than or equal to the switcher's X Position, the Player has crossed the threshold, it will trigger. Their collision layer will be switched to layer_2 (if not priority_only), and their visual priority will be set to priority_2. |
| If current_side is the right: |
|
If the Player's X Position is greater than or equal to switcher's X Position, the Player is still on the right, has not crossed the threshold and nothing will happen. Otherwise, if the Player's X Position is less than the switcher's X Position, the player has crossed the threshold, it will trigger. Their collision layer will be switched to layer_1 (if not priority_only), and their visual priority will be set to priority_1. |
After these checks (whether it triggered a switch or not), the switcher will then update current_side based on what side the Player is now on.
Result
The result of this system is that the Player's layer is only switched when the switcher threshold is crossed. It works no matter how fast the Player is moving.
Additionally, because current_side is always updated even when the Player is outside of the switcher range, if the Player jumps over (or otherwise moves around) a switcher it won't trigger, even when they enter back into the range on the other side.
Loops
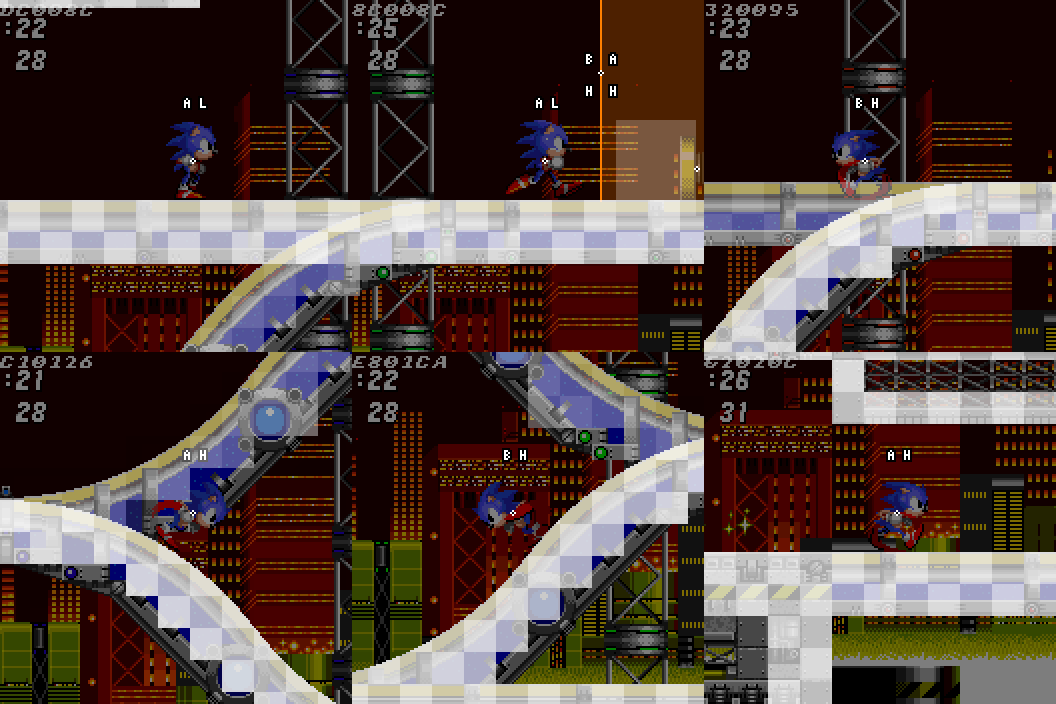
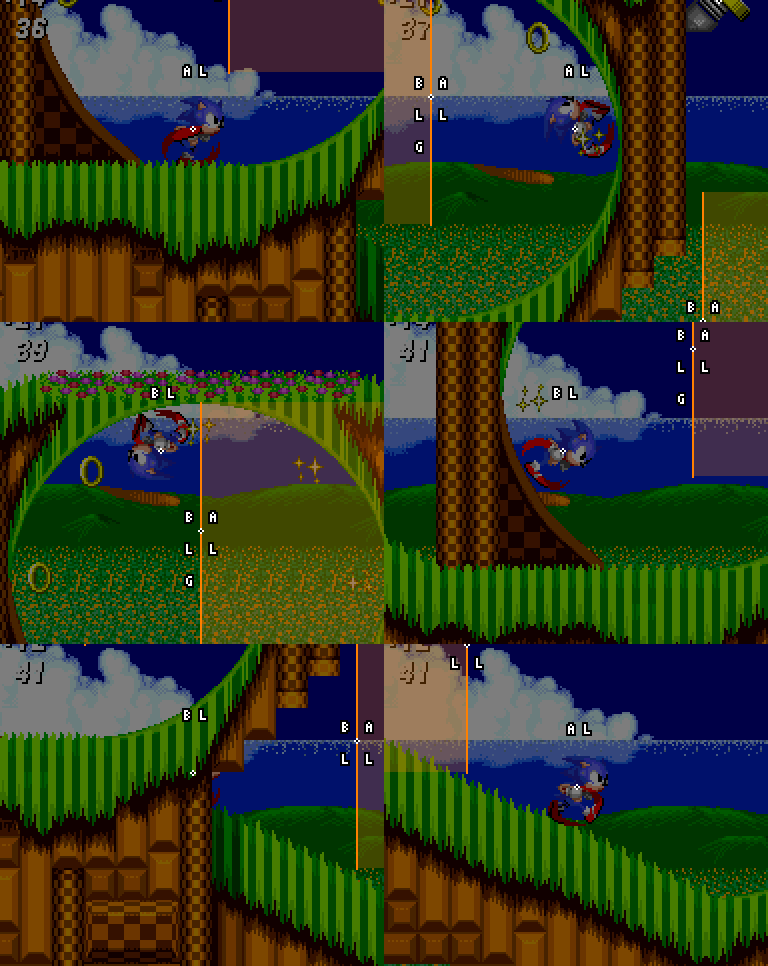
In Sonic 2 onwards, loops will use 2 or more layer switchers in order to swap the Player to the correct path.
|
|
Sonic's layer changes from A to B via the mid loop switcher. |
|---|
Typically this is one grounded_only layer switcher in the middle of the loop, and one layer switcher after the loop. There isn't usually one before the loop as the game assumes the Player has already been set to the correct layer sometime beforehand (though it would be safest to put one before too).
Overlapping Paths
Waves
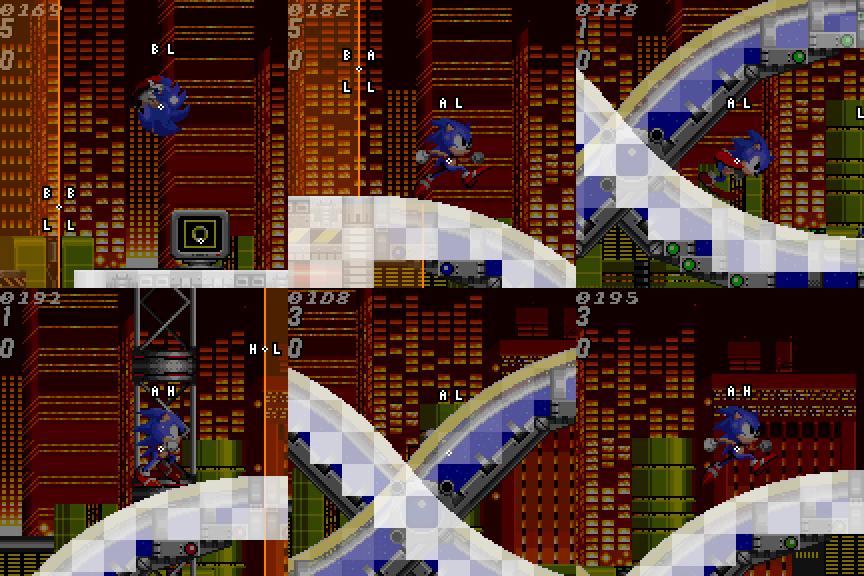
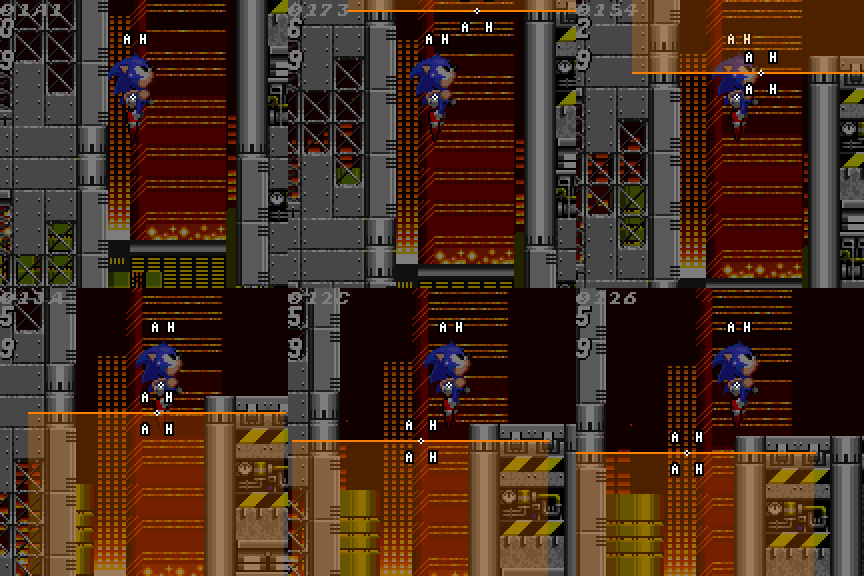
The 2 crossing waves in Chemical Plant are more simple than they look. Each path of the wave is a separate collision layer, and 2 switchers (one on top and one on the bottom) set the Player to the correct layer as they enter.
Along the wave at each peak or valley, priority_only switchers swap the Player's visual priority in order to weave the sprite in and out of the graphics, the entire time remaining the same single collision layer.
ZigZag Path
Sometimes a path ends in a spring, and sends you back where you came from but takes you on an entirely new path. This is achieved with layer switchers situated right next to the spring, ensuring you have to travel all the way along the zig zag path.
Notes
- On this guide and in it's images, collision layer labels [A, B] and visual priority labels [L, H] represent values [0, 1] respectively in the original games.
- This page is essentially part 2 of 2. This details how Solid Tiles and collision layers are used to create anything from simple slopes all the way to bigger Sonic set-pieces like loops. For part 1, describing what Solid Tiles are and how they are used directly, go to Solid Tiles.
