Difference between revisions of "SPG:Solid Objects"
From Sonic Retro
(→Item Monitor: Extra information) |
(Moved hitbox information to new page) |
||
| Line 2: | Line 2: | ||
'''Notes:''' | '''Notes:''' | ||
*''The research applies to all four of the [[Sega Mega Drive]] games and [[Sonic CD]]''. | *''The research applies to all four of the [[Sega Mega Drive]] games and [[Sonic CD]]''. | ||
| + | *''There are 2 main ways objects interact with the Player. [[SPG:Hitboxes|Hitboxes]] like rings and bumpers, and solidity like spikes or push blocks.'' | ||
| + | *''Sometimes objects which may appear to be solid (like bosses or bumpers) actually only have a hitbox, and when they overlap, simply push the Player in the other direction. As a general rule, any seemingly solid object that the Player cannot stand on or push against is most likely actually using a [[SPG:Hitboxes|hitbox]] with some sort of speed or repel related reaction rather than ''real'' solidity, which will be explained up ahead.'' | ||
==Introduction== | ==Introduction== | ||
| − | There are many objects in Sonic games and they interact with the Player in many different ways | + | There are many objects in Sonic games and they interact with the Player in many different ways. Solid Objects are a very different beast than Solid Tiles. |
| − | |||
| − | |||
| − | |||
| − | |||
| − | |||
| − | |||
| − | |||
| − | |||
| − | |||
| − | |||
| − | |||
| − | |||
| − | |||
| − | |||
| − | |||
| − | |||
| − | |||
| − | |||
| − | |||
| − | |||
| − | |||
| − | |||
| − | |||
| − | |||
| − | |||
| − | |||
| − | |||
| − | |||
| − | |||
| − | |||
| − | |||
| − | |||
| − | |||
| − | |||
| − | |||
| − | |||
| − | |||
| − | |||
| − | |||
| − | |||
| − | |||
| − | |||
| − | |||
| − | |||
| − | |||
| − | |||
| − | |||
| − | |||
| − | |||
| − | |||
| − | |||
| − | |||
==Solid Objects== | ==Solid Objects== | ||
Revision as of 07:35, 26 November 2022
| Sonic Physics Guide |
|---|
|
| Collision |
|
| Physics |
|
| Gameplay |
| Presentation |
| Special |
Notes:
- The research applies to all four of the Sega Mega Drive games and Sonic CD.
- There are 2 main ways objects interact with the Player. Hitboxes like rings and bumpers, and solidity like spikes or push blocks.
- Sometimes objects which may appear to be solid (like bosses or bumpers) actually only have a hitbox, and when they overlap, simply push the Player in the other direction. As a general rule, any seemingly solid object that the Player cannot stand on or push against is most likely actually using a hitbox with some sort of speed or repel related reaction rather than real solidity, which will be explained up ahead.
Contents
- 1 Introduction
- 2 Solid Objects
- 3 Sloped Objects
- 4 Jump Through Platforms
- 5 Pushable Blocks
- 6 Item Monitor
- 7 Objects That Collide
Introduction
There are many objects in Sonic games and they interact with the Player in many different ways. Solid Objects are a very different beast than Solid Tiles.
Solid Objects
Object-player collision doesn't work the same way as Solid Tiles. The Player does not collide with objects using his solid tile sensors, instead, special calculations are used to check if the Player's general shape is inside an object's solid box, and push him out.
This all occurs after the Player's code has been executed for that frame, including their tile collision and movement. Since objects run their code after the Player, it's the job of the objects to push the Player out of themselves. Like say the Player is running towards a solid block object with some medium speed. When their position changes at the end of their code, they will move inside the solid object. Then soon afterwards on the same frame the solid object runs its code, checks for the Player and acts solid accordingly, pushing the Player out.
General Solid Object Collision
Solid object collision does not involve the object hitboxes and instead uses the actual size of the objects. The Width Radius and Height Radius. The Player will use their Height Radius for this too, but horizontally they of course use their Push Radius instead.
The first thing the object collision code does is check if the Player is standing on the object. The Player has a flag which determines if they are standing an object, which is set upon landing on one. If they are, it will skip straight to checking if the Player has walked off the edges rather than general object collision (which we will go into detail about further down in Standing On Solid Objects). Otherwise, it will continue as follows.
The following is long. It is written in a way very close to how the original game has it coded because accuracy requires it. To orient yourself, a brief overview of the long process below goes as follows:
- The Player will check if they are overlapping the object.
- The Player will decide which side of the object they are nearest to on both axis (either left or right and either top or bottom).
- Then check how close in pixels they are to being outside of the object on that side (distance to left or right and distance to top or bottom).
- The game then decides whether they're closer to a horizontal side to be pushed out on the x axis or a vertical side to be pushed out on y axis.
- The Player will then be pushed out towards that side on that axis by the distance they overlap.
Now, let's get into the details.
Checking For An Overlap
First thing that needs to happen is the game needs to know if the Player is even touching the object to begin with.
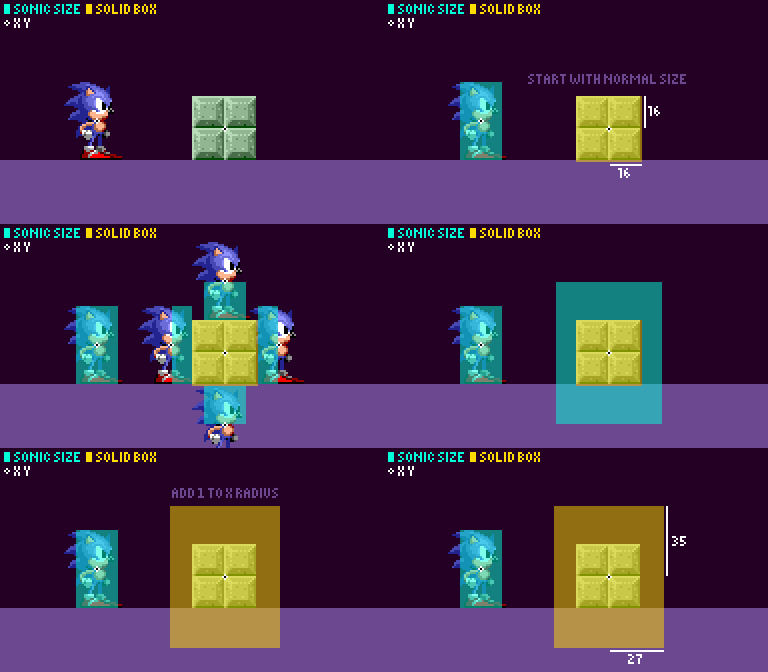
Both the Player and the solid object are of course rectangles, but it would be costly to check if 2 rectangles overlap each frame. Instead, a lot of calculations are saved because checks if a single position (the Player's position) is within one rectangle. This is achieved by combining the Player's current Push and Height Radius values with the object's Width and Height Radius values to form this new rectangle.
Horizontally, the object combines its own Width Radius with the Player's Push Radius and adds 1px extra (so Push Radius + 1). The extra pixel is added because the final position the Player pushes at is the Players Push Radius + 1 away from the object's side edge.
Vertically, it very similar. The object combines its own Height Radius with the Player's current Height Radius to get a combined radius. 1px isn't added here, but it is (kind of) later after a collision has occurred.
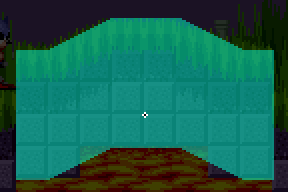
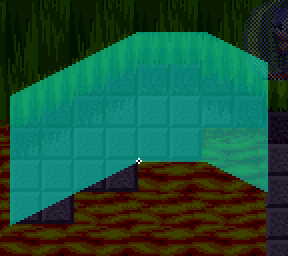
Here's a demonstration of how these new radiuses relate to the Player's size (while standing in this case) for a block.
From this point, when I refer to the object's combined radiuses I will call them combined X radius and combined Y radius, and I will refer to the entire box as the combined box. I will also refer to combined X diameter (which is combined X radius * 2) and combined Y diameter (which is combined Y radius * 2).
Now all the game needs to worry about is the Player's X Position and Y Position being within this new combined box, it no longer needs to worry about what the Player's sizes are at all.
Horizontal Overlap
The game will calculate the difference between the Player's X Position and the left edge of the combined box.
left_difference = (the Player's X Position - object's X Position) + combined_x_radius
Then, it will check if this new difference value has passed the left or right boundaries of the combined box, and exit the object collision if it has.
 // the Player is too far to the left to be touching?
 if (left_difference < 0) exit object collision
 // the Player is too far to the right to be touching?
 if (left_difference > combined_x_diameter) exit object collision
If no exit occurred, the Player is overlapping on the X axis, and it will continue. The game will remember this left difference.
Vertical Overlap
Then for vertical overlap, it calculates the difference between the Player's Y Position and the top edge of the combined box.
top_difference = (the Player's Y Position - object's Y Position) + 4 + combined_y_radius
The game also allows the Player to be slightly above the object by 4 pixels and still overlap, extending the top of the object 4 pixels for extra overlap. This is likely just in case the object moves down slightly or the object is slightly lower than a previous ledge the Player was standing on. The game does this by effectively pretending the Player is 4px lower than they really are when checking the y overlap. If the object is lower than the Player, top_difference would be negative before combined Y radius is added, so it is achieved by simply adding 4 to the distance. This is subtracted later.
Then, it will check if this new difference value has passed the top or bottom boundaries of the combined box, and exit the object collision if it has.
 // the Player is too far above to be touching
 if (top_difference < 0) exit object collision

 // the Player is too far down to be touching
 if (top_difference > combined_y_diameter) exit object collision
If no exit occurred, the Player is overlapping on the y axis, and it will continue to the next step. The game will remember this top difference.
The reason the game does it in this fashion rather than just checking between -radius and +radius for example is to preserve calculations needed. It has been done in such a way that it now has 2 variables it can keep using, left_difference and top_difference.
Finding The Direction of Collision
If the Player is found to be touching the object, the game will then decide whether they are to be popped out the top or bottom, or the left or right of the object. To do this, the game will first determine which side the Player is in comparison with the object's position.
If the Player's X Position is greater than the object's X position, they're on the right, otherwise, they're on the left. If the Player's Y Position is greater than the object's Y position, they're on the bottom, otherwise, they're on the top.
After the side is determined for each axis, the game will calculate a distance to the nearest edge.
Horizontal Edge Distance
If the Player is on the left, the edge distance is simply equal to the left difference which is the distance to the left side of the combined box and will be a positive number.
x_distance = left_difference
If the Player is on the right, the distance will be flipped around like so:
x_distance = left_difference - object_x_diameter
This is effectively the distance to the right side of the combined box and will be a negative number.
Whichever side it is, we will call this new distance the x distance, and the game knows which side, left or right, the Player is based on the sign (+/-) of this value.
Vertical Edge Distance
It is the same along the y axis. If the Player is on the top, the edge distance is simply equal to the top difference which is the distance to the top side of the combined box and will be a positive number.
y_distance = top_distance
If the Player is on the bottom, the distance will be flipped around (and that extra 4px from before will be subtracted).
y_distance = top_difference - 4 - object_y_diameter
This is effectively the distance to the bottom side of the combined box and will be a negative number.
Whichever side it is, we will call this the y distance, and the game knows which side, top or bottom, the Player is based on the sign (+/-) of this value.
Note: You may have noticed that if the Player is on the top, the extra 4px isn't subtracted yet. It will be subtracted upon landing on top.
Choosing The Direction
Finally, with all of this information, the game can decide which way the Player should be popped out. Either vertically or horizontally.
It does this by finding which side the Player is nearer to, which makes sense.
 if (absolute(x distance) > absolute(y distance))
 {
   collide vertically
 }
 else
 {
   collide horizontally
 }
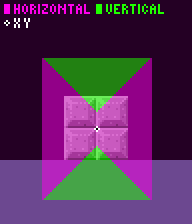
Here's a visual example of what axis Sonic would collide depending on his X Position and Y Position within the solid area of a block.
The horizontal axis is favoured just a little more than the vertical, which is simply due to Sonic's Width and Height Radius not being square. Keep in mind this exact pattern is only valid for an object of this exact size and while Sonic is standing.
From there, the game can easily tell which way to pop out the Player on either axis depending on the sign (+/-) of the distance value. When colliding vertically, the game knows that Player is on top if the y distance is positive, and underneath if the y distance is negative. Same goes for left and right and the x distance.
Popping The Player Out
Once a collision has occurred and the game had decided the direction the Player then needs to be "popped out" of the combined box so that their position is no longer within it. But where does it put the Player? Well, there's also an even greater use for the x distance or y distance. They are the exact distance the Player needs to move to exit the object, but reversed. So when they are popped out, they will simply be subtracted from their position.
Popped Left and Right
Popping the Player out left or right will simply reset his speeds and position, and set him to pushing if he is grounded.
There are a couple of conditions. The game will only bother popping the Player out horizontally if absolute y distance is greater than 4. If not, it will exit.
If the game does decide to affect the Player's speeds, this also depends on a few factors. Firstly, if x distance is 0, Sonic's speeds won't be affected. Secondly, if the Player is on the left and the game has decided they need to be popped out to the object's left side, it will only stop the Player's speeds if they are is moving right (X Speed > 0), towards the object. The same is true for colliding with the right, but if the Player is moving to the left (X Speed < 0). Basically, he must be moving towards the object. When his speeds are stopped, X Speed and Ground Speed are set to 0.
Regardless of x distance or the Player's current X Speed, x distance will be subtracted from the Player's position, popping the Player out of the object.
A few other things happen behind the scenes, such as the object is told it is being pushed, and the Player is told they are pushing.
Popped Downwards
If the Player bumps the bottom of an object, the game will check if the Player is moving vertically (Y Speed is not 0). If not, the game then checks if the Player is standing on the ground, and if they are, kills them from crushing, then exits. This is why you can see secret crushing objects in ceilings, as when the Player touches them while standing on anything he will be crushed as described. Only objects can do this.
Otherwise, the game checks if 'Y Speed' is less than 0. If not, it will exit as the Player is moving down and away from the object.
Finally, if the y distance is smaller than 0, the game will subtract y distance from his Y Position and set his Y Speed to 0.
Popped Upwards
If the game decides the Player is to be popped out upwards, they will land on the object.
Before it does this, it checks if y distance is larger than or equal than 16. If it is, the game will exit the landing code.
Then the game subtracts the 4px it added earlier from y distance.
Next, it will completely forget about the combined X radius we were using before, and use the actual X radius of the object, not combined with anything at all. So 16 in the case of a push block for example. It will then compare the Player's position using this radius.
First it will get a distance from the Player's X Position to the object's right edge.
x_comparison = object's X Position + object's X Radius - the Player's X Position
Then it will check this comparison to tell if the Player is within the x boundaries.
 // if the Player is too far to the right
 if (x_comparison is less than 0) exit landing

 // if the Player is too far to the left
 if (x_comparison is greater than or equal to action_diameter) exit landing
This means the Player will exit the landing and will just slip off the side keep falling if their X Position isn't directly above the object, which is actually quite strange as it's as if the Player is only 1 pixel thick. You may wish to keep using the combined radius here instead.
The last check is if the Player's Y Speed is negative, they wont land and it will exit.
Finally, if the code has reached this far, the Player will land. From this point, it's rather simple.
The game subtracts y distance from the Player's Y Position. It also subtracts an extra 1px afterwards to align them correctly (which is why that extra 1px was added to the combined_x_radius in the first place!).
Then it resets the Player to be grounded, similarly to normal Landing On The Ground but simply sets the Player's Y Speed to 0, and his ang to 0. Also, the game will set a flag telling the game the Player is on the object.
Finally, the Player's Ground Speed is set to equal their X Speed.
Specifics
As mentioned in Basics, the Player's collisions with tiles and objects only concern themselves with the Player's floored position (their pixel position), and the same applies to the object itself. So, upon the point of contact, the Player's floored X Position finds itself overlapping the combined box. He is then pushed out by this difference. Since this difference only accounts for the distance between floored values, it's a whole number. Meaning if the Player was 1px inside the object's right side while he has an X Position of 1.75, after being pushed out he'd have an X Position of 2.75, as a rough example.
So after being popped out, if the Player keeps trying to walk towards it, he has to cover the rest of the distance of the pixel he's currently in before his pixel position overlaps the object again. This amounts to contact being made every 4 frames or so.
Standing On Solid Objects
Unlike tiles, which are an organised simple grid of data that can be easily checked each frame, objects are more expensive to check for.
So when standing on top of an object, rather than check beneath the Player each frame to ensure he's still touching it and to move him with it, the game sets a standing-on-object flag which will effectively glue the Player to an object when he lands on it.
The flag's job is making him stick to the object's surface and stay grounded, even though he's not touching any Solid Tiles (as far as his tile sensors are concerned, the Player is in the air while standing on an object). This flag will only be unset when walking off the edge of an object or jumping/getting hurt.
Walking Off The Edges
If the Player is standing on an object, the object will only check if the Player has walked off of it.
First, it calculates a distance to the object's left side.
x_left_distance = (the Player's X Position - the object's X) + combined X radius //get the position difference
The Player will have walked off the edge if this distance is less than 0 or is greater than or equal to (combined X radius * 2). When this happens, the standing-on-object flag is unset and the Player is no longer grounded.
Moving On Platforms
After all checks are complete and if the Player is still on it, the game handles moving the Player with the object and keeping them stuck to it.
Note:
- As mentioned when describing hitboxes, they are uneven and odd sized compared to the sprite. Using the method described above - the same is true for solid object boxes, so the Player will push against objects 1px further away when facing leftwards than he will tiles.
- You may notice that the Player is 1px inside objects like Switches or GHZ Rocks when he stands on them, regardless of the object's Width Radius and Height Radius being correct. This is thanks to the standing on object code missing the part where it is supposed to subtract 1 extra pixel from the position the Player stands on the object (the Player is supposed stand at object Y Position - object Y Radius - player Y Radius - 1). Most objects "correct" this by actually adding 1 to the height radius used when acting solid. This corrects the issue but means the Player's initial collision with an object will be slightly different. All they had to do was add 1 line of code to fix this and never have to do anything weird with the object heights. You never have to be concerned about this if you ensure the Player will be repositioned correctly according to the object's Height Radius when standing on an object, but it may mean the way Sonic stands on things like switches will differ.
Bugs Using This Method
Overall, this method for collision with objects is pretty well made. However, there are a few obvious problems that become apparent when you mess with objects enough.
Slipping
As mentioned, since landing on the top of objects doesn't measure using the same radius as the rest of object collision, bizarrely this means if you jump down towards the corner of an object, you'll slip right off the sides because it exits the landing code if the Player's position isn't right above the object. This appears to be deliberate as the smaller radius is very explicitly used, but doesn't add any benefit as far as I can tell.
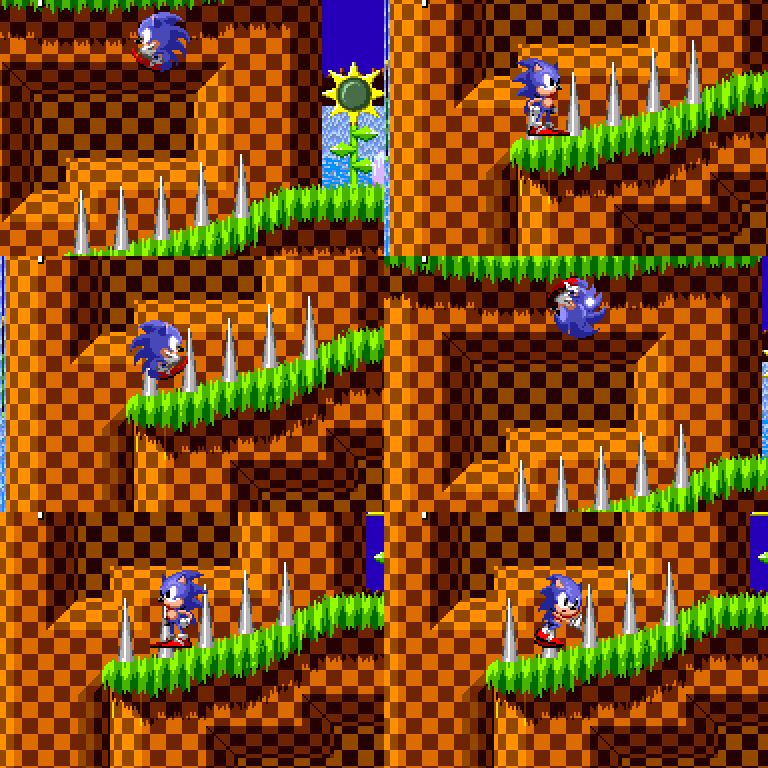
The way the object collision code is executed, being from inside each object in order, there's effectively a priority system in place. If two objects want to push the Player two conflicting ways, the one who executes their solid object code last will win out. The result of this, and partly thanks to the edge slipping mentioned above, the Player can very easily slip between two objects which haven't been placed perfectly touching next to each other.
The Player will collide on top with both spikes, but his position isn't directly over either of them when landing, so he will slip down the sides. Next, both spikes will try and push him with their sides, but only the last spike to do so will actually result in a net position change.
Bottom Overlap
When the vertical overlap is being checked, the game pretends the Player is 4px lower than they actually are. This allows 4px of extra "grip" to the top of objects, however it also effectively removes 4px from underneath them. When jumping up into an object, the Player will be able to enter it by around 4px before being popped out. Though, this is hard to notice during normal gameplay.
This can be corrected by accounting for the added 4px when checking overlap and calculating distances with the bottom of the object.
False Object Standing Flag
This final bug is less of a design flaw and more of a major bug.
If for some reason the object you are standing on is deleted or otherwise unloaded, and the game fails to reset the standing-on-object flag you can then start walking through the air. This is because the flag is telling the game that the Player is still grounded even though there's no longer any object to be grounded to. Because the Player's grounded, he won't fall. Additionally, they also won't be able to walk off the object's sides as the object isn't even there to check for it.
Sloped Objects
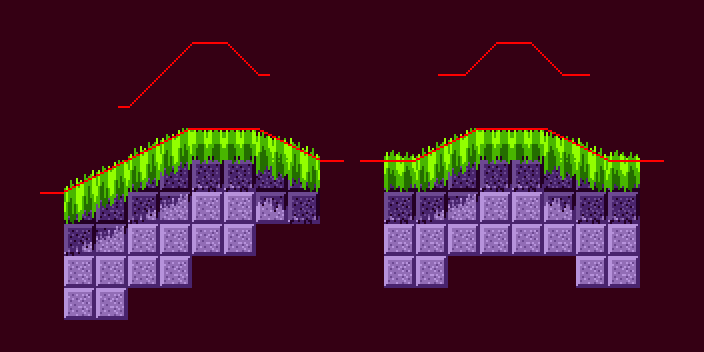
You may have noticed some objects in the classic games are sloped, rather than box shaped. Like the Collapsing GHZ platform, the large platforms from marble, diagonal springs, or even the Spring Ramps in S2.
This is achieved by using the same code as normal, but injecting a different value to use as the y position of the object. To get this y position, the game uses a height array.
Height Array
The height array for these objects are
 [32 32 32 32 32 32
 33 34 35 36 37 38 39 40 41 42 43 44 45 46 47 48 49 50 51 52 53 54 55 56 57 58 59 60 61 62 63 64 64 64 64 64 64 64 64 64 64 64 64 64 64 64 64 64 64 63 62 61 60 59 58 57 56 55 54 53 52 51 50 49
 48 48 48 48 48 48]
and
 [32 32 32 32 32 32
 32 32 32 32 32 32 32 32 33 34 35 36 37 38 39 40 41 42 43 44 45 46 47 48 48 48 48 48 48 48 48 48 48 48 48 48 48 48 48 48 48 47 46 45 44 43 42 41 40 39 38 37 36 35 34 33 32 32 32 32 32 32 32 32
 32 32 32 32 32 32]
A height array is centred on the object's X Position.
The game stores these height arrays "compressed". They are half the horizontal size of the object.
This is possible because the game simply "stretches out" the array information when the array is read. So if the array steps down in 1s (like 12, 11, 10) that represents a slight slope, but if the array steps up in 2s (like 12, 14, 16) that represents a 45 degree slope.
Extra Height Values
There is some extra slope information to the sides of the object, which isn't overlapping the object at all. Typically 6 array values either side (representing 12 extra pixels either side). This is true for any fully solid sloped object, but not for sloped jump through platforms.
The reason is simply because the Player can be standing on an object while their X Position isn't directly over it, and this gives the game height array values to read for those positions. Platforms work slightly differently as explained in Walking Off Edges and thus do not need the extra values.
Notes:
- In this guide, this extra height information will not be shown when displaying the solid area of a sloped object. This is because it only matters when the Player is standing on the object (but this extra information will be separated from the main values whenever height arrays are written down)
- This could be solved without adding extra height values by just using the first or last height array value if the Player's X Position is outside of the object boundary.
Array Collision Process
Any time a sloped object checks to collide with the Player (both when the player is and isn't already standing on the object), instead of using the Height Radius to calculate the top and bottom edge, it instead uses the value from the array at Sonic's X Postion.
We'll call this array value the current_height. The value to shift the object on the Y axis by can be thought of as:
Height Radius - current_height
We'll call this value the current_shift. This continuously updates from the array values as the Player's X position changes and passes over the object, resulting in smooth motion.
And from there on as far as the Player is concerned, the object is shifted on the Y axis by current_shift. Essentially you can think of the height array as a full Y Distortion array for the entire solid object. Well, sort of. It's actually all an illusion.
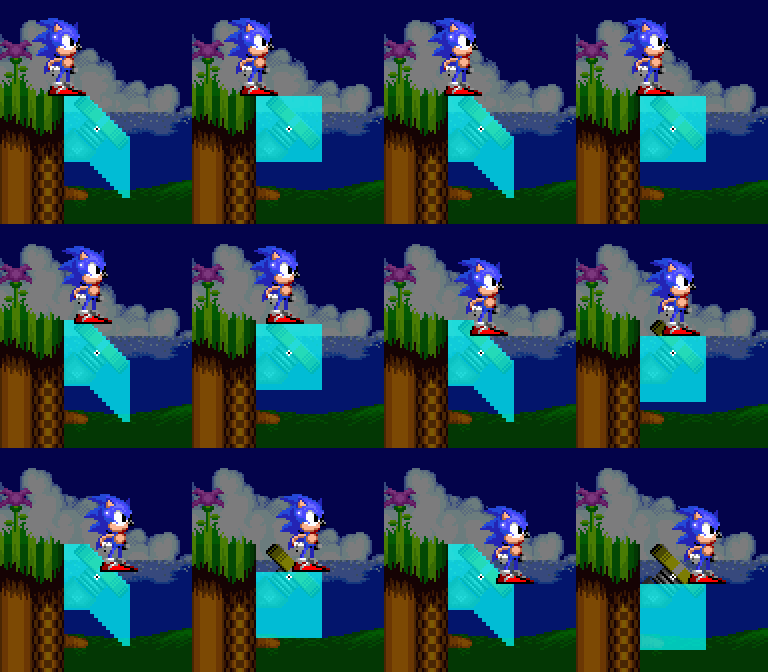 A diagonal spring's collision, if it didnt propell you.
As you can see, the slope of the object is merely a trick. The animation on the right shows what is actually happening. The entire object is (effectively) moving based on the current_shift. It's not actually moving, it's position doesnt change - but in the context of the collision routine, it effectively does.
Because the entire object "moves", both sides of the object get sloped / distorted the same way.
It makes sense here because of the platform's design, but less so on platforms of other shapes, like the other Marble platform.
The bottom right corner of this platform's solidity clearly doesn't match up, not much can be done about that in the original game without major modifications and more complications in this system.
Here you can't access the bottom anyway, but objects such as Diagonal Springs do suffer from accessible weird underside sloped solidity. If you find a diagonal spring, try jumping under it. You won't be able to jump as high when hitting the spring side than the base side.
Differences To Solid Tiles
Compared to Solid Tiles (which a have comprehensive combination of angle and height data), with sloped objects there are no angle values to be found because the array is height information only, and no Sensors are being used here. This means that the Player will have an angle value of 0 as they walk on a sloped object, and won't jump off or be affected by slope physics at all. In addition, the Player will be slightly "deeper" into the slopes than they would on solid tiles. This is because their centre point is always snapped to the slope, rather than one of their side floor sensors.
As you can see, the Player's angle remaining 0 changes the way they interact with the slopes considerably.
Jump Through Platforms
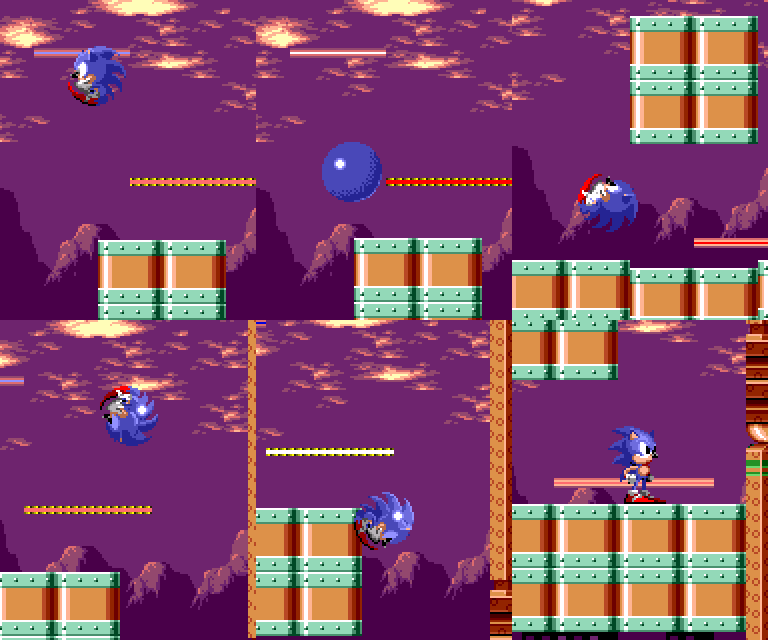
Jump through platforms are small objects which are only solid from the top. Since all the Player can do with platforms is land on them, they use their own code to check for just that, and in a more scrutinised way.
First, it will check if the Player 's Y Speed is less than 0. If it is, it will exit the collision. This means it will only check for overlap with the Player while they are moving down or staying still. This is why the Player can jump right up through it.
Horizontal Overlap
Next, it will check for X overlap in the exact same way that it does when landing on a normal solid object, using the object's normal X radius. Complete with all it's issues. If there's an overlap, it will continue.
Vertical Overlap
Next, the Y overlap is where things get interesting.
The game calculates the platform's surface Y coordinate by subtracting the Height Radius from the Y Position.
Then the Player's bottom Y is calculated by adding their Height Radius to their Y Position. It also adds 4 to this bottom Y for much the same reason as the normal solid object collision, it allows the Player to collide even when they're 4 pixels above.
The first check is if the platform's surface Y is greater than the Player's bottom Y. If it is, it will exit as the platform is too low.
Next, it will check a distance between the Player's bottom and the platform's surface (platform's surface Y minus the Player's bottom Y). If the distance is less than -16 or is greater than or equal to 0, it will exit as the Player is too low.
If it reaches past all those checks, the Player will land.
Popping The Player Out
The distance from before is added to the Player's Y Position, plus an extra 3px. After this the normal landing-on-object things occur, such as setting his speeds and standing-on-object flag.
Walking Off Edges
Platforms also use a different walking off edges code to normal Solid Objects. And since it's up to objects what width radius they want to use, things can get a little inconsistent. It's mentioned above that objects add the Player's radius to get a combined radius. This actually isn't always the case. Sometimes objects will just provide their unaltered width radius which is the case with most platforms. This means not only will the Player fall through the corners of platforms like any other object, but he will also walk off them just as easily, way sooner than he really should as if they are only 1px in total width, unlike the normal object collision.
This was probably missed because the Player doesn't need to push against these platforms, so it's much harder to notice if the Player's Push Radius hasn't been applied.
After this of course, the Player is still standing on it, so the game handles updating the Player's position on the object and moving him if the object is moving.
Worthy of note, is that many objects share the platform's "walking off edges" code.
Note: The code itself isn't the issue, the issue is moreso that the objects can far more easily pass in a radius that isn't combined when they use this because the general solid object code also uses the radius for pushing and for walking off, which requires it to be combined.
Pushable Blocks
Pushable blocks (specifically the type found in Marble Zone) are essentially normal solid objects, except for the fact when you are pushing them, they move. These blocks move rather slowly, and you might assume that it sets the block and the Player's speeds to some value like 0.3, but this is not the case.
The block actually moves 1 entire pixel whenever you touch it from the side. But that sounds much faster than they actually move right? Well, in practice the block will only move once around every 3 frames. And the reason for this is rather technical to say the least and requires that you properly emulate the way the original game's positions and object collisions work.
Upon Contact
When the Player has contacted the push block, the Player has been popped out, and his speeds have been set to 0, the push block will then do some extra things. If the Player pushed to the left, both the Player and the block will move 1 pixel to the left, the Player's X Speed is set to 0 and Ground Speed is set to -0.25. If they pushed to the right, both the Player and the block will move 1 pixel to the right, the Player's X Speed is set to 0 and Ground Speed is set to 0.25.
After being popped out the Player is no longer touching the object. When this happens, the Player's pixel position has been altered, but their subpixel position remains the same. So if the Player was half a pixel into the object before, they're now half a pixel outside of it. Before they make contact with the object again, they needs to cover this subpixel distance. This would normally take around 4 frames for a static wall, but here it instead takes 2-3 frames because they are given a headstart when their Ground Speed is set to .25.
Because the mechanics of movement within 256 subpixels are difficult to explain or visually demonstrate, here's what a few frames of pushing a pushable block to the right would look like:
 Frame 0:
   -- the Player gains speed along the floor naturally and moves his position
   Ground Speed: 0.34375 -- added acc to Ground Speed
   X Speed: 0.34375 -- X Speed set to Ground Speed (on flat ground)
   X Position: 2669.97265625 -- added X Speed to X Position. the Player's subpixel position (.972) is very close to entering the next pixel, which is where he will collide again.

 Frame 1:
   -- the Player gains speed along the floor naturally and moves his position
   Ground Speed: 0.390625 -- added acc to Ground Speed
   X Speed: 0.390625 -- X Speed set to Ground Speed (on flat ground)
   X Position: 2670.36328125 -- added X Speed to X Position. the Player's X pixel has changed

   -- the Player makes contact with push block and is popped out to the left.
   Ground Speed: 0 -- Ground Speed set to 0
   X Speed: 0 -- X Speed set to Ground Speed (on flat ground)
   X Position: 2669.36328125 -- 1 subtracted from X Position

   -- The push block runs its own code and both are moved to the right by 1 pixel, and the Player's Ground Speed is set.
   Ground Speed: 0.25 -- Ground Speed set to 0.25
   X Speed: 0 -- X Speed set to 0
   X Position: 2670.36328125 -- 1 added to X Position
At this point, the Player has just pushed the block and has been moved out of it, then along with it. The fractional part of their position is currently .363 , just left of halfway through the pixel.
 Frame 2 (1 frame since last push):
   -- the Player gains speed along the floor naturally and moves his position
   Ground Speed: 0.296875 -- added acc to Ground Speed
   X Speed: 0.296875 -- X Speed set to Ground Speed (on flat ground)
   X Position: 2670.66015625 -- added X Speed to X Position

 Frame 3 (2 frames since last push):
   -- the Player gains speed along the floor naturally and moves his position
   Ground Speed: 0.34375 -- added acc to Ground Speed
   X Speed: 0.34375 -- X Speed set to Ground Speed (on flat ground)
   X Position: 2671.00390625 -- added X Speed to X Position. the Player's X pixel has changed

   -- the Player makes contact with push block and is popped out to the left.
   Ground Speed: 0 -- Ground Speed set to 0
   X Speed: 0 -- X Speed set to 0
   X Position: 2670.00390625 -- 1 subtracted from X Position

   -- the Player makes contact with push block and both are moved to the right by 1 pixel.
   -- This only took 2 frames, because the Player's subpixel was positioned just right on the previous push, which is very rare.
   Ground Speed: 0.25 -- Ground Speed set to 0.25
   X Speed: 0 -- X Speed set to 0
   X Position: 2671.00390625 -- 1 added to X Position
The Player has just pushed the block again, and has been moved out of it, then along with it. It took 2 frames. This time, the fractional part of their position is currently .003 , the very left of the pixel. This means they have farther to travel to reach the block again.
 Frame 4 (1 frame since last push):
   -- the Player gains speed along the floor naturally and moves his position
   Ground Speed: 0.296875 -- added acc to Ground Speed
   X Speed: 0.296875 -- X Speed set to Ground Speed (on flat ground)
   X Position: 2671.30078125 -- added X Speed to X Position

 Frame 5 (2 frames since last push):
   -- the Player gains speed along the floor naturally
   Ground Speed: 0.34375 -- added acc to Ground Speed
   X Speed: 0.34375 -- X Speed set to Ground Speed (on flat ground)
   X Position: 2671.64453125 -- added X Speed to X Position

 Frame 6 (3 frames since last push):
   -- the Player gains speed along the floor naturally and moves his position
   Ground Speed: 0.390625 -- added acc to Ground Speed
   X Speed: 0.390625 -- X Speed set to Ground Speed (on flat ground)
   X Position: 2672.03515625 -- added X Speed to X Position. the Player's X pixel has changed

   -- the Player makes contact with push block and is popped out to the left.
   Ground Speed: 0 -- Ground Speed set to 0
   X Speed: 0 -- X Speed set to 0
   X Position: 2671.03515625 -- 1 subtracted from X Position
   -- the Player makes contact with push block and both are moved to the right by 1 pixel.
   -- This time, it took 3 frames, which is far more common.
   Ground Speed: 0.25 -- Ground Speed set to 0.25
   X Speed: 0 -- X Speed set to 0
   X Position: 2672.03515625 -- 1 added to X Position
The Player has just pushed the block again, and has been moved out of it, then along with it. This time it took 3 frames thanks to his subpixel/fractional positions being allowed to wrap around and never reset. This 3 frame delay is the most common and is effectively the push speed.
The reverse would have the exact same timings. It seems they deliberately controlled this delay by adding .25 to his Ground Speed.
If you simply want to roughly copy it without the specifics or nuances of this system or you are using different object collision, just make a timer which triggers a movement every 3 frames while the Player is pushing.
To see what happens to a push block once it is pushed off a ledge, see Game Objects.
Item Monitor
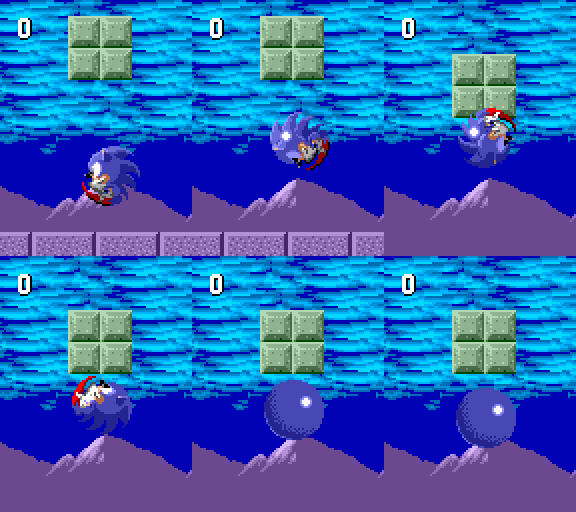
Item monitor solidity differs from normal solid objects. For one, item monitors will never push the Player out downward - they will only push the Player up to land on it, or left and right. This is so that when monitors land on the Player, they won't be crushed. Secondly, rather than only allowing the Player to land if their X Position is directly over it, there are 4 pixels of extra room either side for landing on the top.
Lastly, if the Player's Y Speed is greater than or equal to 0 and the Player is rolled up (curled in a ball) the Player won't collide (they won't be repositioned, or have their speeds changed whether they were set to land on it, or hit the sides).
Objects That Collide
Some objects like walking enemies, pushable blocks, and item monitors all have to land on and stick to solid ground. They typically do this by casting a single downward sensor, much like the Player does, at their central bottom point. The same applies to wall collision. The way that objects use tile collision varies greatly and will be described for each individual Game Object.
