Difference between revisions of "Final Egg"
From Sonic Retro
Doomdorm64 (talk | contribs) (→Overview) |
|||
| (17 intermediate revisions by 11 users not shown) | |||
| Line 1: | Line 1: | ||
| − | {{ | + | {{Breadcrumb |
| + | |Sonic Adventure|:Category:Sonic Adventure levels|l2=Levels|{{PAGENAME}}}} | ||
{{LevelBob | {{LevelBob | ||
| − | | levelscreen= | + | | levelscreen=SA1 StageImage SonicFE2.png |
| screenwidth=320 | | screenwidth=320 | ||
| + | | levelscreen2=SADX_Final_egg.jpg | ||
| + | | screenwidth2=320 | ||
| + | | levelscreentitle = Dreamcast | ||
| + | | levelscreen2title = SADX | ||
| levelno=First/Third/Tenth | | levelno=First/Third/Tenth | ||
| game=Sonic Adventure | | game=Sonic Adventure | ||
| acts=2 | | acts=2 | ||
| − | | | + | | location=[[Mystic Ruins]] |
| − | | | + | | theme1=industrial |
| − | | | + | | boss=Egg Viper |
| − | | | + | | playedas=[[Sonic the Hedgehog|Sonic]], [[Amy Rose|Amy]] and [[E-102 γ]] |
| − | | | + | | name_jp=ファイナルエッグ ''Fainaru Eggu'' |
| − | + | | prev=Lost World | |
| − | |||
| − | |||
| − | |||
| − | |||
| − | | | ||
| − | | | ||
}} | }} | ||
| − | {{ | + | '''{{PAGENAME}}''' is [[Dr. Eggman]]'s base in ''[[Sonic Adventure]]''. It is [[Sonic the Hedgehog|Sonic]] and [[Amy Rose|Amy]]'s final level, and [[E-102 Gamma]]'s first. It appears to be thematically based off several classic Sonic levels, including [[Death Egg Zone (S2)|Death Egg Zone]], [[Metropolis Zone]] and [[Scrap Brain Zone]]. |
| − | |||
| − | |||
| − | ( | ||
| − | + | Story-wise, Eggman makes Gamma go through a training course in this level shortly after his activation. Much later, Sonic comes here to finish off Eggman after a mysterious trip to the past, while Amy comes here to search for [[Lily|the bird]]'s missing parents. | |
| − | Its boss is the [[Egg Viper]]. | + | Its boss is the [[Egg Viper]], fought by Sonic. |
| − | + | ==Overview== | |
| + | ===Mechanical Resonance=== | ||
| + | [[File:SA Final Egg Sonic.png|left|thumb|200px]] | ||
| + | [[File:SA Final Egg Amy.png|thumb|200px]] | ||
| + | This is the beginning area for both Sonic And Amy. Both versions begin identically, though some of the level elements and enemies are changed. In the last area with the giant robotic arms, Sonic's path will lead him straight ahead, into a room with various springs leading to an elevated exit. Beyond there is an area filled with conveyor belts, plus a bottomless pit. After maneuvering past this room there will be a set of large rotating drums, very similar to the ones from ''[[Sonic the Hedgehog 2 (16-bit)|Sonic 2]]''<nowiki>'</nowiki>s [[Metropolis Zone]] and [[Sonic & Knuckles]]' [[Flying Battery Zone]]. The area ends in a corridor after the drums. | ||
| − | + | In Amy's level, a left turn is taken in the last mechanical arms area, leading her towards an elevator which will take her to a higher section of the same area. She arrives back on Sonic's path, just beyond the point where they deviated. In the next room, instead of springs leading to the high door, the door on the ground level will be open instead. This leads to an area with 5 doors; four of these doors are dead ends containing a Bladed Spina, while one leads to the next checkpoint. The correct door is randomized on each playthrough of the level. Finally, there is one small corridor with a high exit on the left side. To reach it the player must use Amy's hammer jump. After going through here, the balloon will appear right in front of the player. There are 3 ring boxes hidden in the back of the room. | |
| − | |||
| − | + | ===Crank the Heat Up!!=== | |
| + | Sonic is the only character to access this part. The structure of the first section is a tall cylinder with a fan at the top, a switch at the bottom, and various floating platforms in between. It's not possible to simply fall to the bottom, as there are invisible 'fall to your death' triggers just below every set of platforms. There are thin, downward-spiraling hallways at the edges of the room, which are used after each floating platform section to progress to the next lowest level. After reaching the bottom of the room and touching the switch, the floor opens up and allows Sonic to continue moving downwards even further. After a short ride on a tiny platform and a set of long drops onto more floating platforms, Sonic arrives at a large elevator, which takes him to the next area. | ||
| − | == | + | ===Gamma's Training area=== |
| − | This is | + | [[File:SA Final Egg Gamma.png|thumb|200px]] |
| + | This is the only area which Gamma visits. His goal is to destroy the Sonic doll. The level acts as a training exercise, giving you harmless [[Tails]] and [[Knuckles]] stuffed dolls to shoot, increasing your remaining time. The Sonic doll is attached to a peg moving horizontally across a long wall in the last room; shoot it 3 times to destroy it. | ||
| − | + | Sonic's part of the level is not that simple. After getting off the elevator, there is a room dead ahead, filled with explosive Beats. To leave, Sonic must find the ladder on the far side from the door, climb it and head for the high exit. The next section has fans that keep Sonic afloat, similar to those seen in [[Wing Fortress]]. After passing through 4 more rooms with fans dividing them, another area containing Beats is reached. There is a slope right in front of the player at the far end of the room; just walk past the enemies to reach it. Sonic will continue down a long tunnel and into a tall shaft, which he plummets to the bottom of while dodging floating spiked balls. After escaping this room is ''another'' area filled with Beats; walk past them them and open the door on the far wall. The room you enter is where Gamma's part of the level ends. There are two rooms to pass through here, ending in a third one with the start of a ring trail. [[Light Speed Dash]] on the path of rings and hit the capsule to end the level, or wait for a [http://www.youtube.com/watch?v=NBtkugzC6Uo&fmt=18 particularly slow-moving platform] to descend, which leads to an area containing four extra lives. | |
| − | |||
| − | |||
==Enemies== | ==Enemies== | ||
| − | * [[ | + | * [[Spinner|Bladed Spinner]] (Amy, Sonic) |
| − | * [[ | + | * [[Electro Spinner]] (Sonic) |
| − | * [[ | + | * [[Egg Keeper]] (Amy, Sonic) |
| − | * [[ | + | * [[Beat]] (Sonic) |
* Target Doll (E-102, Sonic) | * Target Doll (E-102, Sonic) | ||
| − | {{ | + | {{SAdv_Level|character=Sonic the Hedgehog|bgcolor=blue|charcolor=white|levelno=10|areas=2|rings=751 + (12-480)|arank=4m 30s}} |
| + | {{SAdv_Level|character=Amy Rose|bgcolor=hotpink|charcolor=white|levelno=3|areas=2|rings=72 + (4-160)|arank=2m 30s}} | ||
| + | {{SAdv_Level|character=E102 "Gamma"|bgcolor=grey|charcolor=black|levelno=1|areas=1|rings=120|arank=3m 0s}} | ||
| + | |||
| + | ==References== | ||
| + | <references/> | ||
| − | + | {{SAOmni|1}} | |
Latest revision as of 12:23, 1 October 2019
| |
Sonic Adventure |
| Levels |
| Final Egg |
| show;hide
|
| Final Egg |
|---|
| First/Third/Tenth stage, Sonic Adventure |
| Number of Acts: 2 |
| Location: Mystic Ruins |
| Level theme: industrial |
| Played as: Sonic, Amy and E-102 γ |
| Boss: Egg Viper |
Non-English names:
|
| ← Lost World |


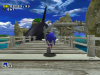
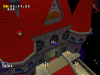
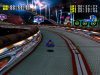
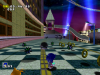
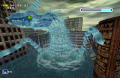
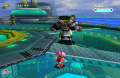
Final Egg is Dr. Eggman's base in Sonic Adventure. It is Sonic and Amy's final level, and E-102 Gamma's first. It appears to be thematically based off several classic Sonic levels, including Death Egg Zone, Metropolis Zone and Scrap Brain Zone.
Story-wise, Eggman makes Gamma go through a training course in this level shortly after his activation. Much later, Sonic comes here to finish off Eggman after a mysterious trip to the past, while Amy comes here to search for the bird's missing parents.
Its boss is the Egg Viper, fought by Sonic.
Contents
Overview
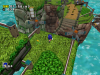
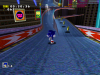
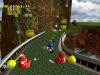
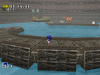
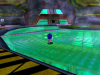
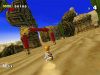
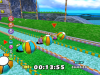
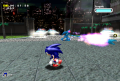
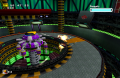
Mechanical Resonance


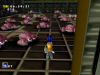
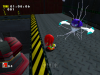
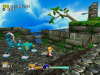
This is the beginning area for both Sonic And Amy. Both versions begin identically, though some of the level elements and enemies are changed. In the last area with the giant robotic arms, Sonic's path will lead him straight ahead, into a room with various springs leading to an elevated exit. Beyond there is an area filled with conveyor belts, plus a bottomless pit. After maneuvering past this room there will be a set of large rotating drums, very similar to the ones from Sonic 2's Metropolis Zone and Sonic & Knuckles' Flying Battery Zone. The area ends in a corridor after the drums.
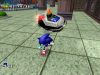
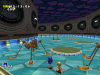
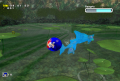
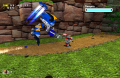
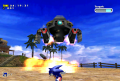
In Amy's level, a left turn is taken in the last mechanical arms area, leading her towards an elevator which will take her to a higher section of the same area. She arrives back on Sonic's path, just beyond the point where they deviated. In the next room, instead of springs leading to the high door, the door on the ground level will be open instead. This leads to an area with 5 doors; four of these doors are dead ends containing a Bladed Spina, while one leads to the next checkpoint. The correct door is randomized on each playthrough of the level. Finally, there is one small corridor with a high exit on the left side. To reach it the player must use Amy's hammer jump. After going through here, the balloon will appear right in front of the player. There are 3 ring boxes hidden in the back of the room.
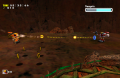
Crank the Heat Up!!
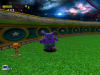
Sonic is the only character to access this part. The structure of the first section is a tall cylinder with a fan at the top, a switch at the bottom, and various floating platforms in between. It's not possible to simply fall to the bottom, as there are invisible 'fall to your death' triggers just below every set of platforms. There are thin, downward-spiraling hallways at the edges of the room, which are used after each floating platform section to progress to the next lowest level. After reaching the bottom of the room and touching the switch, the floor opens up and allows Sonic to continue moving downwards even further. After a short ride on a tiny platform and a set of long drops onto more floating platforms, Sonic arrives at a large elevator, which takes him to the next area.
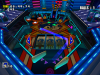
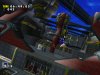
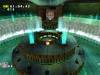
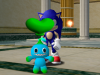
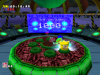
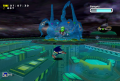
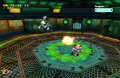
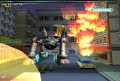
Gamma's Training area

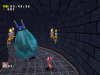
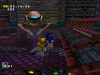
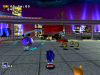
This is the only area which Gamma visits. His goal is to destroy the Sonic doll. The level acts as a training exercise, giving you harmless Tails and Knuckles stuffed dolls to shoot, increasing your remaining time. The Sonic doll is attached to a peg moving horizontally across a long wall in the last room; shoot it 3 times to destroy it.
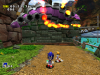
Sonic's part of the level is not that simple. After getting off the elevator, there is a room dead ahead, filled with explosive Beats. To leave, Sonic must find the ladder on the far side from the door, climb it and head for the high exit. The next section has fans that keep Sonic afloat, similar to those seen in Wing Fortress. After passing through 4 more rooms with fans dividing them, another area containing Beats is reached. There is a slope right in front of the player at the far end of the room; just walk past the enemies to reach it. Sonic will continue down a long tunnel and into a tall shaft, which he plummets to the bottom of while dodging floating spiked balls. After escaping this room is another area filled with Beats; walk past them them and open the door on the far wall. The room you enter is where Gamma's part of the level ends. There are two rooms to pass through here, ending in a third one with the start of a ring trail. Light Speed Dash on the path of rings and hit the capsule to end the level, or wait for a particularly slow-moving platform to descend, which leads to an area containing four extra lives.
Enemies
- Bladed Spinner (Amy, Sonic)
- Electro Spinner (Sonic)
- Egg Keeper (Amy, Sonic)
- Beat (Sonic)
- Target Doll (E-102, Sonic)
| Sonic the Hedgehog |
|---|
| Level number: 10 |
| Areas: 2 |
| Maximum rings: 751 + (12-480) |
| A-rank requirement: 4m 30s |
| Amy Rose |
|---|
| Level number: 3 |
| Areas: 2 |
| Maximum rings: 72 + (4-160) |
| A-rank requirement: 2m 30s |
| E102 "Gamma" |
|---|
| Level number: 1 |
| Areas: 1 |
| Maximum rings: 120 |
| A-rank requirement: 3m 0s |
References
| Sonic Adventure / Sonic Adventure DX: Director's Cut | |
|---|---|
|
Main page (SADX|2010) Manuals (SADX) Development (SADX) |
show;hide
Adventure Fields: Sub-games: Dreamcast Prereleases: DX Prereleases: 2010 Prereleases: Books:
Comics: Music: Songs: "Open Your Heart" | "It Doesn't Matter" | "Believe in Myself" | "Unknown from M.E." | "My Sweet Passion" | "Lazy Days ~Livin' in Paradise~" |