Difference between revisions of "Death Egg Zone (Sonic & Knuckles)"
From Sonic Retro
m (Text replacement - "|Sonic Jam Official Guide}}" to "|''Sonic Jam Official Guide''}}") |
BSonirachi (talk | contribs) m (Text replacement - "Great Eggman Robo" to "Kyodai Eggman Robo") |
||
| (5 intermediate revisions by 3 users not shown) | |||
| Line 10: | Line 10: | ||
| game=Sonic & Knuckles | | game=Sonic & Knuckles | ||
| acts=2 | | acts=2 | ||
| − | | boss= | + | | boss=Kyodai Eggman Robo |
| subboss=Red Eye | | subboss=Red Eye | ||
| subboss2=Death Ball | | subboss2=Death Ball | ||
| Line 32: | Line 32: | ||
| next=The Doomsday Zone | | next=The Doomsday Zone | ||
}} | }} | ||
| − | + | {{OtherPage|page=Death Egg Zone|desc=the [[Sonic the Hedgehog 2 (16-bit)|Sonic the Hedgehog 2]] level|page2=Death Egg (disambiguation)|desc2=other uses}} | |
| − | '''Death Egg Zone''' is the seventh | + | '''Death Egg Zone''' is the seventh [[Zone]] of ''[[Sonic & Knuckles]]'' (and the thirteenth Zone of ''[[Sonic the Hedgehog 3 & Knuckles]]''). As the name implies, the stage is set in the enormous hull of the [[Death Egg]]. [[Sonic the Hedgehog|Sonic]] and [[Miles "Tails" Prower|Tails]] enters by jumping on board from [[Sky Sanctuary Zone]], and exits for a final battle with [[Dr. Eggman]] in space as the Death Egg falls apart. |
| − | Knuckles doesn't participate in this level as Sky Sanctuary concluded his story, | + | [[Knuckles the Echidna|Knuckles]] doesn't participate in this level as Sky Sanctuary concluded his story. However, by using the [[Level Select]] he can play this stage normally...for the most part. He's unable to beat the first boss due to his lower jump height. |
| − | == | + | ==Overview== |
| − | + | Whereas the Death Egg was represented as a [[Death Egg Zone|short series of corridors and boss fights]] in ''[[Sonic the Hedgehog 2 (16-bit)|Sonic the Hedgehog 2]]'', it has been expanded to a full two-Act Zone in this game. Act 1 has the player explore the enormous hull of the Death Egg, where many contraptions are spread about to slow down the heroes as much as possible. These include dangerous electricity fields that will shock the player should they attempt to come into contact with them. A [[Lightning Shield]] will allow the player to safely stand on these fields (making it one of only two Zones where the Shield features its elemental immunity, the other being [[Carnival Night Zone]]), but the electrical surges from the fields can even overpower the Shield, taking it away. | |
| − | + | Anti-gravity orbs will make the player float into the air, bridges and ramps made of light will periodically turn on and off, and conveyor belt lifts will transport the player up and down through hazardous corridors filled with [[Spikes (obstacle)|spikes]] and missile launchers; jumping up and down on the lifts will make the conveyor belts change direction. Large white tubes labelled "EGG" will fiddle around with the gravity when the player passes through them, causing the player to spin up and down until they leave. Another major feature are light beam transportation systems that begin a countdown when the player steps into their launching stations, then launch the player through a "light snake" that loops around an area. Many of these transportation systems can be ignored, which is generally faster to do and often rewards the player with [[Ring]]s. | |
| − | + | At a certain point in Act 1, the player will enter a large room where the player is constantly being pulled to the right and bouncing off of [[Spring]]-shaped [[bumper]]s, along with a larger bumper blocking the way out. The center of the room holds a strange contraption with six yellow buttons moving up and down, and the player must touch each button to turn them red in order to remove the blockade and escape. The player will then eventually fight [[Red Eye]] at the end of the Act. | |
| − | + | After Red Eye's destruction, the player advances to Act 2, which is now set outside the Death Egg where space itself can be seen, along with a breathtaking view of [[Sonic's world]]. Many of the gimmicks seen in Act 1 are present here, along with the introduction of sections where the gravity is reversed, causing the player to walk about on the ceiling. The gravity is altered by passing through white gravity tubes, entering the vertical transport tubes or by pressing [[button]]s. This gameplay mechanic would later be repurposed in a number of levels throughout the series, such as [[Crazy Gadget]], [[Egg Rocket Zone]]/[[Cosmic Angel Zone]], [[Egg Utopia]], [[Cyber Track]] and [[Dead Line]]. | |
| + | |||
| + | Act 2 ends with some very difficult boss fights against the [[Death Ball]], followed by the [[Kyodai Eggman Robo]]. If Sonic has at least all of the [[Chaos Emeralds]] after finishing this Zone, he will go on to [[The Doomsday Zone]]. Otherwise, the game ends. | ||
==Quotes== | ==Quotes== | ||
| − | {{quote|Face bald, belligerent Robotnik in his whirling Death Egg!}} | + | {{quote|Face bald, belligerent Robotnik in his whirling Death Egg!|2=''Sonic & Knuckles'' US manual|ref={{fileref|S&K MD US SonicJam manual.pdf|page=9}}}} |
| − | + | {{quote|When thinking of space, gravity controls come to mind, so that was the theme behind this stage. We tried to give it a feel you could only have in outer space, how did we do? We surveyed many people to determine if up and down should be reversed when the gravity flips. I guess that it is just easier to have pressing down to crouch feel natural!|[[Yuji Naka]]|''[[Sonic Jam Official Guide]]''|ref={{fileref|SonicJamOfficialGuide Book JP.pdf|page=91}}}} | |
| − | {{quote| | ||
==Enemies== | ==Enemies== | ||
| − | + | {| style="width:auto;" | |
| − | + | |style="text-align:center;"|{{spriteImage|Spikebonker.png}} | |
| + | |'''[[Spikebonker]]''' — [[Badnik]] with a large spiked ball floating around it. | ||
| + | |- | ||
| + | |style="text-align:center;"|{{spriteImage|Chainspike.png}} | ||
| + | |'''[[Chainspike]]''' — Blue Badnik with extendable spikes in four directions. | ||
| + | |} | ||
| + | |||
| + | ==Animals== | ||
| + | {| style="width:auto;" | ||
| + | |style="text-align:center;"|{{spriteImage|s2 cucky.gif}} | ||
| + | |'''[[Cucky]]''' | ||
| + | |- | ||
| + | |style="text-align:center;"|{{spriteImage|s2 ricky.gif}} | ||
| + | |'''[[Ricky]]''' | ||
| + | |} | ||
==References== | ==References== | ||
| Line 60: | Line 75: | ||
{{S&KOmni}} | {{S&KOmni}} | ||
| − | |||
[[Category:Sonic and Knuckles levels]] | [[Category:Sonic and Knuckles levels]] | ||
Revision as of 12:29, 7 March 2021
| |
Sonic & Knuckles |
| Levels |
| Death Egg Zone |
| show;hide
|
| Death Egg Zone |
|---|
| Seventh Zone, Sonic & Knuckles |
| Number of Acts: 2 |
| Level themes: Death Egg, industrial, outer space |
| Sub-boss: Red Eye |
| Sub-boss for Act 2: Death Ball |
| Boss: Kyodai Eggman Robo |
| Maximum rings, Act 1: 278 + 90 |
| Maximum rings, Act 2: 198 + 120 |
| Prerequisite: Play as Sonic and/or Tails |
| Non-English names: |
| ← Sky Sanctuary Zone | The Doomsday Zone → |


- For the Sonic the Hedgehog 2 level, see Death Egg Zone. For other uses, see Death Egg (disambiguation).
Death Egg Zone is the seventh Zone of Sonic & Knuckles (and the thirteenth Zone of Sonic the Hedgehog 3 & Knuckles). As the name implies, the stage is set in the enormous hull of the Death Egg. Sonic and Tails enters by jumping on board from Sky Sanctuary Zone, and exits for a final battle with Dr. Eggman in space as the Death Egg falls apart.
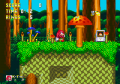
Knuckles doesn't participate in this level as Sky Sanctuary concluded his story. However, by using the Level Select he can play this stage normally...for the most part. He's unable to beat the first boss due to his lower jump height.
Contents
Overview
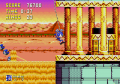
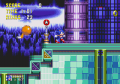
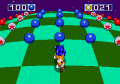
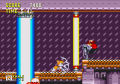
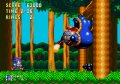
Whereas the Death Egg was represented as a short series of corridors and boss fights in Sonic the Hedgehog 2, it has been expanded to a full two-Act Zone in this game. Act 1 has the player explore the enormous hull of the Death Egg, where many contraptions are spread about to slow down the heroes as much as possible. These include dangerous electricity fields that will shock the player should they attempt to come into contact with them. A Lightning Shield will allow the player to safely stand on these fields (making it one of only two Zones where the Shield features its elemental immunity, the other being Carnival Night Zone), but the electrical surges from the fields can even overpower the Shield, taking it away.
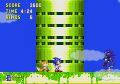
Anti-gravity orbs will make the player float into the air, bridges and ramps made of light will periodically turn on and off, and conveyor belt lifts will transport the player up and down through hazardous corridors filled with spikes and missile launchers; jumping up and down on the lifts will make the conveyor belts change direction. Large white tubes labelled "EGG" will fiddle around with the gravity when the player passes through them, causing the player to spin up and down until they leave. Another major feature are light beam transportation systems that begin a countdown when the player steps into their launching stations, then launch the player through a "light snake" that loops around an area. Many of these transportation systems can be ignored, which is generally faster to do and often rewards the player with Rings.
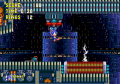
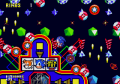
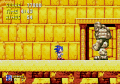
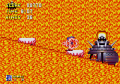
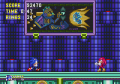
At a certain point in Act 1, the player will enter a large room where the player is constantly being pulled to the right and bouncing off of Spring-shaped bumpers, along with a larger bumper blocking the way out. The center of the room holds a strange contraption with six yellow buttons moving up and down, and the player must touch each button to turn them red in order to remove the blockade and escape. The player will then eventually fight Red Eye at the end of the Act.
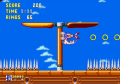
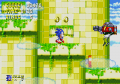
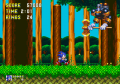
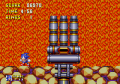
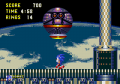
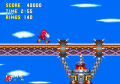
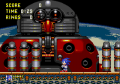
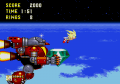
After Red Eye's destruction, the player advances to Act 2, which is now set outside the Death Egg where space itself can be seen, along with a breathtaking view of Sonic's world. Many of the gimmicks seen in Act 1 are present here, along with the introduction of sections where the gravity is reversed, causing the player to walk about on the ceiling. The gravity is altered by passing through white gravity tubes, entering the vertical transport tubes or by pressing buttons. This gameplay mechanic would later be repurposed in a number of levels throughout the series, such as Crazy Gadget, Egg Rocket Zone/Cosmic Angel Zone, Egg Utopia, Cyber Track and Dead Line.
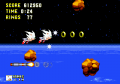
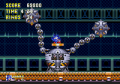
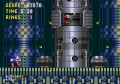
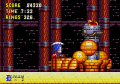
Act 2 ends with some very difficult boss fights against the Death Ball, followed by the Kyodai Eggman Robo. If Sonic has at least all of the Chaos Emeralds after finishing this Zone, he will go on to The Doomsday Zone. Otherwise, the game ends.
Quotes
| “ | Face bald, belligerent Robotnik in his whirling Death Egg! | „ |
| — Sonic & Knuckles US manual[4] | ||
| “ | When thinking of space, gravity controls come to mind, so that was the theme behind this stage. We tried to give it a feel you could only have in outer space, how did we do? We surveyed many people to determine if up and down should be reversed when the gravity flips. I guess that it is just easier to have pressing down to crouch feel natural! | „ |
Enemies
| Spikebonker — Badnik with a large spiked ball floating around it. | |
| Chainspike — Blue Badnik with extendable spikes in four directions. |
Animals
| Cucky | |
| Ricky |
References
| Sonic & Knuckles | |
|---|---|
|
Main page (S3&K|KiS2|Blue Sphere) Manuals Development |
show;hide
Sub-Bosses: Level Bosses: Books:
Comics: Music: |