
Difference between revisions of "Sonic the Hedgehog CD/Maps"
From Sonic Retro
(New page: Below are a list of '''Sonic the Hedgehog CD Level Maps'''. Click on a thumbnail to pull up a full view. Made with qiuu's converter and Stealth's SonED2. ==[[Palmtree Panic Zon...) |
(+ special stages) |
||
| Line 76: | Line 76: | ||
Image:SCD_map_R82D.png|Metallic Madness Zone 2 Bad Future | Image:SCD_map_R82D.png|Metallic Madness Zone 2 Bad Future | ||
Image:SCD_map_R83C.png|Metallic Madness Zone 3 Good Future | Image:SCD_map_R83C.png|Metallic Madness Zone 3 Good Future | ||
| − | Image:SCD_map_R83D.png|Metallic Madness Zone 3 Bad Future</gallery>[[Category:Level Maps]] | + | Image:SCD_map_R83D.png|Metallic Madness Zone 3 Bad Future</gallery> |
| + | ==[[Special Stage (Sonic CD)|Special Stage]]== | ||
| + | <gallery>Image:SCDSS1.png|Special Stage 1 | ||
| + | Image:SCDSS2.png|Special Stage 2 | ||
| + | Image:SCDSS3.png|Special Stage 3 | ||
| + | Image:SCDSS4.png|Special Stage 4 | ||
| + | Image:SCDSS5.png|Special Stage 5 | ||
| + | Image:SCDSS6.png|Special Stage 6 | ||
| + | Image:SCDSS7.png|Special Stage 7 | ||
| + | Image:SCDSS8.png|Special Stage 8</gallery>[[Category:Level Maps]] | ||
Revision as of 06:33, 19 July 2009
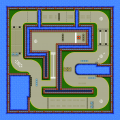
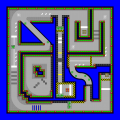
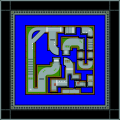
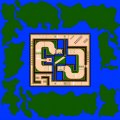
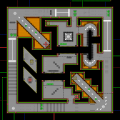
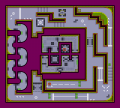
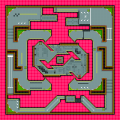
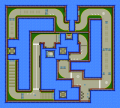
Below are a list of Sonic the Hedgehog CD Level Maps. Click on a thumbnail to pull up a full view. Made with qiuu's converter and Stealth's SonED2.
Contents
Palmtree Panic Zone

Palmtree Panic Zone 1 Present

Palmtree Panic Zone 1 Past

Palmtree Panic Zone 1 Good Future

Palmtree Panic Zone 1 Bad Future

Palmtree Panic Zone 2 Present

Palmtree Panic Zone 2 Past

Palmtree Panic Zone 2 Good Future

Palmtree Panic Zone 2 Bad Future

Palmtree Panic Zone 3 Good Future

Palmtree Panic Zone 3 Bad Future
Collision Chaos Zone

Collision Chaos Zone 1 Present

Collision Chaos Zone 1 Past

Collision Chaos Zone 1 Good Future

Collision Chaos Zone 1 Bad Future

Collision Chaos Zone 2 Present

Collision Chaos Zone 2 Past

Collision Chaos Zone 2 Good Future

Collision Chaos Zone 2 Bad Future
Collision Chaos Zone 3 Good Future
Collision Chaos Zone 3 Bad Future


Tidal Tempest Zone

Tidal Tempest Zone 1 Present

Tidal Tempest Zone 1 Past

Tidal Tempest Zone 1 Good Future

Tidal Tempest Zone 1 Bad Future

Tidal Tempest Zone 2 Present

Tidal Tempest Zone 2 Past

Tidal Tempest Zone 2 Good Future

Tidal Tempest Zone 2 Bad Future

Tidal Tempest Zone 3 Good Future

Tidal Tempest Zone 3 Bad Future


Quartz Quadrant Zone

Quartz Quadrant Zone 1 Present

Quartz Quadrant Zone 1 Past

Quartz Quadrant Zone 1 Good Future

Quartz Quadrant Zone 1 Bad Future

Quartz Quadrant Zone 2 Present

Quartz Quadrant Zone 2 Past

Quartz Quadrant Zone 2 Good Future

Quartz Quadrant Zone 2 Bad Future

Quartz Quadrant Zone 3 Good Future

Quartz Quadrant Zone 3 Bad Future
Wacky Workbench Zone

Wacky Workbench Zone 1 Present

Wacky Workbench Zone 1 Past

Wacky Workbench Zone 1 Good Future

Wacky Workbench Zone 1 Bad Future

Wacky Workbench Zone 2 Present

Wacky Workbench Zone 2 Past

Wacky Workbench Zone 2 Good Future

Wacky Workbench Zone 2 Bad Future
Wacky Workbench Zone 3 Good Future

Wacky Workbench Zone 3 Bad Future


Stardust Speedway Zone

Stardust Speedway Zone 1 Present

Stardust Speedway Zone 1 Past

Stardust Speedway Zone 1 Good Future

Stardust Speedway Zone 1 Bad Future

Stardust Speedway Zone 2 Present

Stardust Speedway Zone 2 Past

Stardust Speedway Zone 2 Good Future

Stardust Speedway Zone 2 Bad Future

Stardust Speedway Zone 3 Good Future

Stardust Speedway Zone 3 Bad Future
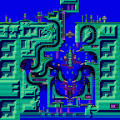
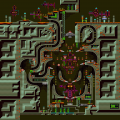
Metallic Madness Zone

Metallic Madness Zone 1 Present

Metallic Madness Zone 1 Past

Metallic Madness Zone 1 Good Future

Metallic Madness Zone 1 Bad Future

Metallic Madness Zone 2 Present

Metallic Madness Zone 2 Past

Metallic Madness Zone 2 Good Future

Metallic Madness Zone 2 Bad Future
Metallic Madness Zone 3 Good Future

Metallic Madness Zone 3 Bad Future
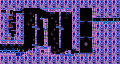
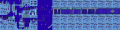
Special Stage
Special Stage 1
Special Stage 2
Special Stage 3
Special Stage 4
Special Stage 5
Special Stage 6
Special Stage 7
Special Stage 8


