Difference between revisions of "SonLVL Manual/Object Editing"
From Sonic Retro
MainMemory (talk | contribs) m |
m (Text replacement - "__NOTOC__" to "__TOC__") |
||
| Line 1: | Line 1: | ||
| − | + | __TOC__ | |
{{SonLVL Manual TOC}} | {{SonLVL Manual TOC}} | ||
The "Objects" tab in SonLVL allows you to edit the placements of objects, rings, start positions, and [[Casino Night Zone]]'s special bumpers. | The "Objects" tab in SonLVL allows you to edit the placements of objects, rings, start positions, and [[Casino Night Zone]]'s special bumpers. | ||
Latest revision as of 04:27, 25 March 2020
Contents
| SonLVL |
|---|
| Main Article |
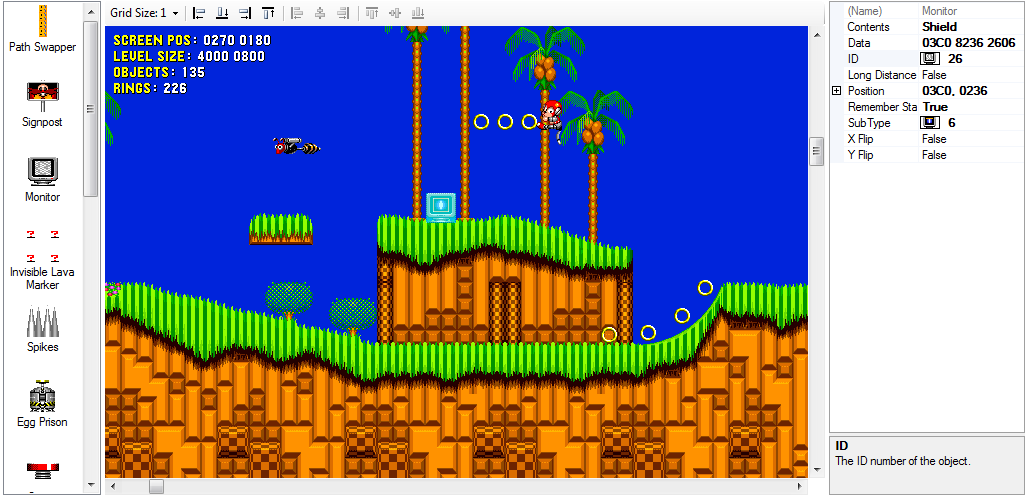
The "Objects" tab in SonLVL allows you to edit the placements of objects, rings, start positions, and Casino Night Zone's special bumpers.
On the left side of the window is an object palette listing all the objects that can be used in the current level. You can click on an object in the list and drag it into the level to place it. On the right side is a property grid enabling you to edit individual properties of the selected item(s).
Toolbar
- Grid Size dropdown: This controls the size of the grid display, and objects will snap to the nearest multiple of the grid size when being moved. A grid size of 1 disables the grid.
- Align with Left Wall: Moves the selected objects left until they touch the right edge of a solid block on the current viewed path (path 1 default) or the left edge of the level.
- Align with Ground: Moves the selected objects down until they touch the top edge of a solid block on the current viewed path (path 1 default) or the top edge of the level.
- Align with Right Wall: Moves the selected objects until they touch the left edge of a solid block on the current viewed path (path 1 default) or the left edge of the level.
- Align with Ceiling: Moves the selected objects up until they touch the bottom edge of a solid block on the current viewed path (path 1 default) or the top edge of the level.
- Align Lefts: Moves the selected objects so that their left edges line up with the leftmost edge of the selected objects.
- Align Centers: Moves the selected objects so that their centers line up with the point in the center of the leftmost and rightmost edges of the selected objects.
- Align Rights: Moves the selected objects so that their right edges line up with the rightmost edge of the selected objects.
- Align Tops: Moves the selected objects so that their top edges line up with the topmost edge of the selected objects.
- Align Middles: Moves the selected objects so that their middles line up with the point in the middle of the topmost and bottommost edges of the selected objects.
- Align Bottoms: Moves the selected objects so that their bottom edges line up with the bottommost edge of the selected objects.
Controls
- Left click: Select an object or ring group. Hold Ctrl to select multiple objects.
- Left click empty area, drag: Select all objects within an area.
- Left click object, drag: Move object(s).
- Double left click: Create a new object.
- Shift + Double left click: Create a new ring group.
- Ctrl + Double left click: Create a new special bumper. (Casino Night only)
- Right click: Bring up a context menu.
- Up, Down, Left, Right: Move the camera by 16 pixels.
- Hold Shift: Move the camera by the size of a chunk (usually 256 or 128 pixels).
- Hold Ctrl: Move the camera to the edge of the level.
- Q: Disable collision viewing.
- W: View collision path 1.
- E: View collision path 2.
- R: Toggle viewing of angle values.
- T: Toggle objects above/below high plane.
- Y: Toggle viewing of low plane.
- U: Toggle viewing of high plane.
- I: Toggle grid visibility.
- O: Toggle HUD.
- P: Toggle viewing of objects from all timezones (Sonic CD only).
- [: View previous palette.
- ]: View next palette.
- -: Zoom out.
- +: Zoom in.
- Delete: Delete all selected objects.
- A: Decrease type of all selected objects.
- Z: Increase type of all selected objects.
- S: Decrease subtype of all selected objects.
- X: Increase subtype of all selected objects.
- J: Increase grid size.
- M: Decrease grid size.
- Ctrl+X: Cut selected objects.
- Ctrl+C: Copy selected objects.
- Ctrl+V: Paste copied objects.
- Ctrl+F: Find objects.
- F3: Find next object (after finding an object).
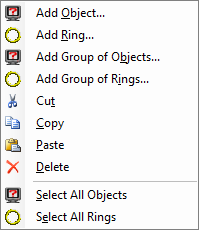
Context Menu
- Add Object...: Brings up the Add Object dialog, allowing you to add an object to the level (same as double-click).
- Add Ring...: Adds a ring group to the level (same as shift + double-click).
- Add Group of Objects...: Brings up a dialog allowing you to create a rectangular pattern of evenly spaced objects.
- Add Group of Rings...: Brings up a dialog allowing you to create a rectangular pattern of evenly spaced rings.
- Cut: Copies selected items to the clipboard, and then deletes them from the level.
- Copy: Copies selected items to the clipboard.
- Paste: Pastes items from the clipboard into the level.
- Delete: Deletes selected items from the level.
- Select All Objects: Selects all objects in the level, mainly used to quickly delete all the objects from a level.
- Select All Rings: Selects all rings in the level, mainly used to quickly delete all the rings from a level.

