SonLVL Manual/Layout Editing
From Sonic Retro
Revision as of 13:29, 11 September 2016 by MainMemory (talk | contribs)
| SonLVL |
|---|
| Main Article |
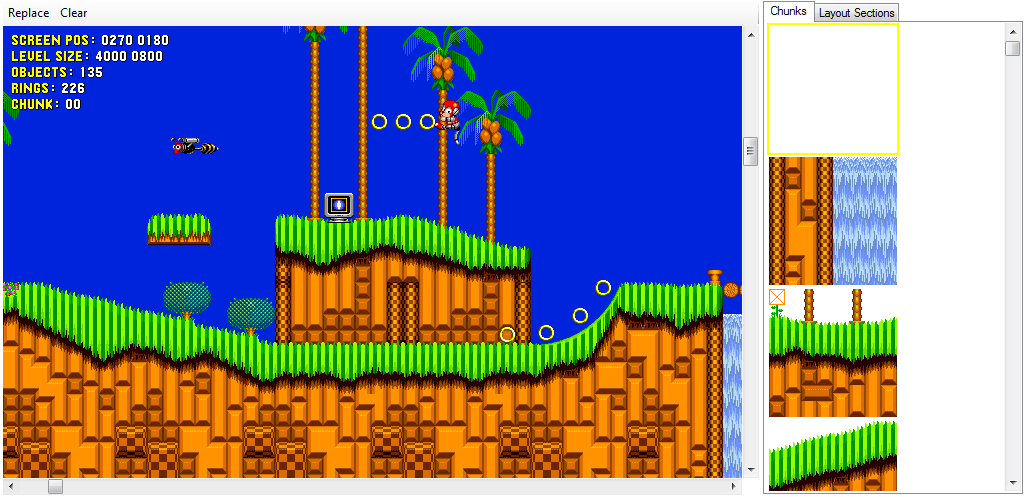
The "Foreground" and "Background" tabs in SonLVL allow you to edit the level layout for the foreground and background planes.
On the right side of the window is a list of the chunks available for the current level from which you can select the chunk you wish to draw with, and a list of the saved "layout sections" you may paste into the level.
Toolbar
- Replace: Allows you to replace all instances of a specified chunk in the plane being edited with another chunk.
- Clear: Fills the entire plane being edited with chunk 0 (usually blank).
Controls
- Left click: Draw with the selected chunk.
- Double left click: Toggle the loop flag (S1/SCD layouts only).
- Right click: Select the chunk under the cursor.
- Right click, drag: Select an area.
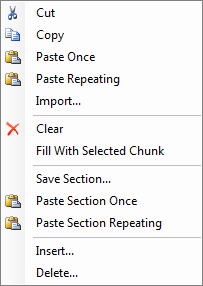
- Right click inside selected area: Open context menu.
- Up, Down, Left, Right: Move the camera by 16 pixels.
- Hold Shift: Move the camera by the size of a chunk (usually 256 or 128 pixels).
- Hold Ctrl: Move the camera to the edge of the level.
- Q: Disable collision viewing.
- W: View collision path 1.
- E: View collision path 2.
- R: Toggle viewing of angle values.
- T: Toggle objects above/below high plane.
- Y: Toggle viewing of low plane.
- U: Toggle viewing of high plane.
- I: Toggle grid visibility.
- O: Toggle HUD.
- P: Toggle viewing of objects from all timezones (Sonic CD only).
- [: View previous palette.
- ]: View next palette.
- -: Zoom out.
- +: Zoom in.
- A: Decrease index of selected chunk.
- Z: Increase index of selected chunk.
- Ctrl+F: Find chunks.
- F3: Find next chunk (after finding a chunk).
Context Menu
Note that several of these commands will also affect objects when used in the foreground editor when the "Include objects with foreground selection" item in the Edit menu is checked.
- Cut: Copies selected area to the clipboard, and then clears the area.
- Copy: Copies selected area to the clipboard.
- Paste Once: Pastes area from the clipboard into the level once at the location the menu was opened from.
- Paste Repeating: Pastes area from the clipboard into the level repeatedly to fill the selected area.
- Import...: Allows you to generate layout, chunk, block, and tile data from an image.
- Clear: Fills the selected area with chunk 0.
- Fill With Selected Chunk: Fills the selected area with the chunk selected from the chunk list.
- Save Section...: Saves a copy of the selected area as a layout section that can be pasted into the level later.
- Paste Section Once: Pastes selected layout section into the level once at the location the menu was opened from.
- Paste Section Repeating: Pastes selected layout section into the level repeatedly to fill the selected area.
- Insert...: Allows insertion of blank cells/rows/columns into the level based on the size of the selected area.
- Delete...: Allows deletion of cells/rows/columns from the level based on the selected area.
Layout Sections
Layout sections allow you to take a section of the level, assign a name to it, and paste it as many times as you want. Layout sections can be created by the "Save Section..." option in the layout editor's context menu, or by importing from an image. Layout sections are saved in the project folder, with the same name as the level being edited and a .sls extension.

