
Fangame How-to:SonicGDK/Building a map
From Sonic Retro
(Original guide by Xaklse)
| |
This article is a work in progress. Its content and location may change completely and frequently until this notice is removed. |
Now that you have installed SonicGDK, you can create actual game levels, also known as maps in Unreal.
Contents
Editor layout
Run the UDK Editor and close all the windows that appear. Create a new blank map (File>New...>Blank Map); the editor may be a bit daunting at first, but you don't have to learn all the functions associated to every button, so check the following pictures to get started. The screen space that contains the black void with the blue grid and the red cube is called viewport.
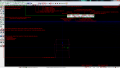
UDK Editor
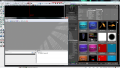
Content browser & Kismet windows
Actor classes


Basic stuff
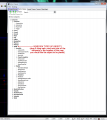
Let's create a new map by using one of the existing map templates, do so by selecting the File>New...>Midday Lighting option (Figure 1). After the map is loaded, open the Search For Actors window (Figure 2); there you can see the objects that are placed in the map:
- Brush_0 is the Red Builder Brush which is like a cookie cutter or a template; you can reshape it and then use it to create an additive or subtractive brush that will alter the map's space. You can construct the level only with brushes, but UDK heavily rely on static meshes. Unfortunately, if you need new static meshes, 3D modeling software is required to create them.
- StaticMeshActor_3 is the static mesh used for the floor; StaticMeshActor_5 is the cube that is on the floor.
- InterpActor_3 is the sky dome, which happens to be a dynamic/movable static mesh.
- WorldInfo_0 represents the world itself, it contains all the objects and holds important information about the map and the game.
- PlayerStart_0 is the player start location, which is organized into a network of navigation points.
blahblah
All the objects you place in a map with the Unreal Editor have properties; if you double-click on any of them, or select one of them and press F4, the Object Properties window appears with a list of properties and their values. When you mouse over the name of a property, the editor usually displays tooltips, which are very important if you want to know the effects of modifying a property.
How do I enable "Sonic Physics mode" in my map?
- To enable "Sonic Physics mode" on a static mesh, use the "Add SGDK StaticMesh" option (select the StaticMesh in the content browser, right-click in the level editor window).
- To enable "Sonic Physics mode" on CSGs or terrain, use SonicPhysicsVolumes to encompass the walkable surfaces.
Sonic placement & configuration
blahblah
Checkpoints & goal
blahblah
Enemies
blahblah
Cameras
blahblah
Paths
blahblah