Difference between revisions of "Egg Golem"
From Sonic Retro
CosmoCress (talk | contribs) m (→Trivia: minor spelling fix) |
BSonirachi (talk | contribs) |
||
| (8 intermediate revisions by 3 users not shown) | |||
| Line 1: | Line 1: | ||
| + | {{Breadcrumb | ||
| + | |Sonic & Knuckles|:Category:Sonic & Knuckles bosses|l2=Bosses|{{PAGENAME}}}} | ||
{{BossInfo | {{BossInfo | ||
| − | | image= | + | | image=Snzboss.png |
| − | | | + | | name=Egg Golem |
| − | + | | game=Sonic & Knuckles | |
| − | | game= | + | | level=Sandopolis Zone |
| − | | | + | | hits=8 |
| − | | | ||
| − | |||
| − | |||
}} | }} | ||
| − | The '''Egg Golem''' is | + | {{otherPage|desc=the identically-named [[Sonic Adventure 2]] boss|page=Egg Golem (Sonic Adventure 2)}} |
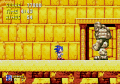
| + | The '''Egg Golem''' (エッグゴーレム){{fileref|SonicMegaCollectionSaikyouKouryakuGuide Book JP.pdf|page=169}} is the third boss of ''[[Sonic & Knuckles]]'', fought at the end of [[Sandopolis Zone]] Act 2. | ||
| − | == | + | ==Strategy== |
| − | The | + | The Egg Golem is another off the wall boss—literally. The boss is a huge orange brick statue that emerges from the right wall and lumbers forward slowly, alternately extending its two stone arms. One is in the background and one is in the foreground. When the one in the foreground extends, the player must jump onto it (they can't stand on the one in the background or be hurt by it). Being careful not to touch the spikes on the end of the arm or on the robot's chest, the player should jump and hit it above the spikes. |
| − | + | The tricky part of this battle is hitting the boss and landing back on his arm without touching the spikes; it takes practice. When the player hits the head, the bricks fly away, revealing [[Dr. Eggman]]/[[Eggrobo]]'s cockpit. The player should then hit it as many times as they can (in practice, about twice) before the bricks come back, then repeat the pattern. If the player is bold, they can hit him several times on one extension of the arm. The machine is slowly advancing and will eventually crush the player against the left wall, but they would have to be really slow for that to happen. When [[Knuckles the Echidna|Knuckles]] fights this boss, it moves faster than normal, therefore giving the player less time to defeat it. Sometimes the laser eye at the top of the statue powers up; hitting the head will deactivate it, but if the player doesn't hit it quickly, it'll fire a laser beam down at them. The player should be sure to always hit the bricks from the arm as they can't reach them from the floor. Eight hits to the cockpit destroys the mech entirely. | |
| − | + | One odd feature is that if the player is still very close to Eggman/EggRobo's cockpit when the shell comes back, the shell will bounce the player away, but not very far and not damaging them as such, but the tendency to fall on the spiked hand here is high. | |
| − | + | ==Oddities== | |
| − | + | Interestingly, the boss is programmed so that, if it reaches the left wall, it'll backpedal rapidly and start again from the right wall. However, it's impossible to survive being squished by the statue once it reaches (and somewhat enters) the left wall. Players can notice this if they use [[debug mode]] to survive. Also, with debug mode, the player can see that some scrambled tile data appears on the foreground behind the Golem. | |
| − | == | + | ==References== |
| − | + | <references/> | |
| − | |||
| − | + | {{S&KOmni|3}} | |
| − | + | [[Category:Sonic & Knuckles bosses]] | |
| − | + | [[Category:Sonic and Knuckles bosses]] <!-- keep for DPL --> | |
| − | |||
| − | |||
| − | |||
| − | |||
| − | |||
| − | |||
| − | |||
| − | |||
| − | |||
| − | |||
| − | |||
| − | |||
| − | |||
| − | |||
| − | [[Category:Sonic | ||
Latest revision as of 21:04, 6 March 2021
| |
Sonic & Knuckles |
| Bosses |
| Egg Golem |
| Egg Golem |
|---|
| Game: Sonic & Knuckles |
| Level: Sandopolis Zone |
| Hits to defeat: 8 |

- For the identically-named Sonic Adventure 2 boss, see Egg Golem (Sonic Adventure 2).
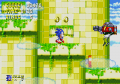
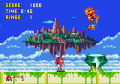
The Egg Golem (エッグゴーレム)[1] is the third boss of Sonic & Knuckles, fought at the end of Sandopolis Zone Act 2.
Strategy
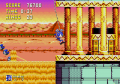
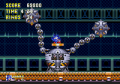
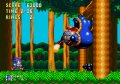
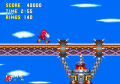
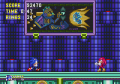
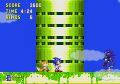
The Egg Golem is another off the wall boss—literally. The boss is a huge orange brick statue that emerges from the right wall and lumbers forward slowly, alternately extending its two stone arms. One is in the background and one is in the foreground. When the one in the foreground extends, the player must jump onto it (they can't stand on the one in the background or be hurt by it). Being careful not to touch the spikes on the end of the arm or on the robot's chest, the player should jump and hit it above the spikes.
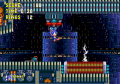
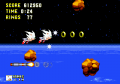
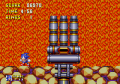
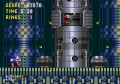
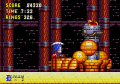
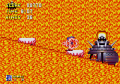
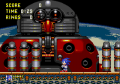
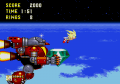
The tricky part of this battle is hitting the boss and landing back on his arm without touching the spikes; it takes practice. When the player hits the head, the bricks fly away, revealing Dr. Eggman/Eggrobo's cockpit. The player should then hit it as many times as they can (in practice, about twice) before the bricks come back, then repeat the pattern. If the player is bold, they can hit him several times on one extension of the arm. The machine is slowly advancing and will eventually crush the player against the left wall, but they would have to be really slow for that to happen. When Knuckles fights this boss, it moves faster than normal, therefore giving the player less time to defeat it. Sometimes the laser eye at the top of the statue powers up; hitting the head will deactivate it, but if the player doesn't hit it quickly, it'll fire a laser beam down at them. The player should be sure to always hit the bricks from the arm as they can't reach them from the floor. Eight hits to the cockpit destroys the mech entirely.
One odd feature is that if the player is still very close to Eggman/EggRobo's cockpit when the shell comes back, the shell will bounce the player away, but not very far and not damaging them as such, but the tendency to fall on the spiked hand here is high.
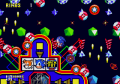
Oddities
Interestingly, the boss is programmed so that, if it reaches the left wall, it'll backpedal rapidly and start again from the right wall. However, it's impossible to survive being squished by the statue once it reaches (and somewhat enters) the left wall. Players can notice this if they use debug mode to survive. Also, with debug mode, the player can see that some scrambled tile data appears on the foreground behind the Golem.
References
| Sonic & Knuckles | |
|---|---|
|
Main page (S3&K|KiS2|Blue Sphere) Manuals Development |
show;hide
Sub-Bosses: Level Bosses: Books:
Comics: Music: |